- 7 Minutes to read
- Print
- DarkLight
- PDF
October21 Release Notes
- 7 Minutes to read
- Print
- DarkLight
- PDF
Dynamic Planning: Formula Field Added in Maps
Now, the Formula fields are also available as filter fields in the ESM Maps. You can apply the Formula fields as filters while moving data from one External Source Model to another External Source Model, Master, or Analytic Model.
Previously, Formula fields were not available in the Map filters and you could filter and transfer data from one map to another only based on Text and Date fields.
For example, if you want to load only a subset of data based on a specific calculation in the Source model, use the Filter Field section of the Source Map to indicate which rows of data to load. In the following example, the map indicates that only rows with Department Aerospace that have the Project End as 02/01/2020 should be loaded from Revenue to Budget. In this example, Department is a Text field, and Project End is a Formula field.

Once you run this Map, the data corresponding to the Aerospace Department with Project End as 02/01/2020 is segregated in the output.
Here is the resulting data.

To move data from the source ESM to target ESM you must create a calculation and then run the External Source Map. For more information on creating a calculation, see Run Calculation with a Map.
When a map is run, Reverse Filtering is applied to preserve all existing data in the target ESM that does not satisfy the filter condition. So, when you select formula filters in the map, the data that meets the filter condition will be appended to the existing data in the output.
For example, if you want to load data only for the rows of the Aerospace Department that have the Project End calculated as “04/01/2020”, you have to update the filter field in the Map as shown in the image below.
In the following example, you can see that only rows with the Department as Aerospace and that have the Project End calculated as "04/01/2020" are loaded from Revenue to Budget and appended to the data existing in the output.

Business Example
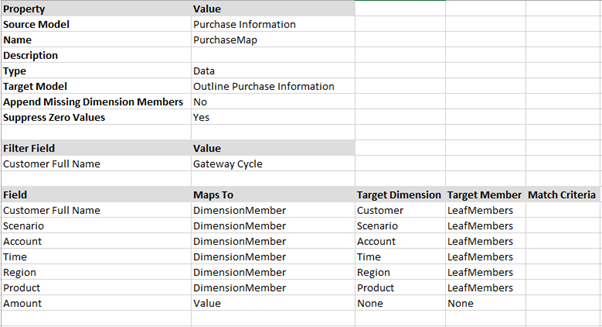
Below is an example of data mapping from an ESM to an Analytical Model. Here, you can load the rows with Gateway Cycle as the Customer Full Name field value. The data can be loaded from Purchase Information to Outline Purchase Information.

Here, Customer Full Name is the formula field that should be mapped to the Customer field in the Target dimension. The formula condition being:
CONCATENATE ([Customer First Name], “ “, [Customer Last Name])

To move data from Purchase Information to Outline Purchase Information, you must create a calculation and run the Purchase Map. For more information on creating a calculation, see Run Calculation with a Map.

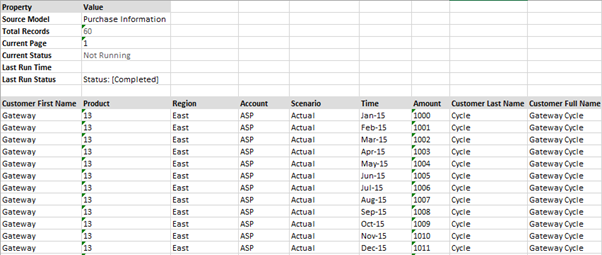
Based on the Calculation, rows with the Customer Full Name as Gateway Cycle are loaded from the Purchase Information to Outline Purchase Information and appended to the data existing in the output.
So, when you run the calculation and select the Scenario Dimension as 13, the uploaded data corresponding to the Gateway Cycle as the Customer’s Full Name Product will be updated in the output.

Business Value
With formula filters in the maps, you have the flexibility to transfer Formula field-specific data from one ESM to another instead of copying all the existing data.
It significantly reduces the effort and time previously involved to segregate data based on Formula fields and enhances the existing filtering with more options to group data.
In Practice: To use Formula Field in Maps
In SpotlightXL, select the Model task and the Map subtask.
Select the name of the Source Model defined on the Source Model page.
Enter a name for this map and add the description.
Select the type as Data for loading external source data.
Select or specify the name of the ESM you want to map the Source ESM to.
For Append Missing Dimension Members, select No when mapping to another external source model.
For the Filter field, specify the name of the field in the Source ESM to filter the data you want to load. Under the Value column, you can specify the value name.
Specify the name of the formula under the Filter field and the value.
For the Fields column, specify field names from the Source Model that will be mapped to fields in another model.
Select any of the following in the Maps To column:
DimensionFilter: This filter indicates that there is no field present in the Source ESM to map to the Target ESM. You will have to specify a value in the Default Value Column.
Value: indicates that this field in the external source is a value to be copied as is to the specified field in the target ESM.
In the Target Field column, select the name of the field in the target ESM.
In the Default Value column, specify the text, date, or number to be updated into this field.
For information on the steps to create an ESM to ESM map and run a Calculation, see the Transferring Data from One External Source Model to Another External Source Model topic.
Platform: GetReportData API Update
Now, the GetReportData API supports the Workforce cube in addition to the Financial Cube. In the Request Body, you can provide the value for the CubeName parameter as “Workforce” and get the appropriate report based on the ReportCode you have provided.
Information and settings like excel formulas, headers and footers, report level comments, insert formulas, formula exceptions, hide/show rows, text formatting, suppress empty rows/columns/headers that are present in a report in the application are excluded in the API response.
Generate an APIKey and provide the same in the header before you run the GetReportData API.
Provide the following parameters to get the API key:
Method
POST
Endpoint Url Syntax
<Provide Application Url>/auth/login
Sample Body
{
“Username”: “xyz@planful.com”,
“Password”: “Ayz@123”,
“TenantCode”: “Apr2021Demo”,
“ClientType”: “xyz”
}
When you run this, an authorization key is generated.
Provide the following parameters to get the workforce-based report:
Method
POST
Endpoint Url Syntax
<Provide Application Url>/WkReportDataProvider/GetReportData
Headers
Key : APIKey
Value : Authorization Key
Sample Request
{
"ReportCode" : "WFP Actuals1",
"Lineage" : "File Cabinet",
"CubeName" : "Workforce",
"PageFilters" : [ {
"DimensionName" : "Employee",
"MemberIds" : [ 763799,763801,763803,763805]
} ],
"ApplyPageFilters" : "true"
}
Sample Response
{
"RowHeaders": [
[
{
"Label": "P1",
"DimensionName": "Position",
"MemberId": "596897"
},
{
"Label": "Allocation Percentage",
"DimensionName": "Measures",
"MemberId": "Allocation Percentage"
}
],
[
{
"Label": "P1",
"DimensionName": "Position",
"MemberId": "596897"
},
{
"Label": "Amount in CC",
"DimensionName": "Measures",
"MemberId": "Amount in CC"
}
],
[
{
"Label": "P1",
"DimensionName": "Position",
"MemberId": "596897"
},
{
"Label": "Amount in LC",
"DimensionName": "Measures",
"MemberId": "Amount in LC"
}
],
"Status": "Success",
"StatusMessage": ""
}
Platform: Added Consolidation Security and Dimension Security Links in User Management
Now, we have added Consolidation Security and Dimension Security links to the User Actions section in Maintenance > Admin > User & Role Management. With this change, all the user security features are available under one section and are easily accessible.

Platform: Changed Visual Appearance of a Locked Scenario
Now, we have enhanced the visual appearance of a Locked Scenario in the Template Setup page of Maintenance > Planning Templates. With this change, the locked scenario appears in a maroon font color along with a lock icon.
The following is an illustration of the same.

Platform: Changed Visual Appearance of Elimination Members in Hierarchy Management
Now, we have enhanced the visual appearance of the elimination members in Hierarchy Management. When a member has the Elimination property set to Yes, you can identify the member distinctly in the list with its maroon font color along with a tooltip that suggests you can post elimination data to this particular Hierarchy member. Previously, the elimination member used to be displayed in a blue color font.

Platform: Enhanced the Approval Role page
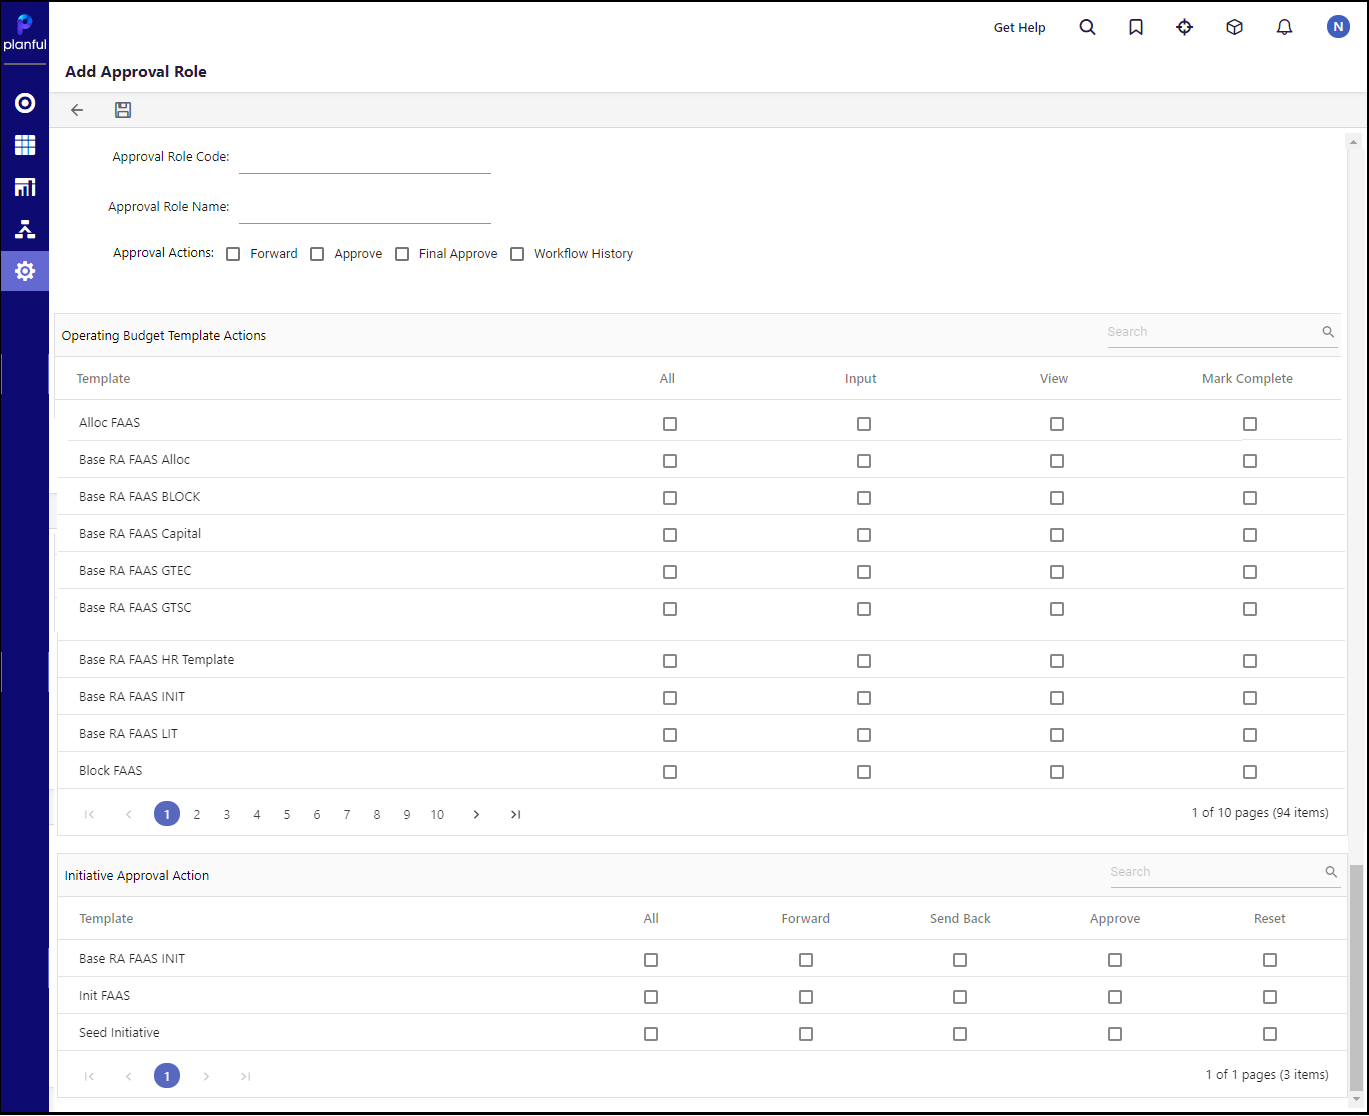
Now, we have enhanced the look and feel of the Add/Edit Approval Role pages under Maintenance > Admin > User & Role Management > Approval Role. You can now search for the required templates in the tables using the search functionality.

Predict: Enhanced the Support for Signals in Report Sets
Now, the following Report Set configurations are supported:
Single Dimension - Single Member
Single Dimension - Multiple Member
Multiple Dimension - Single Member
In the Advancedtab, following configurations are supported:
Single Dimension - Single Member
Single Dimension - Multiple Member, only if the SUM function is used.
Multiple Dimension - Single Member, only if the formula is specified as a tuple () with comma separated values.
Predict: Enhanced the Support for Signals in Dynamic Reports
Now, you will not be required to precompute all scenarios in Dynamic Reports to view the Signals in these reports. Instead, once you have completed the Model Training, you will see Signals for all scenarios in Dynamic Reports.
Predict: Added Export Functionality to Signals
Now, you can click on the PDF icon available on the Signal Context screen to download a snapshot of the signal context that you have chosen.
This change provides you with the flexibility to view and analyze the signal context offline and thereby reduces the dependency on application availability.


