Intro to Consolidation
- 29 Minutes to read
- Print
- DarkLight
- PDF
Intro to Consolidation
- 29 Minutes to read
- Print
- DarkLight
- PDF
Article Summary
Share feedback
Thanks for sharing your feedback!
How to Access the Consolidation Control Panel
As an end user, all of your Consolidation tasks will be carried out in the Consolidation Control Panel.(1).gif)
Your Admin user will provide you with security. There are two types of Consolidation users:
Centralized - If you are at the root member (defined as the top member in the hierarchy) then you are interacting as a Centralized user managing the Consolidation Process in its entirety.
Decentralized - If you have been provided specific dimension member access within the hierarchy and you select a Company from the member selector, then you are interacting in Decentralized mode. This means that the modules available may be restricted and you have limited access to Company intersections for modifying data.
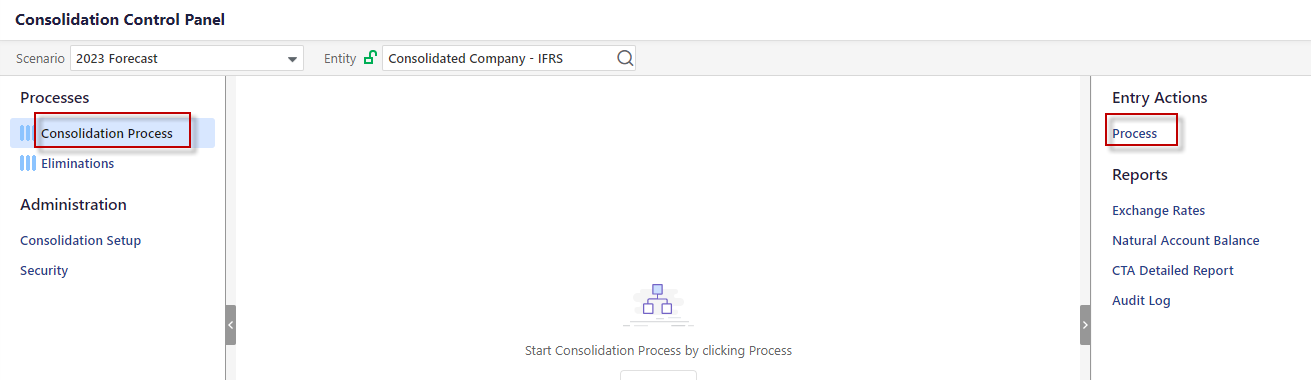
Click the Consolidation icon shown below in blue to access the Consolidation Control Panel.

Dissecting the Consolidation Control Panel
The Consolidation Control Panel is organized by Process. Click a Process (located in the left pane) to view associated details in the center pane.

Entry Actions, located in the right pane, are available based on selections made in the center pane. Process approval details are displayed in the right pane. After all, processes are posted / processed successfully, you mark processes as Complete. When you mark a process Complete, the grid becomes empty and all the processes are locked from editing. Also, no actions are available for locked processes.
Description of Fields on the Consolidation Control Panel
Scenario - You can run Consolidation for any specific scenario or scenarios. However, journal entries can only be posted against the Actual scenario. You might want to run Consolidation for other scenarios, for example, to eliminate the Fx affect. To do so, you'll add a scenario that takes actuals and converts to a budget rate. Or, you can take budget and convert to actual rates. Now, when you start to analyze actual to budget data for the month, quarter or year, the affect of Fx is removed.
Period - Consolidation tasks relate to dates or time periods. Click the Calendar button to select a month and year.
Note:
You can only post entries to open periods. You can post one-sided entries. Use a dummy or plug account to offset the side.
Entity Lock / Unlock icon - Indicates a locked or unlocked company.  Once a company is closed they are locked and therefore not editable.
Entity - Access to dimension members here is based on user type; Centralized or Decentralized. (The label shown here is the name given to Segment 2 – company segment. If you named the segment Company, it will appear as Company)
Left Pane
Processes Pane :
Standard Journals - Standard Journal Entries are entries that are created for processing one-time journal entries. You can add Standard Journals to Budget scenarios.
Recurring Journals - Recurring Journal Entries are those which will not vary across time and can be automated and consistent for each period within your process. For example, if you have an annual expense (such as rent) you can accrue the expense in twelve equal payments every month with a Recurring Journal Entry. A debit and credit to the appropriate segment intersections will be created every month.
Dynamic Journals - Dynamic Journal Entries are used when entry balances fluctuate from period to period. For example, as a financing strategy you take out a loan with a variable interest rate. This means that the principal and interest payment will likely fluctuate from period to period based on the loaded rate for the period.
Non Controlling Interest -Describes the relationship between a parent company and a subsidiary (otherwise referred to as joint ventures or minority interest relationships), the related accounts, and Dynamic Journal Entries used in adjusting the investment in the subsidiary. The calculations and postings take place during the Consolidation Process.
Reclassifications - Reclassification Entries are usually used to correct financial information that has been incorrectly posted against an intersection within the database. For example, if $500 was recorded in the wrong GL account, you can move the amount to the correct GL account with a Reclassification Entry.
Eliminations - Elimination Sets are comprised of due to and due from accounts that make up an intercompany transaction. Eliminations are processed individually or together as part of the Elimination Process. The Elimination Process calculates and posts Elimination Entries at Eliminating Companies within your legal entity hierarchy to ensure the proper aggregation of financial information at consolidated reporting levels. For example, a transaction that involves the sale of an item manufactured by a subsidiary to another subsidiary should be eliminated when reporting consolidated results.
Consolidation Process - Run the Consolidation Process. If a Centralized User runs the Consolidation Process, all company/legal entities will be updated for the selected scenario and time periods. If a Decentralized User runs the Consolidation Process, only the selected company/legal entity(s) will be updated for the selected scenario and time periods . If Consolidation Status is implemented in your application, click here to read all about it. If you are not sure if Consolidation Status is implemented, click the Consolidation Process. If the center pane displays the company hierarchy with a period at the top of each column, then this feature is enabled. If the center pane is blank, it is not enabled.
Note:
During the Consolidation Process ,Planful creates calculations for Non Controlling Interest, currency translation adjustments, retained earnings, Dynamic Journals and currency conversion. Currency conversions with exceptions are not executed when the Currency Conversion process takes place from the Data Load Rules process. Currency Conversions with exceptions must be executed via Currency Exchange Rates and/or the Consolidation Process to include exception details.
Actual Data Load - Displays the Actual Data Load grid containing the Actual Data Templates. Using the Actual Data Load process, you input actual budget data in the available templates.
See: How to Input Actuals.
Right Pane
Entry Actions :
Select the checkbox next to entries to perform an Entry Action. These actions are available based on where you are within the Consolidation Process and your security privileges. Entry Actions allow you to control the lifecycle of a journal.
Entry Actions are available based on your selections. For example, if you want to post an Elimination Set, select the checkbox next to the Elimination Set and click the Post Entry Action.
Type of Entry Actions:
Forward - submit an entry for review. Select a journal entry that is in process and click Forward to move the entry to pending review.
Send Back - return a journal entry to an In Process status to make required changes. This option is only available when the journal is in the Pending Review or Approved state.
Approve - approve a journal entry that is pending, which confirms the entry for posting.
Reject - refuse a journal entry. You can edit a rejected journal, select it and click the In Process entry action.
Process - calculate the value of a selected journal entry and post to the database.
Clear Data - delete previously processed Elimination data.
Post - post the entry to the application.
Inactive - disable an entry (such as a Dynamic Journal Entry, an Elimination Set or Non Controlling Interest). Disabled/Inactive entries are not posted.
Active - make an Inactive entry Active. Only active entries are posted.
Reports - Reports are available based on Process. Some examples of reports include; Verify Data, Audit Log, and Exchange Rate.
Center Pane
When you click a process, for example Dynamic Journals, the center pane is displayed. All entries for Dynamic Journals are displayed based on scenario, period, and company selections. The Status column (shown below) provides information on whether the entry is active or inactive. Only active entries can be processed with Status Column.

The Show All toggle, when turned off, displays all Active and Inactive journals in the selected period. When turned on, all journals for all periods are shown.
Show All Turned Of

Show All Turned On

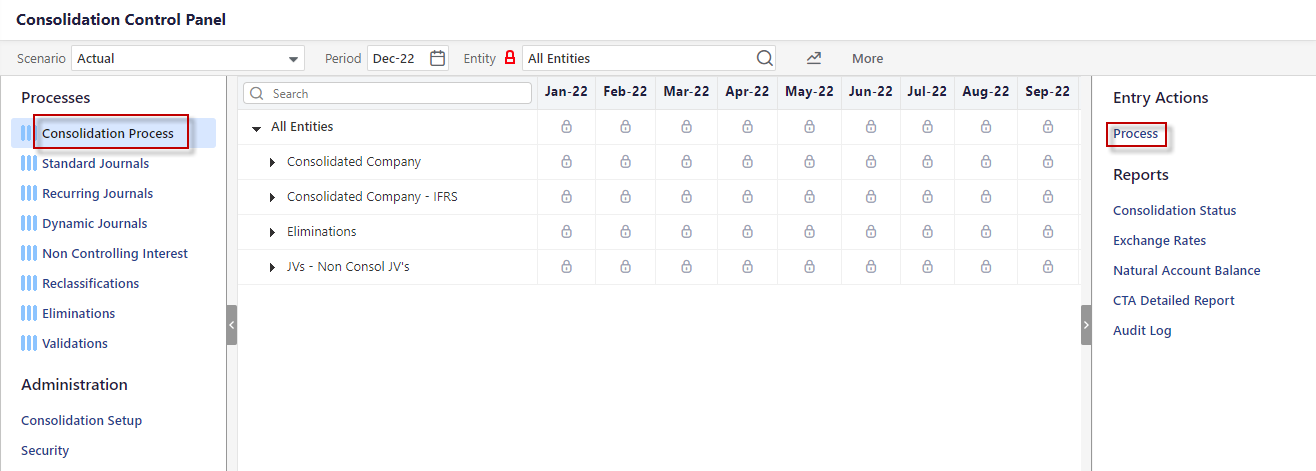
If you click the Consolidation Process and the Workflow Status feature is enabled, a company hierarchy with a period at the top of each column is displayed as shown below. If this feature is not enabled, the pane will be blank.
Activities that Complete During Consolidation Processing
When you run Consolidation, the bullet points below happen. However, you have the option to define a Custom Consolidation Process. Click here for information.
Process Dynamic Journals in local and common currency
Process Non Controlling Interest
Calculate the minority interest expense and liability accounts for Non Controlling Interest
Calculate the investment in subsidiary for Non Controlling Interest in local and common currency
Process required partitions in the reporting database
Calculate Retained Earnings for all companies in local currency
Calculate currency translation adjustments
Process interim currencies
Calculate Retained Earnings for interim currencies
Calculate currency translation adjustment for interim currencies
Reporting members with assigned currency values, exchange rates, and calculation types are converted.
Process reporting cube
Note:
Cash flow currency calculations are not calculated for Pre-Loaded Budget scenarios. This means that the reporting currency calculations are applicable for Actual, Budget and Forecast scenarios only.
Note:
Based on your set up, common currency data (including Eliminations) may be part of interim currency calculations. For example, if your common currency is USD and a hierarchy contains entities with Euro as the local currency, all data (including Elimination data) can be viewed in Euro if interim currency for all entities is set to Euro.
Custom User-Defined Consolidation Process - What Is It and How Does It Work
With the User Defined Consolidation Process feature, you can configure and personalize your Close process. For example, you can balance books at local and common currencies during your Close process and require interim and reporting currencies get processed after Consolidation is complete. For Budget and Forecasts, you have the flexibility to run the Consolidation Process for specific financial years (period range) for the scenario versus all years.
Without the Custom User-Defined Consolidation Process, the Consolidation Process runs conversions and other calculations for common currency, local currency, interim currency, and reporting currency all at once in a big chunk. For example, let’s say you wanted to post Eliminations, Dynamic Journals (in common currency), and Reclassifications. You have to run the Consolidation Process, then Eliminations, and then the Consolidation Process again so that interim and reporting currency would reflect the eliminated intercompany transactions. With the User Defined Consolidation Process, you can process local currency and common currency, post Eliminations and common currency adjustments (if any) and then consolidate interim and reporting currency.
Follow the steps in the

How to Process Consolidation With Configurable Steps
Access the Consolidation Control Panel.
Select the Scenario, Period, and Company.
Click the Consolidation Process and select Process Action. The Process Setup page is displayed.
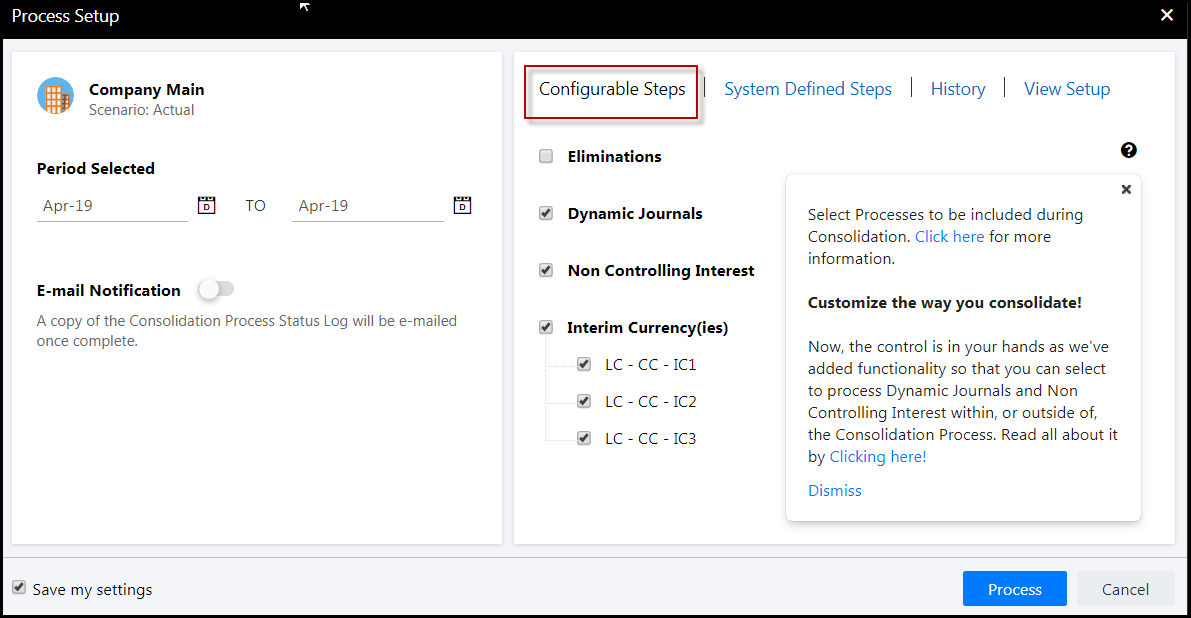
The Configurable Steps tab is displayed by default as shown below.
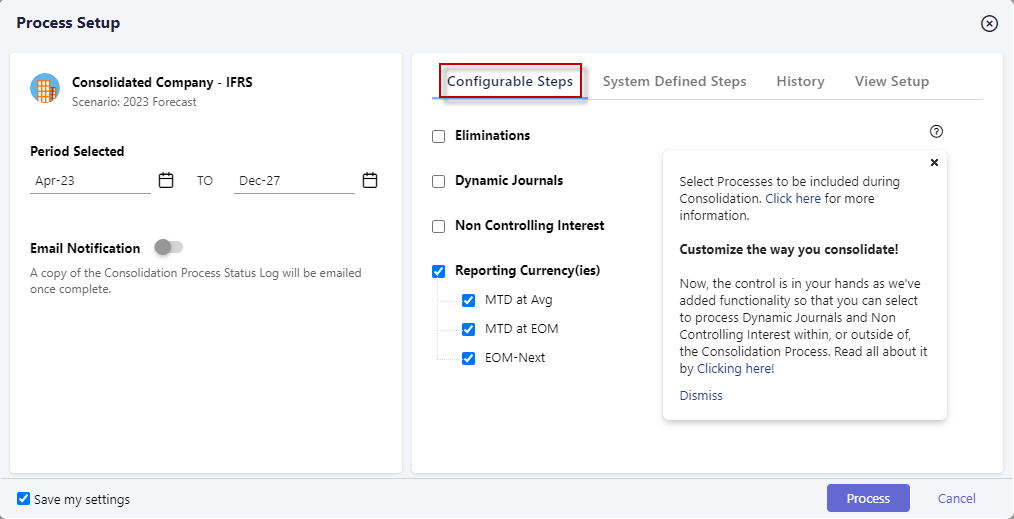
The Period Selected field is populated based on the Period selected on the Consolidation Control Panel. Select a TO period if you want to run the process for multiple periods.
For E-mail Notification, click the slider, which will change to blue (on) and select the e-mail addresses of those you want the Consolidation Process Status Log sent to.
In the Configurable Steps pane, select the Interim Currency(ies) you want consolidated during the Consolidation Process. The number of available Interim currencies is based on the number of Interim Currencies specified on the Define Currency Parameters Configuration Task.
Select the Reporting Currency(ies) you want consolidated during the Consolidation Process. Reporting Currency is defined in Hierarchy Management. In the image below, you can see how the leaf level members in the Reporting hierarchy match up with the Reporting Currency on the Consolidation Setup page.

Select to include Eliminations, Dynamic Journals and Non Controlling Interest to be processed during the Consolidation Process. Alternatively, do not select the checkboxes should you choose to process Dynamic Journals and Non Controlling Interest outside of the Consolidation Process. Customers who had earlier opted to include Dynamic Journals and Non Controlling Interest as part of the Consolidation Process will see that both the options are selected when they navigate to the Process Setup page.
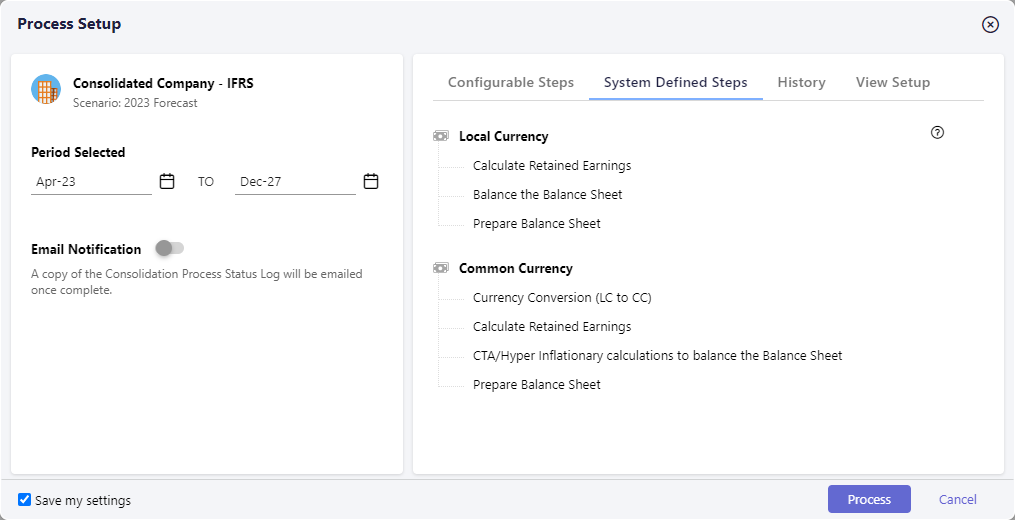
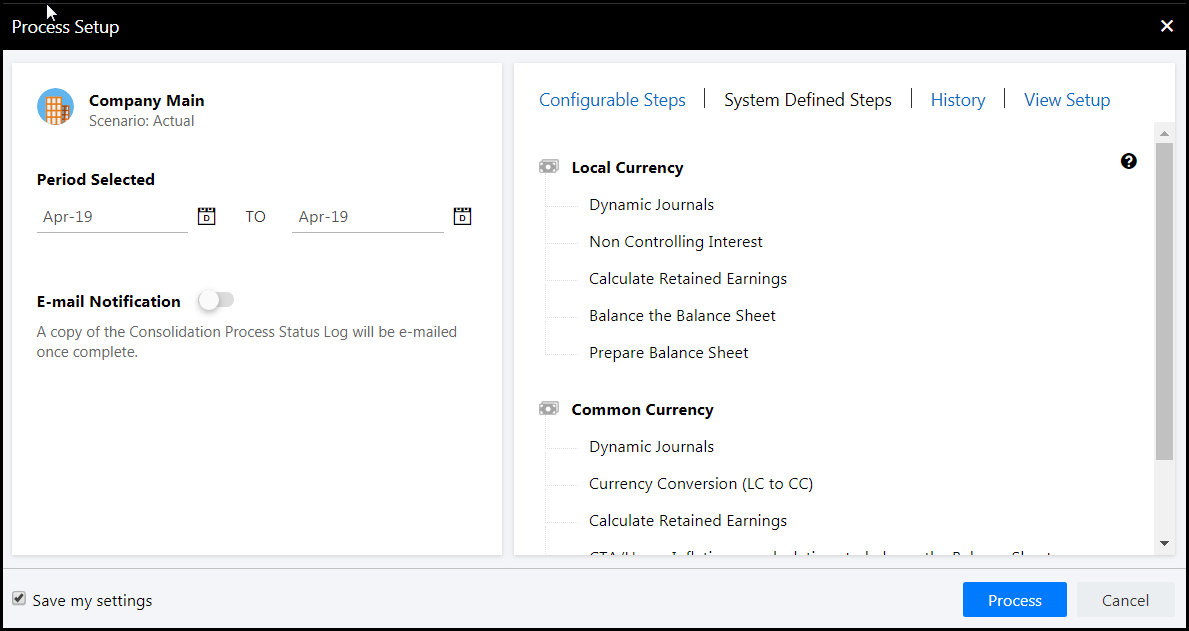
Note:Once you select the checkbox to include Dynamic Journals to be processed during the Consolidation Process, you cannot select specific Dynamic Journal Entries to process for the period. Instead, all active Dynamic Journal Entries for the period will be processed.Click the System Defined Steps tab. The Consolidation Process calculates both Common and Local Currency by default. The activities under Local Currency and Common Currency are system populated based on what needs to be performed and how your application is configured.
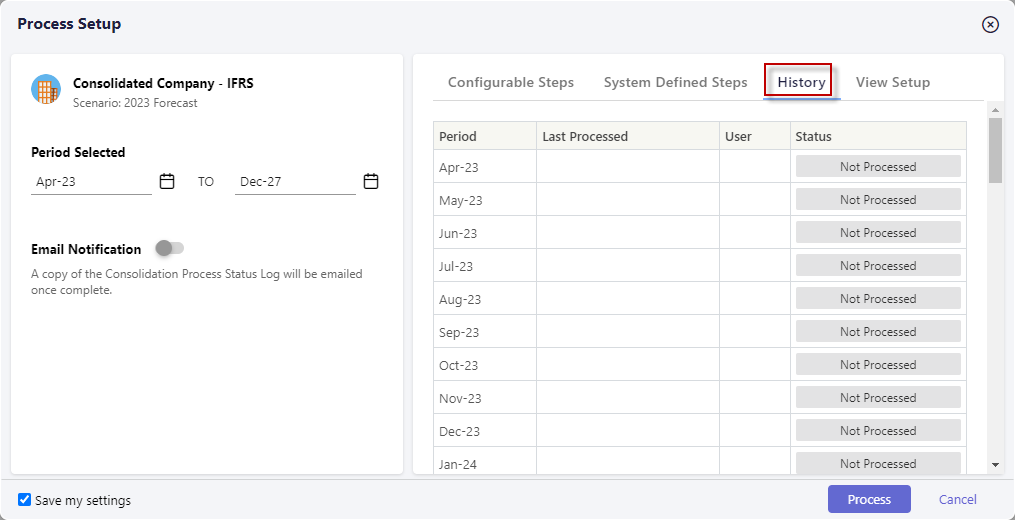
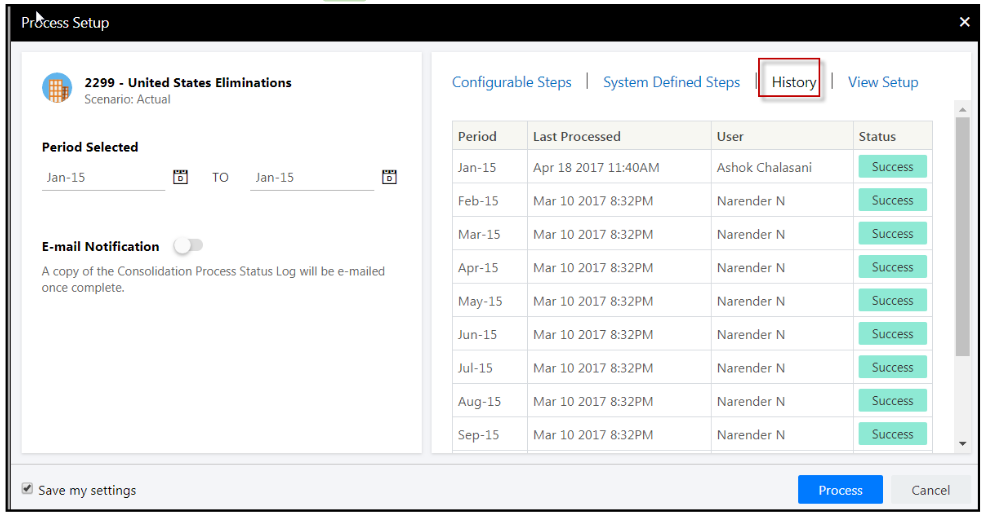
Click the History tab to view information on the period, date and time the last Consolidation Process was run as well as the user that ran the process and the status of the process.
Click the View Setup tab to view the account setup completed on the Consolidation Control Panel > Consolidation Setup.
Click Save my settings so that every time you access the Process Setup page, your selections for Interim and Reporting currency is retained from the previous run. Settings are user specific.
Click Process. You’re done!
Note:The reporting cube should be refreshed 3 times during the Consolidation Process; once before the processing of Dynamic Journals in local currency, prior to the processing of Dynamic Journals in common currency, and at the very end.


How to Post Eliminations During the Consolidation Process
Optionally, include Eliminations (along with Dynamic Journals, Non Controlling Interest, Interim Currencies, and Reporting Currencies) in the Consolidation Process, which can then be scheduled to run in Cloud Scheduler. This eliminates the need for manual execution, however, you can continue to post Eliminations independently as well. Having both options provides additional flexibility and convenience.
Active Elimination Sets are processed and posted during the processing of common currency in the Consolidation Process. More specifically, the sequence of execution within the Consolidation Process is as follows:
Local Currency
Common Currency
Interim Currency
Reporting Currency
During the processing of Common Currency, the following happens:
Local currency is converted to common currency
Dynamic Journals Posting
Non Controlling Interest Calculations
Active Elimination Sets are processed and posted - this happens the first time Elimination Sets are posted and for subsequent Consolidation processing the Elimination Sets are first cleared and then posted.
Current Year Retained Earnings calculations
Beginning Retained Earnings calculations
Hyperinflationary Company Processing
CTA calculations
If the posting of any Eliminations fails during the Consolidation Process, the entire process fails. If a Cloud Scheduler task includes the posting of Eliminations for a company and the Elimination company under the rollup company is deleted at some point in time, the Cloud Scheduler task will fail. To resolve this issue, update the existing Cloud Scheduler task and uncheck the Eliminations checkbox. Save it and run again.
In Practice
Access the Consolidation Control Panel.
Select the Consolidation Process.
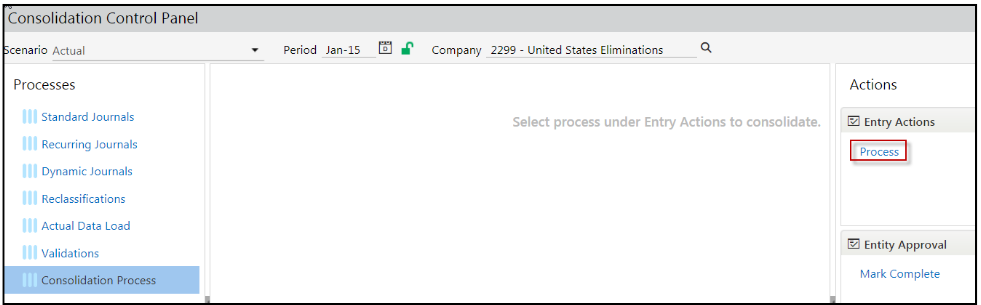
Click the Process action. The Process Setup page appears as shown below.
Select the Eliminations checkbox and click Process or set up a Cloud Scheduler process. Note that the Eliminations checkbox is only available/visible in the selected company is a rollup and has an Elimination company as one of its descendants.
Note:The Save my settings option is not applicable for Eliminations. So, the Eliminations checkbox will always be unchecked by default.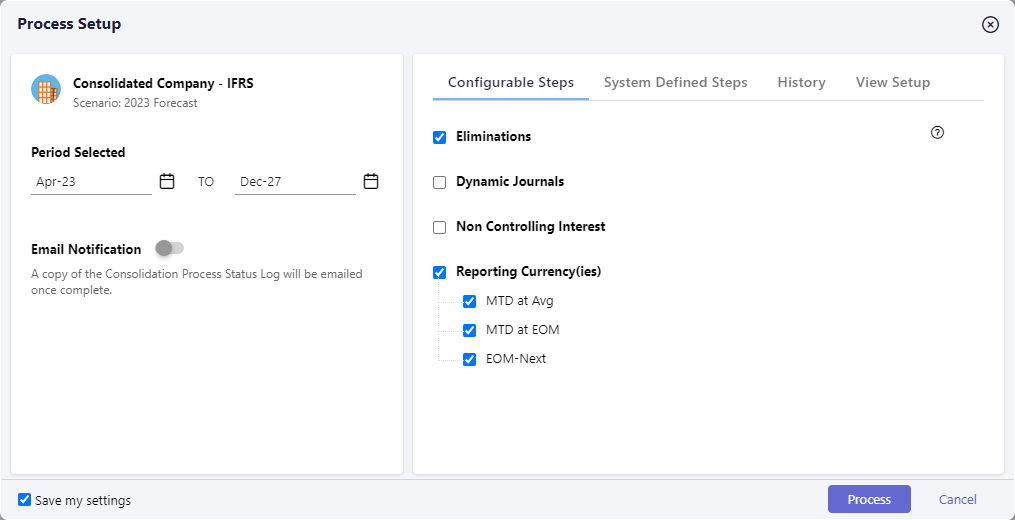

How to Clear Eliminations Posted as Part of the Consolidation Process
When Eliminations are posted as part of the Consolidation Process, the only way to clear Elimination postings is to perform the following steps.
Access the Consolidation Control Panel.
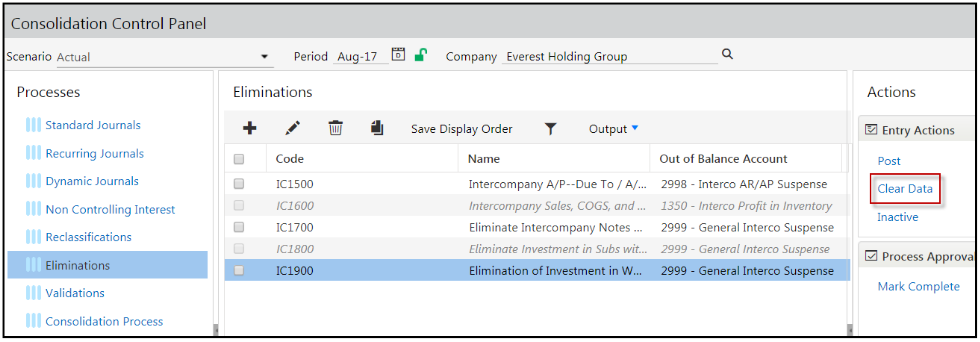
Click the Eliminations Process in the left pane. Eliminations are shown in the center pane.
Select an Elimination and click the Clear Data action as shown below.
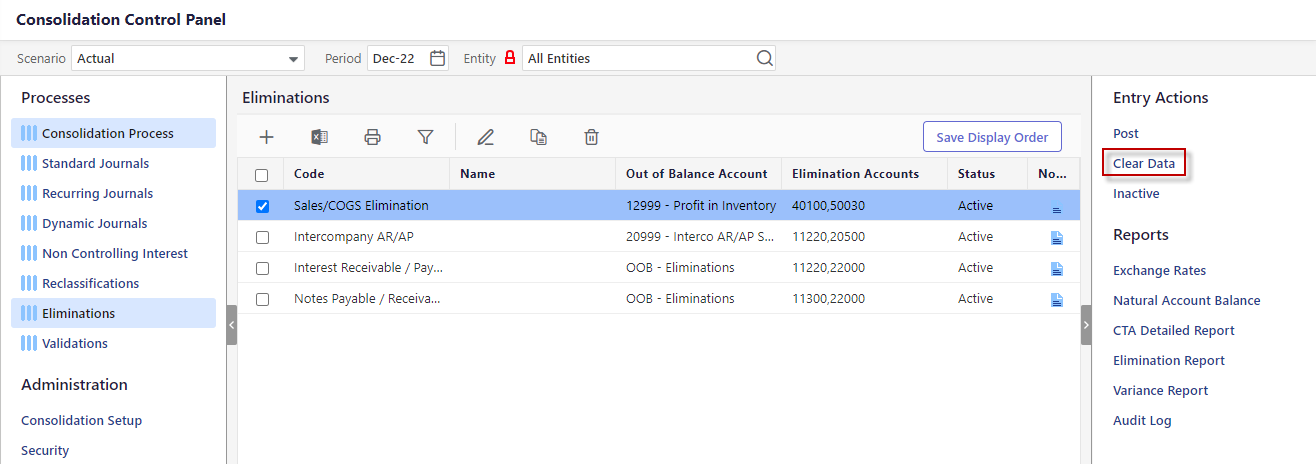 Note:You cannot clear Elimination postings using the Clear data option under Maintenance > DLR.

Clearing Dynamic Journals and Non Controlling Interest Posted as Part of the Consolidation Process
When you select to process Dynamic Journals and Non Controlling Interest as part of the Consolidation Process, the Consolidation Process will not clear data for inactive artifacts (Dynamic Journals and Non Controlling Interest).
How to Process Consolidation Without Configurable Steps
You can set up a process in Cloud Scheduler or run Consolidation from the Consolidation Control Panel. For Centralized Consolidations, all company/legal entities will be updated for the selected scenario and time periods when Consolidation is run. For Decentralized Consolidations, only the selected company/legal entity(s) will be updated for the selected scenario and time periods when Consolidation is run.
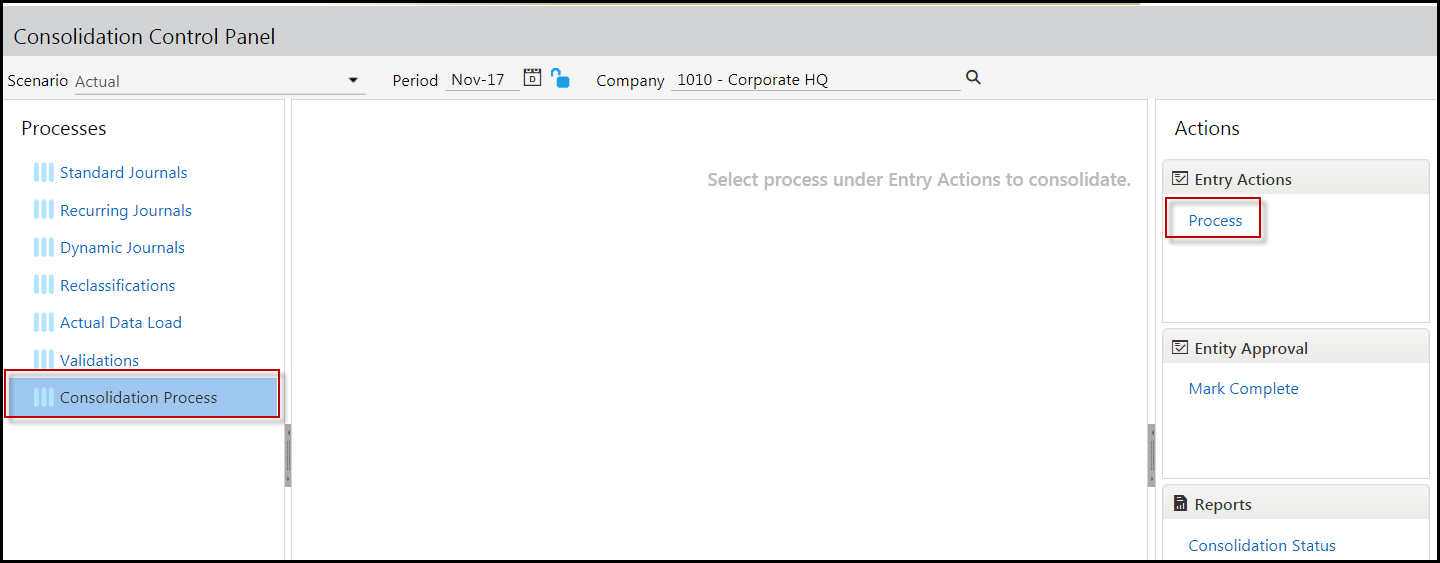
Select Consolidation Process from the Processes pane.
Select Process from the Entry Actions pane.
The Process Setup page is opened. Scenario selection includes Actual, Budget, and Forecast scenario types. If Actual scenario is selected then the Year and Period selections are applicable. If Budget/Forecast scenario types are selected then the Year selection is disabled and a single period is displayed for processing. You can select this to process all of the periods within a Budget or Forecast scenario type.
Select a Year to drive periods displayed for processing.
Select from the list of available periods based on the Scenario and Year selections. Locked periods are not available for selection.
Click the Process button to execute the Consolidation Process. Once the Consolidation Process is complete, a Process Status page will appear indicating whether or not the process was successful.

There are prerequisites that must completed before you can process consolidations, which include:
Post Journal Entries
Execute Intercompany Eliminations
Update Foreign Currency Exchange Rates
Define Consolidation Setup selections
Explanation of Journal Types
There are three types of journals; Standard , Recurring and Dynamic.

Standard Journal Entries are entries created for processing one-time journal entries. Recurring Journal Entries do not vary across time. Standard Journals can also be of Auto-Reversing type to post subsequent periods.
Recurring Journal Entries do not vary across time and can be automated and consistently applied for each period within your process. For example, if you have an annual expense (such as rent) you can accrue the expense in twelve equal payments every month with a Recurring Journal Entry. A debit and credit to the appropriate segment intersections will be created every month.
Dynamic Journal Entries are used when entry balances fluctuate from period to period. For example, as a financing strategy you may take out a loan with a variable interest rate. This means that the principal and interest payment may fluctuate from period to period based on the loaded rate for the period.
How to Access the Consolidation Control Panel
As an end user, all of your Consolidation tasks will be carried out in the Consolidation Control Panel. Your Admin user will provide you with security. There are two types of Consolidation users:
Centralized - If you are at the root member (defined as the top member in the hierarchy) then you are interacting as a Centralized user managing the Consolidation Process in its entirety.
Decentralized - If you have been provided specific dimension member access within the hierarchy and you select a Company from the member selector, then you are interacting in Decentralized mode. This means that the modules available may be restricted and you have limited access to Company intersections for modifying data.
Click the Consolidation icon shown below in blue to access the Consolidation Control Panel.

Dissecting the Consolidation Control Panel
The Consolidation Control Panel is organized by Process. Click a Process (located in the left pane) to view associated details in the center pane.

Entry Actions, located in the right pane, are available based on selections made in the center pane. Process approval details are displayed in the right pane. After all processes are posted / processed successfully, you mark processes as Complete. When you mark a process Complete, the grid becomes empty and all the processes are locked from editing. Also, no actions are available for locked processes.
Description of Fields on the Consolidation Control Panel
Scenario - You can run Consolidation for any specific scenario or scenarios. However, journal entries can only be posted against the Actual scenario. You might want to run Consolidation for other scenarios, for example, to eliminate the Fx affect. To do so, you'll add a scenario that takes actuals and converts to a budget rate. Or, you can take budget and convert to actual rates. Now, when you start to analyze actual to budget data for the month, quarter or year, the affect of Fx is removed.
Period - Consolidation tasks relate to dates or time periods. Click the Calendar button to select a month and year.
Note:
You can only post entries to open periods. You can post one-sided entries. Use a dummy or plug account to offset the side.
Lock / Unlock icon - Indicates a locked or unlocked period.  Once periods are closed they are locked and therefore not editable.
Company - Access to dimension members here is based on user type; Centralized or Decentralized. (The label shown here is the name given to Segment 2 – company segment. If you named the segment Company, it will appear as Company)
Left Pane
Processes Pane :
Standard Journals - Standard Journal Entries are entries which are created for processing one-time journal entries. You can add Standard Journals to Budget scenarios.
Recurring Journals - Recurring Journal Entries are those which will not vary across time and can be automated and consistent for each period within your process. For example, if you have an annual expense (such as rent) you can accrue the expense in twelve equal payments every month with a Recurring Journal Entry. A debit and credit to the appropriate segment intersections will be created every month.
Dynamic Journals - Dynamic Journal Entries are used when entry balances fluctuate from period to period. For example, as a financing strategy you take out a loan with a variable interest rate. This means that the principal and interest payment will likely fluctuate from period to period based on the loaded rate for the period.
Non Controlling Interest -Describes the relationship between a parent company and a subsidiary (otherwise referred to as joint ventures or minority interest relationships), the related accounts, and Dynamic Journal Entries used in adjusting the investment in the subsidiary. The calculations and postings take place during the Consolidation Process.
Reclassifications - Reclassification Entries are usually used to correct financial information that has been incorrectly posted against an intersection within the database. For example, if $500 was recorded in the wrong GL account, you can move the amount to the correct GL account with a Reclassification Entry.
Eliminations - Elimination Sets are comprised of due to and due from accounts that make up an intercompany transaction. Eliminations are processed individually or together as part of the Elimination Process. The Elimination Process calculates and posts Elimination Entries at Eliminating Companies within your legal entity hierarchy to ensure the proper aggregation of financial information at consolidated reporting levels. For example, a transaction that involves the sale of an item manufactured by a subsidiary to another subsidiary should be eliminated when reporting consolidated results.
Consolidation Process - Run the Consolidation Process. If a Centralized User runs the Consolidation Process, all company/legal entities will be updated for the selected scenario and time periods. If a Decentralized User runs the Consolidation Process, only the selected company/legal entity(s) will be updated for the selected scenario and time periods . If Consolidation Status is implemented in your application, click here to read all about it. If you are not sure if Consolidation Status is implemented, click the Consolidation Process. If the center pane displays the company hierarchy with a period at the top of each column, then this feature is enabled. If the center pane is blank, it is not enabled.
Note:
During the Consolidation Process ,Planful creates calculations for Non Controlling Interest, currency translation adjustments, retained earnings, Dynamic Journals and currency conversion. Currency conversions with exceptions are not executed when the Currency Conversion process takes place from the Data Load Rules process. Currency Conversions with exceptions must be executed via Currency Exchange Rates and/or the Consolidation Process to include exception details.
Actual Data Load - Displays the Actual Data Load grid containing the Actual Data Templates. Using the Actual Data Load process, you input actual budget data in the available templates.
See: How to Input Actuals.
Right Pane
Entry Actions :
Select the checkbox next to entries to perform an Entry Action. These actions are available based on where you are within the Consolidation Process and your security privileges. Entry Actions allow you to control the lifecycle of a journal.
Entry Actions are available based on your selections. For example, if you want to post an Elimination Set, select the checkbox next to the Elimination Set and click the Post Entry Action.
Type of Entry Actions:
Forward - submit an entry for review. Select a journal entry that is in process and click Forward to move the entry to pending review.
Send Back - return a journal entry to an In Process status to make required changes. This option is only available when the journal is in the Pending Review or Approved state.
Approve - approve a journal entry that is pending, which confirms the entry for posting.
Reject - refuse a journal entry. You can edit a rejected journal, select it and click the In Process entry action.
Process - calculate the value of a selected journal entry and post to the database.
Clear Data - delete previously processed Elimination data.
Post - post the entry to the application.
Inactive - disable an entry (such as a Dynamic Journal Entry, an Elimination Set or Non Controlling Interest). Disabled/Inactive entries are not posted.
Active - make an Inactive entry Active. Only active entries are posted.
Reports - Reports are available based on Process. Some examples of reports include; Verify Data, Audit Log, and Exchange Rate.
Center Pane
When you click a process, for example Dynamic Journals, the center pane is displayed. All entries for Dynamic Journals are displayed based on scenario, period, and company selections. The Status column (shown below) provides information on whether the entry is active or inactive. Only active entries can be processed.
With Status Column.

The Show All toggle, when turned off, displays all Active and Inactive journals in the selected period. When turned on, all journals for all periods are shown.
Show All Turned Of

Show All Turned On

If you click the Consolidation Process and the Workflow Status feature is enabled, a company hierarchy with a period at the top of each column is displayed as shown below. If this feature is not enabled, the pane will be blank.

Activities that Complete During Consolidation Processing
When you run Consolidation, the bullet points below happen. However, you have the option to define a Custom Consolidation Process.
Process Dynamic Journals in local and common currency
Process Non Controlling Interest
Calculate the minority interest expense and liability accounts for Non Controlling Interest
Calculate the investment in subsidiary for Non Controlling Interest in local and common currency
Process required partitions in the reporting database
Calculate Retained Earnings for all companies in local currency
Calculate currency translation adjustments
Process interim currencies
Calculate Retained Earnings for interim currencies
Calculate currency translation adjustment for interim currencies
Reporting members with assigned currency values, exchange rates, and calculation types are converted.
Process reporting cube
Note:
Cash flow currency calculations are not calculated for Pre-Loaded Budget scenarios. This means that the reporting currency calculations are applicable for Actual, Budget and Forecast scenarios only.
Note:
Based on your set up, common currency data (including Eliminations) may be part of interim currency calculations. For example, if your common currency is USD and a hierarchy contains entities with Euro as the local currency, all data (including Elimination data) can be viewed in Euro if interim currency for all entities is set to Euro.
Custom User-Defined Consolidation Process - What Is It and How Does It Work
With the User Defined Consolidation Process feature, you can configure and personalize your Close process. For example, you can balance books at local and common currencies during your Close process and require interim and reporting currencies get processed after Consolidation is complete. For Budget and Forecasts, you have the flexibility to run the Consolidation Process for specific financial years (period range) for the scenario versus all years.
Without the Custom User-Defined Consolidation Process, the Consolidation Process runs conversions and other calculations for common currency, local currency, interim currency, and reporting currency all at once in a big chunk. For example, let’s say you wanted to post Eliminations, Dynamic Journals (in common currency), and Reclassifications. You have to run the Consolidation Process, then Eliminations, and then the Consolidation Process again so that interim and reporting currency would reflect the eliminated intercompany transactions. With the User Defined Consolidation Process, you can process local currency and common currency, post Eliminations and common currency adjustments (if any) and then consolidate interim and reporting currency.
Follow the steps in the

How to Process Consolidation With Configurable Steps
Access the Consolidation Control Panel.
Select the Scenario, Period and Company.
Click the Consolidation Process and select the Process Action. The Process Setup page is displayed.
The Configurable Steps tab is displayed by default as shown below.
The Period Selected field is populated based on the Period selected on the Consolidation Control Panel. Select a TO period if you want to run the process for multiple periods.
For E-mail Notification, click the slider, which will change to blue (on) and select the e-mail addresses of those you want the Consolidation Process Status Log sent to.
In the Configurable Steps pane, select the Interim Currency(ies) you want consolidated during the Consolidation Process. The number of available Interim currencies is based on the number of Interim Currencies specified on the Define Currency Parameters Configuration Task.
Select the Reporting Currency(ies) you want consolidated during the Consolidation Process. Reporting Currency is defined in Hierarchy Management. In the image below, you can see how the leaf level members in the Reporting hierarchy match up with the Reporting Currency on the Consolidation Setup page.
Select to include Eliminations, Dynamic Journals and Non Controlling Interest to be processed during the Consolidation Process. Alternatively, do not select the checkboxes should you choose to process Dynamic Journals and Non Controlling Interest outside of the Consolidation Process. Customers who had earlier opted to include Dynamic Journals and Non Controlling Interest as part of the Consolidation Process will see that both the options are selected when they navigate to the Process Setup page.
Note:Once you select the checkbox to include Dynamic Journals to be processed during the Consolidation Process, you cannot select specific Dynamic Journal Entries to process for the period. Instead, all active Dynamic Journal Entries for the period will be processed.Click the System Defined Steps tab. The Consolidation Process calculates both Common and Local Currency by default. The activities under Local Currency and Common Currency are system populated based on what needs to be performed and how your application is configured.
Click the History tab to view information on the period, date and time the last Consolidation Process was run as well as the user that ran the process and the status of the process.
Click the View Setup tab to view the account setup completed on the Consolidation Control Panel > Consolidation Setup.
Click Save my settings so that every time you access the Process Setup page, your selections for Interim and Reporting currency is retained from the previous run. Settings are user specific.
Click Process. You’re done!
Note:The reporting cube should be refreshed 3 times during the Consolidation Process; once before the processing of Dynamic Journals in local currency, prior to the processing of Dynamic Journals in common currency, and at the very end.


How to Post Eliminations During the Consolidation Process
Optionally, include Eliminations (along with Dynamic Journals, Non Controlling Interest, Interim Currencies, and Reporting Currencies) in the Consolidation Process, which can then be scheduled to run in Cloud Scheduler. This eliminates the need for manual execution, however, you can continue to post Eliminations independently as well. Having both options provides additional flexibility and convenience.
Active Elimination Sets are processed and posted during the processing of common currency in the Consolidation Process. More specifically, the sequence of execution within the Consolidation Process is as follows:
Local Currency
Common Currency
Interim Currency
Reporting Currency
During the processing of Common Currency, the following happens:
Local currency is converted to common currency
Dynamic Journals Posting
Non Controlling Interest Calculations
Active Elimination Sets are processed and posted - this happens the first time Elimination Sets are posted and for subsequent Consolidation processing the Elimination Sets are first cleared and then posted.
Current Year Retained Earnings calculations
Beginning Retained Earnings calculations
Hyperinflationary Company Processing
CTA calculations
If the posting of any Eliminations fails during the Consolidation Process, the entire process fails. If a Cloud Scheduler task includes the posting of Eliminations for a company and the Elimination company under the rollup company is deleted at some point in time, the Cloud Scheduler task will fail. To resolve this issue, update the existing Cloud Scheduler task and uncheck the Eliminations checkbox. Save it and run again.
In Practice
Access the Consolidation Control Panel.
Select the Consolidation Process.
Click the Process action. The Process Setup page appears as shown below.
Select the Eliminations checkbox and click Process or set up a Cloud Scheduler process. Note that the Eliminations checkbox is only available/visible in the selected company is a rollup and has an Elimination company as one of its descendants.
Note:The Save my settings option is not applicable for Eliminations. So, the Eliminations checkbox will always be unchecked by default.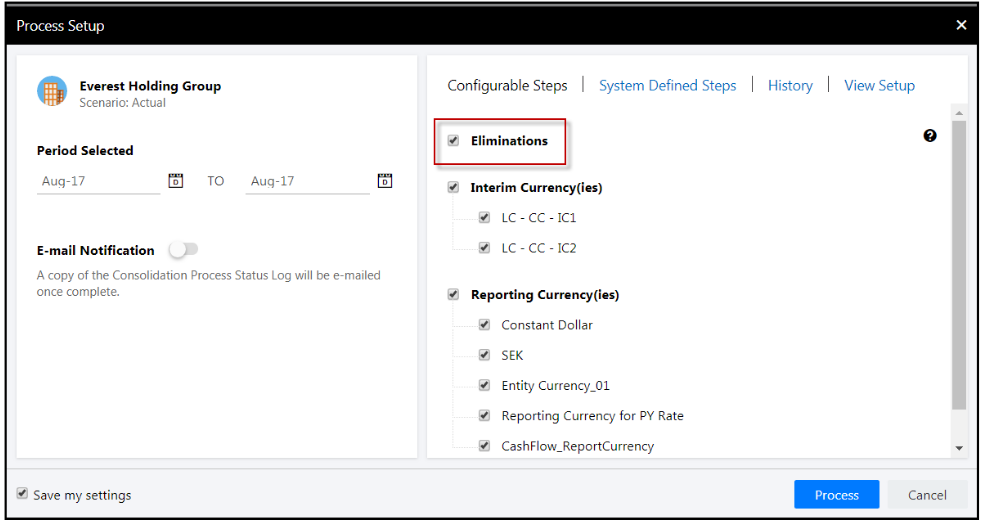

How to Clear Eliminations Posted as Part of the Consolidation Process
When Eliminations are posted as part of the Consolidation Process, the only way to clear Elimination postings is to perform the following steps.
Access the Consolidation Control Panel.
Click the Eliminations Process in the left pane. Eliminations are shown in the center pane.
Select an Elimination and click the Clear Data action as shown below.
 Note:You cannot clear Elimination postings using the Clear data option under Maintenance > DLR.

Clearing Dynamic Journals and Non Controlling Interest Posted as Part of the Consolidation Process
When you select to process Dynamic Journals and Non Controlling Interest as part of the Consolidation Process, the Consolidation Process will not clear data for inactive artifacts (Dynamic Journals and Non Controlling Interest).
How to Process Consolidation Without Configurable Steps
You can set up a process in Cloud Scheduler or run Consolidation from the Consolidation Control Panel. For Centralized Consolidations, all company/legal entities will be updated for the selected scenario and time periods when Consolidation is run. For Decentralized Consolidations, only the selected company/legal entity(s) will be updated for the selected scenario and time periods when Consolidation is run.
Select Consolidation Process from the Processes pane.
Select Process from the Entry Actions pane.
The Process Setup page is opened. Scenario selection includes Actual, Budget, and Forecast scenario types. If Actual scenario is selected then the Year and Period selections are applicable. If Budget/Forecast scenario types are selected then the Year selection is disabled and a single period is displayed for processing. You can select this to process all of the periods within a Budget or Forecast scenario type.
Select a Year to drive periods displayed for processing.
Select from the list of available periods based on the Scenario and Year selections. Locked periods are not available for selection.
Click the Process button to execute the Consolidation Process. Once the Consolidation Process is complete, a Process Status page will appear indicating whether or not the process was successful.

There are prerequisites that must completed before you can process consolidations, which include:
Post Journal Entries
Execute Intercompany Eliminations
Update Foreign Currency Exchange Rates
Define Consolidation Setup selections
Explanation of Journal Types
There are three types of journals; Standard , Recurring and Dynamic.

Standard Journal Entries are entries created for processing one-time journal entries. Recurring Journal Entries do not vary across time. Standard Journals can also be of Auto-Reversing type to post subsequent periods.
Recurring Journal Entries do not vary across time and can be automated and consistently applied for each period within your process. For example, if you have an annual expense (such as rent) you can accrue the expense in twelve equal payments every month with a Recurring Journal Entry. A debit and credit to the appropriate segment intersections will be created every month.
Dynamic Journal Entries are used when entry balances fluctuate from period to period. For example, as a financing strategy you may take out a loan with a variable interest rate. This means that the principal and interest payment may fluctuate from period to period based on the loaded rate for the period.
Was this article helpful?