Contents x
- Getting Started
- Structured Planning
- Structured Planning Configuration Tasks
- Using Planning Control Panel
- Understanding Template Input and View Modes
- Working with Data Discrepancies in Templates
- Explanation of Line Types in Templates
- Understanding Workflow Actions
- Using Dynamic Commentary in Planning Templates
- Working with Reports in Structured Planning
- Working with Snapshots in Planning Control Panel
- How-Tos
- Workforce Planning
- Initiative Planning
- Capital Planning
- MyPlan Guides
- MyPlan User Guide
- Accessing MyPlan
- Dissecting the MyPlan Interface
- Retained In-Memory Actions
- How Actions Are Calculated
- Adjusting, Updating, Adding, and Editing Accounts in MyPlan
- How to Add New Headcount
- How to Edit a Headcount
- How to Add Multiple Employees at Once
- How to Edit Multiple New Hires at Once
- How to Add a Headcount Based on an Existing Headcount and Edit Details
- How to Add an Asset
- How to Delete a Headcount
- How to Add an Asset Not Yet Budgeted
- How to Add An Asset for a Budget Entity When the Asset Definition Does Not Exist
- How to Edit an Asset
- How to Update an Account
- Working with Templates in MyPlan
- Activity Manager
- How to Submit a Budget/Forecast
- Template Locking
- Limitations
- MyPlan User Options
- Benefits of MyPlan
- MyPlan User Guide
- Dynamic Planning
- Dynamic Planning Overview
- Dynamic Planning User Security
- Using Aggregation Process
- SpotlightXL - Download & Installation
- SpotlightXL
- Using SpotlightXL-Analyze
- Using SpotlightXL-Report
- Cascade Reporting in SpotlightXL
- Excel Reporting in SpotlightXL
- Office Reporting in SpotlightXL
- Using SpotlightXL-Model
- Using SpotlightXL-Model Setup Subtask
- Using SpotlightXL-Model Dimensions Subtask
- How to Define a Dimension Members for a Model?
- How to Add a Dimension Member to a Generated Model?
- How to Delete a Dimension Member from a Generated and Locked Model?
- How to Lock Dimension Members
- How to Setup Data Locking?
- How to Turn Data Locking On or Off?
- How to Define Multiple Number Formats for Dimension Members in Views?
- Using SpotlightXL-Model Attributes Subtask
- Using SpotlightXL-Model Maps Subtask
- Using SpotlightXL-Model Scopes Subtask
- Using SpotlightXL-Model Formulas Subtask
- Using SpotlightXL-Model Calculation Subtask
- Using SpotlightXL-Model Data Subtask
- Using SpotlightXL-Model Import and Export Data Subtask
- Using SpotlightXL-Model Administration Subtask
- Using SpotlightXL- External Source Model Subtask
- External Source Model Process
- View Formulas in External Source Model
- External Source Model Field Types, Expressions, and Formulas
- Loading Data to External Source Models
- Support for Variables and Expressions in External Source Models
- Source Map
- Source Model
- Transferring Data from One External Source Model to Another External Source Model
- Using Filter Field Section
- Using Aggregate Functions in Maps
- Configuring Maps using Aggregate Functions - Use Cases
- Multiple External Source Model - Use Case
- Managing Access to ESMs
- Using External Source Model Functions
- Text Functions
- Numeric Functions
- Date Functions
- Logical Functions
- Step-by-Step Use Case for Forecasting Revenue Spread Over Time
- Using ESM Canvas
- ESM Formatting in SpotlightXL
- Predict Signals in DAP (Direct Access) Reports
- Using Model Design
- How-Tos
- Using SpotlightXL-Manage Task
- SpotlightXL Manage User Management Subtask
- Using Group Management
- Using Navigation Access
- Using Application Administration
- Using Metadata Download
- Using Application Settings
- Defining Default Behavior for View and Report Properties
- Defining Default Tab Color for Views and Reports
- How to Provide Calculation Access to Contributor Users?
- Running Calculations in the Background for Views and Reports
- Calculations Execution Delayed and Batched for Better Performance
- Application-Level Data Locking for Views
- Application-Level Data Locking for Reports
- Hiding Empty Folders for Views and Reports
- Indenting Dimension Members
- Using Application Statistics
- Using Audit Log
- Using Process Management
- Using Schedule Management
- Using Model Permissions
- Using Request Status
- Using Model Backup/Restore
- SpotlightXL Manage Office Reports Subtask
- Using Token Management
- Dynamic Planning How to Load an External Data Source into a Master Model (Legacy)
- Spotlight Web
- Analyze
- Report
- Model
- How to Enable the Model Menu in Planful Applications?
- How to Create a Model in the Spotlight Web?
- How to Create a Model by Copying an Existing Model in Spotlight Web?
- How to Create an External Source Model?
- Contributor and Reviewer Access in Model Manager
- Exploring the Model Interface
- Exploring More Menu Model Options
- How to Restore a Model in the Spotlight Web?
- How to Schedule a Calculation Scheduler in Spotlight Web?
- Model Artifacts Browser
- Running and Filtering Reports
- Running and Filtering Views
- Using the Dimension Browser for Hierarchy Management
- Using the Dimension Attribute Browser
- Running and Filtering Calculations
- Filtering Formulas
- Filtering Scopes
- Creating, Editing, and Filtering Maps
- Creating, Editing, and Filtering External Source Model Fields
- Creating, Editing, and Filtering External Source Model Formulas
- Filtering External Source Model Maps
- Frequently Asked Questions
- Spotlight for Google Sheets
- Using Write Back
- Direct Access to PCR Model
- Creating a Direct Access Model to PCR Model
- Metadata Dimension Security for the Scenario Dimension
- Support for PCR Attributes, Attribute Hierarchies, and Alternate Hierarchies
- Support for PCR Substitution Variables and Derived Variables
- Reporting and Analysis Primer
- Multiple POV Selections in SpotlightXL and Spotlight for Direct Connect Models
- Support for PCR Cube Default Members for System-Defined Dimensions in New Views, Formatted Reports, and Excel Reports
- Support for Drill Through in Direct Connect Models in Both SpotlightXL and Spotlight
- Information for Experienced Power and Contributor Users
- Converting a Master Model into a Direct Access to PCR Model
- Using Currency Exchange Rates in Dynamic Planning
- Using Breakback
- Dynamic Planning API Library
- Base URL
- List of Dynamic Planning SOAP APIs
- Append Attributes (Master and Analytic Models)
- Parameters
- Sample Payload for Creating or Appending Attributes With Display Labels (Without Specifying the Member-Attribute Mapping)
- Sample Payload for Updating the Member-Attribute Mapping for Previously Saved Attributes
- Sample Payload for Creating or Appending Attributes (Without Display Labels, Without Specifying the Member-Attribute Mapping)
- Sample Payload for Creating or Appending Attributes and Specifying the Member-Attribute Mapping
- Response
- Append Dimension Members (Master and Analytic Models)
- Calculation Run (Master and Analytic Models)
- Calculation Status (Master and Analytic Models)
- Clear Data (Master and Analytic Models)
- Clear Leaf Data (Master and Analytic Models)
- Export Dimension / Attribute Hierarchy (Master and Analytic Models)
- Export Leaf-Level Data (Scoped) (Master and Analytic Models)
- Load Data (Master and Analytic Models)
- Clear Data (External Source Models)
- Clear Dimension Members (Metadata) (External Source Models)
- Export Leaf-Level Data (Scoped) (External Source Models)
- Load Data (External Source Models)
- Load Dimension Members (Metadata) (External Source Models)
- Create Users and Groups (User Management)
- List Users and Groups (User Management)
- Dynamic Planning: Group Access API
- How-Tos
- How to Open a Second Instance of SpotlightXL
- How to Use Change Data Tracking
- How to Use Variables in SpotlightXL Views and Reports
- How to Cascade a Report in SpotlightXL
- How to Backup and Restore a Model in SpotlightXL
- How to Find Data Cells Quickly in SpotlightXL
- How to Lock Dimension Members in SpotlightXL
- How to Work with Folders in SpotlightXL
- How to Add a Chart to a Report in SpotlightXL
- How to Add a Leaf Level Member to a Hierarchy in SpotlightXL
- How to Add or Delete Dimensions from a Model in SpotlightXL
- How to Create a Report from a View in SpotlightXL
- How to Create a View and Specify Properties in SpotlightXL
- How to Create and Load External Source Models
- How to Create Dimensions as Attributes in SpotlightXL
- How to Define Dimension Security
- How to Define Multiple Number Formats for Dimension Members in SpotlightXL View
- How to Download Data from Structured Planning into a Dynamic Planning Model
- How to Filter Members Using Design Manager in SpotlightXL
- How to Lock a Model to Prevent Modification or Clearing In SpotlightXL and Web
- How to Lock and Unlock Scaling in SpotlightXL
- How to Lock Members in a View or Report to Prevent Modification in SpotlightXL
- How to Perform Multi-Tab Analysis in SpotlightXL
- How to Restore a Model in SpotlightXL
- How to Save Data on Attributes for Views and Reports in SpotlightXL
- How to Select Data and Member Design Manager Options to Populate Report Values
- How to Share a POV Dimension Across Models in a Report
- How to Specify Match Criteria in SpotlightXL
- How to Use Excel Formulas in SpotlightXL
- How to Use the Metadata Viewer in SpotlightXL
- How to Update a Dimension Hierarchy Without Clearing a Model
- How to Configure the Number of Invalid Login Attempts
- How to Create a Report Based on an Existing Report in SpotlightXL
- How to Create a Report Based Off Multiple Models in SpotlightXL
- How to Log Into Spotlight for Office
- How to Create Report Collections in Dynamic Planning
- How to Use ClickOnce Installer for Automatic Upgrades
- How to Schedule a Calculation in SpotlightXL
- Consolidation
- Consolidation Process Prerequisites
- Consolidation Control Panel Overview
- Consolidation Administration Overview
- Processes Overview
- Using Consolidation Process
- Using Standard Journals
- Using Recurring Journals
- Using Dynamic Journals
- How to Add a Dynamic Journal?
- How to Upload Dynamic Journals?
- How to Copy a Dynamic Journal?
- How to Edit a Dynamic Journal?
- How to Delete a Dynamic Journal?
- How to Post a Dynamic Journal?
- How to Clear Dynamic Journal Data?
- How to View Dynamic Journals at the Rollup Level?
- Setting Up Rules in Journals
- Processing Dynamic Journals and Non-Controlling Interest Outside of the Consolidation Process
- Using Non Controlling Interest
- Using Reclassifications
- Using Eliminations
- Using Validations
- Using Actual Data Load
- Entry Actions Overview
- Using Reports in Consolidation
- How-tos?
- How to Configure Retained Earnings Roll Forward?
- How to Setup for Enhanced Retained Earnings Roll Forward?
- How to Close with Consolidation?
- How to Process Consolidation With Configurable Steps?
- How to Unlock Multiple Periods in the Consolidation Process?
- How to Lock Multiple Periods in the Consolidation Process?
- How to Provide Security for Centralized Consolidation Users?
- How to Provide Security for Decentralized Consolidation Users?
- How to Disable Display of Security Option from the Consolidation Control Panel?
- How to Process Consolidation and Include or Exclude Dynamic Journals and Non-Controlling Interest?
- Frequently Asked Questions (FAQs)
- Reports
- Reports Overview
- Reports Configuration Tasks
- Report Administration Limitations
- Using Reports Home Page
- Using Report Folders
- Using Report Documents
- Understanding Report Sets
- Working with Report Collection
- How to Set Up a Report Collection?
- Setting Up the General Information in Report Collection
- Using the Reports Tab in Report Collection
- Using the Setting Tab in Report Collection
- Using the Distribution Tab in Report Collection
- Report Collection Best Practices
- Report Collection Limitations
- How to Download a Report from the Report Collection?
- Distributing a Report Collection
- How to Use Substitution Variables in Report Collection?
- Report Collection Status Information
- Working with Financial Package
- How to Set Up a Financial Package?
- Using Top Menu Options in the Financial Package
- Using Left Pane Options in the Financial Package
- Using Center Pane Options in the Financial Package
- Using the Status Bar in the Financial Package
- Understanding Financial Package Security and User Types
- How to Build and Run a Financial Package Report?
- Working with Different File Types in Financial Package
- Working with PowerPoint Files in Financial Package
- Working with Excel Files in Financial Package
- Financial Package Best Practices
- Understanding Dynamic Reports
- How to Set Up a Dynamic Report?
- Setting Up Header & Footer in Dynamic Reports
- Setting Up Page, Row, & Column in Dynamic Reports
- Setting up Dimension Members in Dynamic Reports
- Using Dimension Member Pick List in Dynamic Reports
- Locking Dimension Members in Dynamic Reports
- Integrating Dynamic Reports with Financial Package Publisher
- Working with Dynamic Reports
- Formatting a Report at Cell Level
- Using Formulas in a Report
- Using Grid Actions in Dynamic Reports
- Using Other Setting in Dynamic Reports
- Using Drill Through in Dynamic Reports
- How to Set Up Substitution Variables in Dynamic Reports?
- Using Quick Functions in Dynamic Reports
- Making an Attribute Available for Dynamic Reporting
- How to Build and Run a Dynamic Report?
- Example of Building a Dynamic Report
- Enhanced Drill Through in Dynamic Reports
- Drilling Through to Translations and Transactions
- Drilling Through to Planning and Capital Template Data
- How to Drill Through to Template Data?
- Drilling Through Reporting on Preloaded and Forecast Scenarios
- Drilling Through Reporting on Closed Period
- Drilling Through Reporting on WFP Data
- Drilling Through Reporting on GL Data
- Drilling Through Reporting on Consolidation Data
- Viewing Code, Name, or Label in Dynamic Report Drill Through
- Understanding Shared Mode Data in Drill Through
- Viewing Operational Planning Notes in Drill Through Report
- Using Save and Reset Settings in Drill Through Report
- Disabling Drill-Through Functionality
- Understanding Drill Down and Drill Through in Dynamic Reports
- Viewing Template Notes in Dynamic Reports
- Dynamic Commentary in Reports
- Displaying Currency in Dynamic Reports
- Understanding Automatic Data Refresh
- Printing Dynamic Reports
- Exporting Dynamic Reports Output in Unprotected View
- Viewing History from Reports
- Dynamic Reports Use Case
- Dynamic Reports - How Tos
- Dynamic Reports Best Practices
- Reporting Cube Configuration Limitations
- How-tos?
- Workforce Reporting
- Dashboards
- Dashboards User Guide
- Using Dashboards
- Dashboard Designer
- How to Add Dimensions to Each Chart Axis?
- Using Substitution Variables for Chart Titles, SubTitles, and Axis Name
- How to Share a Dashboard?
- How to Upload a Thumbnail?
- How to Define Custom Members on a Chart?
- How to Use a Stacked Column Chart in Combination Charts?
- Dashboard is Supported on iOS Mobile Devices
- Changing the Chart Type
- Adding Tables and Text to a Dashboard
- How to Apply a Percentage Calculation for a Dimension or Dimension Combination?
- How to Alter Default Chart Settings?
- Using Consider Absolute Value Denominator Option for KPI Chart
- Using Dynamic Planning Data in a Dashboard
- Using Dynamic Report Chart in Dashboards
- Using Filters in Dashboards
- Customizing Color Schemes in Dashboard Charts
- How to Build a Workforce Dashboard?
- How To Set Dashboards As Your Homepage?
- Viewing History from Dashboards
- Dashboards Administration Guide
- How to Provide Users with Navigation Access to Dashboards?
- Working with Dashboards Reporting Area
- Understanding Dashboards Dimension Security
- How to Apply Scenario Security in Dashboards?
- How to Copy Budget Entity Security to Report Security?
- Using Substitution Variables in Dashboards
- Pre-Defined Custom Members/Formulas in Dashboards
- Sharing Dashboards
- Differentiating Edit Versus View Access to Dashboards
- Differentiating Dashboards Versus Dynamic Reports
- Validating Dashboard Updates
- Recommended Dashboards Screen Resolution
- Auditing Dashboards
- Best Practices for Dashboards Administration
- Dashboards User Guide
- Planful AI Assistant
- Predict
- Budget Manager Experience
- Maintenance
- Administration
- Managing User & Roles
- Configuring Security Options
- Setting Up Add-In Security
- Setting Up Approval Roles
- Setting Up Consolidation Security from User & Role Management
- Setting Up Data Integration Security
- Setting Up Dimension Security
- Managing Reports Access
- Assigning Scenario Access to a User
- Providing Workforce Reporting Access
- Securing Reports and Data
- Configuring Offline Planning
- User Access/Security Overview
- How-Tos
- Configuring Security Options
- Scenario Setup Overview
- Add Scenario
- How Tos
- How to Delete a Scenario?
- How to Delete a Template from a Locked Scenario?
- How to Copy a Scenario?
- How to Forward a Scenario?
- How to Lock/Unlock a Scenario?
- How to Refresh Closed Period Data?
- How to Refresh Preloaded Data?
- How to Reset a Scenario?
- How to Perform Scenario Maintenance?
- How to Manage User Scenario Access?
- How to Upload a Document to a Scenario?
- How to Export the Seeding Exception Report for a Plan Scenario?
- How to Print the Scenario List?
- How to Update the Scenario Print Settings?
- How to Export the Scenario List in Excel Format?
- How to Remove Closed Periods YTD Data from Forecast Reports?
- How to Roll Forward a Scenario?
- Scenario Locking for Shared Mode Enabled Applications
- Inputting Global Field Values
- Securing Scenarios
- Understanding Security Administration
- Configuration Tasks Overview
- General Financial Configuration
- Configuring Ivy
- Define Capital Budgeting Criteria
- Define Workforce Planning Budgeting Criteria
- Data Integration Configuration
- Define Login Restrictions
- MyPlan Account Mapping
- Define Reporting Areas
- Configuring Consolidation
- Workflow Configuration
- Configuring Planful Predict
- Configuring Workdays Setup
- Cloud Scheduler Overview
- Understanding Job Manager
- Understanding Process Flow
- Understanding Job Manager
- Using Customize Branding
- MyPlan Configuration
- Comments Manager Overview
- What is the difference between Structured Planning and Dynamic Planning?
- Frequently Asked Questions (FAQs)
- Managing User & Roles
- Multi-Currency
- Hierarchy Management Overview
- Hierarchy Management Interface Overview
- Creating and Managing Additional Finance Hierarchies
- Adding Report Categories
- Setting Up Attributes for Attribute Hierarchies
- Understanding Best Practices - Finance Hierarchies
- Understanding Reporting Members and Calculated Members
- Setting Up an Attribute Hierarchy
- Configuring OLAP Cube
- Understanding Example of How to Use Attributes
- Adding Another Level to Your Attribute Hierarchy
- Reflecting New Attribute Levels in Reports
- Setting Up An Attribute Used in Reporting and Enabling Drill Down to Dimension Member
- Mapping and Unmapping Workforce Planning Default Measures for Reporting Purposes
- Understanding Best Practices - Attribute Hierarchies
- Setting Up an Alternate Hierarchy
- Setting Up a Dated Hierarchy
- Entity Hierarchy Overview
- Sibling Hierarchies - Multiple Set of Books Overview
- Versioned Hierarchy Management in Dynamic Planning
- Exploring Additional Hierarchy Topics
- How-Tos
- Exploring the Frequently Asked Questions (FAQs) for Hierarchies
- Planning Templates Overview
- Using Global Fields
- Adding Attributes
- Line Item Category Overview
- Template Setup Overview
- Template List Overview
- Adding Template Overview
- Designing Templates
- Understanding Mapping Options on the Template List Page
- Setting Up Spreads
- Planning Template Design Best Practices
- How-Tos
- Template List Overview
- Workforce Overview
- Workforce Planning Setup Overview
- Employees Overview
- How-Tos
- Adding a Profile Picture to Employee Profile
- Managing Employee Information Using the Reports Option
- Applying Mass Updates to Employees
- Using Customize Roster to Add Compensation Items
- Changing Budget Raise Percentage
- Employee Positions Outside of the Current Budget Cycle
- Automated Employee Processing
- Performance Statistics of Employee Page or Employees Tab
- Calculating Budget Review Date and Current Review Date
- Pop-up Message Introduced across all the windows in Workforce Planning Setup
- Copying the Employees from One Scenario to Another
- Exploring Use Cases on How to Update Several Employees at Once
- Creating a Duplicate Employee
- How-Tos
- Compensation Groups Overview
- Compensation Items Overview
- Compensation Basis Overview
- Understanding of Wages
- Understanding of Wages with Annual Cap
- Understanding Fixed Amount
- Understanding Fixed Amount per FTE
- Understanding Fixed Amount based on Employee Attribute
- Understanding Tiers on Employee Attribute - Value in Wages
- Understanding Profit Sharing Setup Example with Multiple Caps And Different Percentages
- Understanding Marginal Benefit Calculation Setup Examples
- Understanding Situations When You Can't Edit a Compensation Item
- Understanding Pre-built Calculation Basis
- Understanding the Link to Global Fields Option
- How-Tos
- How to View the Compensation Items in a Workforce Planning Budget Report?
- How to Set Up 401K Match?
- How to Copy all Compensation Items and Rates from One Scenario to Another?
- How to Input Data Using the Direct Data Input Compensation Item?
- How to Lock Compensation Items to Prevent Modification?
- How Changes to Compensation Items Affect Running Scenarios?
- How to Select Compensation Items for Calculating Wages?
- How to Update Compensation Items Loaded via a Data Load Rule?
- How to Make the Bonus Expense Calculation Variable?
- Compensation Basis Overview
- Employee Types Overview
- Pay Plans Overview
- Workforce Attributes Overview
- Employees Overview
- Using Export Employee Data
- Workforce Planning Data Load Rules
- Frequently Asked Questions (FAQs)
- Workforce Planning Setup Overview
- Capital Planning Overview
- Rules
- Data Integration
- Loading Data With Actual Data Templates
- Setting Up Translations
- Guide to Export Data Setup and Export Data
- Setting Up Transaction Details
- DLR
- Creating and Managing Data Load Rules (DLR)
- Data Load Rules - Field Explanation
- Understanding Data Load Rule List
- Understanding New Data Load Rule
- Understanding Select Sample Input File
- Define Overall Rule Settings
- Understanding Load Item - Segment Hierarchies for Define Overall Rule Settings
- Understanding Load Item - Data for Define Overall Rule Settings
- Understanding Load Item - Data for Attributes and Attribute Hierarchies
- Understanding Load Item - Data for Entity Hierarchies
- Understanding Load Item - Data for User Load
- Understanding Load Item - Data for Workforce Planning
- Understanding Load Item - Data for Currency Exchange Rates
- Understanding Manipulate Input File
- Understanding Define Data Mappings
- Understanding Load Data
- Processing of Data Load Rules - Scenario Locking
- Converting a DLR Type
- How to Add an Integration Service Process?
- Understanding Clear Data
- How to Clear Data in Finance?
- Workforce - Clear Data
- How to Clear Data for Specified Time Periods?
- How to Preview Data for Specified Time Periods?
- How to Export Data for Specified Time Periods?
- How to Preview Data for Specified Home Budget Entity?
- How to Export Data for Specified Home Budget Entity?
- How to Preview Data for Specified Segment Combination?
- How to Delete Data Using the Specified Segment Combination?
- How to Preview Data for Specified Employee and Position?
- How to Delete Data Using the Specified Employee and Position?
- How to Export Data Using the Specified Employee and Position?
- How to Load Zeros Through Data Load Rules to Reflect in a Template?
- Using Data Calculation Exceptions
- Additional Topics
- API Library
- Data Import
- Data Export
- API Compliance
- Client Application Platforms
- API Access Keys
- API Calls - Overview
- Objects
- Platform SOAP APIs
- Login API
- GetSessionId API
- GetVersion API
- GetAllCurrencies API
- GetAllCurrencyTypes API
- Logout API
- User Management
- Dimension Security Update API
- Structured Planning APIs
- Reports SOAP APIs
- Best Practices and Tips
- Enumerations
- Planful API Library
- Report Administration
- Using Application Audit
- Administration
- Release Updates
- 2025 Release Notes
- 2024 Release Notes
- December 2024 Release Notes
- November 2024 Release Notes
- October 2024 Release Notes
- September 2024 Release Notes
- August 2024 Release Notes
- July 2024 Release Notes
- June 2024 Release Notes
- May 2024 Release Notes
- April 2024 Release Notes
- March 2024 Release Notes
- February 2024 Release Notes
- January 2024 Release Notes
- Product Summary 2024
- 2023 Release Notes
- 2022 Release Notes
- 2021 Release Notes
- 2020 Release Notes
- 2019 Release Notes
- 2018 Release Notes
- 2017 Release Notes
- December 17 Maintenance Release
- 2.3.1 Modeling Release Notes, December
- Fall 17 Release Notes
- 2.3 Modeling Release Notes, November
- October 17 Maintenance Release
- 2.2.2 Modeling Release Notes, October
- September 17 Maintenance Release
- Summer 17 Release Notes
- 2.1.2.2 Modeling Release Notes, July/August
- July 17 Release Notes
- 2.1.2 Modeling Release Notes, July
- June 17 Release Notes
- 2.1.1 Modeling Release Notes, June
- Spring 17 Release Notes
- April 17 Release Notes
- 2.0.2 Modeling Release Notes, April
- March 17 Release Notes
- 2.0.1 Modeling Release Notes, March
- Winter 17 Release Notes
- 2.0 Modeling Release Notes, February
- January 17 Release Notes
- 1.9.2 Modeling Release Notes, January
- 2016 Release Notes
- Planning/Consolidation/Reporting December 16 Release Notes
- 1.9.1 Modeling Release Notes, December
- Planning/Consolidation/Reporting Fall 16 Release Notes
- 1.9 Modeling Release Notes, November
- Planning/Consolidation/Reporting October 16 Release Notes
- 1.8.2 Modeling Release Notes, October
- Planning/Consolidation/Reporting September 16 Release Notes
- 1.8.1 Modeling Release Notes, September
- Planning/Consolidation/Reporting Summer 16 Release Notes
- 1.8 Modeling Release Notes, August
- Planning/Consolidation/Reporting July 16 Maintenance Release
- 1.7.2 Modeling Release Notes, July
- Planning/Consolidation/Reporting June 16 Maintenance Release
- 1.7.1 Modeling Release Notes, June
- Planning/Consolidation/Reporting Spring 16 Feature Release
- 1.7 Modeling Release Notes, May
- Planning/Consolidation/Reporting April 16 Maintenance Release
- 1.6.2 Modeling Release Notes, April
- Planning/Consolidation/Reporting March 16 Maintenance Release
- 1.6.1 Modeling Release Notes, March
- Planning/Consolidation/Reporting Winter16 Release
- 1.6 Modeling Release Notes, February
- Planning/Consolidation/Reporting January 16 Maintenance Release
- Enhancements to Application Behavior
- 1.5.2 Modeling Release Notes, January
- Additional Resources
How to Add a Line Item Template Type?
- 5 Minutes to read
- Print
- DarkLight
- PDF
Contents
How to Add a Line Item Template Type?
- 5 Minutes to read
- Print
- DarkLight
- PDF
Article summary
Did you find this summary helpful?
Thank you for your feedback
Complete the following steps to add a Line Item template.
- Navigate to Maintenance > Planning Templates > Template Setup.
- Ensure the selected Scenario is the Default Scenario. Click Add.
- For Template Type, select Line Item Template.
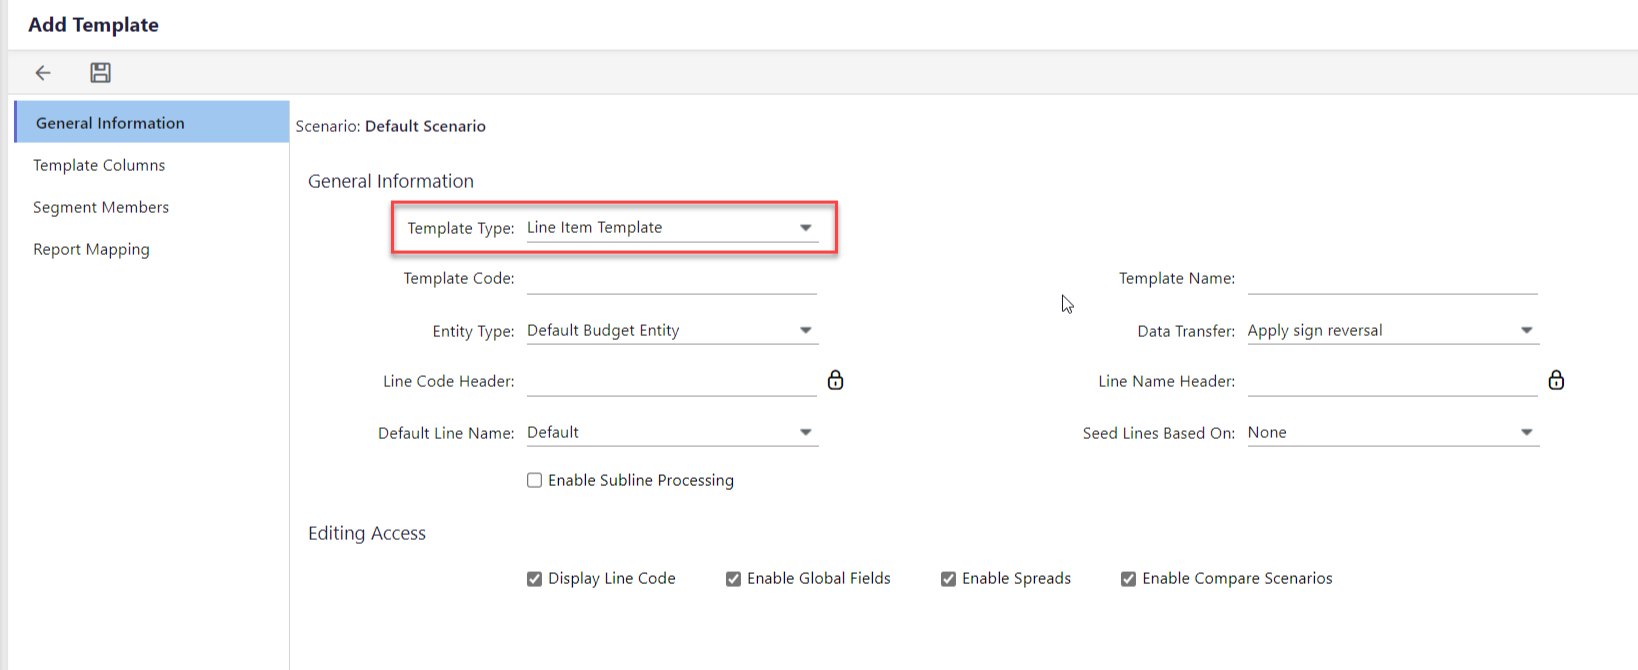
- Enter the Template Code, Template Name and select the Entity Type for the template.
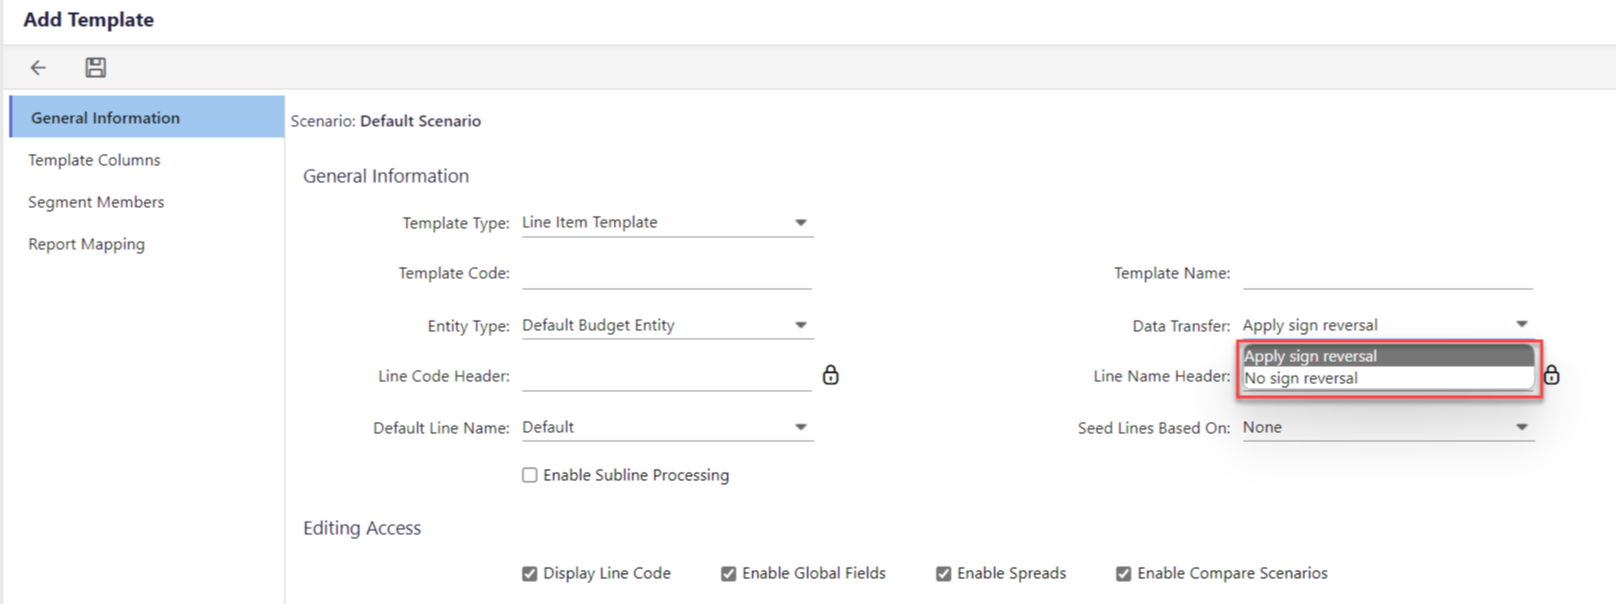
- For Data Transfer select Apply Sign Reversal or No Sign Reversal. This selection works with the Debit/Credit field in the Natural Account segment. Debit accounts typically display data in the same sign as stored in the database. Credit type accounts typically store data in the opposite sign of that stored in the database. Therefore, a credit becomes a debit (or negative) in the database, but is displayed as a positive in reports and during input.
Apply Sign Reversal - Select this option so that credit type accounts are displayed and entered opposite the sign they are stored.
No Sign Reversal - Select this option to display and enter balances as they should be stored in the database.
- Optionally, you can perform the below steps:
- For the Line Code Header and Line Name Header, enter a code to identify the column and a label for columns with line names.
- Customize the Default Line Name. The change will be reflected once the template is opened and closed or processed via the Simulation Engine. For example, an Admin might configure the Line Name column to display account or product name.
- Select Seed Lines Based On checkbox to seed template line data from all scenarios, the compare scenarios selected on the Scenario page, or history periods.
- Select Enable Subline Processing if you want all sublines associated with the template are processed along with the template. For more information, see Template Sublines.
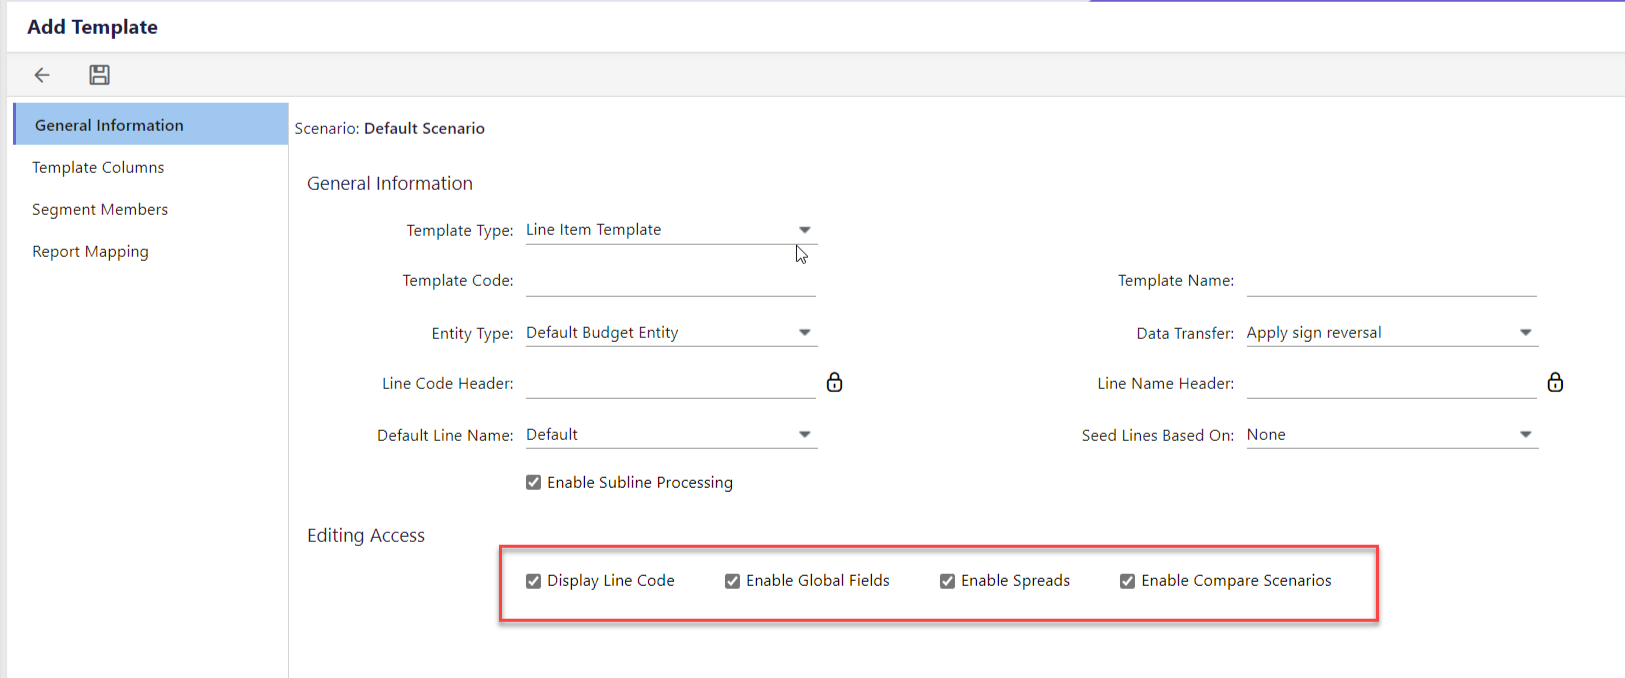
- The checkboxes under the Editing Access section are selected by default. Uncheck if you wish to disable it
- Display Line Code to display a separate column in the template for the line codes.
- Enable Global Fields to allow global fields in the template setup. For more information on Global Fields, see Setting Up and Applying Global Fields to Templates.
- Enable Spreads to allow users to spread data from a total column to period columns, based on the selected spread method. For more information, see Setting Up and Using Spreads in Templates.
- Enable Compare Scenarios to enable the scenario associated with the template to be compared against another scenario, which will appear in a column in the template when opened via the Planning Control Panel. For more information, see Compare Scenarios.
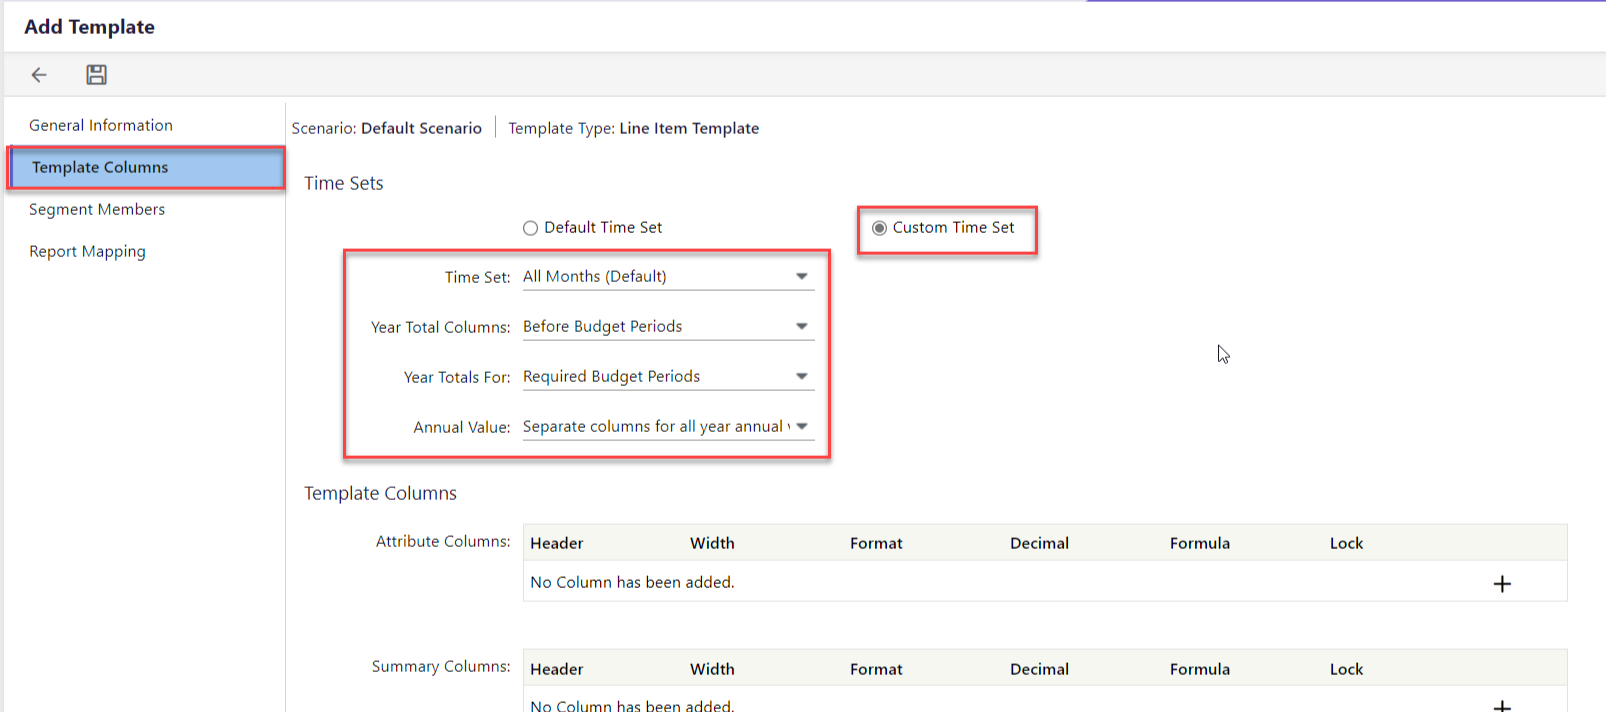
- Once all of the fields on the General Information tab have been updated, select the Template Columns tab. This is where you will configure template column structures such as Time Set and Template Attribute/Summary Columns.
Time Sets-Time Sets allow input at a selected time period frequency in a template for each input year. This flexibility allows you to create templates with accurate operational plans and provide a means for long term strategic planning.- Default Time Set- Planful automatically assumes the default time set of 12 month configuration.
- Custom Time Set- Select Custom Time Set to use any other custom time sets that have been created.
Fields available when Custom Time Set is selected:
- Time Set - Select the time set you want associated with the template. The Time Set options available are those already defined on the Define Time Sets page.
- Year Total Columns - This selection determines the position of the Year Total(s) columns on the template with respect to the Budget Periods.
- Before Budget Periods – Places the Year Total(s) column before all budget periods.
- After Budget Periods - Places the Year Total(s) column after all budget periods.
- By Budget Periods (Before) – Places the Year Total(s) column before the budget periods per time set structure (year, quarter, month).
- By Budget Periods (After) - Places the Year Total(s) column after the budget periods per time set structure (year, quarter, month).
- Year Totals For- Determines the way the Year Total column is produced on the template. The options are:
- Required Budget Periods - Creates a Year Total column with data for periods that don't have year-level budget input.
- All Periods - Creates the Year Total column which contains data for all years.
- Annual Value - Applicable for managing spread values for multi-year scenarios. Select to have separate spread columns for each year annual value or a single spread column for all years.
Note:Time sets are available for Global Template Single Copy, Global Template Entity Copy, Line Item and Allocation template types. - For Attribute Columns, select the number of attribute columns you want to include in the template. This is an optional step. You can add up to 10 attribute columns.
- Header - Enter the column name for the attribute column.
- Width - Specify the column width. You may re-initiate template column widths from the template directly for any template type except for Initiative and Capital templates.
- Format:
- Row Format - Allows for attribute values with varying formats.
- Text – Allows for text characters.
- Number - Allows numerical values to be entered within the template.
- Currency - Applies a currency symbol ($) to the first digit in each cell of the column.
- Percent - Applies a percentage symbol (%) and allows users to enter numbers in a percent format.
- Decimal - Specify the number of decimals.
- Formula - This field is optional. You can apply a formula to the column. The formulas entered here are not adjusted automatically to respective lines when opened from the Planning Control Panel if the formulas contain absolute reference conditions.
- Lock - Select to lock or unlock the attribute column from budget users. Budget users may not enter or edit data in locked attribute columns.
- For Summary Columns, by default, templates display a summary column to show the calculated year-to-date amounts. Up to 5 summary columns may be added to display other information.
- Once complete, click the Segment Members tab. You can set Segment Member Sources for Global Template Single Copy, Global Template Entity Copy, Allocation and Line item templates.
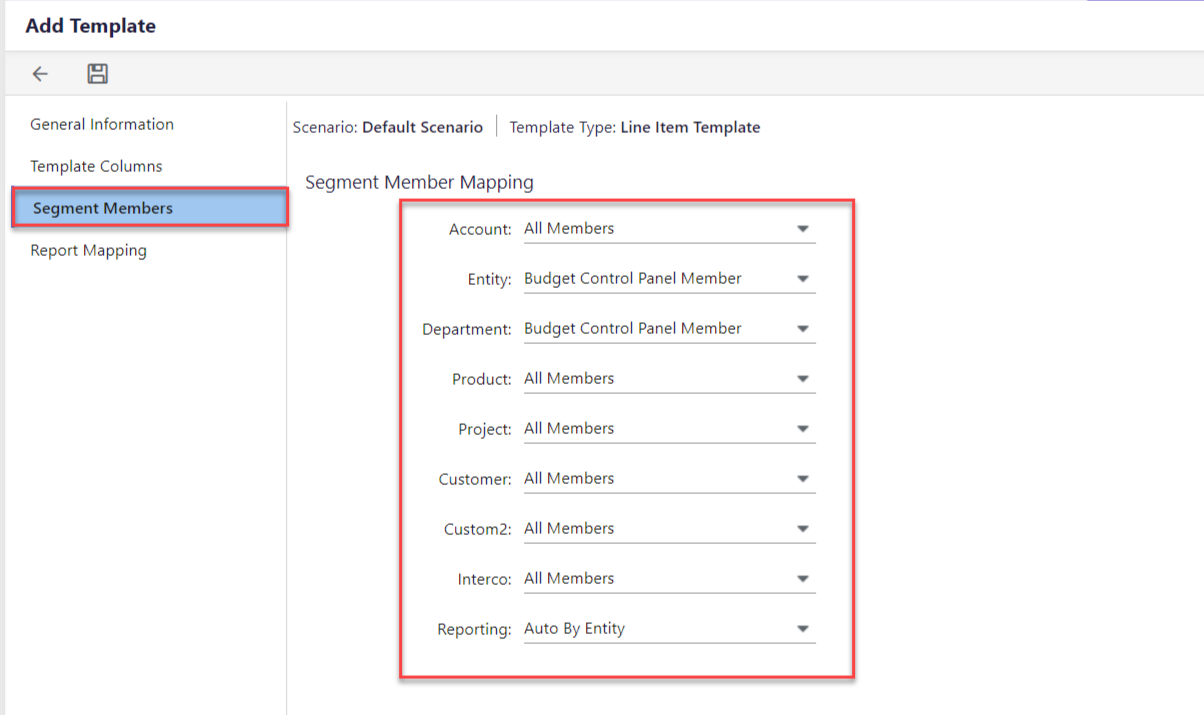
Template rows are then mapped to dimensions at the leaf level members through template parameters. All dimensions must be accounted for when setting the parameters for the template. Source options within Segment Members include:
• All Members in the dimension are available to be defined in the rows
• Fixed Segment Members are a single-member selection
• Filtered Segment Members allows the user to define multiple members
• Budget Control Panel Member is controlled by the budget entity
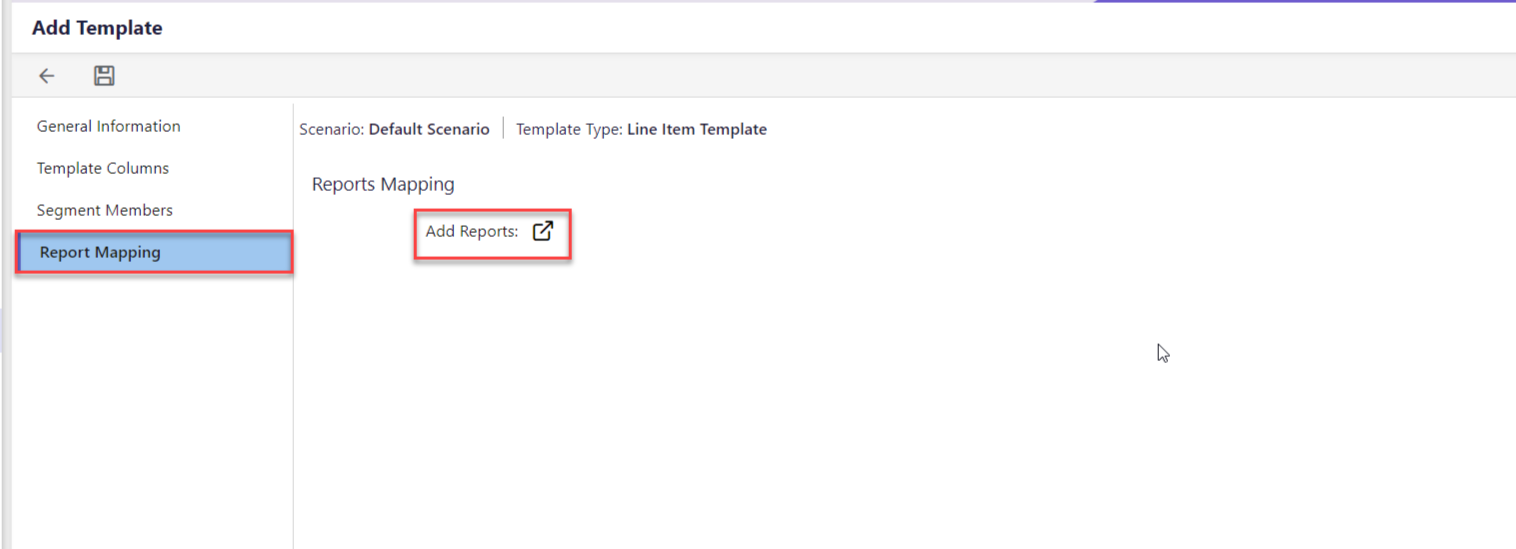
• Allow Destination Account Setup to enable a row with flexibility to override the destination account mappings of the dimensions in the budget entity - Lastly, click the Report Mapping tab if you want reports mapped to templates. This is an optional step.
- Once you have gone through all the tabs to set up and confirm, click Save. Before you can perform Template set up, navigate to Maintenance > Planning Templates > Line Item Category. Complete the set up. For information on how to do so, click here. Once line item category is complete, navigate to Template Setup to set up the template structure such as lines, account mapping, formulas, and formatting. Remember, the template is not complete until Template Setup is done.
Was this article helpful?
Thank you for your feedback! Our team will get back to you
How can we improve this article?
Your feedback
Comment
Comment (Optional)
Character limit : 500
Please enter your comment
Email (Optional)
Email
Please enter a valid email