Managing User & Roles
  • 24 Minutes to read
  • Dark
    Light
  • PDF

Managing User & Roles

  • Dark
    Light
  • PDF

Article summary

The User & Role Management page allows administrators to create users and user groups, assign approval roles, and manage access permissions. This section empowers administrators to seamlessly control roles and permissions, ensuring that users only have access to the areas of the application necessary for their roles, thus maintaining security and operational efficiency.

Key Features for Administrators:

  1. Add Users: This tab allows administrators to add new users to the system.
  2. Create User Groups: This tab allows administrators to group users for easier management and role assignments.
  3. Configure Security: The Security options in both the User and User Group tabs enable administrators to set and manage security configurations, ensuring that access to sensitive areas is restricted appropriately.
  4. Assign Approval Roles: The Approval Role Setup allows administrators to assign specific approval roles, tailoring permissions based on user responsibilities.
  5. Define Navigation Roles: The Navigation Role tab enables administrators to create and assign navigation roles, controlling which areas of the application users can access.
  6. Model Permissions: This tab allows power users to map/unmap the model permissions and update the security permissions to the dimension members.

Navigate to Maintenance > Administration > User & Role Management.

Now, let's explore all the options available on User & Role Management.

User

The User tab displays all users and provides functionality to add, edit, delete, and copy user permissions, providing access to application pages and other user actions. It also ensures data security and maintains Planful users.

Admin users will have access to add and maintain Planful users and provide access to application pages and data security for those users.

Add

Adding a new user is essential for managing access and permissions, ensuring users have the right roles and security settings for their tasks.


Adding a new user

To add a new user, follow the steps below:

  1. Navigate to Maintenance > Administration > User & Role Management > User.
  2. Click Add.
    USer(2)
  3. Enter a valid Email address; this will serve as the user's login ID.

  4. Select a User Authentication Mode:
    1. Native — Log in to Planful using the Login page
    2. SSO Provider — Log in to Planful using Single Sign-On (Planful supports all providers who support the SAML 2.0 standard)
    3. Hybrid — Log in to Planful using the Login page, Single Sign-On, or both
  5. Enter the user’s first and last name.
  6. Select the user's Status: Active or Inactive. Users must be active to access Planful.
  7. Assign a Navigation Role to the user. To learn more about the Navigation Role, click here.
  8. Select Regular User or Reporting Administrator for the Reporting Role. A regular user does not have the same access and privileges as a reporting administrator.
    1. Report Administrator - Has Full Control of all artifacts, sub-folders and folders
    2. Regular User - Permissions available for Regular Users is dependent upon the security permissions assigned to the user at the artifact, folder, and sub folder level
  9. Select Regular User or Admin User for the Task Manager Role.
  10. Select Administrator, User, or Budget Manager for the Support Role
    1. Administrator: Selecting this role gives the user access to both the Full Experience and the Budget Manager Experience (BME). Also, when a support administrator clicks the Get Help icon, they can find all help and support-related resources under one header.

    2. User: Selecting this role causes the Budget Manager Experience checkbox to appear. Selecting this checkbox gives the user access to both the Full Experience and the BME. If the checkbox is not selected, the user can only access the Full Experience.
    3. Budget Manager: Selecting this role allows users to access only the Budget Manager Experience (BME). Within BME, the user can access only the artifacts (templates, reports, or dashboards) that finance teams share with them. The user will not have access to any other functions available in the Full Experience. For more information on the capabilities of a Budget Manager, click here.
      Note:
      The number of available Administrator roles is based on your Service Level Agreement (SLA).  
  11. Select Yes if you are adding a Dynamic Planning user. The Dynamic Planning Role drop-down list will be displayed.
    • Select Power User or Contributor User or Reviewer User for the Dynamic Planning Role.
      Note:
      The Contributor and Reviewer user needs to be assigned to a user group in the Dynamic Planning application.
  12. Additionally, configure the following settings to enable or disable specific user access and security features:
    1. Select Background Administrator to disable the user from logging into all Planful applications other than through Web Services. This is useful for a typical user account which is created to perform back-end tasks, such as DLR loads, Cloud Scheduler jobs, etc.
    2. Select Disable Password Expiration Check so that the normal password expiry policy is not applicable for this user. This is useful for a user account created to perform back-end tasks, such as Data Load Rule loads, Cloud Scheduler jobs, etc.
    3. Select Enable Two Step Verification to prompt users to select a method for receiving a verification code (SMS, email, or phone app) that they will use as part of their login process. This will enhance login security for the users. To learn about selecting a two-step verification method, click here.
      Note:
      Two-step verification is applicable only for login through the application web page, for both Native and SSO user accounts. It does not apply to login authentication via Excel Add-in, Offline Planning or web service requests.
    4. Select Enable Web Service Access to allow the user to import data from external sources into the application through Web Services.
    5. Select Enable Post Message to allow the user to post announcements.
  13. Click Save.


Export Options

Exporting user data can be done using two methods: Export to Excel and Print. These options allow you to easily download or print a comprehensive list of user details.

Export to Excel & Print

You can download the list of users using the Export to Excel and Print option.

The exported data will closely resemble the information displayed on the User page, with slight variations. Both options include the following details:

  • User Name & User Email    
  • Security
  • Status    
  • Navigation Role    
  • Reporting Role    
  • User Type
  • Authentication Mode    
  • Support Role    
  • Created Date    
  • Created By    
  • Modified Date    
  • Modified By    
  • Validation Status    
  • Mapped Date    
  • Expiry Date    
  • Last Login Date

Export to Excel

To export the list of users in the application to Excel format, follow the steps below:

  1. Navigate to Maintenance > Administration > User & Role Management > User.
  2. Click Export as Excel.
    USer(2)
  3. Click Ok.
    The data is exported to an Excel sheet.

Print

This option allows you to print the user data list.

  1. Navigate to Maintenance > Administration > User & Role Management > User.
  2. When you click the Print option, you will see the entire user data in the sheet for printing


Edit

Use the edit option to update user roles and properties when there are changes in job responsibilities or access needs.

Editing the user role and properties

To edit a user information, follow the steps below:

  1. Navigate to Maintenance > Administration > User & Role Management > User.
  2. Select the user for whom you want to update details, and then click Edit.

  3. Make the required changes on the Edit User page and then click Save.
Note:
The user Email and Authentication type cannot be modified.


Copy Permissions

The admin can copy an existing (i.e., source) user and all associated permissions and roles to a target user. This is an easy way to give a new user the same permissions as an existing user.

Copying permissions from one user to another

Permissions and roles that can be copied:

  • Approval Role
  • Consolidation security 
  • Data Integration Security
  • Dimension security
  • Report Access
  • Scenario Access
  • Navigation Role
  • User Groups, whereby all user groups the source user belongs to will be copied to the target user
  • Analytics Security
Note:
Copying user permissions and roles overwrites all existing permissions for the target user, so proceed with caution.

To copy user permission from a source user to a target user(s), follow the steps below:

  1. Navigate to Maintenance > Administration > User & Role Management > User.
  2. Select the user whose permissions you want to use as the source user and click Copy Permissions.
  3. On the Copy User Permissions page, select the target user from the User list and click Right Arrow to add them to the Target users list. You can add multiple users to the target list.
    Note:
    • Click Apply Filter to enable the search filter row.
    • To remove the user from the target list, select the user and click Left Arrow.
  4. Once the target user(s) is added to the list, click Save.
    The source user’s permissions and roles are copied to the target user(s).


Delete

Use the delete option to remove a user's access to the application. To delete the user, follow the steps below:

  1. Navigate to Maintenance > Administration > User & Role Management > User.
  2. Select the user you wish to delete and click the Delete icon.
    Delete(3)
  3. Click Delete


Security Configurations

User Setup Required by Module

The table below provides information on user security related tasks available from the User & Role Management page and the module they are related to. These tasks are to be completed for regular and admin users based on the module. Other user security setup is required within the module itself. For example, in Consolidation there is a Security page.


Planning

Consolidation

Reporting

Modeling

Admin Only

Scenario Access

X

X

X

X


Approval Roles

X


Data Integration

X

X

X


X

Report Access


X


Add-In Security

X

(only required if users need access to Offline Planning)


Workforce Reporting Security

X

(only required to secure Workforce Reports if you're using Workforce Planning)


X


To learn more about the security configuration, refer to Security Configuration

Lock User

To prevent a user from signing on to Planful follow the steps below:

  1. Navigate to Maintenance > Administration > User & Role Management > User.
  2. Select a user you wish to lock and click the Security Options.
  3. Select the Lock User checkbox and click OK.
    Note:

    To unlock, select the user, uncheck the Lock User box, and click OK.


Reset Password

Administrators can send a password reset link to the user's registered email address.

Resetting user(s) password.

To send the reset password link for a user or group of users, follow the steps below:

  1. Navigate to Maintenance > Administration > User & Role Management > User.
  2. Select a user for whom you wish to reset the password and click Reset Password.

  3. The Password Reset page appears. You can also select multiple users by clicking the checkboxes.
  4. Click Send.
    The selected user(s) will receive the reset password link via mail at their registered email address.


User Group

The User Group tab is used to add and edit groups of categorized users. If you need to provide a group of users with the same access privileges, it is easier to create a user group and assign group privileges rather than assign privileges to each user one by one.


Add

The add option lets administrators add groups of users, making it easier to assign the same access privileges to multiple users at once by managing them collectively.

Adding a User Group

To add a new user group, follow the steps below:

  1. Navigate to Maintenance > Administration > User & Role Management > User Group.
  2. Click Add.
  3. Enter a descriptive name and code for the User Group.
    Note:
    The group code is unique and cannot be changed once you create the User Group.
  4. Click the Add user name field to add users to this group. Start typing the user name or navigation role, and you can see the users appearing in the drop-down.

    Alternatively, click Browse users to search for all the users. The All Users pop-up will have the list of all users within the application. Select the users you want to add to the user group by clicking the checkbox associated with the user name. Use the search field to search by name or navigation role to find the required user. Click Add once you complete the selection.

    You will return to the Add User Group page where you can see the selected users for the group.
  5. Click Add.

Now, you need to configure the security options for the user group. 

Note:
Once you've created a user group, the access configurations are not automatically applied. By default, the status indicator will be no color, indicating that you need to actively configure the security options for the user group. Head over to the Security Options section article to learn more about Security Options and how you can configure them.


Export Options

Exporting user group data can be done using two methods: Export to Excel and Print. These options allow you to download or print a comprehensive list of user groups easily.

Export as Excel & Print

You can download the list of user groups (using Print and Export options) and the corresponding mapped users (Export Option).

The export options include:

Export as Excel

Using this option you can export the list of user groups and the corresponding mapped users.

  1. Navigate to Maintenance > Administration > User & Role Management > User Group.
  2. Click the Export option.
  3. Click one of the following. 
    1. Export User Groups:When you export the list of user groups, the following information is available in the Excel sheet.
      • User Group Code
      • User Group Name
      • Created Date
      • Created By
      • Modified Date
      • Modified By
    2. Export Mapped Users:This option is used to export the list of users associated with all the user groups displayed in this tab in an Excel sheet. If a user is part of multiple user groups, then the user’s name will repeat in the respective user groups. You can also use the Export User Groups option to export the list of user groups displayed in the User Groups tab. When you export the list of mapped users, the following information is available in the Excel sheet related to each user:
      • User Group Code
      • User Group Name
      • User First Name
      • User Last Name
      • User Email ID
  4. Click OK

Print

This option allows you to print the entire user group List.

The data will be identical to what is displayed on the User Group tab. To print, follow the steps below:

  1. Navigate to Maintenance > Administration > User & Role Management > User Group.
  2. When you click the print option, the following information is available in the sheet:
  • User Group Code
  • User Group Name
  • Created Date
  • Created By
  • Modified Date
  • Modified By


Edit

Using the edit option, the administrator can modify existing user groups by adding or removing users as needed. This ensures user groups reflect current roles, responsibilities, or organizational changes.

Editing the User Group

To edit the User Group, follow the steps below:

Note:
System-defined user groups cannot be modified. This means that you cannot add new members or remove existing ones from this group, but you can still configure the security options.

  1. Navigate to Maintenance > Administration > User & Role Management > User Group.
  2. Select the user group you wish to edit and click the edit icon. The Edit User Group appears.
  3. Make the required changes and click Save. Edit the security options if required.
    Note:
    You cannot modify the group code.


Delete

Administrators can delete the user group when it is no longer needed.

Deleting the User Group

To delete the user group, follow the steps below:

  1. Navigate to Maintenance > Administration > User & Role Management > User Group.
  2. Select the user group you wish to delete and click the delete icon.
Note:
Before deleting a user group, administrators must unmap all security configurations associated with the selected user group.


Security Options

Security options refer to settings or configurations that control access, permissions, and security-related aspects for users within those groups.

Security Options

The Status Indicators of security icons to assess the level of configurations for each user group. 

When you hover over the security options icon, you can interpret the status as follows: 

  • No color: Indicates that no access has been configured
  • Red: Indicates that the access has been configured for a few areas
  • Green: Indicates that the access has been configured for all areas
Note:
After creating a user group the status icon reflects no color until you have set the group configuration settings.

Additionally, when you click the security options icon, you can determine the configuration status of each area by the associated indicators. There are two statuses: Configured and Not configured. A green checkmark indicates that the configuration is complete, while the red exclamation point indicates the areas are yet to be configured.

You can start configuring these settings by selecting the security options icon in two ways:

  1. Navigate to Maintenance > Administration > User & Role Management > User Group.
  2. Select the user group and click directly on the security options icon within the user group's Security column. (or)

    Select the user group and click the security options icon in the menu.
  3. You can configure the following areas for user groups:
    • Add-In-Security - Setting up add-in security is important when using Planful Offline Planning, which is an Excel planning tool that allows you to download and perform budgeting tasks while not connected to the application. To learn more about Add-In-Security, click here.
    • Data Integration Security - Data integration security is comprised primarily of Data Load Rules. A Data Load Rule tells the system how to handle data values in the data source during a data load. To learn more about Data Integration Security, click here.
    • Report Access - To provide users and user groups with access to generated reports, each user or user group must be assigned access privileges. Any user with access to User & Role Management can update Report Access for a user, user group, or artifact. To learn more, click here.
    • Scenario Access - To provide users and user groups access to a scenario, each user or user group must be assigned access privileges. To learn more about Scenario Access, click here.
    • Workforce Reporting Security - Workforce Reporting enables structured, ad hoc analysis of workforce planning dimensions and measures. Workforce Reporting is integrated into the application as a Reporting Area, allowing you to report on employee-specific compensation and other financial dimensions. To learn more about Workforce Reporting Access, click here.


Navigation roles in the Planful application determine the specific navigation paths that grant users access to certain pages and their associated functionalities. By assigning navigation roles, the application ensures that users have appropriate access levels and enhances the overall user experience.

The admin user can create a Navigation Role and assign Navigation Access to a specific Navigation Role. Then the Navigation Role can be assigned to users. This ensures users can only access the designated paths based on their assigned roles.

Navigation: Maintenance > Administration > User & Role Management > Navigation Role

Add

A Navigation Role defines a unique role that helps customize user access within the system.

Adding Navigation Role

To create a new Navigation Role, follow the steps below:

  1. Navigate to Maintenance > Administration > User & Role Management > Navigation Role.
  2. Click Add.
    Add- Naigation Role
  3. Enter a code and name for the navigation role.
  4. Click Save.

Refer to the Navigation Access section below to understand how to assign Navigation Access to a Navigation Role. Once assigned, you can link the Navigation Role to a user during the process of adding or editing the user.


Edit

To edit the Navigation Role, follow the steps below:

  1. Navigate to Maintenance > Administration > User & Role Management > Navigation Role.
  2. Select the navigation role from the list and click the Edit icon.
  3. Make the required changes on the Edit Navigation Role page and then click Save.

Delete

To delete a Navigation Role, follow the steps below:

Note:
If the Navigation Role is assigned to a user(s), you must remove the assignments to delete the selected Navigation Role.


  1. Navigate to Maintenance > Administration > User & Role Management > Navigation Role.
  2. Select the Navigation Role you wish to delete and click the Delete icon.
  3. Click Delete.

Navigation Access

Administrators can assign specific navigation paths to designated roles to manage user access within the application. This ensures that users within those roles can access only the appropriate sections of the system.

Assigning Navigation Access

The admin user can assign the Navigation Access to a specific Navigation Role. To assign the Navigation Access, follow the steps below:

  1. Navigate to Maintenance > Administration > User & Role Management > Navigation Role.
  2. Select the specific Navigation Role to which you want to assign Navigation Access and click Navigation Access.
  3. Use the hierarchy structure to expand and collapse navigation options. Click the checkbox next to the navigation option to allow access to the path.
  4. Click Save.
    Note:
    You can select different Navigation Role from the drop-down list, and assign Navigation Access.


Apply Filter

Use the filter option to narrow the list to match your search criteria.

Applying Filter

This option is used to filter the Navigation Role from the list.

  1. Click Apply Filter.

    A search filter row appears.
  2. Enter your search keyword in any of the search filter columns. The system will filter and display the data that matches your specified criteria.
    Note:
    Click Clear Filter to hide the search filter option.


Export Options

The Export option for the Navigation Role area helps the administrators export the summary and detailed navigation reports.

Export to Excel & Print

Export to Excel:

The Export option for the Navigation Role area helps the administrators to export the summary report and the detailed navigation report.

To export the summary report and the detailed navigation report, follow the steps below:

  1. Navigate to Maintenance > Administration > User & Role Management > Navigation Role.
  2. Click the Export to Excel icon.
  3. From the drop-down click Download Summary Report or Download Detailed Report
    • Download Summary Report: The summary report provides a condensed view of navigation roles. This report includes the list of navigation roles, including role code, name, creation and modification details, and whether they are predefined or custom-created. 
    • Download Detailed Report: The detailed report offers comprehensive navigation role information and access details for different users, highlighting specific permissions and access levels with Yes or No indicators.
  4. Click OK.

Print:

This option allows you to print the Navigation role list.

  1. Navigate to Maintenance > Administration > User & Role Management > Navigation Role.
  2. When you click the Print option, you will see the entire navigation role list in the sheet for printing.


Approval Role

The Approval Role tab is used to create and configure roles with specific actions for users. Approval roles specify the actions that users can perform during the budgeting process.

For example, you can assign a budget manager with an approval role to approve certain budgets. Approval roles can have varying levels of user responsibility for budget entities. For example, a user has access to two entities (A and B), but has HR responsibility for entity B only. You can then restrict the user to view only specific data based on HR access for the approval role assigned to the entity.

Example of a Typical Approval Role Configuration

The following shows a typical Approval Role setup for a Budget Administrator and a Regular Budget User.

Approval RoleAccess Permissions for BudgetsApproval Workflow Access Permissions
Budget Administrator
  • Budget Template (Input, View)
  • Payroll Budget (Input, View)
  • Forward Budget for Approval
  • Send Back Budget
  • Approve Budget
  • Final Approve Budget
Budget User
  • Budget Template (Input, View)
  • Budget Input
  • Forward Budget

Business Value:

You can create approval roles for users to ensure clarity, alignment, and accountability within an organization and improve the regular functioning of the business.

The grid displays the following information:

  • Approval Role Code: Displays the unique code to identify an approval role
  • Approval Role Name: Shows the name by which you can identify an approval role
  • Created Date: Indicates displays the date and time when an approval role was created
  • Created By: Displays the user’s name who created the approval role
  • Modified Date: Indicates the date and time when an existing approval role was last modified
  • Modified By: Displays the user’s name who had made the last changes to an existing approval role
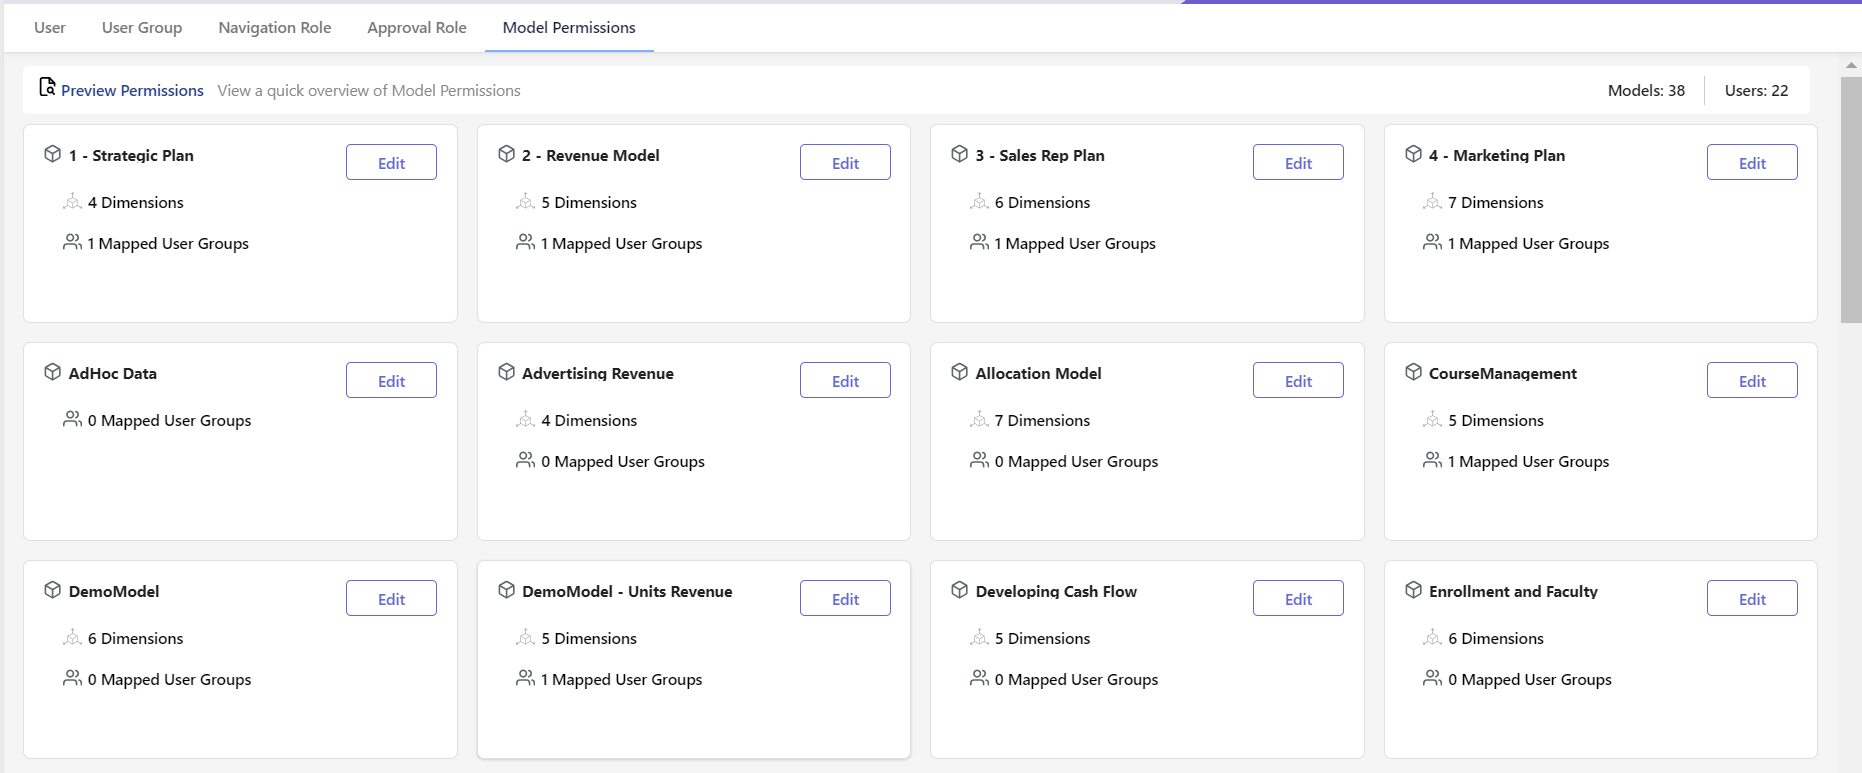
Add

To define approval actions for users, administrators can create new Approval Roles, ensuring users have the appropriate access to entity and template workflows.

Adding a New Approval Role

This option allows to create a new Approval Role. 

To create a new Approval Role, follow the steps below:

  1. Navigate to Maintenance > Administration > User & Role Management > Approval Role.
  2. Click Add.
  3. Enter a Code and Name (optional) for the Approval Role.
  4. Select the required Approval Actions for the new Approval Role from the drop-down to access entity actions.

    The list of approval actions is explained below:
    • Forward: This option allows you to forward the budget entities that contain budgets for approval. You can forward budgets when the current status of the budget entity is In Progress. Forwarded budgets are locked to ensure that they are not editable
    • Approve: This option allows you to approve forwarded budgets
    • Final Approve: This option allows you to flag all budgets with a Final Approval status. Final-approved budgets are locked and cannot be edited by users or administrators
    • Workflow History: This option allows you to view the complete workflow history of a budget which includes the action, action date, user name, and comment
      Note:
      The selected Approval Actions appear in the Entity Workflow section (Actions menu on the right pane) of the Planning Control Panel only when the approval role is assigned to the user. To view the Entity Workflow actions, select either a roll-up or leaf-level entity.
  5. Select the required template actions from the Operating Budget Template Actions section for all the required templates for the approval role.
    Note:
    The availability of the template actions depends on whether the Workflow Setup is enabled or disabled in your application.
    • If the Workflow setup is enabled, you can see All, Input, View, Forward, and Approve
    • If the workflow setup is not enabled, you can see All, Input, View, and Mark Complete
    The list of budget template actions is explained below:
    • All: Allow the approval role to perform all template actions
    • Input: Allow the approval role to open budget templates in Input mode and to enter data
    • View: Allow the approval role to open budget templates in Read Only mode
    • Forward: Allow users to forward a template for approval once they input all the required information 
    • Approve: To allow the approval role to access the Approve action in the Planning Control Panel and approve forwarded budgets 
    • Mark Complete: Allow the approval role to mark templates Complete. Once a template is complete, it cannot be opened in Input mode until marked Not Complete
      Note:
      The above actions can be performed only when you select the leaf-level entity under the roll-up on the Planning Control Plan page.
      Note
      When you add templates to a budget model, update security roles to provide the appropriate access privileges.
  6. Select the required Initiative Approval Actions to allow budget users to perform workflow actions on Initiative budgets.

    The list of initiative approval actions is explained below:
    • All: Allow the approval role to perform all initiative template actions
    • Forward: Allow the approval role to forward selected initiatives
    • Send Back: Allow the approval role to send back forwarded initiatives
    • Approve: Allow the approval role to approve initiatives
    • Reset: Allow the approval role to reset initiatives to a status of Work in Progress. All initiatives can be reset even if they are approved
  7. Click Save.


Edit

This option is used to edit the approval role.

  1. Navigate to Maintenance > Administration > User & Role Management > Approval Role.
  2. Select the required Approval Role and click Edit.
  3. Make the required changes on the Edit Approval Page and then click Save.


Delete

This option is used to delete the approval role.

  1. Navigate to Maintenance > Administration > User & Role Management > Approval Role.
  2. Select the required approval role you wish to delete and click Delete.


Apply Filter

Use the filter option to narrow the list to match your search criteria.

Applying Filter

This option is used to filter the approval role.

  1. Navigate to Maintenance > Administration > User & Role Management > Approval Role.
  2. Click Apply Filter to make the search filter row visible.
    A search filter row appears.
  3. Enter your search keyword in any of the search filter columns. The system will filter and display the data that matches your specified criteria.
Note:
Click Clear Filter to hide the search filter option.


Export Options

The Export options for the Approval Role help the administrator export the list of approval roles.

Export to Excel and Print

You can download the list of approval roles data using the Export to Excel and Print option. The exported data will be identical to what is displayed on the Approval Role page and both options include the following details:

  • Approval Role Code
  • Approval Role
  • Created Date
  • Created By
  • Modified Date
  • Modified By

Export to Excel

This option allows you to export the list of approval roles created in the Excel format.

  1. Navigate to Maintenance > Administration > User & Role Management > Approval Role.
  2. Click Export to Excel.
  3. Click Ok. The data is exported to an Excel sheet.

Print

This option allows you to print the list of approval roles.

  • When you click the Print option, you will see the entire approval data in the sheet for printing.


Model Permissions

The Model Permissions tab displays the list of existing Model Permissions and allows the power user to map/unmap user groups to the model. Additionally, the power user can secure specific dimension members, ensuring that user groups cannot access those members.

Notes:
  • The Model Permissions tab is only visible to Power users.
  • To assign permissions, navigate to the Add/Edit User section and ensure that Dynamic Planning User is set to Yes and Dynamic Planning Role is set to Power User.

The Model Permissions page displays a list of models along with their details, such as dimensions and associated user groups. There are three types of models available:

  • Analytical Models
  • Direct Access to PCR (DAP) Models 
  • External Source Models (ESM) Models

Power users can grant access to user groups for different models, including their respective dimensions and members. 

You can review permissions for a model and its user group(s) by selecting the model in the Select Model drop-down within the Preview Permissions link.


To define the user permissions for any model, follow the steps below: 

  1. Navigate to Maintenance > Administration > User & Role Management > Model Permissions.
  2. Click Edit on the required model.
  3. Click Map in the User Groups section. The Map User Groups page is displayed.
    Note:
    If the user group(s) are already mapped, skip to step 4.
  4. Select the required user group and click Save. If the list is extensive, utilize the search option to find the necessary user group.
    Once a user group is added to the model, all the related users within the user groups are associated with it. 
  5. When a user group is mapped with the model, you can do the following:
    1. Copy Permissions: Use this option to copy the permissions set of the respective user group to other user groups. Suppose you copy the permissions to a new user group not mapped with the model. In that case, the new user group will be automatically mapped to the model, and the permissions will be applied simultaneously.
      Note: 

      If you copy the permissions to any group that already has a set of defined permissions, then these copied permissions will override the old permissions.

    2. Remove Permissions: Use this option to un-map the related user group.
      Note:
      You cannot define member-level security for ESM and DAP models. The user groups added to ESM will have full permissions on all dimensions of the ESM model. The user groups added to the DAP model will honor the dimension security from the financial model defined in Structured Planning.

  6. In the Configure Security section, you can select the dimension you need from the Secure a Dimension list. The related members are displayed below the list.
    • Select the scenario members from the list that require security restrictions. The user groups will have access only to those members not selected
    • In the Selected Members section, you can view the secured dimension members list. You can also change the security permissions to Selected or Select + All Children from the drop-down
  7. Click Save in the top right corner after you secure the dimensions. The Model Permissions are updated.


Related Articles


Was this article helpful?