Workforce Planning - Classic UI
- 5 Minutes to read
- Print
- DarkLight
- PDF
Workforce Planning - Classic UI
- 5 Minutes to read
- Print
- DarkLight
- PDF
Article summary
Did you find this summary helpful?
Thank you for your feedback
This template type is used to set up employees by planning entity, set up allocations, employee positions and salary calculations. An example of a Workforce template is shown below.

When you open a Workforce template in Input mode, the template appears with several options in the top ribbon. Here is an explanation for option in the ribbon.
- Publish Employees - Clicking this option makes employees available for reporting purposes. If you edit or add employees, for example, you'll need to click Publish Employees to commit the changes to the reporting cube so that the information is available for Dynamic Reporting.
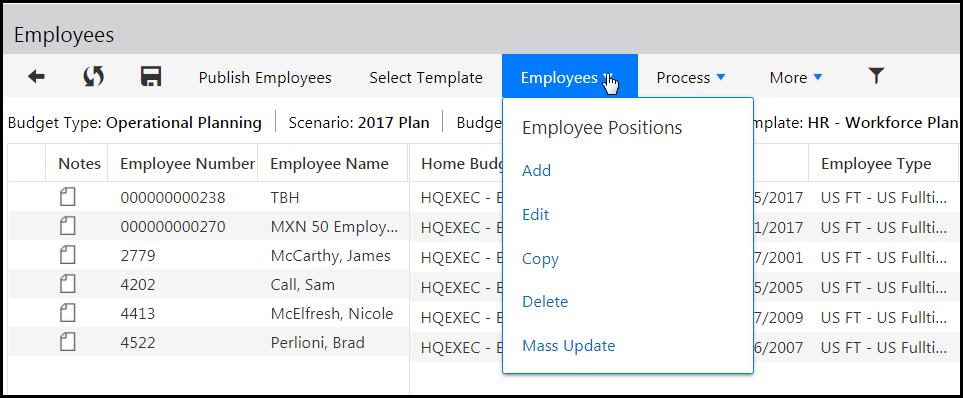
- Employees - Add, edit and delete employees. Fields may be edited directly on this page by clicking the cell in the grid; Salary Class, Rate, Hour, Annualized, Employee Edit, etc. Use Mass Update to update several employees at once.
- Process - Employees are automatically processed when employee data is updated from the Employee list page (shown above), the Add and Edit pages as well as the Mass Update page.
- More - Provides budget entity and template approval actions without returning to the Planning Control Panel, view notes and documents, and run reports.
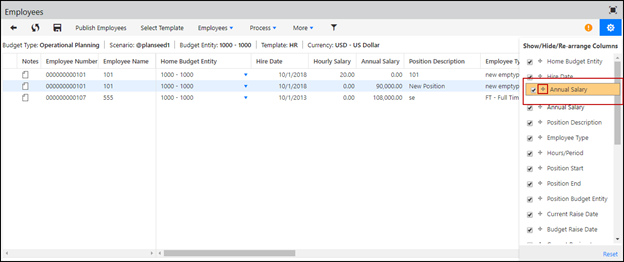
- Settings icon - Personalize the Employees list page. Rearrange or hide columns and it auto-saved as your default view.
End users can view and edit the adjusted annual salary of an employee by following these steps:
- Open an Workforce template from the Planning Control Panel.
- Click Employees, and then select Add or Edit. From the Review Type drop-down list, select Single or Multiple.
If you select Single, follow these steps:- Select Budget Raise Date, Budget Review, and then enter the Budget Raise Percent/Amount.
- In the Adjusted Annual Salary field, select the year from the drop-down list. The Adjusted Annual Salary value is displayed for the selected year.
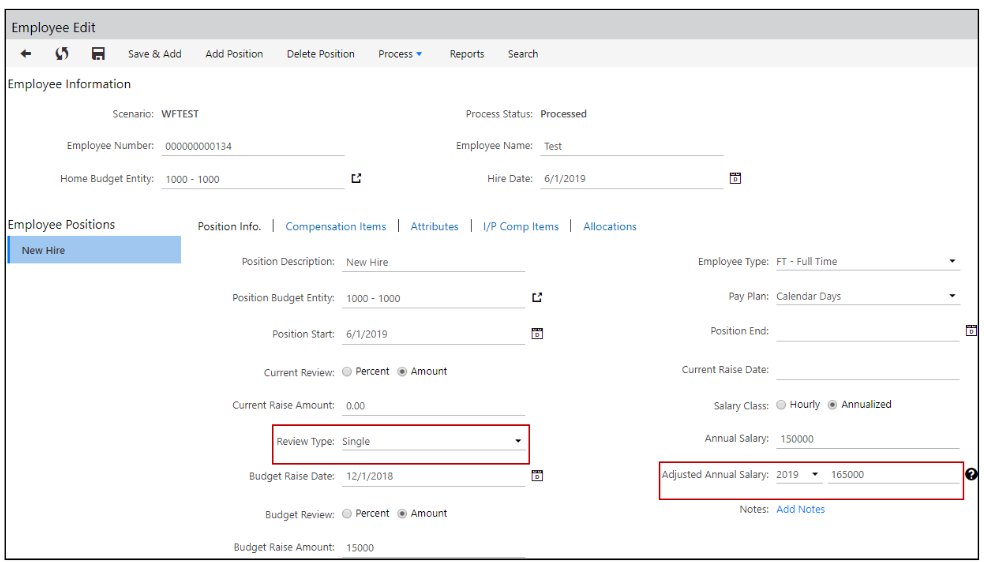
- Click the Save icon or click Save & Add.
- If you select Multiple, follow these steps:
- Select Budget Review as either Percent or Amount.
- In the Budget Raise table, specify the budget raise date and Budget Raise Percent/Amount.Tip!
You can add and delete raise dates and percentages/amounts by clicking the Add or Delete icons.
- In the Adjusted Annual Salary field, select the year from the drop-down list. The latest Adjusted Annual Salary value is displayed for the selected year.
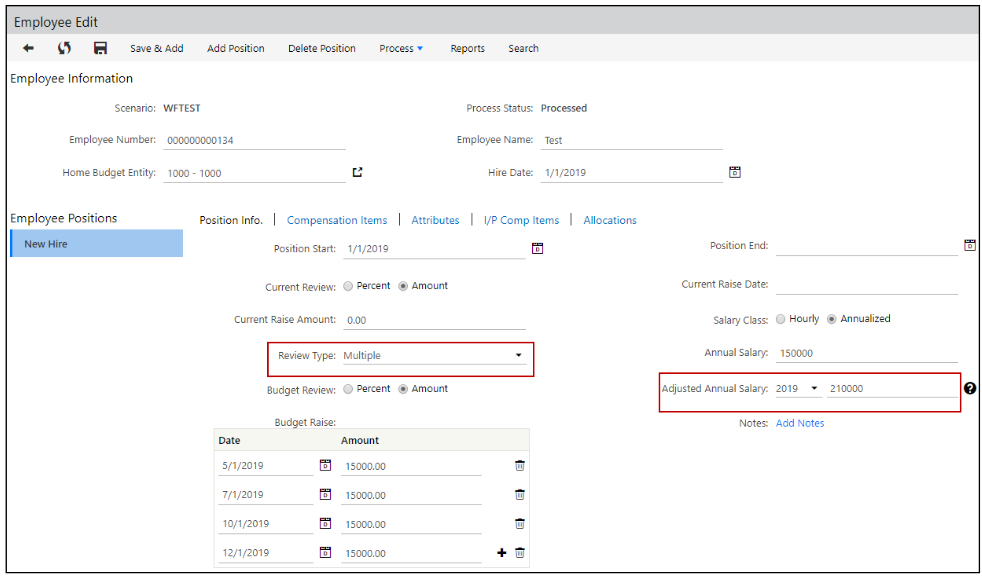
- Click the Save icon or click Save & Add.


How to Adjust An Employees' Annual Salary With Examples?
End users can view the adjusted annual salary from the Adjusted Annual Salary column on the Employees list page. Access the Employees list page by opening an Workforce Template from the Planning Control Panel. The latest Adjusted Annual Salary value is displayed for the selected year. You can change the year and view the updated Adjusted Annual Salary for the selected year.

Note:
When employee details are updated/loaded from Data Load Rules (DLRs), you must process all the employee to ensure that the updated Annual Adjusted Salary values are displayed.
Example 1: Annual Salary Calculation with Review Type as Single
The following example displays the budget raise of an employee in amount. The Review Type is selected as Single, so the budget raise occurs once in a year. In this case, the value in the Adjusted Annual Salary column is displayed for the selected year.
| Period | Annual Salary | Budget Raise (Percent) | Budget Raise (Amount) | Adjusted Annual Salary |
| Year 2018 | 150,000 | 10% | 15,000 | 165,000 |
| Year 2019 | 165,000 | 9.09% | 15,000 | 180,000 |
| Year 2020 | 179,998.5 | 8.33% | 15,000 | 195,000 |
| Year 2021 | 194,992.38 | 7.69% | 15,000 | 210.000 |
Example 2: Annual Salary Calculation with Review Type as Multiple
The following example displays the budget raise of an employee in percentage and amount for the same fiscal year. The Review Type is selected as Multiple, so the budget raise occurs multiple times in the same year (2019). In this case, the latest adjusted annual salary for 2019 is 210,000 and it is displayed in the Adjusted Annual Salary column.
| Period | Annual Salary | Budget Raise (Percent) | Budget Raise (Amount) | Adjusted Annual Salary |
| May 2019 | 150,000 | 10% | 15,000 | 165,000 |
| July 2019 | 165,000 | 9.09% | 15,000 | 180,000 |
| Oct 2019 | 180,000 | 8.33% | 15,000 | 195,000 |
| Dec 2019 | 195,000 | 7.69% | 15,000 | 210.000 |
Export of Employees Page to Excel
On the Employees page (accessed from the Planning Control Panel), from the More list, select Export as Excel.

This exports the list of employees to an Excel spreadsheet. Open the spreadsheet; the Adjusted Annual Salary details are displayed for each employee.

How to Setup an Employee Who Belongs to a US Entity But is Temporarily Working for A EU Entity
Within Workforce Planning, each employee has a Home Budget Entity and a Position Budget Entity. Allocations are always tied to the Position Budget Entity.
Identify the employee within the Home Budget Entity of US, and save the Position Budget Entity as EU within the Employee Edit screen. Now the employee expenses will be charged to the EU entity.
How to Process Employees?
Automated Employee Processing happens when you perform a Save from the Employee Add or Edit page, the Employee list screen and Mass Update. This means that you don't need to manually process employees when you perform a Save from the aforementioned screens. Once the Save action is selected, the system will process employees that have been added or modified.
Please make sure you “refresh” the screen to see the updated information.
Note:
Scenarios must be in an unlocked state in order to process employees associated with the scenarios. Scenarios can be locked and unlocked from the Scenario List page (accessed by navigating to Maintenance > Admin > Scenario Setup).
How to Copy an Employee?
- From the Workforce template, select an employee by highlighting the line in the template and click Employees, Copy.
- Click OK when the system asks if you want to perform a copy.
- The newly copied employee is displayed in the template and the name is preceded by Copy_.
- Make changes to the copied employee as needed and process.
How to and Why Mass Update Employees?
You can make mass changes to employee details for Workforce Planning. For example, you may have twenty new hires planned for April, but now you decide you want to move ten of those to May. You can select all ten records and make one change, and it will apply to all records.
Effected employee details include:
- Home Budget Entity
- Hire Date
- Position Start Date
- Position End Date
- Employee Type
- Position Budget Entity
How to apply a mass update:
Access the Workforce Planning template from the Planning Control Panel in Input mode.
Select Employees > Mass Update to launch the Mass Update screen.
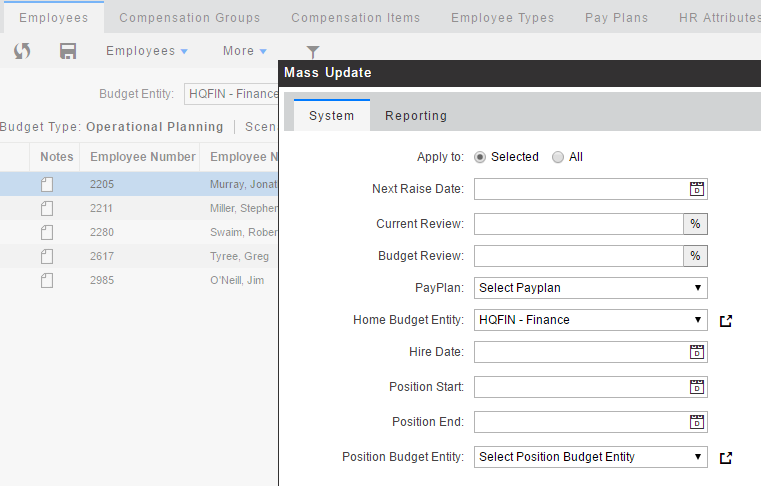
- Make updates to all employees or selected employees only by choosing the Apply to option.
- Makes selections on the System tab and click the Reporting tab to update manager and position information.
- Click Save.


Options Available Under the More list-box
For Budget Entity and Template Approval, see the Workflow topic.
Reports are discussed in the Working with Reports topic.
How to Personalize the Employee List Page?
You can personalize the Employee list page by following these steps:
- From the Planning Control Panel, open an Workforce Planning template.
- On the Employees list page, click the Settings icon. All the column check boxes are selected by default.
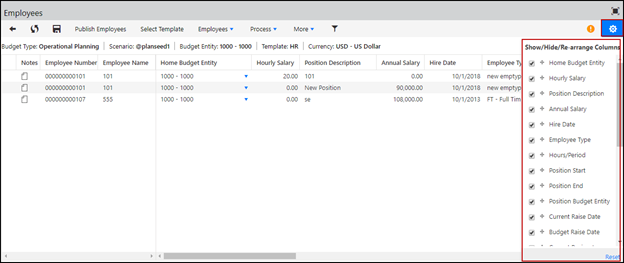
- Unselect the column that you want to hide, and the changes are auto-saved.
- To arrange the columns in a certain order, click the drag indicator and drag the column next to the required column. You can also move the columns on the Employee list page in the required order.
The changes are auto-saved, and this is your default view for the scenario. To export the data in the order that is visible on the screen, click More and then select Export as Excel. - To reset the columns to the default arrangement of your Administrator, click Reset.


Note:
You can uniquely personalize the Employees list page for each scenario to which you have access.
Was this article helpful?