1.8.1 Modeling Release Notes, September
- 12 Minutes to read
- Print
- DarkLight
- PDF
1.8.1 Modeling Release Notes, September
- 12 Minutes to read
- Print
- DarkLight
- PDF
Article summary
Did you find this summary helpful?
Thank you for your feedback
This document describes all the new features and enhancements with this release of Spotlight/SpotlightXL, as well as any known or resolved issues.
New Features and Enhancements
| Features |
|---|
Suppress Rows and/or Columns that are Blank, Zero, or Blank and Zero in Reports |
Suppress Rows and Columns that are Blank, Zero, or Blank and Zero in Reports
You can now opt to "suppress" blank, zero or both blank and zero rows and columns when displaying reports. If you choose to suppress rows and columns then the rows and columns will be hidden when users are running the reports.
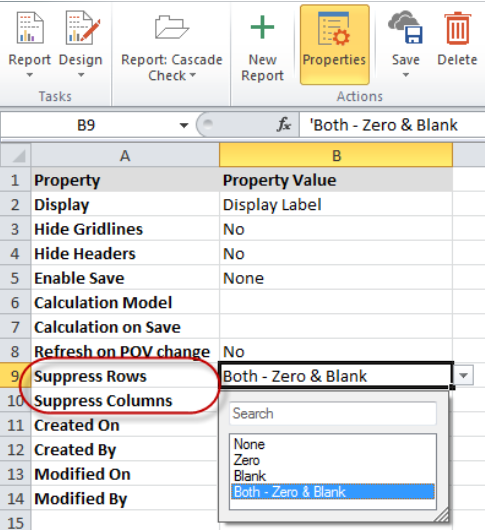
To enable this option, access the Report task and the Design subtask. Select a report and click the Properties action. On the Properties page, select from the following options for the new properties "Suppress Rows" and "Suppress Columns":
None - This is the default. Blank and Zero rows and/or columns will display in the report.
Zero - Rows and/or columns with zero values will be hidden in the report.
Blank - Rows and/or columns that contain no data (blank) will be hidden in the report.
Both - Zero & Blank - Both Blank and Zero rows and/or columns will be hidden in the report.
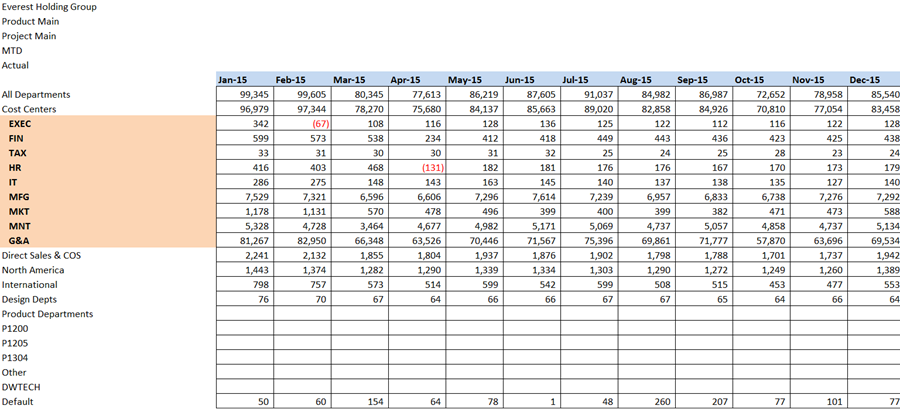
Report Example Where None is Selected for Suppress Blank and Zero Rows and Columns:
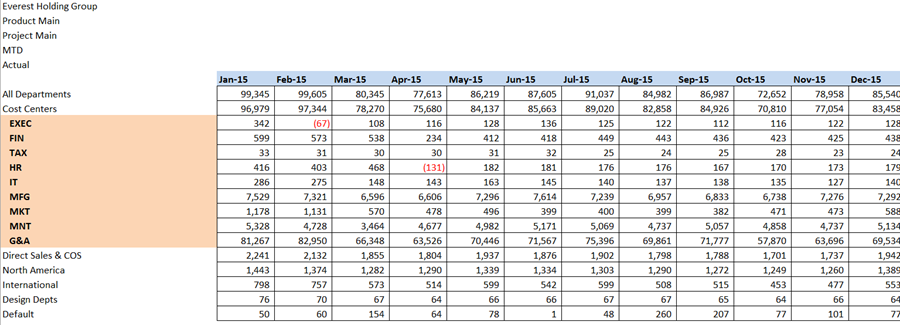
Example of Report Where Suppress Both Zero and Blank Rows and Columns is Selected
Note:
This feature is only available in Spotlight XL, but will be available in Spotlight in the coming releases.
Flexible Options to Save Report Data and Run Calculations
With this release we are introducing additional flexible options when saving a report, which supports two additional use cases:
- Save data for all models available in the report
- Run the calculation without saving the data
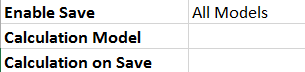
Access the Report task and the Design subtask. Click the Properties action. The Enable Save property now allows you to select from 3 options as shown below.
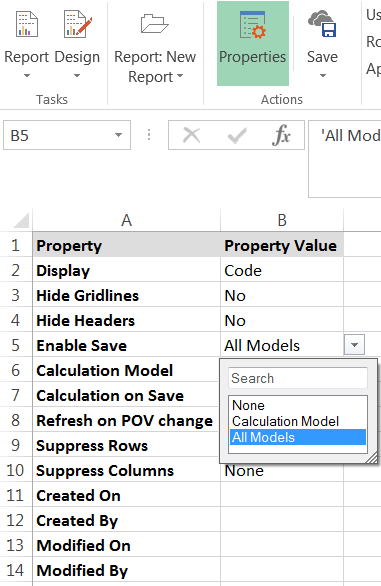
None - This is the default option, when selected no data will be saved.
Calculation Model - This option saves the data of the model where the calculation is running. This means that when you save the report, the calculation is executed automatically as part of the save function.
All Models - This option saves the data for all models available in the report or a specific model in the report.
The table below provides detailed information on results based on possible selections.
| Selections | Image | Results |
|---|---|---|
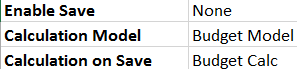
Enable Save = None Calculation Model = None Selected Calculation on Save = None Selected |
| No data is saved. No Calculation is executed. |
Enable Save = None Calculation Model = Model Selected Calculation on Save = Calculation Selected |
| No data is saved. Calculation is executed. |
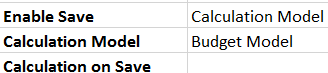
Enable Save = Calculation Model Selected Calculation Model = Model Selected Calculation on Save = None Selected |
| Data saved on Calculation model. No Calculation is executed. |
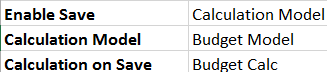
Enable Save = Calculation Model Selected Calculation Model = Model Selected Calculation on Save = Calculation Selected |
| Data saved on Calculation model. Calculation is executed. |
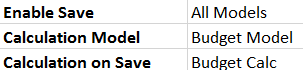
Enable Save = All Models Selected Calculation Model = Model Selected Calculation on Save = Calculation Selected |
| Data is saved on all models. Calculation is executed. |
Enable Save = All Models Calculation Model = None Selected Calculation on Save = None Selected |
| Data is saved on all models. No Calculation is executed. |

Export API
This API allows you to export the leaf level data from a specified model in XML format. Optionally, you can specify one or more filters to export specific data.
POST /modeling /model/data/export HTTP/1.1
Content-Type: application/xml
Accept: application/xml
X-ACCESS-TOKEN: $ACCESS_TOKEN_GUID$
Request Payload
<?xml version="1.0" encoding="UTF-8"?>
<payload>
<model>$ModelNamel</model>
<filters>
<filter>
<dimension>$Dimension</dimension>
<filter-type>$FilterType</filter-type>
<filter-value>$value1</filter-value>
<filter-value>$value2</filter-value>
</filter>
</filters>
<member-display>$MemberDisplay</member-display>
<suppress-zeroes>$SupressZerosFlag</suppress-zeroes>
</payload>
Parameters
$ModelName: (type: string) Name of the model
$Dimension: (type: string) Name of the dimension
$FilterType: (type: string) Dimension filter type, can be FixedMember or MemberAndBelow
$FilterValue: (type: string) Value of the filter
$MemberDisplay (type: string) Optional, can be either Code or Display Label, but defaults to Code
$SupressZerosFlag (type: boolean) Optional, can be either True or False, but defaults to True
Payload Sample
In this sample, 1 filter is defined for each dimension, suppressing zeros is defaulted to True, and members are displayed by Code.
<?xml version="1.0" encoding="UTF-8"?>
<payload>
<model>ExpenseMD</model>
<filters>
<filter>
<dimension>ORG</dimension>
<filter-type>FixedMember</filter-type>
<filter-value>core</filter-value>
</filter>
<filter>
<dimension>accounts</dimension>
<filter-type>FixedMember</filter-type>
<filter-value>motel</filter-value>
</filter>
</filters>
</payload>
Response
Success Response
HTTP/1.1 200/204 OK
Error Responses
Service Not Available (possibly due to maintenance)
HTTP/1.1 503 Service Unavailable
One or more HTTP headers were missing
HTTP/1.1 412 Precondition Failed
Unauthorized Access (access key lookup failed)
HTTP/1.1 401 Unauthorized
Invalid XML (bad request)
HTTP/1.1 400 Bad Request
Not Found (source model not found)
HTTP/1.1 404 Not Found
Organizing Formulas in Folders
We extended the folder structure functionality (currently available in Views, Reports and Calculations) in Spotlight XL to Formulas. With this enhancement Formulas can be organized into folders. By default, the Formulas are organized based on the models in which they were created. This folder structure integration will provide better navigation and searching capabilities.
Access the Model task and the Formula subtask. Click the folder to open the File Cabinet.
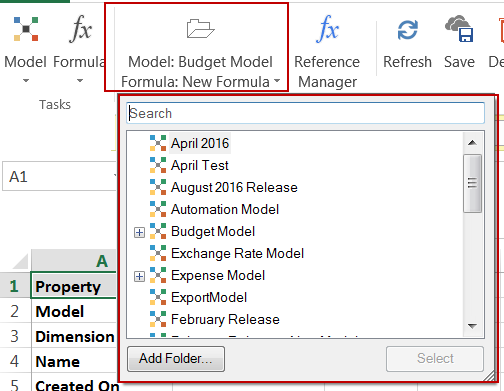
Use the Search functionality at the top of the screen to search for Formulas, then use the up and down arrows to scroll through the results.
Favorites and Recent folders are user specific. The Recent folder displays 10 recently accessed Formulas by user across all Models. The Favorites folder displays 10 Formulas. If you add more than 10 items, the most recent 10 are displayed.
You can add folders, delete and rename folders as well as move Formulas from folder to folder by dragging and dropping.
To add a folder:
Select a model and click Add Folder.
Enter a folder name and click OK.
To delete a folder:
Select the folder.
Make sure there are no Formulas in the folder as you cannot delete a folder that contains Formulas.
Right click and select Delete.
To rename a folder:
Select the folder.
Right-click and select Rename.
Enter the new name of the folder then click OK.
Application Level Dimension Based Locking
Dimension Based Locking has been enhanced so that you can lock dimension members for all views at the application level.
See Also: How to Lock Dimension Members
To lock dimension members across all views at the application level, select the Manage task and the Application Administration, Application Settings subtask. Under the View Property called Dimension based 'Locked', select Application Level (shown below).
Selecting Application Level applies dimension based locking to all Views and related Models in the Modeling application.
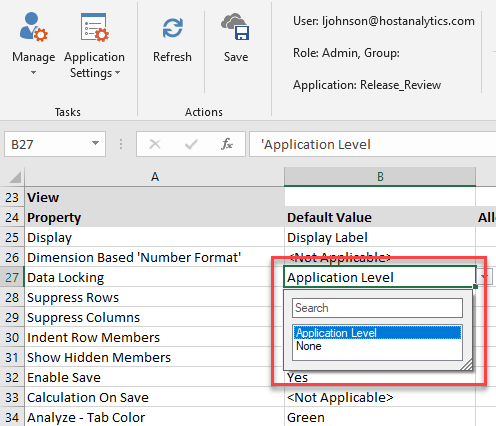
For Dimension based Locked property, select from the following 2 values:
– View Level – This is the default option. With this option admin users must update each view with the dimension on which the locked property is set to Yes. For example, if Locked property on Scenario dimension for ‘Actual’ dimension member is set to ‘Yes’ in the ‘Forecast Model’, then the admin user must update all View properties to ensure that Actual scenario dimension members is locked for input.
– Application Level – This option is globally applicable for all the views and all Models available in the Modeling application. Once an admin user defines the locked property for any dimension in any model, it will be applicable for all Views users access. There is no need for an admin to update each View property to lock the data.
Adding and Deleting Dimensions in a Model
With this release, you can add and/or delete dimensions from a model. When you add or delete dimensions associated with a Model, the modification affects ALL dependent artifacts. For example, if you delete a Company dimension from a Model, not only is the Model modified, but your associated reports and views are modified to reflect the deletion of the Company dimension because views and reports are dependents of the Model.
Note:
It is a best practice to create a staging Model prior to the deletion or addition of dimensions. All leaf level data is moved to the staging model so that you can move this data back to the model you modify once the dimension is deleted or added as the clearing of the model delete the data from the model. Therefore, the following steps provide you with information on creating a staging Model in addition to adding and deleting dimensions.
Creating a Staging Model
Complete the following steps to create a staging model:
- Create the Staging Model
Create a new staging model with the same dimensions as the source model
Create a map of type ‘Both’ to move all metadata and data from the source model to the staging model
Generate the staging model
Clear the source model and make necessary changes (i.e. adding a dimension / deleting a dimension)
Move the data (leaf level only) into the source model from staging model
Create a map of type ‘Data’ to move data from staging model to source model
Create a calculation to generate the source model and move the data from the staging model
Run aggregation or any other calculations as needed to make the source model available for analysis / reporting / modeling
Delete the staging model
Adding a Dimension to a Model
- Click the Modify Model action as shown below. The dimensions associated with the model are displayed.

- Click Add Dimension.
- Enter the name of the dimension you want to add and select whether it is a Value or Key dimension.
- Click OK and then Close the dialog page.
- The added dimension is updated in the Dimension list on the Model Setup page.
- Click Save.
- Access the Model Dimension page and select the newly added dimension for the Model. In the example below, the Company dimension is added. Add members for the Company dimension and then click Save. Also a root member with the name of the dimension is added. You can then add additional dimension members for the Company dimension and click Save.
- Access the Model Map page. Observe the new line for the added dimension. If you select the model with the new dimension as your Source Model, the Source Filter for the new Dimension (Company) is set to DimensionFilter and the Source Value is Company (the name of the root value). The Target Filter is set to None along with the Target Value as shown below. Similarly, if you select the model with the new dimension as your Target Model, the Target Filter is set to Dimension Filter with the Target Value as the root value. The Source Filter is set to None along with the Source Filter Value.

- Return to the Model Setup page and click Generate Model.
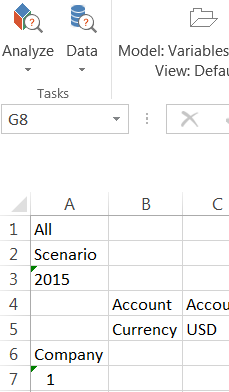
- Access the Analyze Data page. Notice the Company dimension member is now displayed in the Model View.
Note:
Adding a dimension will adjust all dependent artifacts of the model (for example; Map, Formula, Scope, Views, Reports) so that they all become available for usage once the dimension is added, however, it is recommended that an admin user validates the key artifacts and makes the necessary changes if required. Adding a dimension will not make any changes to the Calculations defined on the model. Admin users have to review the calculations and make necessary changes if needed.
Deleting a Dimension From a Model
Note:
You can delete one dimension at a time.
- Click the Modify Model action as shown below. The dimensions associated with the model are displayed.
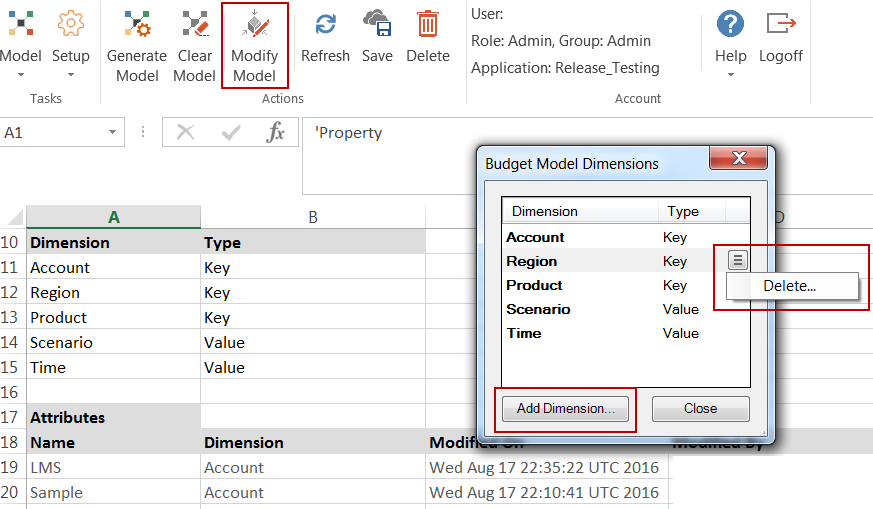
- Delete a selected dimension as shown above.
- When asked if you want to delete the selected item, click Yes
Note:
If there is a formula defined on the dimension that is being deleted then that formula will be deleted when the dimension is deleted. Delete dimension will adjust all dependent artifacts of the model (for example; Map, Formula, Scope, Views, Reports) so that they all become available for usage once the dimension is deleted, however, it is recommended that an admin user validates key artifacts and make necessary changes if needed. Deleting a dimension will not make any changes to the Calculations defined on the model. Admin users have to review the calculations and make necessary changes if needed.
Other Enhancements
Dimension Based Number Format and Locked Properties Enhancement for Views
Dimension based Number Format and Dimension based Locked Properties defined at the View level are now applicable on the page, row or column axis. Access the Properties page by selecting the Analyze task and the Design View subtask. Click the Properties action.
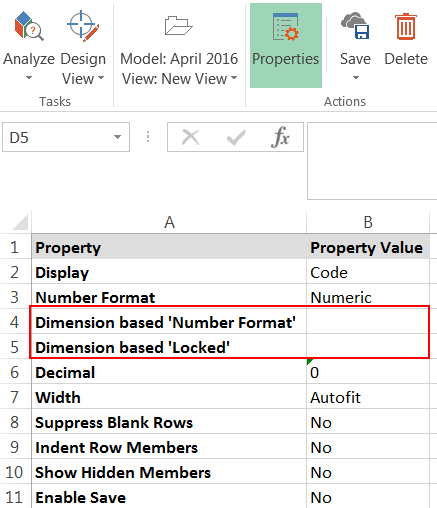
The Page / Filter axis is now supported for both properties defined at the View level.
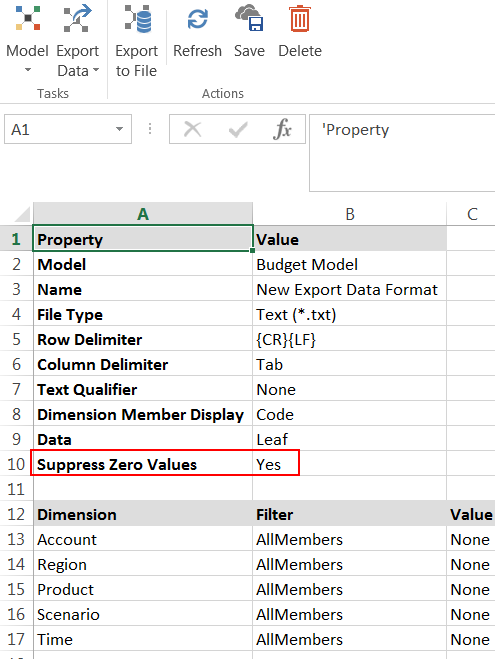
Suppress Zero Values Option in Export Data
The option to Suppress Zero Values is now available in Export Data. Select the Model task and the Export Data subtask. Select Yes to suppress zero values from the data you are exporting as shown below.
Dimension Security Support for Attributes
Dimension Security now supports attributes in views and reports. This was a documented limitation and is no longer the case.
See Also: Attributes
Known and Resolved Issues
Known Issues
| Issue ID | Task | Description |
|---|---|---|
1476 | Report (SpotlightXL) | Variable Passing does not work properly in report with same variable name across multiple models. |
1467 | Model Setup (SpotlightXL) | Cannot delete dimension using "Modify Model", If the model only have 3 dimensions |
1464 | Report (SpotlightXL) | When suppress rows/columns is enabled, If Dimension Members and Data Intersection are available in same column/row in a report then dimension members will be suppressed along with data intersections |
1461 | Model Dimension (SpotlightXL) | Adding a dimension with dot is not recommended. |
1457 | Design Report (SpotlightXL) | In some cases Suppress blank rows/columns is not working as expected when Groups are expanded in the report |
1455 | Report (Spotlight) | Suppress blank rows/columns is not supported in Spotlight (i.e. Web Interface). |
1454 | Design Report (SpotlightXL) | In some cases Suppress blank rows/columns is not working as expected if groups and freeze panes are enabled in the report |
1451 |
| Metadata download fails when Core application tenant has attribute of type Reference-to-Segment. |
1443 | Model Setup (SpotlightXL) | System throws an error if user selects ‘Modify Model’ for a New Model. |
1409 | Design Manager (SpotlightXL) | Deselecting and reselecting the 'Attributes' checkbox in Design Manager removes the Attribute members. |
1406 | Design Report (SpotlightXL) | Excel a Chart Problems. |
1387 | Model External Data (SpotlightXL) | Designer cannot generate external data source model. |
1322 | Report Design (SpotlightXL) | Unable to cascade with substitution variables. |
1321 | Report (Spotlight XL) | Substitution variables are not working as expected in Cascade Report. |
1297 | Design View, Report Design (SpotlightXL) | Drill Through is not supported for Views/Reports containing Attributes. |
1277 | Design View | Permissions for View: Group setting not retained for New View. |
1273 | Report (Spotlight XL) | Cascade Report has inconsistencies with Filters. |
1144 | Report (Spotlight XL) | Freeze Panes location should not be outside of the sheet viewable range. |
1137 | Report (Spotlight XL) | Using Freeze Panes in a SpotlightXL Report causes the scroll bars to disappear or disabled. |
765 | Report Design (Both) | Exclude POV does not work properly when run for a cascaded report. |
733 | Report Design (Both) | Report Design POV Default Filter Value is always set to Code. |
741 | Report Design (Both) | Drill through value is always code (versus label). |
687 | Report Run/Design(Spotlight XL) | The Refresh All Open Reports option does not work as designed in all cases. |
477 | Report Design (Both) | Cell scaling and lock is not functioning as designed for Cascaded reports. |
417 | Report Design(Spotlight XL) | Excel Accounting Number Format functionality can be applied to a report while in Report Design. Right not this functionality is not working properly. |
405 | Report Design(Spotlight XL) | In Report Design, specify a dimension to be cascaded. Copy and paste the cascaded member/block in the same column. Select Save and Run The following is displayed 'Cannot find variable '@Cascade' in model...'. Select Refresh and the following is displayed 'Object reference not set to an instance of an object'. Important! The cascaded member must be defined in the same line or above the cascaded block, otherwise the report will not run. |
Resolved Issues
| Issue ID | Description |
|---|---|
1448 | Grouping not working with padded blank rows in top or left of worksheet. |
1447 | Metadata download fails if same leaf member is part of two or more attribute hierarchies. |
1423 | Folders are deleted when a parent is dragged/dropped into the child folder. |
1319 | Misleading error message is user session times out. |
Was this article helpful?