1.9 Modeling Release Notes, November
- 8 Minutes to read
- Print
- DarkLight
- PDF
1.9 Modeling Release Notes, November
- 8 Minutes to read
- Print
- DarkLight
- PDF
Article summary
Did you find this summary helpful?
Thank you for your feedback
This document describes all the new features and enhancements with this release of Spotlight/SpotlightXL, as well as any known or resolved issues.
New Features and Enhancements
| Features |
|---|
Subscription to Monthly New Feature Release Notifications by User |
Import/Export Model Data
Now, you can import and export Model data in text and csv formats. Access the new Import/Export Data page (shown below) by selecting the Model task and the Import/Export Data subtask. You can import zipped files in text and csv format that were exported from Modeling.
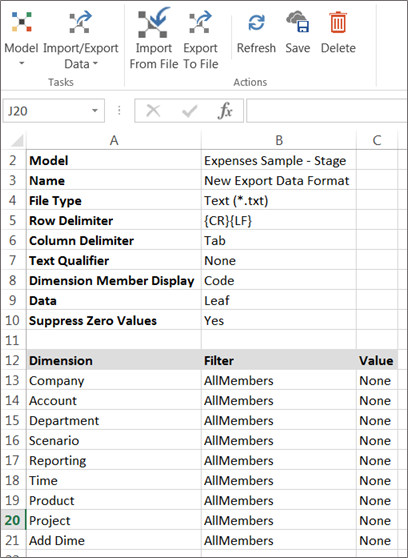
To export data in Modeling, complete the following steps:
Select the Model you want to export data from.
In the Name field, enter a name for the export.
In the File Type field, select Text or Comma delimited.
For Row Delimiter, the default is {CR}{LF}, which means carriage return line feed.
Select a Column Delimiter, which separates each column with a tab, semicolon, or comma.
For Text Qualifier, specify the character you want the system to use to enclose values in the file. This function is important because it separates the field data from the delimiter. You may select to separate the two using single quotes or double quotes. If you choose none, there will be no separator to distinguish between the delimiter and field data.
Select to display dimension members by code or display label in the Dimension Member Display field.
For Data, Leaf is defaulted as all leaf level data will be exported.
Select Yes to manipulate exported data by suppressing values that equal zero in the Suppress Zero Values field.
All dimensions are displayed once the model is selected. Select AllMembers to export all dimension members. Or, filter output by selecting MemberAndBelow or Fixed Member. MemberAndBelow exports the dimension member identified in the Value cell as well as all members below that dimension member in a hierarchy. FixedMember allows you to identify a specific dimension member to export.
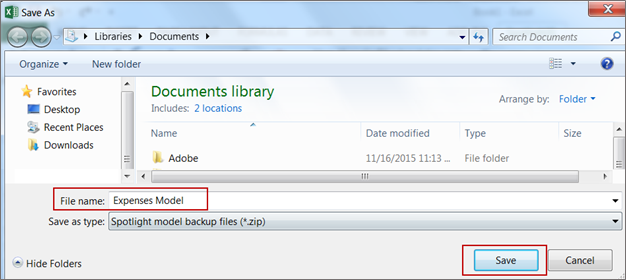
Click the Export to File action shown below.
![]()
Enter a file name and click Save as shown below.
Save the export in Modeling by clicking the Save button. This way, you can reuse this export.
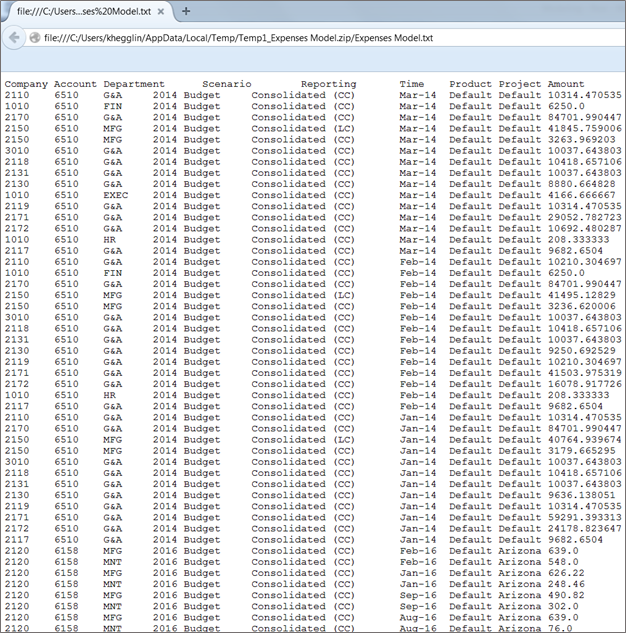
An example of an exported text file is shown below.
To import data in Modeling, complete the following steps:
Click the Import to File action.
Select the exported zip file from the browser window and click Open. You will receive an email based on the success of the import. Any exceptions occurring during the import will be emailed.
Note:
You can only import data that was previously exported from Modeling. Based on the export format that was used to export the data, data will be cleared before importing the data and then the data will be imported. For example, let's say you exported Scenario: Actual, Department: Sales data from a Model. When you import the data, all the data against Scenario: Actual and Department: Sales will be cleared and the data that is available in the exported file will be loaded into the Model.
Tip!
As a best practice, it is not recommended that you open the export file and make changes to the data and or the file.
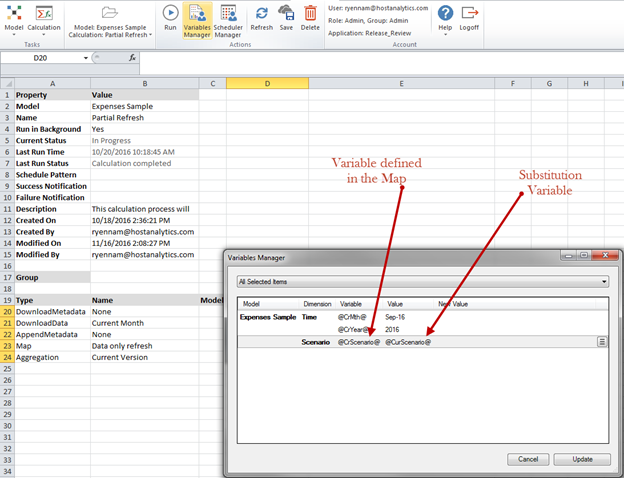
Centralized User Interface to Manage Substitution Variables
On the Substitution Variables page (accessed by selecting the Model task and the Model Administration – Substitution Variables subtask) you can now update the value field for any substitution variable.
Tip!
This feature can be used as a report as it provides a list of substitution variables associated with a model and dimension or all models for any dimension or all models and all dimensions. Up to 10000 rows are displayed. If your selection results into more than 10000 rows, an application message will appear indicating that you can filter on a specific model and dimension.
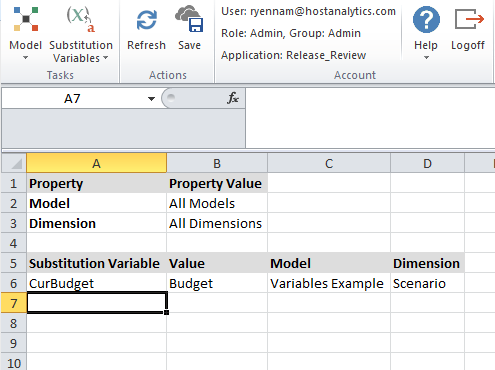
All Models – New option, which displays the substitution variables from all models
All Dimensions – New option, which displays the substitution variables
To update the value of a substitution variable:
- Select the model and dimension. The substitution variables are displayed.
- In the Value field, enter a new value for the associated substitution variable.
- Click Save.
You can select ‘All Models’ and ‘ All Dimensions’ to update the value for all substitution variables. Or, select ‘All Models’ and a particular dimension (for example, Scenario) so that the system will display all substitution variables across all models defined against the Scenario dimension. At that point, you can update the values.
To add a new substitution variable:
- Select the specific model and dimension.
- Add the substitution variable.
- Click Save.
To delete an existing substitution variable:
- Select the specific model and dimension.
- Select and delete the substitution variable.
Note:
All Models & All Dimensions options are only updating values.
You can also use the substitution variable as value in a Calculation. For example, in the Calculation below the current scenario variable is used. The value can be a substitution variable.
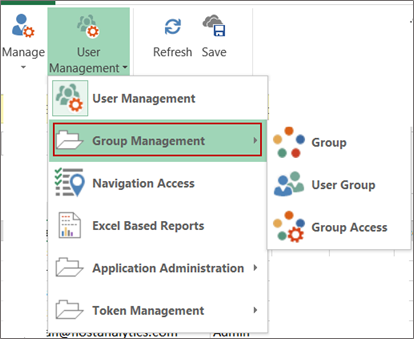
Centralized User Interface to Set Up Group Access
We’ve consolidated the Group and User Group pages under the Group Management subtask as shown below. We’ve also added a new page called Group Access.
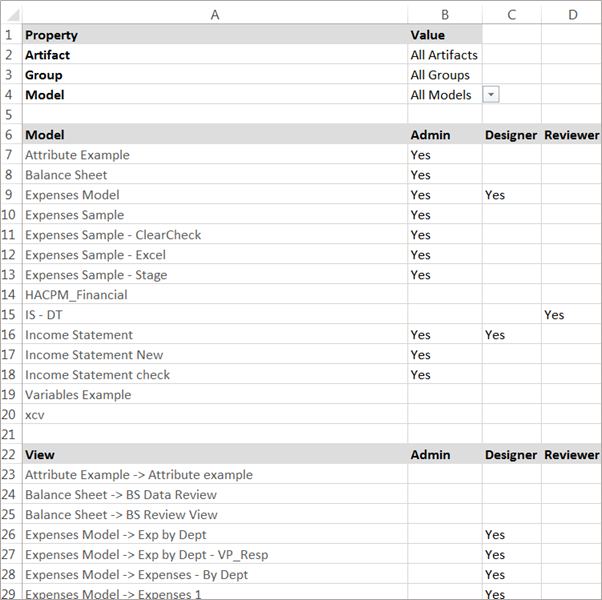
The new Group Access page allows you to assign group access for artifacts (all artifacts or models, views, reports, and calculations specifically) within a Modeling application. In the example below, All Artifacts, All Groups and All Models is selected. However, you can select specific artifacts, groups and models.
Note:
If you select All Artifacts, All Groups and All Models the system will display up to 1000 line items (artifacts) and 20 columns (groups). If more than 1000 rows exist, you will receive a message indicating that you can filter on a specific model, artifact or group. If more than 20 columns exist, you will receive a message indicating to filter on a specific group
Tip!
The existing process to provide group access still functions as always. This alternative provides a centralized page to assign group access.
To assign group access for all artifacts:
For Artifact, select All Artifacts.
Select the group you want to provide access for in the Group field.
Select the model you want to provide access to in the Model field.
Model, View, Report, and Calculation artifacts are available. Select or enter all views, reports and calculations you want to provide access for in the perspective area.
For Admin, select Yes to allow access to admins. Alternatively select Yes for Designer and/or Reviewer users. If a field is blank, it indicates a No value.
Click Save.
Alternatively, assign group access to a single artifact by selecting Model, View, Report or Calculation.
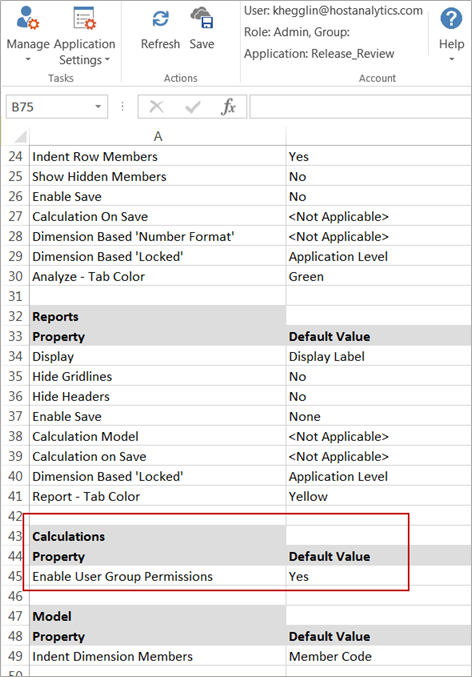
To assign group access to calculations, the Enable User Group Permissions default value must be Yes on the Application Settings page shown below.
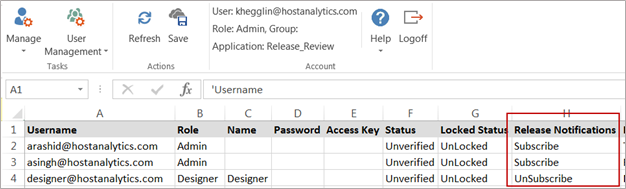
Subscription to Monthly New Feature Release Notifications by User
Users may now subscribe to monthly new feature release information, which includes the latest Excel add-in.
To subscribe, select the Manage task and the User Management subtask. Under the new Release Notifications column, Subscribe is defaulted for all users. If you do not want a user to receive these notifications, Admin users should select “UnSubscribe”.
Attribute Deletion Update
With this release, if you delete an attribute, it will be removed from views and reports once you click the Delete action.
To delete an attribute:
Access the Model task and the Attribute subtask.
Select the Model and the dimension.
Select the attribute you want to delete.
Click Delete.
In the example below, the Expenses Sample model is selected along with the Product dimension. The Product_Type attribute is also selected as it is the attribute that will be deleted.

Update to Design View
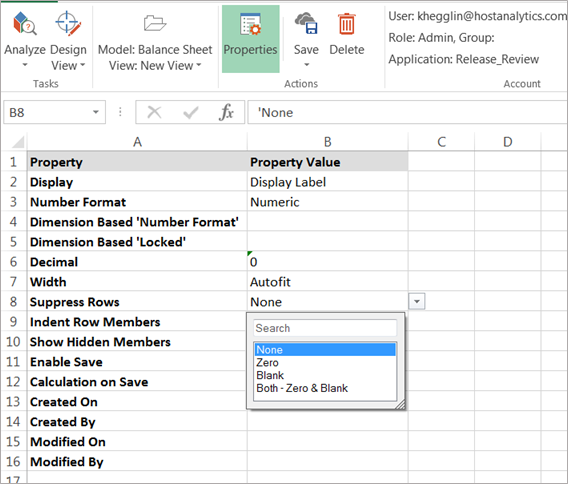
On the Design View page (accessed by selecting the Analyze task and the Design View subtask) you now have the option to suppress zero or zero and blank rows.
Click the Properties action and select Zero or Zero & Blank. The view will be updated once you click Save.
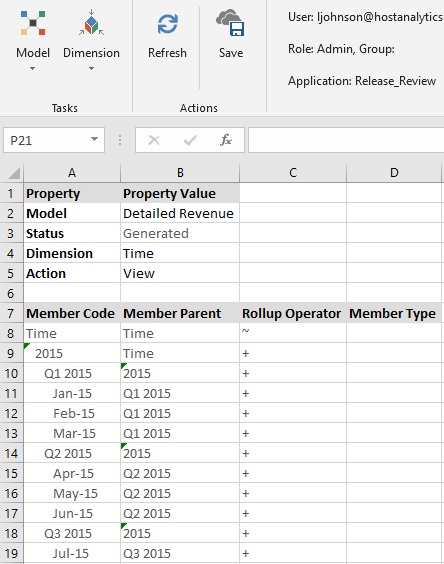
Dimension Member Display Enhancement
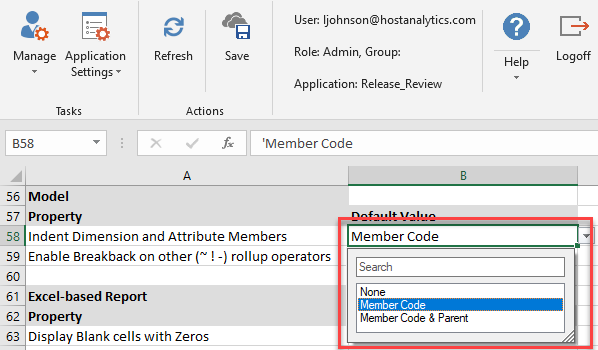
You can display dimension members on the Model Dimension page with indentations based on level as shown below.
Admin users can change the settings from the Application Settings page shown below.
None (i.e. no indentation)
Member Code (i.e. indent only member code column)
Member Code & Parent (i.e. indent both member code and member parent columns)
Known and Resolved Issues
Known Issues
1596
The display order of added Dimension members are not correct after running AppendMetadata.
1527
The corresponding attributes in a map are deleted when the base dimension is deleted.
1492
Using special characters for the model name results in errors.
1464
When suppress rows/columns is enabled, If Dimension Members and Data Intersection are available in same column/row in a report then dimension members will be suppressed along with data intersections.
1457
In some cases Suppress blank rows/columns is not working as expected when Groups are expanded in the report.
1455
Suppress blank rows/columns is not supported in Spotlight (i.e. Web Interface).
1454
In Some cases Suppress blank rows / columns is not working as expected if groups and freeze panes are enabled in the Report.
1446
Unable to navigate to Design View after renaming or removing HostAnalyze worksheet.
1406
Excel a Chart Problems.
1387
Designer cannot generate external data source model.
1322
Unable to cascade with substitution variables.
1321
Substitution variables are not working as expected in Cascade Report.
1277
Group Permissions setting in views are not retained for New View.
1273
Cascade Report has inconsistencies with Filters.
1144
Freeze Panes location should not be outside of the sheets' viewable range.
765
Exclude POV not effective when run in a cascade.
733
Report Design POV Default Filter Value is always in Code.
687
Modified Report definition by removing months column still retain after Refresh.
477
Cell scaling and Cell Locking does not work with cascaded reports.
405
In Report Design, specify a dimension to be cascaded. Copy and paste the cascaded member/block in the same column. Select Save and Run and the following is displayed 'Cannot find variable '@Cascade' in model...'. Select Refresh and the following is displayed 'Object reference not set to an instance of an object'.
1671
Must include a space before and after the subtraction sign in the Formula.
Resolved Issues
1639
In some cases email notifications are not being sent to users.
1600
Report is corrupted when saved with skip dimension with Attribute member.
1534
Performance improvements in Write back process.
1508
Cannot export model with large reports that have been compressed
Was this article helpful?