Adding a Calculated Member to an Account Dimension
- 1 Minute to read
- Print
- DarkLight
- PDF
Adding a Calculated Member to an Account Dimension
- 1 Minute to read
- Print
- DarkLight
- PDF
Article summary
Did you find this summary helpful?
Thank you for your feedback
Complete the steps below to add a calculated member to an Account dimension:
- Navigate to Maintenance > Hierarchy > Hierarchy Management.
- On the Hierarchy Selection pane, select the Finance Hierarchies for Type, Account for Dimension, and Account for Hierarchy from the drop-down list.
.png)
- Click Show.
- Select a rollup node to place the new formula member under that node in the hierarchy.
- Click Add. The Add New Member pop-up appears.
.png) Note:If you have selected Read Mode as the default view, click Edit Hierarchy (on the top right) to view the Add icon.
Note:If you have selected Read Mode as the default view, click Edit Hierarchy (on the top right) to view the Add icon..png)
- Select the Node Type as Leaf Node and the Node Sub Type as Calculated Member from the respective drop-down lists.
.png)
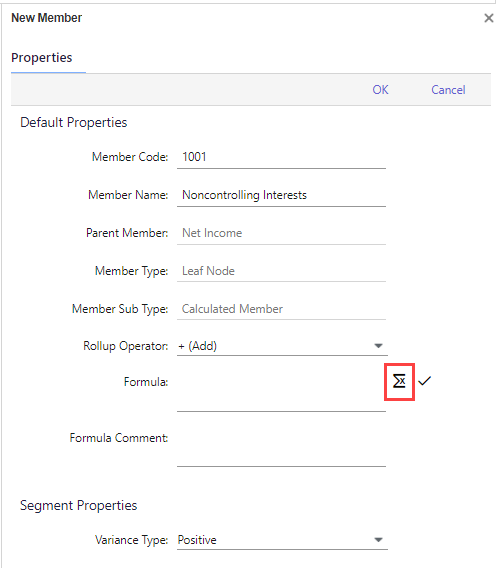
- Click Add. The New Member pane appears on the right side.
- Enter a Member Code and Member Name.
- Select a Rollup Operator from the drop-down list to apply at the Rollup level.
- Click the Select Formula icon to set up the rule.

Set the Rules for the Calculated Member
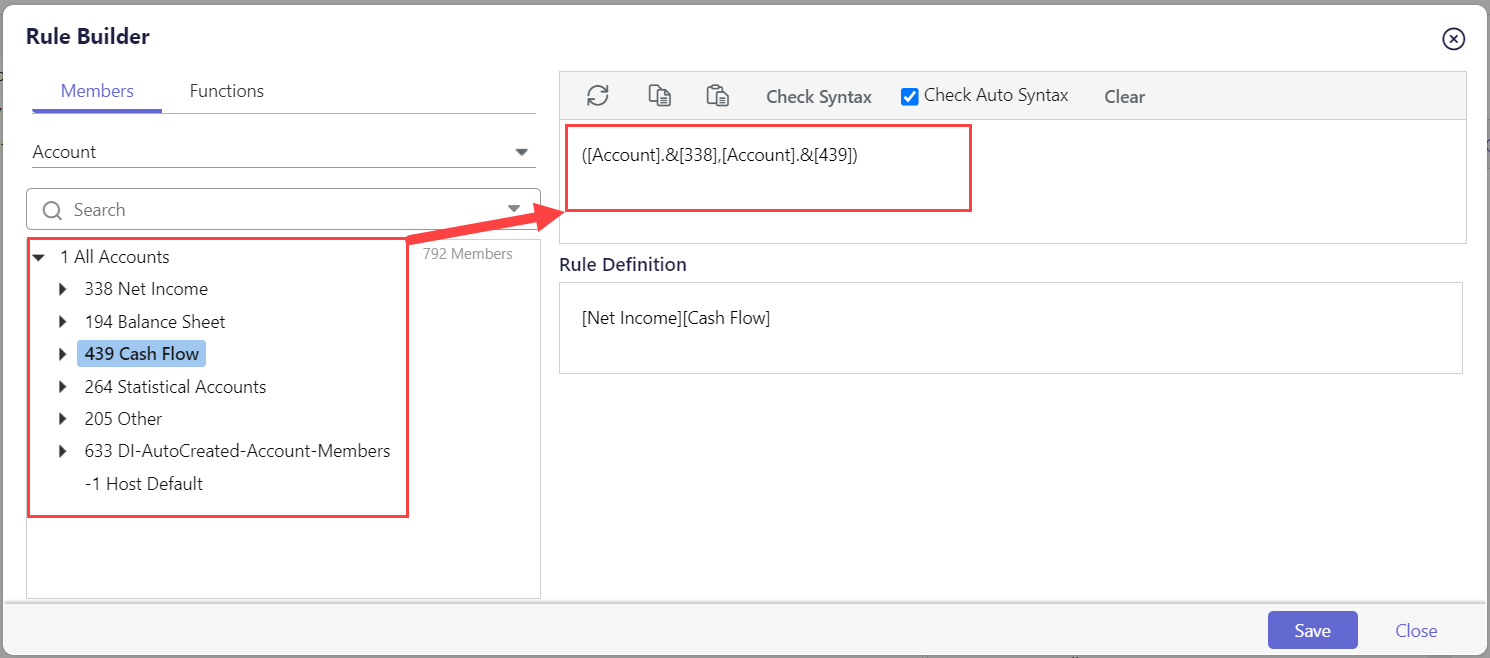
To set the rules for the calculated member, follow the steps below:- Under the Members section, select the necessary dimension from the drop-down list.Note:Utilize the Functions section to set the formula using the pre-defined system functions.
.png)
- Drag and drop the required dimension members into the right pane to add the formula.Notes:
- You can select dimension members from various dimensions using the drop-down menu.
- If you are adding a comma, enclose the rule in parentheses.

Rule Builder Tools:- Reset - Clear the currently added dimension members and revert to the previously saved state.
- Copy - Copy the syntax.
- Paste - Paste the copied syntax.
- Check syntax - Click to validate if the syntax is correct or not.
- Check Auto Syntax - Enable this option to auto-validate the syntax when you save the rule.
- Clear - Removes the rule and rule definition.
.png)
- You can update the Rule Definition for your reference if needed.
- Click Save to add the rule to the formula.
- Click Close to proceed.
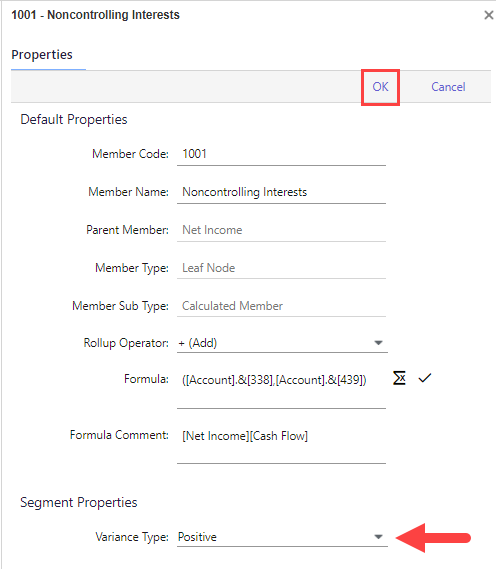
The defined formula and rule definition on the Rule Builder page will be reflected in the Formula and Formula Content, respectively.
- Under the Members section, select the necessary dimension from the drop-down list.
- Select the Variance Type from the drop-down list.
- Click OK to create the calculated member (reflected on the middle pane).

- Click Save. The newly created calculated member appears in the hierarchy.
.png)
Was this article helpful?

.png)
.png)
.png)
.png)

.png)

.png)

.png)