Approval Role Setup - Budget Entity Permissions and Approval Role
- 2 Minutes to read
- Print
- DarkLight
- PDF
Approval Role Setup - Budget Entity Permissions and Approval Role
- 2 Minutes to read
- Print
- DarkLight
- PDF
Article summary
Did you find this summary helpful?
Thank you for your feedback
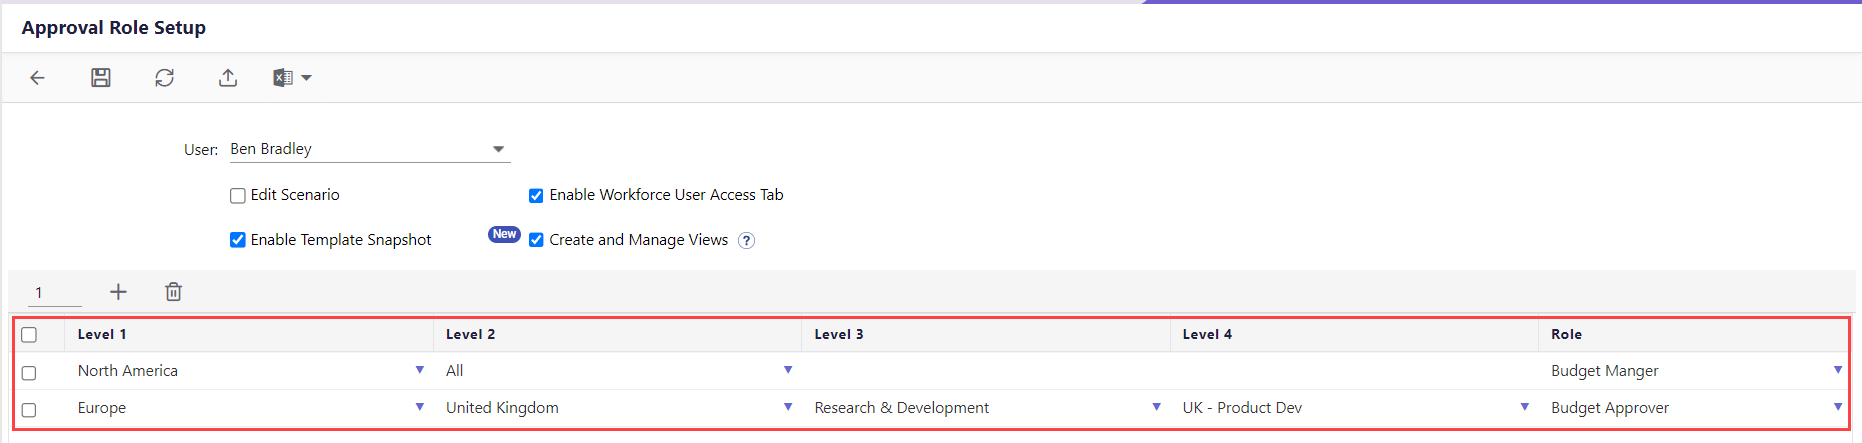
The Level and Role help you to set the budget entity for the user you wish to assign an approval role to, and also select a role for the chosen budget entity. Adding levels to the associate users helps in limiting access to the necessary budget entities.
Users can have varying levels of responsibility for budget entities. Assigning different approval roles for different entities provides a user with different levels of privileges.
For example, when a user has access to two entities A and B, but has HR responsibility for entity B only, the user can be restricted to view only specific data based on HR access for the approval role assigned for the entity. Or, an Admin role might provide Workforce template access, but an Admin with no HR role might not have Workforce template access.
Using any of the three ways you can set user Level and Role:
- Add/edit Budget entity permissions and Approval role on the Approval Role Setup page
- Import Approval Role
- Export Approval RoleNote:
Add rows - To add rows, enter the number of rows you want to add and click the Plus icon
Delete rows - To delete the row(s), select the required row(s) by clicking checkboxes and click the Delete icon
Add/edit Budget entity permissions and Approval role on the Approval Role Setup page
- Click the cell under Level 1, then select the budget entity you want to give the user an approval role for.
- (Optional) Click the cells under columns Level 2, Level 3, and so forth, to add drill-down capabilities to associate with role privileges. For example, Level 1 might be associated with a worldwide organization, Level 2 with the American branch of the organization, Level 3 with the organization’s California offices.
- Click the cell under the Role column, then select a role for the user for the budget entity chosen. Note that roles are defined on the Approval Role page.
Import Approval Role
Approval roles can be imported to the respective user using the following steps.
- Click the Upload File icon.
- Approval Role Upload dialog box appears.Note:The uploading file should follow the format specified by Planful. To obtain a sample format, click Download Sample Template and update your data by following the instructions provided in the spreadsheet.
- Click Choose File and upload the template from your computer.
- Choose Overwrite or Append in Upload Actions.
- Overwrite - Uploaded data will overwrite the existing approval role
- Append - Uploaded data will be added to the existing approval role
- Click Upload.
Learn more about the Import Approval Roles here.
Export Approval Role
You have the ability to export the Level and Role details of the user from our application. Once exported, you can make modifications or add additional information, and then import the updated data.
- Click the Export drop-down list. A list of options appears.
- You can perform any one of the following actions:
- Click Export All Users to export the approval roles and budget entity permissions of all the users in the application.
- Click Export Current User to export the approval roles and budget entity permissions of the user currently selected in the User list box.
- Click Export Selected Users to export the approval roles and budget entity permissions of the users selected in the Export Selected Users window.
- Click Ok.
- The ApprovalRoleExport excel file is downloaded with the required approval roles.
- Make the required changes, and then import the uploaded file.
Was this article helpful?