Defining Attributes
- 3 Minutes to read
- Print
- DarkLight
- PDF
Defining Attributes
- 3 Minutes to read
- Print
- DarkLight
- PDF
Article summary
Did you find this summary helpful?
Thank you for your feedback
Prior to creating an Attribute Hierarchy, you'll define attributes. Attributes are used to report and aggregate dimension data based on traits. For example, a Department dimension is associated with the division attribute dimension. Members of the division attribute dimension are categorized based on profits.
The attributes defined here are used in the Budget Entity Definition and reports.
User-defined attributes are optional. For Financial Segments, you can have up to 25 (10 by default) attributes per dimension (based on your application configuration), which means that you will have 200 attributes (25 per dimension) across 8 dimensions. For Sales, you can have up to 10 attributes per dimension.
Important! You can have a maximum of 10 attributes mapped to the Reporting Cube. You can't unmap an attribute from a reporting area if it is used in a report.
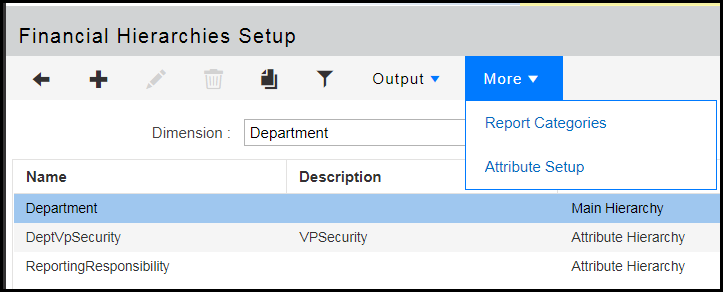
Attributes are created on the Add Attributes page under the More list box on the Financial Hierarchies Setup page.
On the Attribute Setup page, there are several icons in the ribbon, each of which is explained below.
Add - Add a new attribute.
Edit - Edit an existing attribute. You can edit an attribute ONLY if Used in Reporting is No.
Move Up / Move Down - Position attributes on the page.
Save Display Order - Saves the position of the attributes on the page.
Attribute Members - Click to access the Attribute Members List page. View, delete and export attribute members (of attributes that have an attribute type of "Text"). Click Output to export the Attribute Members List to Excel for printing, viewing, or reporting purposes.
To add a new attribute:
Navigate to Maintenance > Hierarchy > Hierarchy Management.
Select the Finance Hierarchy and the dimension you want to add the attribute to.
Click Setup.
Select the hierarchy on the Financial Hierarchy Setup page.
Click the More list-box and select Attribute Setup.
Select a Dimension to which you want to add the Attribute (such as Account.)
Click the Add button to add a new Attribute
Enter a name and description.
Select Type:
Reference to Segment- Select to assign the attribute to a defined segment. This option is used when the attribute is linked to another dimension in the reporting area. For example;
Dimension = Countries
Hierarchy:
Americas Europe Asia Pac United States U.K India Canada Germany China Brazil France Japan Mexico Italy Singapore Columbia Switzerland Peru Let's say you want to use the leaf members in the hierarchy above as the attribute value on another dimension (like Customer). Use the Reference to Segment attribute type and reference Customer. The setup would look as follows:
Dimension – Customer
Attribute – Country
Attribute Values – India, China, USA etc (all leaf members are displayed in the Customer hierarchy properties pane and you can select the country as applicable)
For Sales budgeting and forecasting, select this option to create an attribute on the Sales dimension as a separate reporting hierarchy, or, an association with an existing sales dimension.
Text - Enter a default value to associate with the attribute. Use this type when the attribute value expects alpha-numeric values, which change from one member to another member within the hierarchy. For example:
Dimension – Customer
Attribute – City
Values – Edinburgh, Peterborough, Cambridge etc
Or
Dimension – Customer
Attribute – ContactNo
Attribute Values – 0131 123456, 1223 222222, 1223 444444
Or
Dimension – Customer
Attribute Values – EmailID
Values – john@gmail.com, org@cvcpipes.com
Date - Select a date to associate with the attribute. Use this type when the value changes from one member to another member and the valid input is date. For example:
Dimension – Company
Attribute – DateofIncorporationOrEstablishment
Attribute Values – 2/15/2000, 5/20/1998, 7/25/2004
Month - Select a month to associate with the attribute. For example, if you define an attribute for an Asset segment, you can enter the month you purchase the asset or the month you start depreciating the asset.
Dimension – Customer
Attribute – SubscriptionRenewalMonth
Attribute Values – Jan-15, Mar-15, Dec-15
Year - Enables the Default Year field. Select the year associated with the attribute. For example;
Dimension – Product
Attribute – YearofIntroductionOrLaunch
Attribute Values – 2000, 1998, 2004
List - Specify allowed values. Enter a number and click Add to insert list rows. For example, if the Dimension is Product, the Name is Routers, and you select the List attribute type, you can insert rows to signify the types of routers by name (a list of routers).
Float - Represents numerical data. Select Float to enable the Default Value field where you will enter a value in decimals. Floats represent a more precise number when compared to integers. For example;
Dimension – Product
Attribute – MRP$(MaxRetailPrice)
Attribute Values – 14.20, 20,40, 128.75
Integer -Represents numerical data. Enter an integer, a number without a decimal, to associate with the attribute.
For example;
Dimension – Product
Attribute – ShelfLife(hrs)
Attribute Values – 32, 48, 64 etc
The Dimension field is available when you select Reference to Dimension. For example, you might select the dimension you want to reference for Sales Budgeting because you have a Plant that might be used as a referenced segment for a Product dimension.
Click Save.
Was this article helpful?