- 15 Minutes to read
- Print
- DarkLight
- PDF
Dynamic Journals
- 15 Minutes to read
- Print
- DarkLight
- PDF
Dynamic Journal Entries are used when entry balances fluctuate from period to period. For example, as a financing strategy, you take out a loan with a variable interest rate. This means that the principal and interest payments will likely fluctuate from period to period based on the loaded rate for the period..gif)
Add a Dynamic Journal
Add a Dynamic Journal to post balances that fluctuate from one period to another.
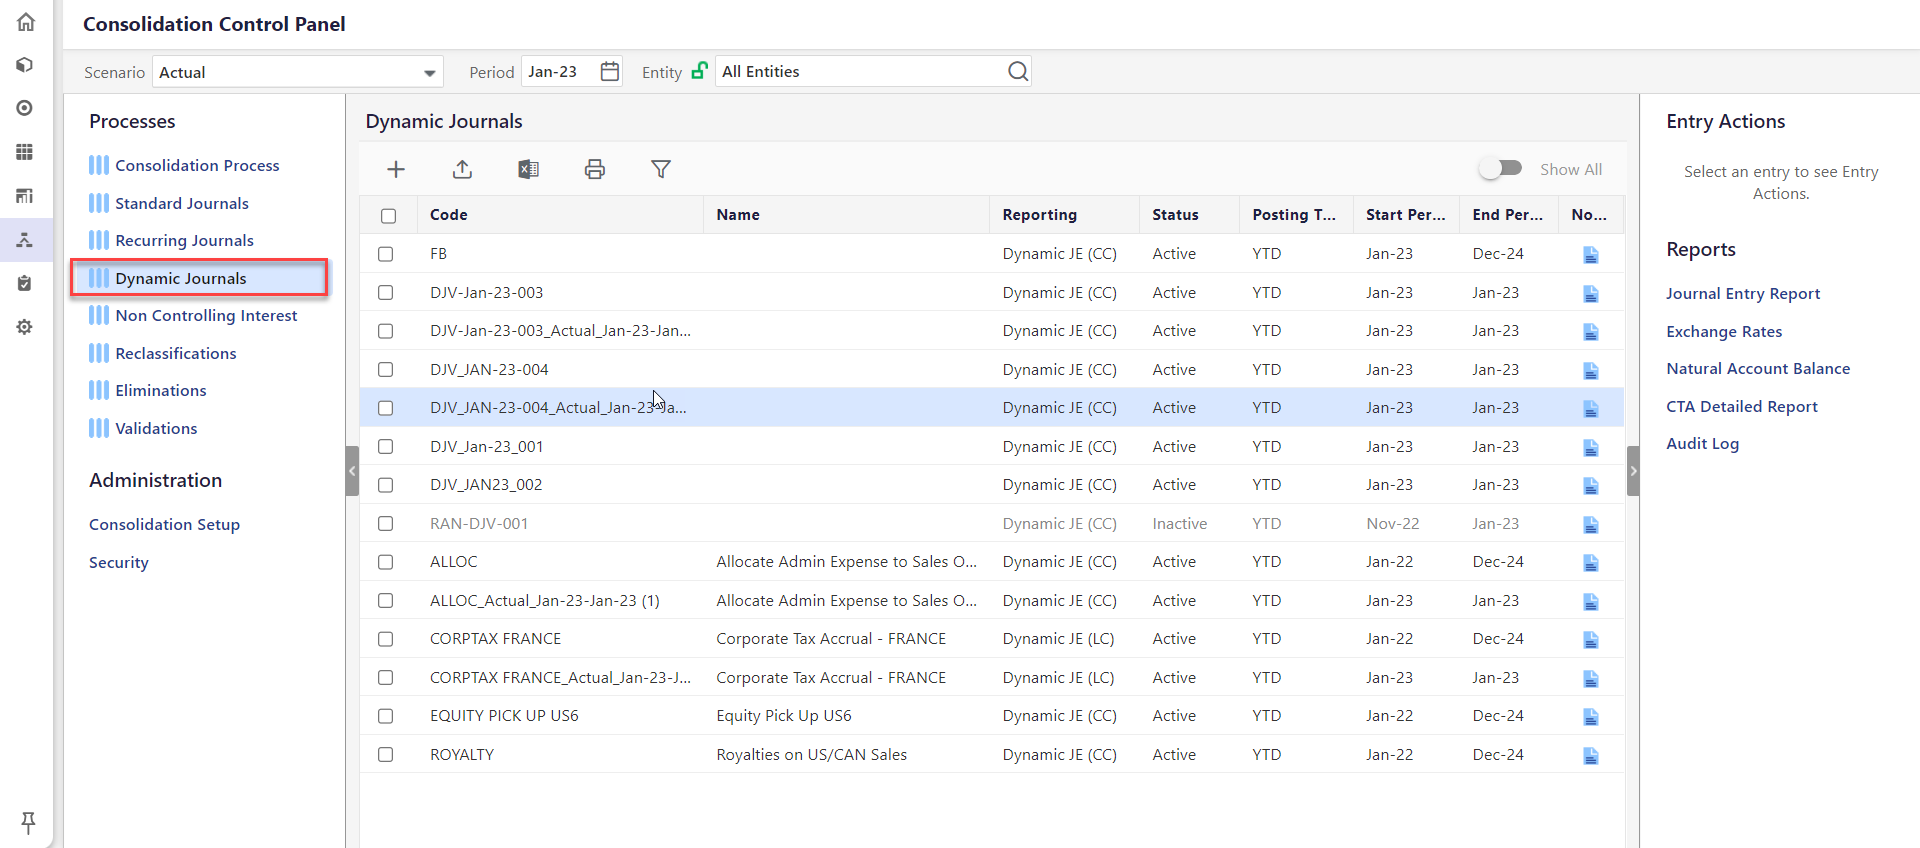
In the Consolidation Control Panel, under Processes, click Dynamic Journals. The Dynamic Journals grid appears.
Click Add. The Add Dynamic Journal dialog box appears.
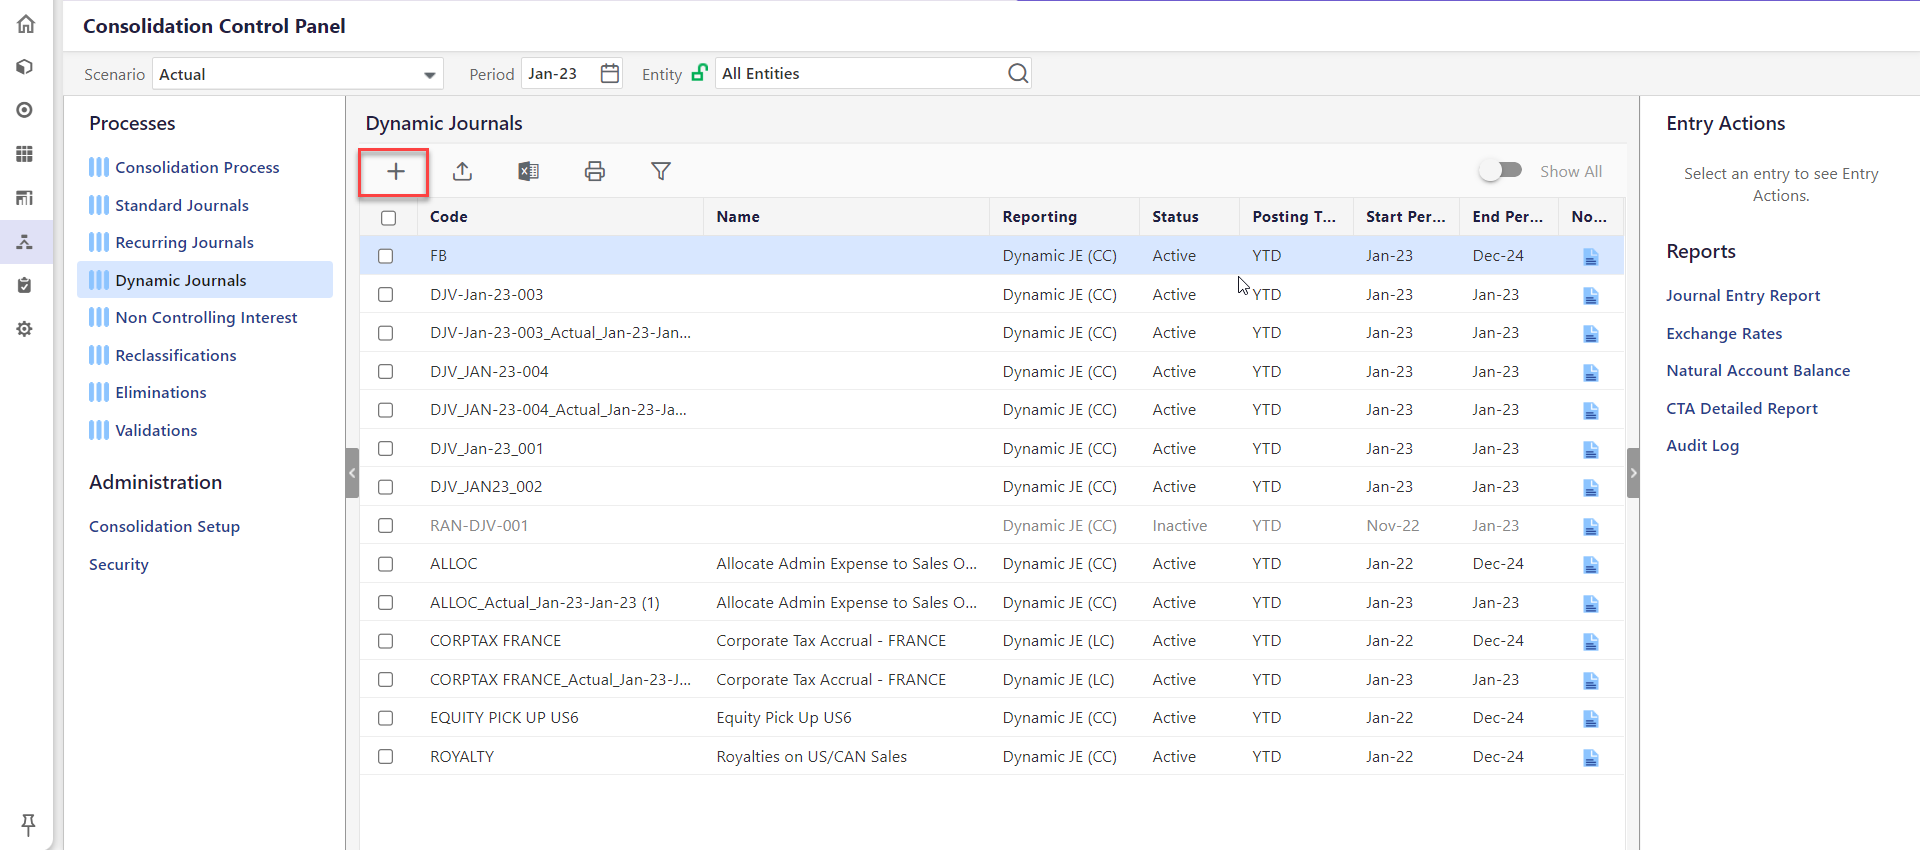
On the Properties tab, specify the required information for the following fields:
In the Code field, enter a code of your choice.
In the Name field, enter a Dynamic Journal name.
In the Period field, select the month and year range. During the selected time period, the Dynamic Journal is active.
In the Posting Type list box, select the MTD or YTD posting type.
Note:MTD (Month-to-date) evaluates entries based on the month’s activity; whereas, YTD (Year-to-date) evaluates the entries based on the cumulative balance of the line items.Note:To use the MTD posting type, contact the Planful support team for additional guidance on accessing this functionality.In the Reporting list box, select whether the Journal is a Dynamic JE (CC) or a Dynamic JE (LC). A journal can be in common currency or in local currency.
Note:A local currency is often used by a company's subsidiaries and then converted to a common currency for consolidated reporting purposes.If you are adding an Unbalanced Journal, select the Unbalanced Journal check box. In Unbalanced Journals, debits are not equal to the total of the credits.
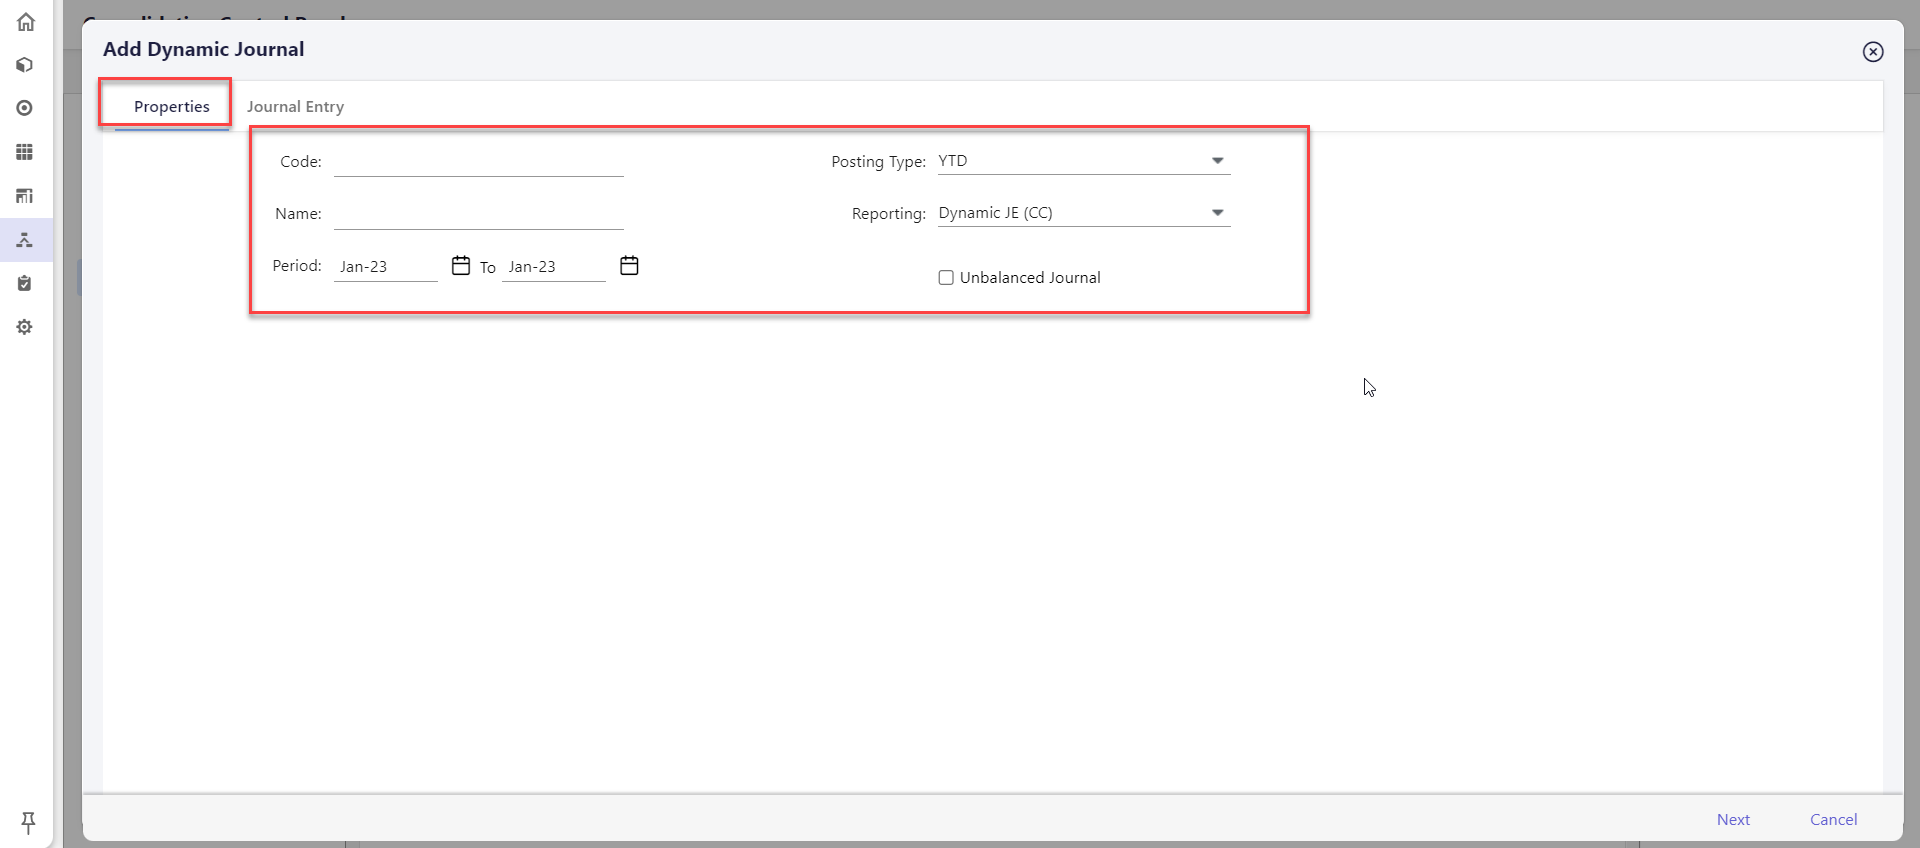
To navigate to the Journal Entry tab, click Next or click the Journal Entry tab. The grid displays segment columns based on the application configuration and user's security. To set up a journal entry, perform the following steps:
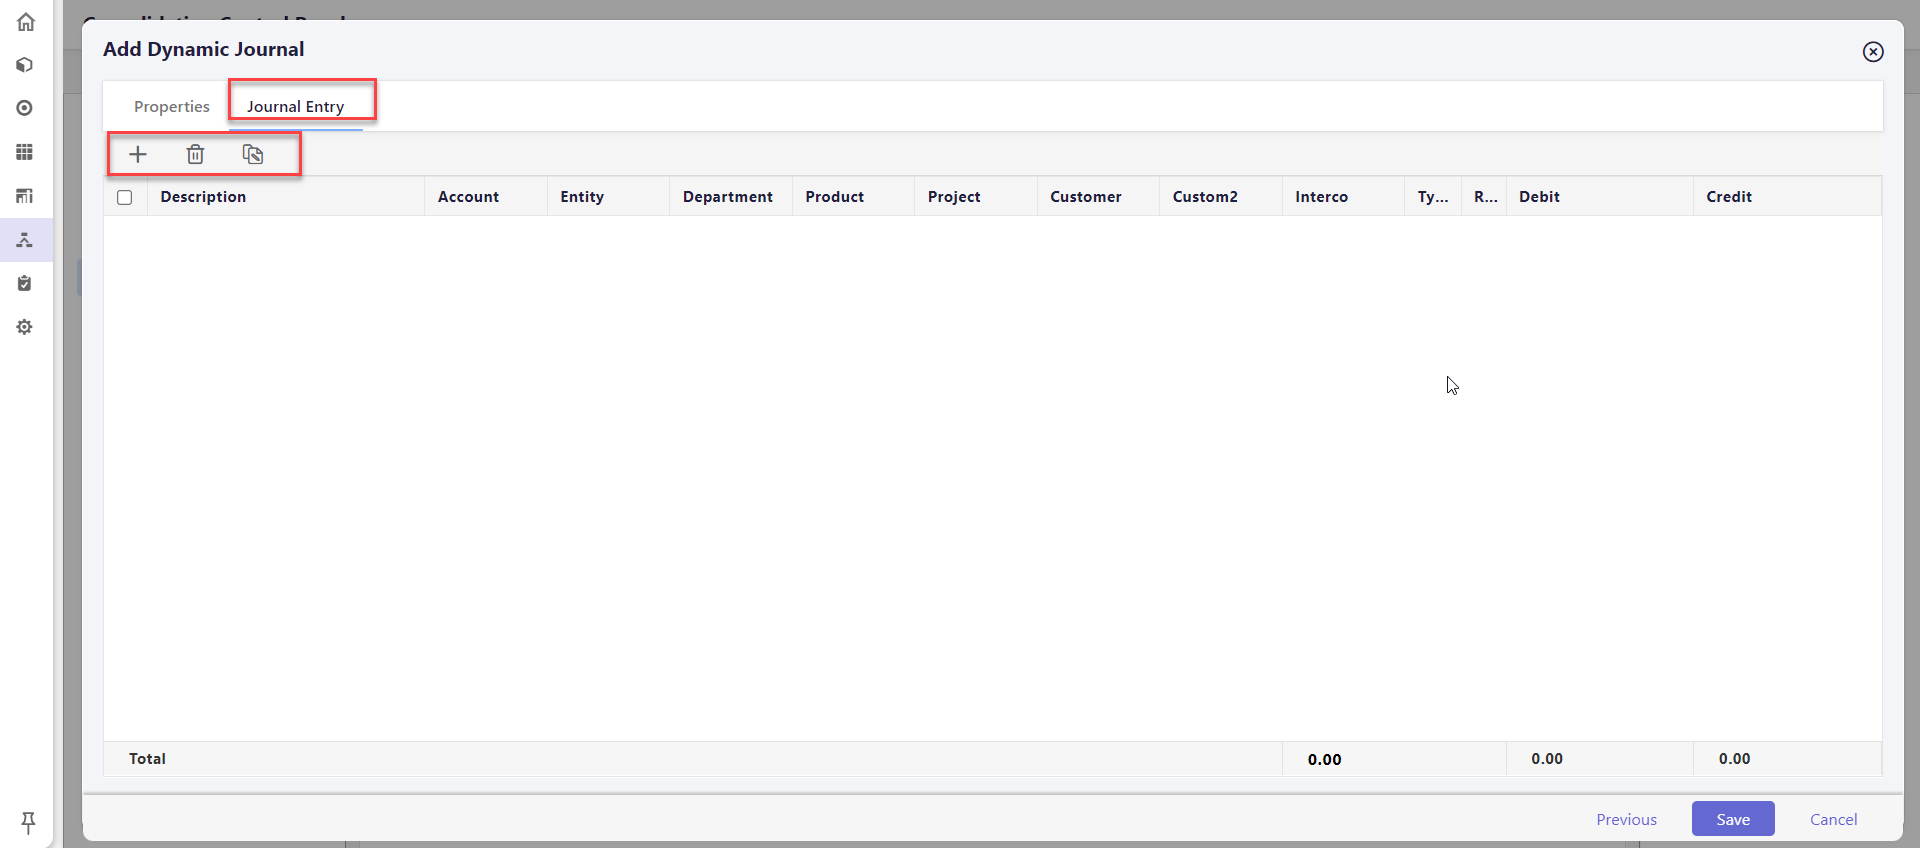
To add a new row, click Add.
To set up the values for each column, do any one of the following:
Specify the required values directly in the UI.
Paste the copied line items from an MS Excel spreadsheet to the journal entry grid.
You can copy or paste all values, including description, segments, and debit or credit values. Use shortcut keys (Ctrl+C and Ctrl+V) to perform this action.
To build a formula for the journal entry, perform the following steps:
Click Enter Rule in the journal entry row. The rule pane appears.
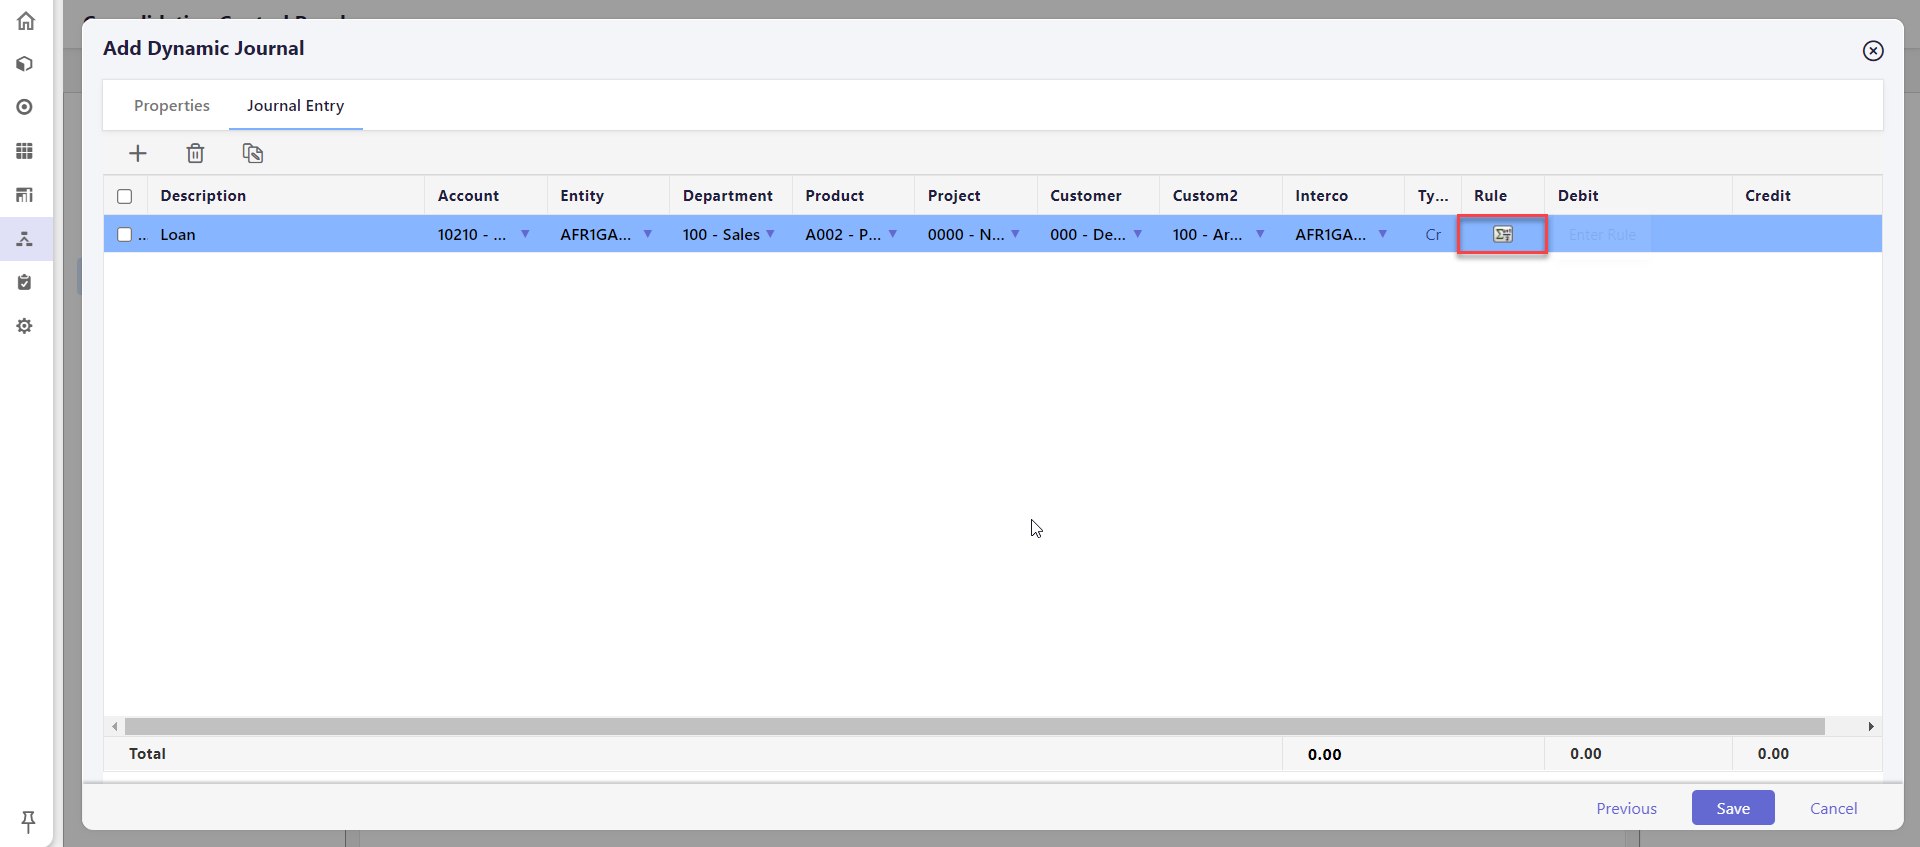
Build a formula by using a Simple Rule or Advanced Rule:
Simple Rule —For the dimensions for which you want to select a member, open the selection pane and select the member.
Advanced Rule —In the left side box, expand the member hierarchy, select the member, and then click the Add icon. Repeat the same procedure to select the function in the right side box. Click the tick (√) icon to verify the syntax of the formula.
To save the rule, click Save
Click Save.
Upload Dynamic Journals
Upload Dynamic Journals in xlsx format directly to the Consolidation module. Use the sample template (that you can download) for ease of use when performing the upload.
Perform the below steps to upload dynamic journals:
Navigate to the Consolidation Control Panel.
Click the Dynamic Journals process. Dynamic Journals appear in the center pane.
If no Dynamic Journals were created or uploaded then this pane will be blank. You can opt to upload or enter journals or do a medley of both. Click Upload.
.png)
When you click the Upload icon, the Dynamic Journals Upload dialog appears. It is a best practice to use the sample Excel template as it shows you exactly how you need to organize your journal data to load it successfully. Click Download sample Excel template.

The template is downloaded to your computer. Open the template.
The template displays and indicates the required fields. It also provides information to ensure the correct data is entered where needed. Copy and paste the template into a new file.
Enter a Journal Code, the period for which you want to load the journals, and the Posting Type.
Enter Dynamic JE (CC) or Dynamic JE (LC) for reporting, formula and enter notes as needed. Rules specified in the upload file are automatically validated during the upload process. If all lines pass validation, the journal is processed successfully. If any rule fails validation, the entire upload is failed, and a detailed error log is provided.
Now, you’re ready to copy and paste journals into the spreadsheet. Before copying and pasting data to the Excel file, make sure you delete all the tips.
Save the xlsx file to your computer.
Back in the Consolidation Control Panel, click Choose File.

Select the file you just saved to your computer and click Submit. Once processing is complete, the uploaded Dynamic Journal will appear in the center pane.
If the file fails to upload, download the failed file to view the cause(s) of the failure, fix the file, and upload again.
Copy a Dynamic Journal
Use copy when you want to use an existing Dynamic Journal to create a copy with new criteria for posting entries. For example, copy a Dynamic Journal with local currency to create a new Dynamic Journal to report on the common currency.
Perform the below steps to copy dynamic journal(s):
- In the Consolidation Control Panel, under Processes, click Dynamic Journals. The Dynamic Journals grid appears.
- Select a journal to enable the View, Copy, and Delete options.
- Click Copy and select Copy Single. The Copy Dynamic Journal dialog appears.
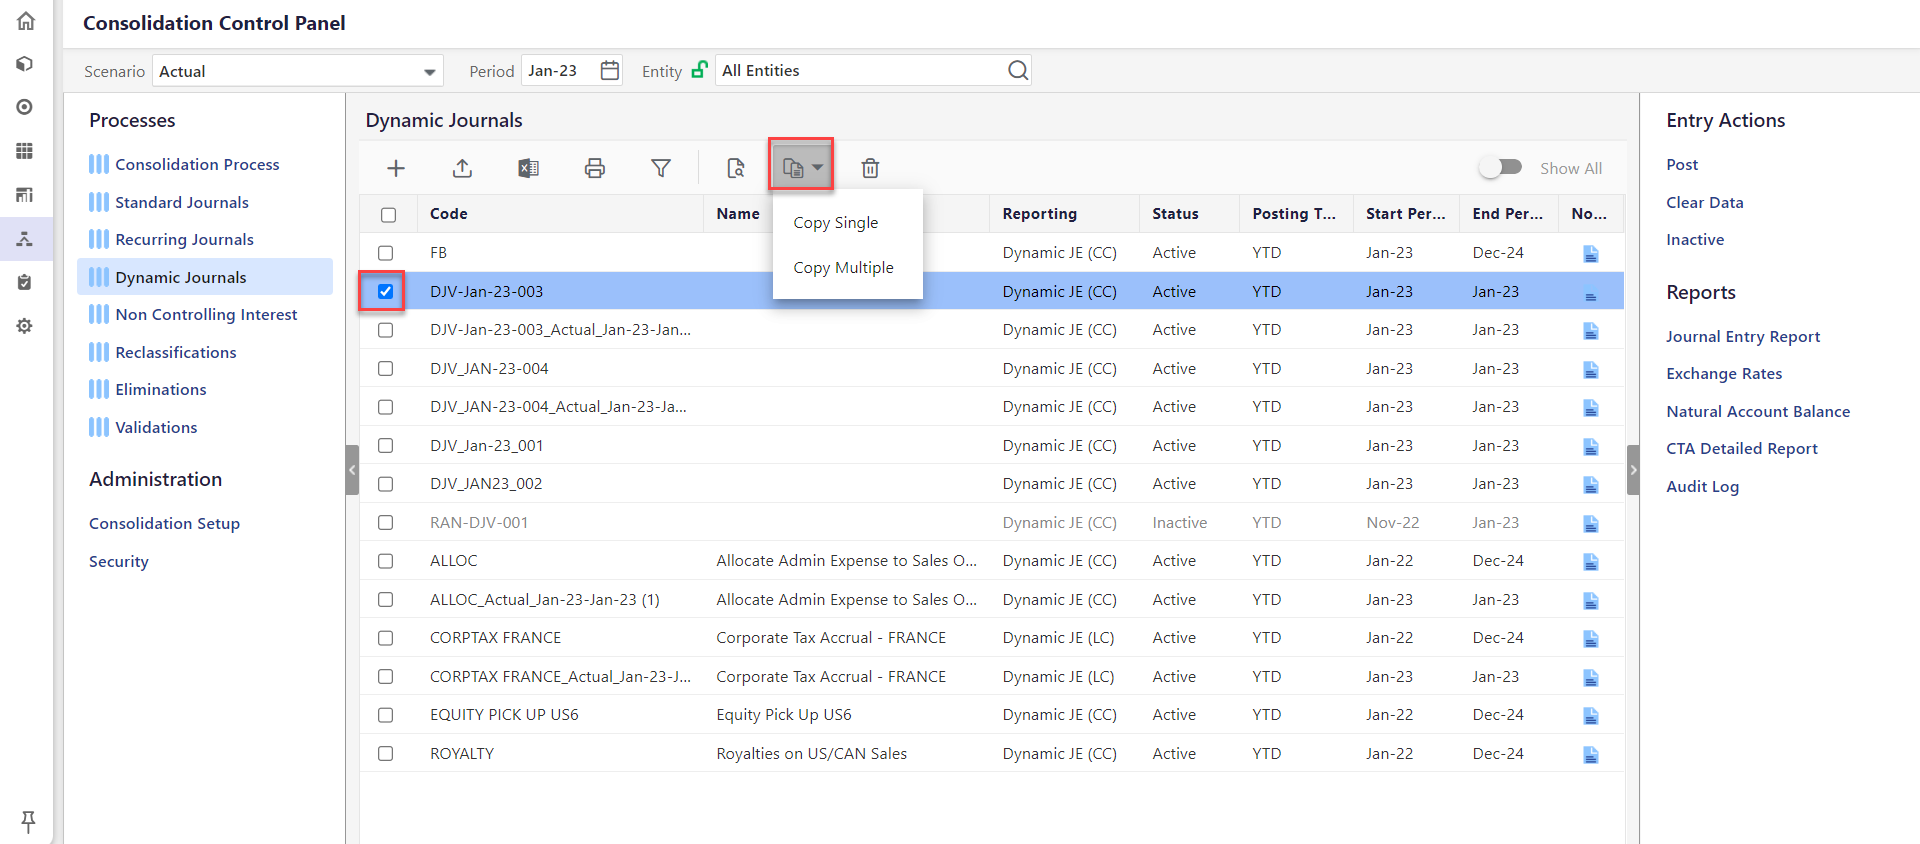 Note:You can also copy journals from one scenario to another using the Copy Multiple functionality. Perform the below steps to do so:
- Click Copy and select CopyMultiple. The Copy Dynamic Journal page appears.
- Select Target Scenario and Period. Select the Email notification checkbox if you want to receive an email if the journal is copied successfully.
.png)
- Click OK. The journal is copied.
- Complete all the fields in the Properties and Journal Entry tabs.
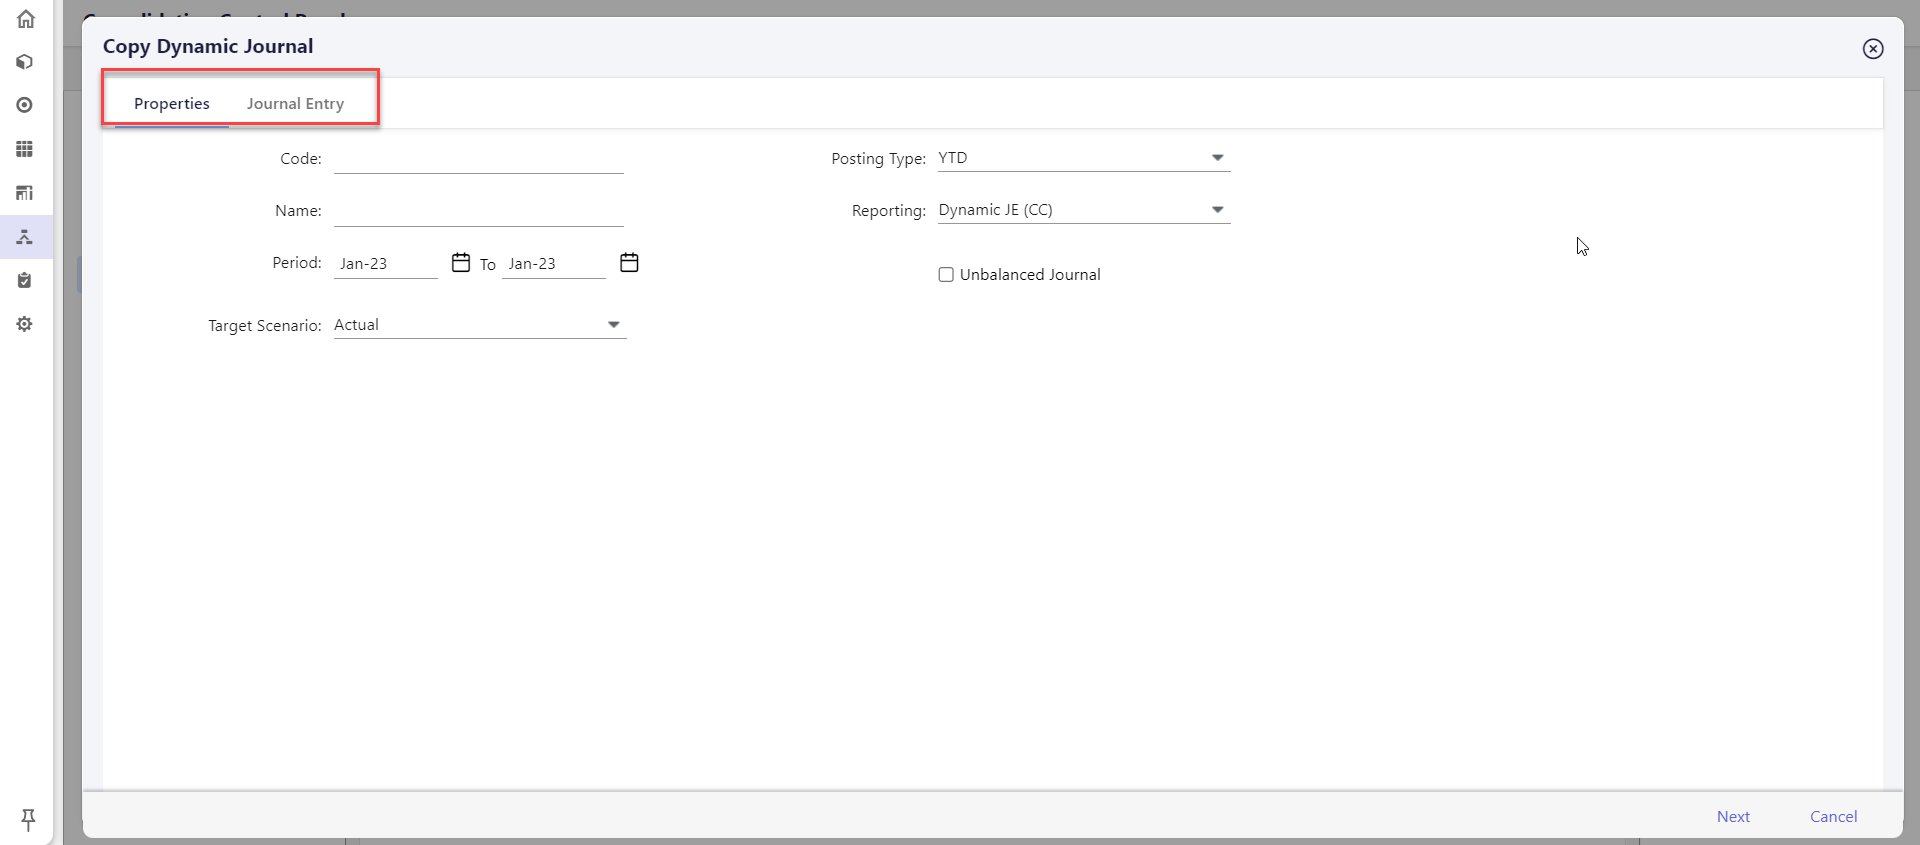
- Click Save.
Open the Dynamic Journal in Edit mode to view entries. Click the Journal Entry tab to view the copied journal lines.
Edit a Dynamic Journal
You may want to edit a Dynamic Journal before the posting of entry balances.
To edit a Dynamic Journal :
In the Consolidation Control Panel, under Processes, click Dynamic Journals. The Dynamic Journals grid appears.
Select the Dynamic Journal.
Click Edit. The Edit Dynamic Journal dialog appears.
.png)
Edit as needed.
Click Save.
View a Dynamic Journal
You cannot edit a dynamic journal created on a leaf level if All Entities are selected in the Entity field. In such cases you can only view the journal.
Perform the below steps to view a dynamic journal:
In the Consolidation Control Panel, under Processes, click Dynamic Journals. The Dynamic Journal grid appears.
Select the Dynamic Journal.
Click View.

Click Next/Previous to navigate between the Properties and Journal Entry tab.
Click Cancel to exit the view.
Delete a Dynamic Journal
You may want to delete unused or inactive Dynamic Journals. When you delete a Dynamic Journal, all the associated journal entries are also deleted.
In the Consolidation Control Panel, under Processes, click Dynamic Journals. The Dynamic Journal grid appears.
Select the Dynamic Journal.
Click Delete.
In the confirmation dialog that appears, click OK. The Dynamic Journal is deleted.
- Note:You can delete many Dynamic Journal lines at once by selecting the checkbox next to each and clicking the Delete icon.
Delete Multiple Dynamic Journal Lines
In the Consolidation Control Panel, under Processes, click Dynamic Journals. The Dynamic Journal grid appears.
Select a Dynamic Journal and click Edit.
In the Journal Entry tab, select the checkbox in the header to select all lines or select more than one line and click Delete.
In the confirmation dialog that appears, click OK.
- Post a Dynamic Journal
Active Dynamic Journal Entries can be posted.
To post a Dynamic Journal :
In the Consolidation Control Panel, under Processes, click Dynamic Journals. The Dynamic Journals grid appears.
Select the active Dynamic Journal Entry, under Entry Actions, and click Post.

The Post Dynamic Journal dialog appears. The Scenario field is read-only and indicates the selected scenario that will be used when posting Dynamic Journal Entries.
Select the fiscal Year by using the calendar icon.
Select the Period by selecting a month range.
Select the Email notification checkbox if you want to send a notification about results when the process is complete, and then enter the email addresses of the recipients you want to notify.
Click Post. The Post Dynamic Journal dialog is exited. A message appears indicating that the Dynamic Journal Entry is submitted for posting based on the selected periods and includes a link to navigate to the Detail View for status.
- Post a Dynamic Journal Using Cloud Scheduler
You can process and post active Dynamic Journals as an independent task in Cloud Scheduler. Inactive Dynamic Journals are not available for selection via the Cloud Scheduler. You must make inactive Dynamic Journals active via the Consolidation Control Panel to make them available for selection in Cloud Scheduler.
In Practice
Access Cloud Scheduler by navigating to Maintenance > Administration > Cloud Scheduler.
Click the Process Flow tab.
Click Add. The New Task page appears.
In the General Information tab, enter the Code, Name, and Email Recipients.
In the Tasks tab, click Add Task to add a new task.
Select Dynamic Journal as the Task Type as shown in the image below. When the Dynamic Journal task type is selected, Task Name + Selected Scenario Name, Scenario, Period, and Dependencies fields are displayed.
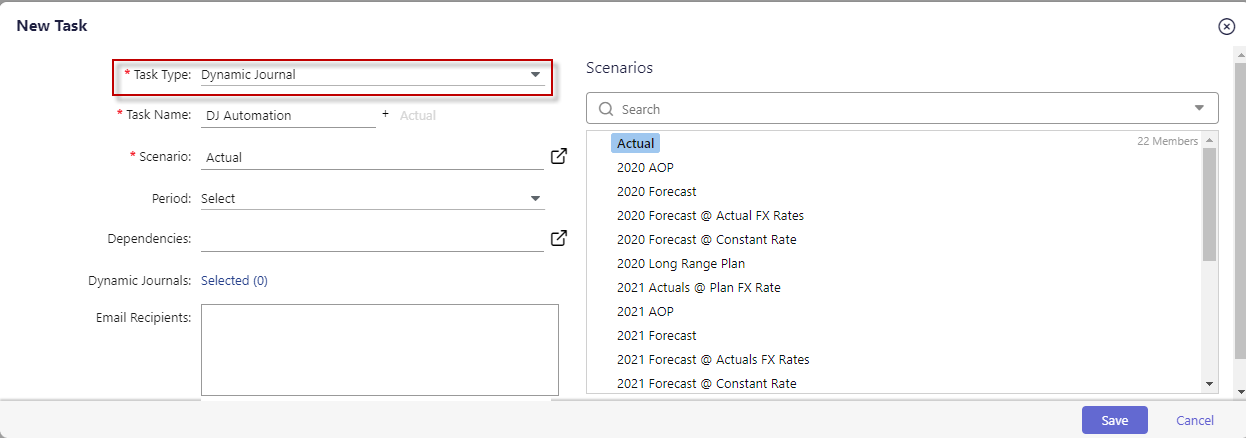
Enter a Task Name and select the Scenario for which you want to process Dynamic Journals. Once the scenario is selected, it will be added to the Task Name as shown below.

Select the period for which you want to process Dynamic Journals. The options include Custom Period (where you can select a specific date range), Previous Period, Current Financial Year, and Current Period.
For Dependencies, select a dependent task that must occur and be completed prior to the posting of Dynamic Journals. For example, the processing of the reporting cube.
Now, select the Dynamic Journals you want to process by clicking the Selected link. The Active Journals/Selected Journals pane appears. Active Journals for the current period are displayed based on actions performed in the Consolidation Control Panel. If there is a journal not displayed, navigate to the Consolidation Control Panel and change the period of the journal to the same period selected in Cloud Scheduler. Navigate back to Cloud Scheduler and the journal will appear in the Active Journals pane. Selected Journals displays the journals selected.
Select all journals you want processed/posted. Click Save.
- Here is an example of how the task name (Task Name + Scenario) appears in the process flow once processed.
 Note:If you delete a Dynamic Journal from the Consolidation Control Panel that is part of a process flow in Cloud Scheduler, the Dynamic Journal will be deleted from the process flow along with all the data. You will be notified via an in application message if the Dynamic Journal selected for deletion is part of a Cloud Scheduler process.
Dynamic Journals can be processed for both the Actual scenario and other scenarios. If you select Custom Period for the Period field, additional From and To fields are displayed. This allows you to select specific dates for which to process Dynamic Journals.
Process Multiple Dynamic Journal Entries Dependent on Previous Entries
To post multiple Dynamic Journal entries dependent on the previous entries, you should manually create a Process Flow task in the Cloud Scheduler. The process flow task must contain one dynamic entry followed by a Cube process, the next dynamic entry, and so on.
Perform the following steps to create Dynamic Journal entries dependent on the previous entries:
- Go to the Cloud Scheduler and select the Process Flow tab.
- Click on Add > Tasks > Add Task and add Dynamic Journals as Task Type. Select the Dynamic Journals you want to process by clicking the Selected link. The Active Journals/Selected Journals pane appears.
- Active Journals for the current period are displayed based on actions performed in the Consolidation Control Panel. If no journal is displayed, navigate to the Consolidation Control Panel and change the journal period to the same period selected in the Cloud Scheduler.NoteInactive Dynamic Journals are unavailable for selection via the Cloud Scheduler. You must make inactive Dynamic Journals active via the Consolidation Control Panel to make them available for selection in Cloud Scheduler.
- Navigate back to Cloud Scheduler, and the journal will appear in the Active Journals pane. Selected Journals displays the journals selected.
- Process and post the active Dynamic Journals as an independent task. Dynamic Journals can be processed for both the Actual scenario and other scenarios.
- You can select Custom Period for the Period field; additional From and To fields are displayed. This allows you to select specific dates for which the Dynamic Journals need to be processed.NoteIf you delete a Dynamic Journal from the Consolidation Control Panel that is part of a process flow in Cloud Scheduler, the Dynamic Journal will be deleted from the process flow along with all the data.
- Select Dependencies, an optional field in Process Flow configuration. Select tasks that must be executed in sequence with the task you are creating.
- Add one Dynamic Journal entry followed by a Cube process, then the next Dynamic Journal entry, and so on.
- For more information, refer to How to add a Process Flow.
Clear Dynamic Journal Data
Data in the previously posted Dynamic Journals can be cleared.
In the Consolidation Control Panel, under Processes, click Dynamic Journals. The Dynamic Journals grid appears.
Select the processed Dynamic Journal, under Entry Actions, and click Clear Data.
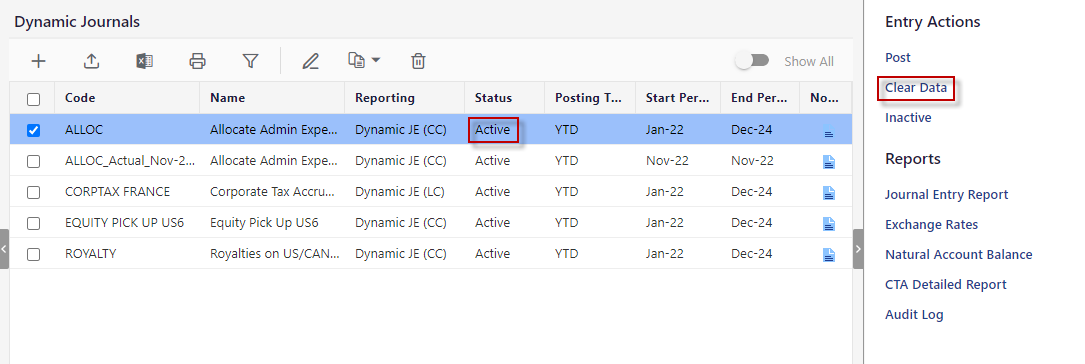
The Clear Dynamic Journal dialog appears.
The Scenario field is read-only and indicates the selected scenario that will be used when posting Dynamic Journal Entries.
Select the fiscal Year by using the calendar icon.
Select the Period by selecting a month range from the dropdown.
Select the Email notification checkbox if you want to send a notification about results when the process is complete. Enter the email addresses of the recipients you wish to notify.
Click Clear Data. The Clear Dynamic Journal dialog is exited. A message appears indicating that the Dynamic Journal Entry is submitted for clearing of data based on the selected periods and includes a link to navigate to the Detail View for status.
- View Dynamic Journals at the Rollup Level
Users having access to all companies can view and post Dynamic Journals at the rollup level. You can view and post Dynamic Journals for companies grouped. Also, it facilitates the display of Dynamic Journals at the rollup level instead of viewing them at the company level.
In Practice: View Dynamic Journals at the Rollup level
- Navigate to Consolidation Control Panel> Dynamic journals.
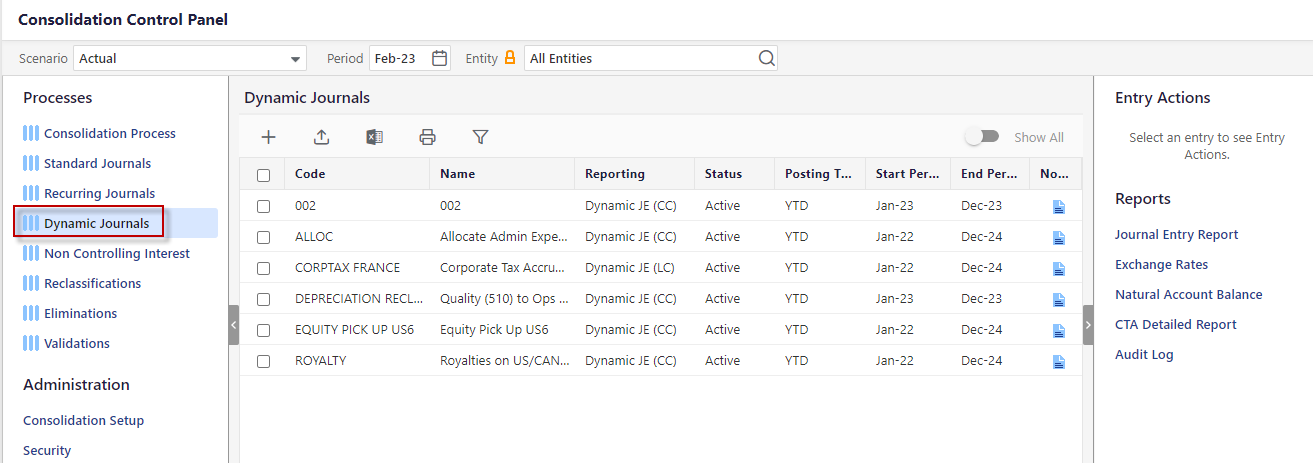
- Select Period and Entity.
- Now, you can select the rollup level companies and post Dynamic Journals.

- Processing Dynamic Journals and Non Controlling Interest Outside of the Consolidation Process
An opt-in configuration item allows you to process Dynamic Journals and Non Controlling Interest outside of the Consolidation Process. This configuration removes the steps associated with posting and clearing data for Dynamic Journals and Non Controlling Interest from the Consolidation Process and enables the functionality to allow users to post and clear Dynamic Journals and Non Controlling Interest within the processes themselves. If you are interested in this item being configured for your application please contact Planful Support for assistance.
You can also post and clear Dynamic Journals and Reclassifications in the cloud so that you can continue working while processing takes place. Once complete, you will be notified via email as well as an in-application notification.
Consolidation Process Changes
The steps within the Consolidation Process associated with calculating Dynamic Journals and Non Controlling Interest in Local and Common Currency will be removed from the Consolidation Process. These steps will post Active Dynamic Journals and Non Controlling Interest as established by the Status, which is set by journal or rule for the time period selected. Inactive journals or rules will clear data for the time period selected.
Dynamic Journals Module Changes
Dynamic Journal List Screen
A checkbox to select journals to Post or Clear Data from is available for updated Entry Actions.
The Status column is removed.
- Entry Actions will be updated with the following options:
Active/Inactive – these options will not be visible as users will determine which journals they would like to execute Entry Actions for and leverage the Start and End Period to determine which journals are active or inactive.
Post:
To post a Dynamic Journal, select the Post checkbox next to the Dynamic Journal and click the Post Entry Action.
The Post Setup page is opened. Select the periods for which you wish to post and click the Post button.
Scenario - Displays the Actual scenario for which the Dynamic Journals will post.
Year - Select the fiscal year for which you want the Dynamic Journals to post.
Period - The months available for processing are displayed. You can only post to unlocked months.
Post - Execute the process.
- Once Dynamic Journal data is posted, a status page provides you with information as to whether the posting was successful or not.
Clear Data:
Delete previously processed Dynamic Journal data.
To clear Dynamic Journal data, select the journal in the middle pane (by selecting the Post/Clear checkbox) and click on the Clear Data Entry Action. This action opens a dialog page, which allows you to clear Dynamic Journal data for the selected period(s).
Scenario - Displays the Actual scenario for which the Dynamic Journals will clear.
Year - Select the fiscal year for which you want the Dynamic Journals to clear.
Period - The months available for clearing are displayed. You can only clear data for unlocked months.
Clear Data - Execute the process.
- Once Dynamic Journal data is cleared, a status page provides you with information as to whether the clear was successful or not.
- Non Controlling Interest Module Changes
Non Controlling Interest List Screen
A checkbox to select rules to Post or Clear Data is opened for the updated Entry Actions.
The Status column is removed.
- Entry Actions will be updated with the following options:
Active/Inactive – Use to determine which rules you would like to execute Entry Actions for and leverage the Start and End Period to determine which rules are active or inactive.
Post:
To post Non Controlling Interest, select the Post checkbox next to the Non Controlling Interest entry and click the Post Entry action.
The Post Setup page is opened. Select the periods for which you wish to post and click the Post button.
Scenario - Displays the Actual scenario for which the Non Controlling Interest will post.
Year - Select the fiscal year for which you want the Non Controlling Interest to post.
Period - The months available for processing are displayed. You can only post to unlocked months.
Post - Execute the process.
- Once Non Controlling Interest data is posted, a status page provides you with information as to whether the posting was successful or not.
Clear Data:
Delete previously processed Non Controlling Interest data.
To clear Non Controlling Interest data, select the entry in the middle pane (by selecting the Post/Clear checkbox) and click on the Clear Data Entry Action. This action opens a dialog page, which allows you to clear Non Controlling Interest data for the selected period(s).
Scenario - Displays the Actual scenario for which the Non Controlling Interest will clear.
Year - Select the fiscal year for which you want the Non Controlling Interest to clear.
Period - The months available for clearing are displayed. You can only clear data for unlocked months.
Clear Data - Execute the process.
- Once Non Controlling Interest data is cleared, a status page provides you with information as to whether the clear was successful or not.
- These Entry Actions will captured in the Audit Log under the Non Controlling Interest Audit Area for more detailed analysis, if required.
Related Articles

