Adding Employees
- 8 Minutes to read
- Print
- DarkLight
- PDF
Adding Employees
- 8 Minutes to read
- Print
- DarkLight
- PDF
Article summary
Did you find this summary helpful?
Thank you for your feedback
To add an employee and process, follow these steps:
- Once you click Add, the Add Employee window appears.
- Enter the employee's name, and employee number to identify the employee (you can later edit this number after it has been saved), and then select the Home Budget Entity to which the employee will belong. Click hereto learn how you can add the profile picture.Note:
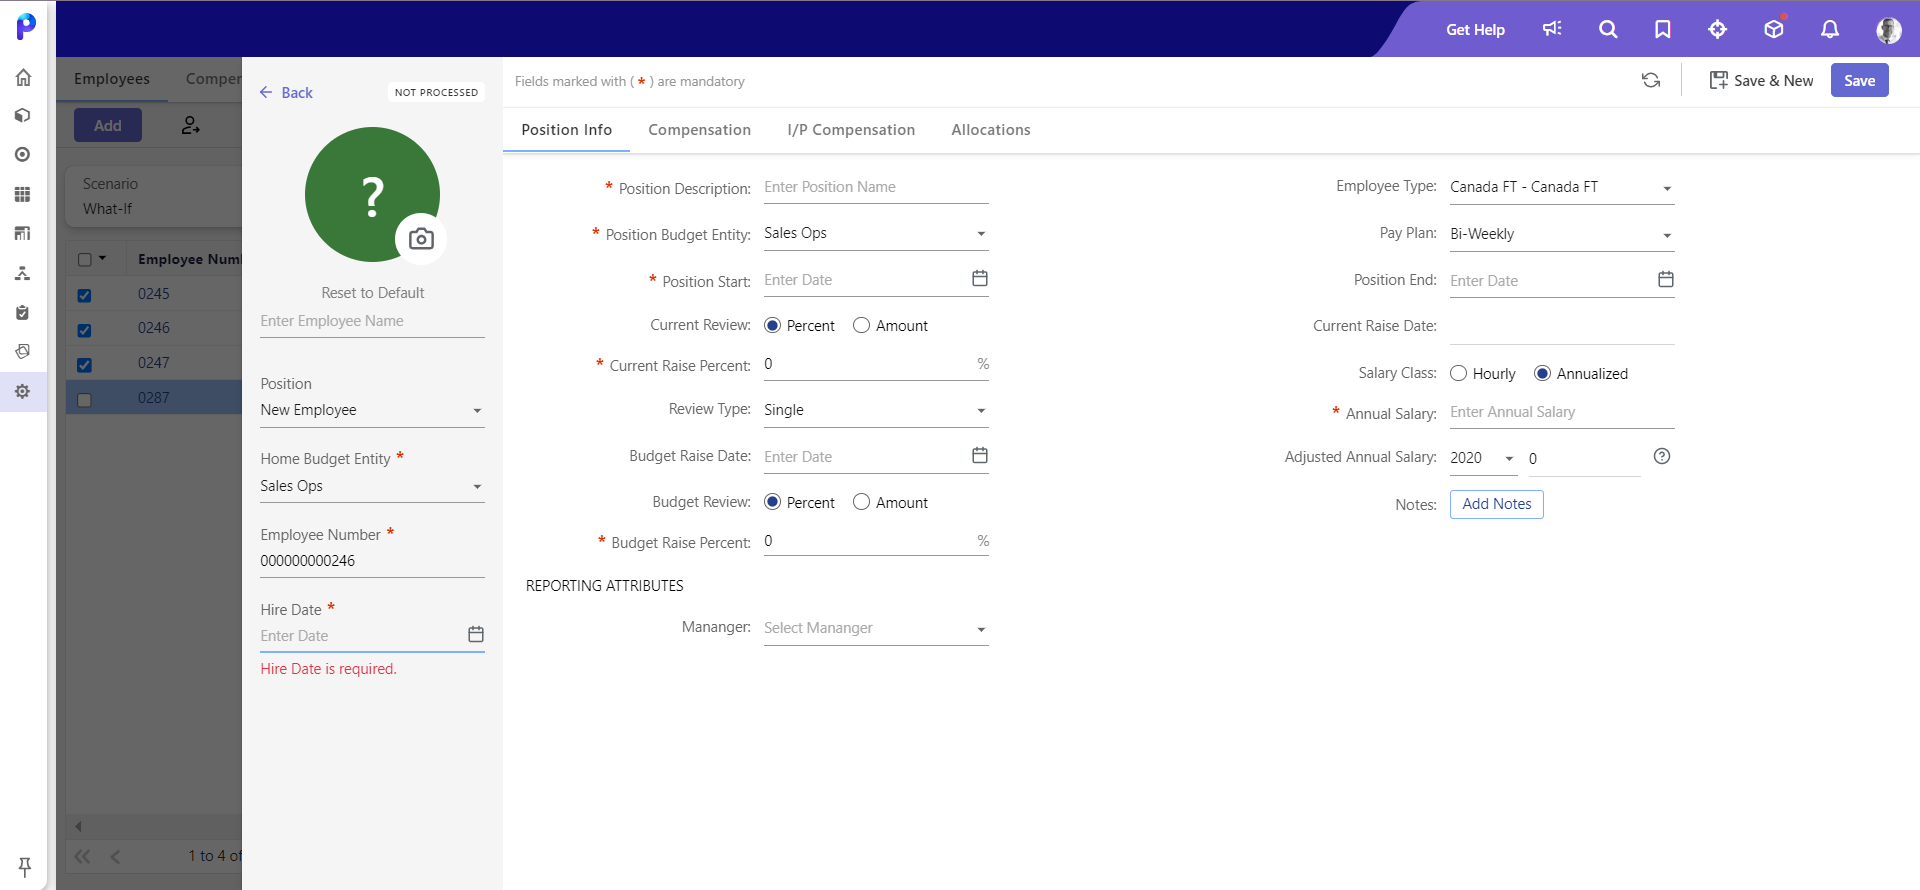
- When you select multiple budget entities from the Budget Entity selection field and if the Home Budget Entity and Position Budget Entity fields are empty as shown in the image below:
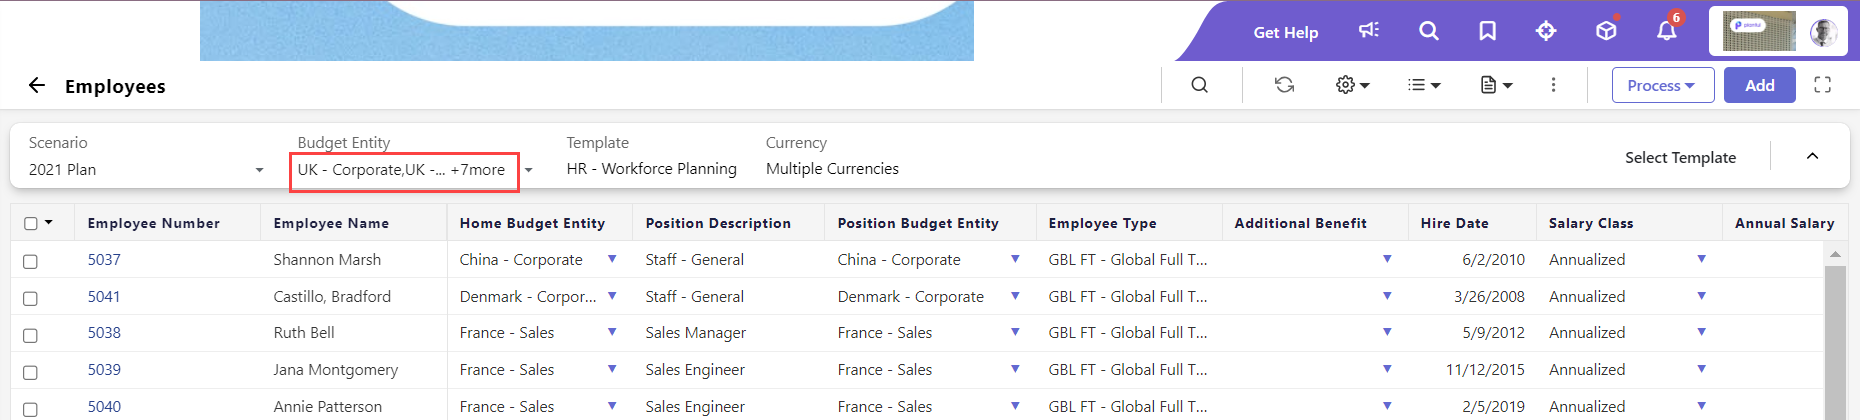
The Add Employee window or have no entity selected by default. This helps you to select the required entity in these fields when there are multiple budget entities selected as shown in the image below:
- If you have selected a single budget entity, for example, Sales from the Budget Entity field, as shown in the image below.
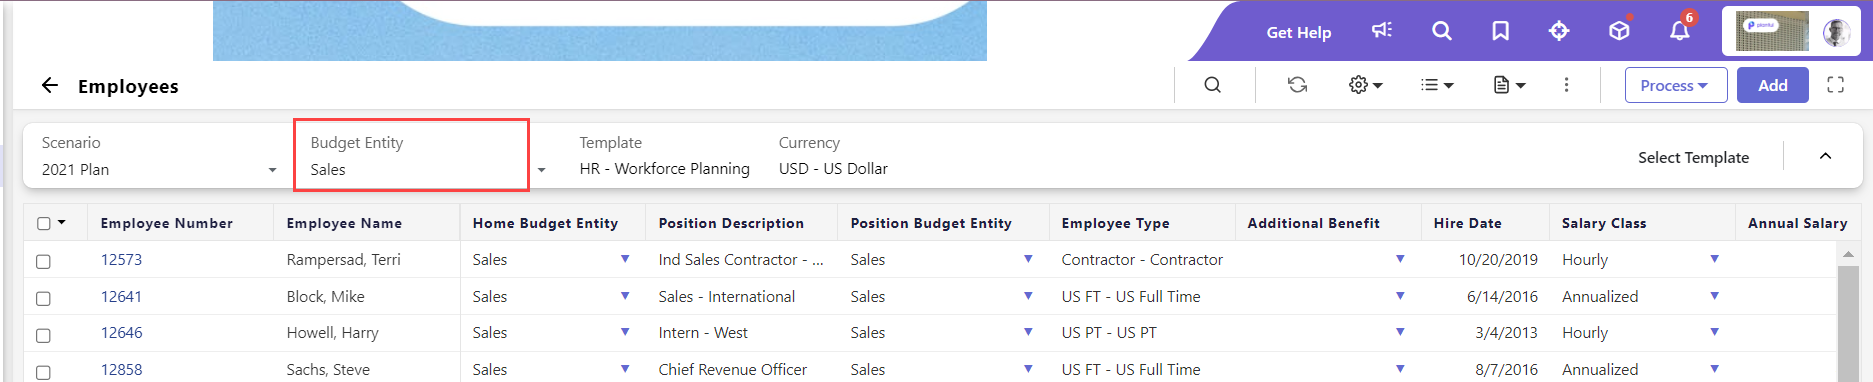
The budget entity selected in the Budget Entity field is also displayed in the Home Budget Entity and Position Budget Entity fields by default on the Add Employee page, as shown in the image below:
- When you select multiple budget entities from the Budget Entity selection field and if the Home Budget Entity and Position Budget Entity fields are empty as shown in the image below:
- For the Hire Date, select the date on which the employee was hired. The Hire Date and the Position Start Date are the same in most cases. However, in some cases, an employee can be tied to two different positions within the same organization making multiple Position Start Dates a possibility. The expense of the employee is always driven by the Position Start Date value.
Click here to learn how to set up employee positions out of the budget cycle.
Now, you need to enter all the details under the following tabs.
Under the Position Info. tab, complete the following fields:
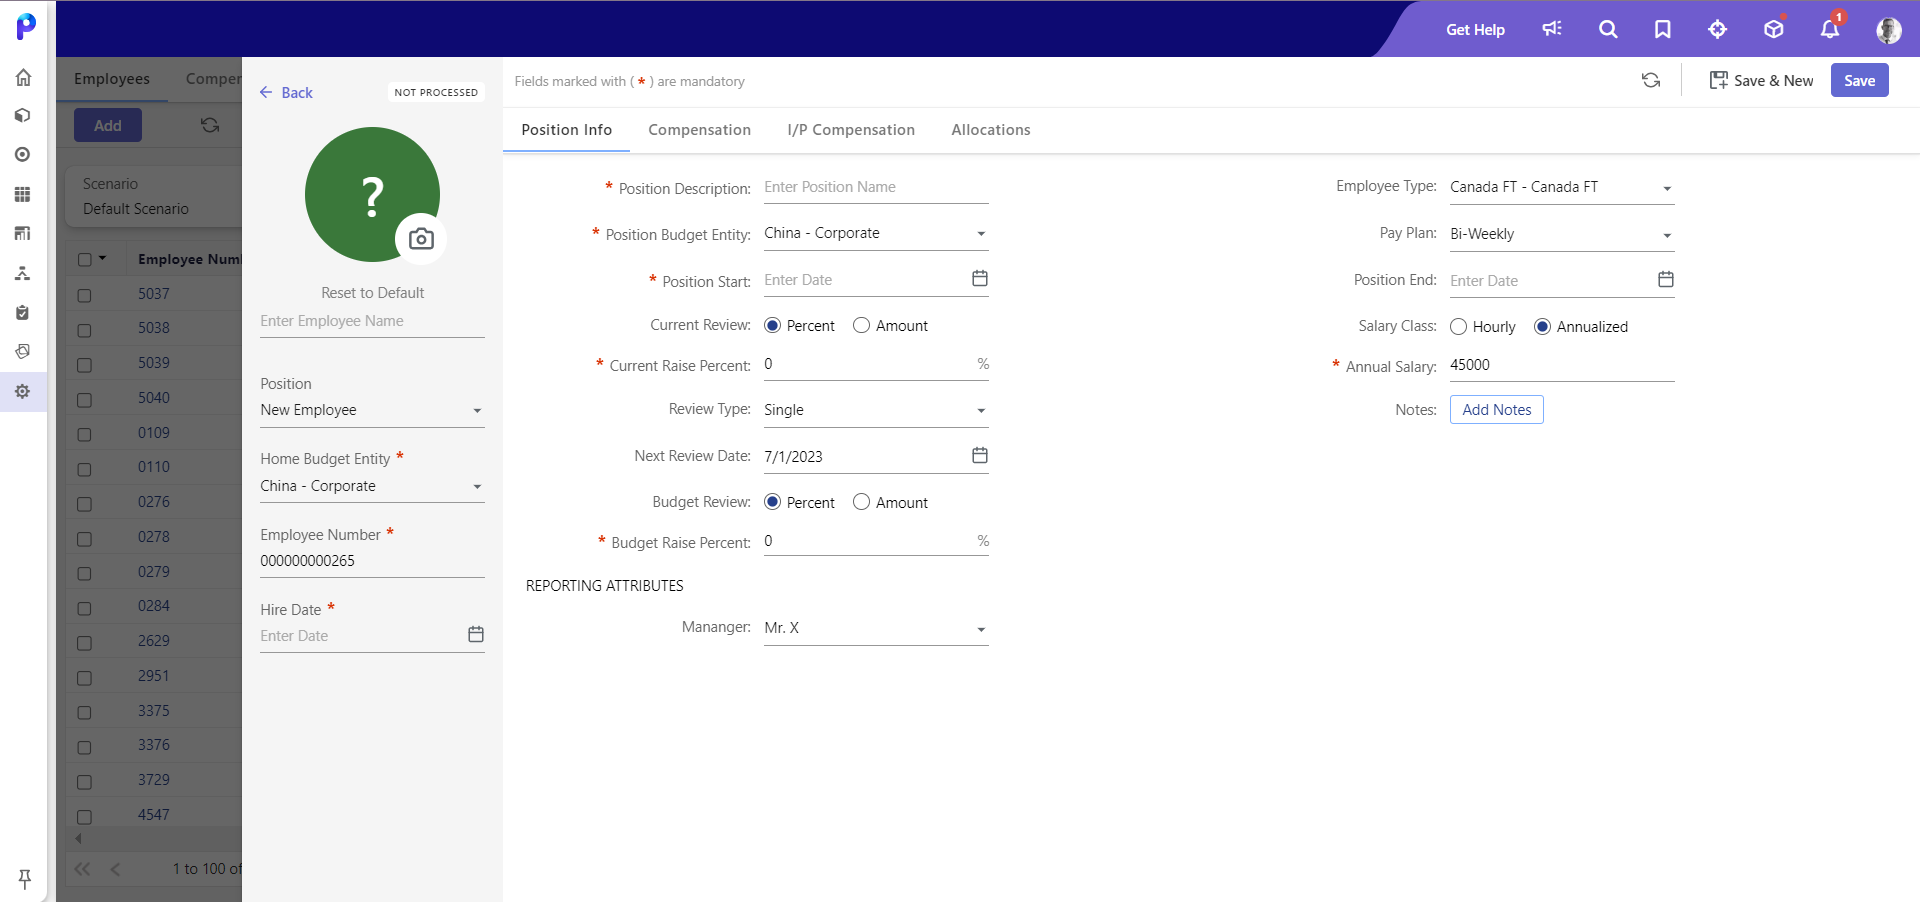
- Position Description: Name of the employee's job description.
- Position Budget Entity: The home budget entity can be edited if an employee moves to another department. This selection is tied to allocations and is populated in the Company Allocations column.
- Position Start: Select the start date of the position.
- Current Review: Select Current Review in Amount or Percentage. Based on this selection, you will see the Current Raise Percent or Current Raise Amount fields. Click here to understand how to calculate the current review date.
- Current Raise Percent: Determined by employee type. Intended to have raise calculations when the raise dates are before the budget scenario start date (since the payroll upload date).
- Next Review Date: Select the employee's next review date.
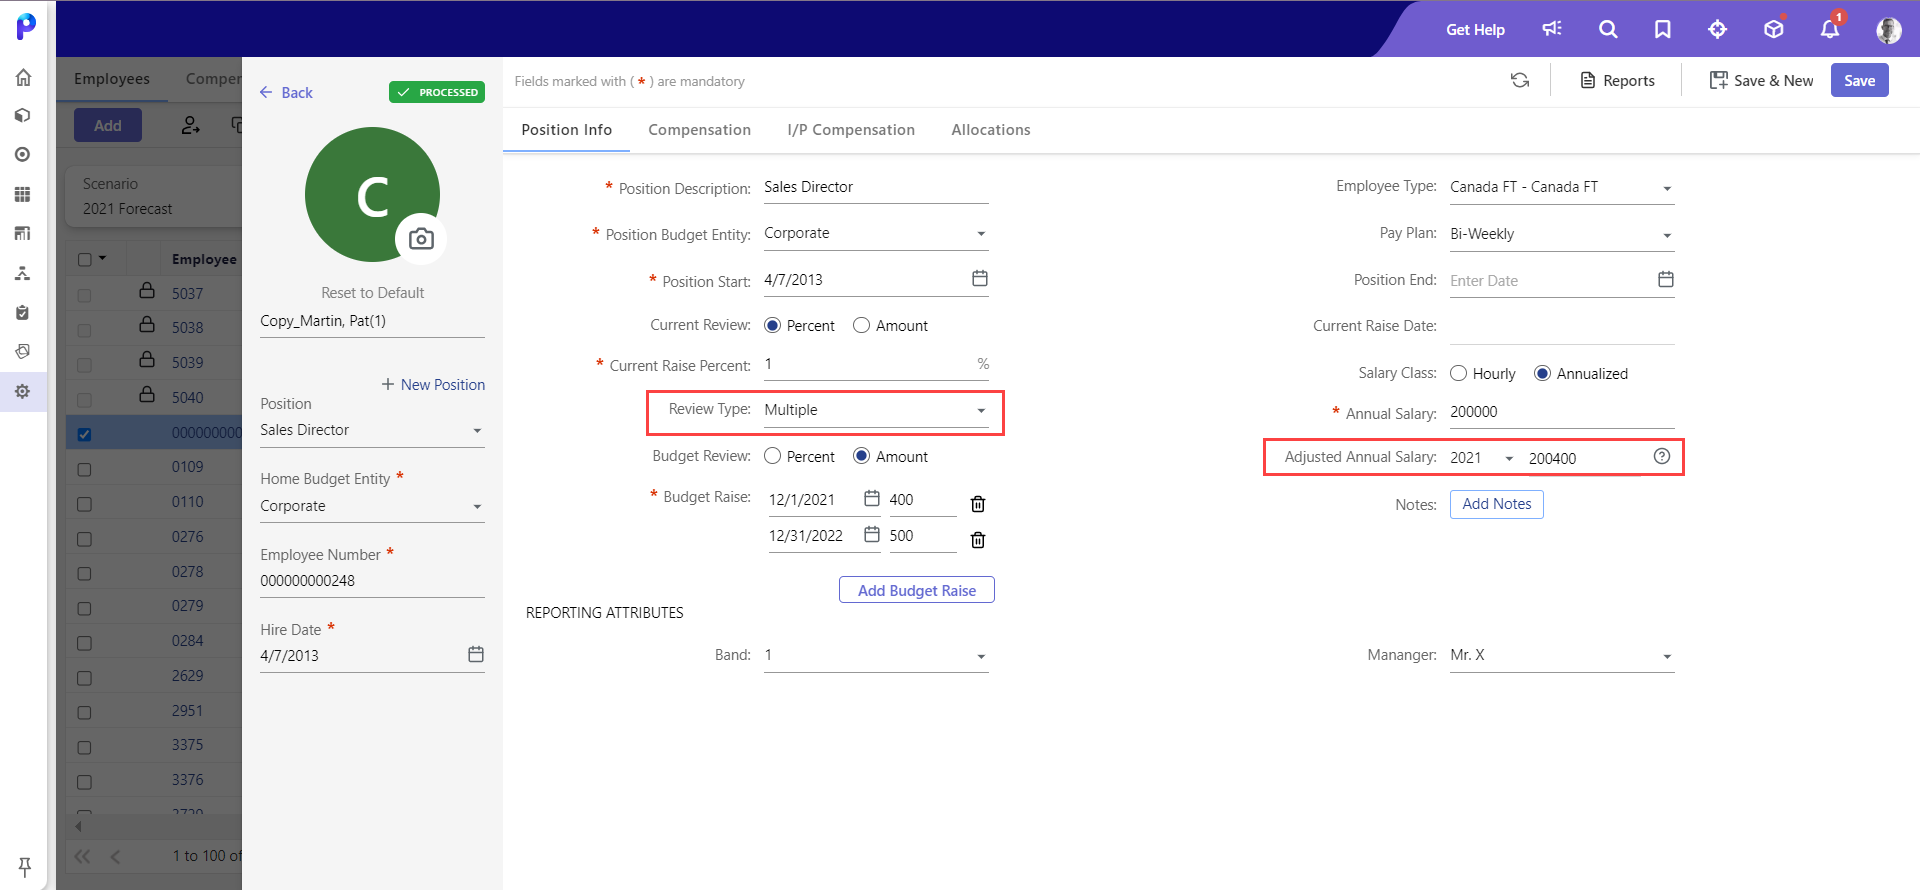
- Review Type: Select whether the employee will have single or multiple reviews. If you select Multiple, the Date and Percentage fields are displayed. Select the date of the review and enter the raise percentage. Add and delete raise dates and percentages as needed by clicking Add or Delete respectively.
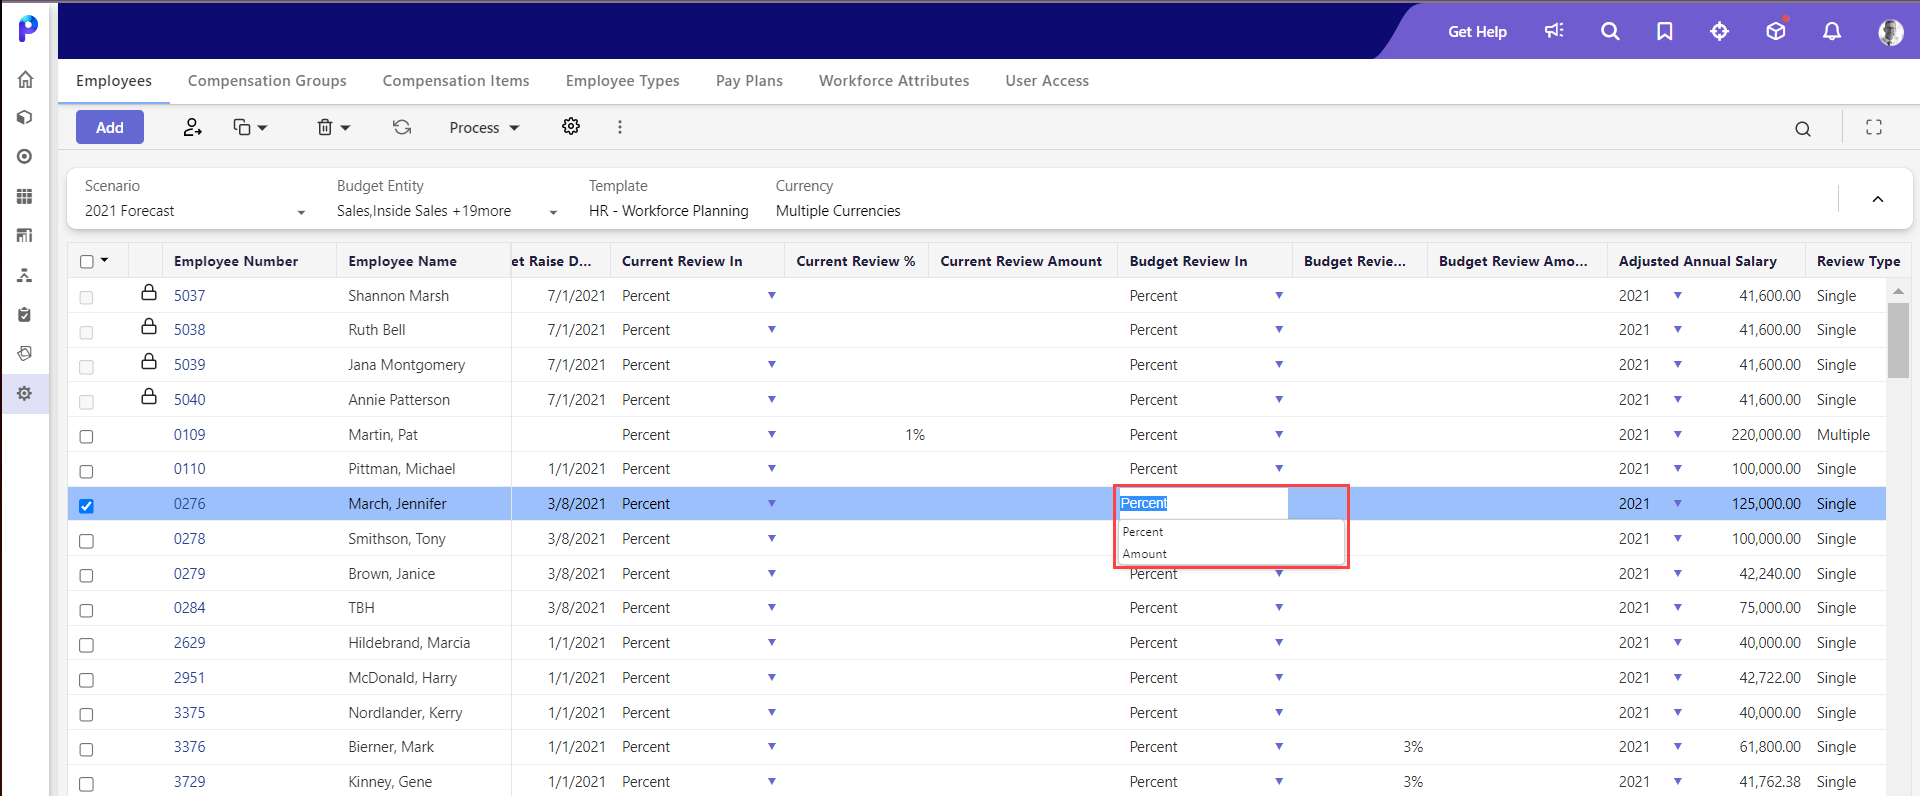
- Budget Review: Select Budget Review in Amount or Percentage. Based on this selection, you will see Budget Raise Percent or Budget Raise Amount fields.
Click here to understand how to calculate the budget review date.- Budget Raise Percent: Based on anniversary dates. The Next Review Date determines the Budget Raise Date. For example, the next review date falls between the Scenario Start and End Dates. Type the percentage increase in merit that employees will receive.
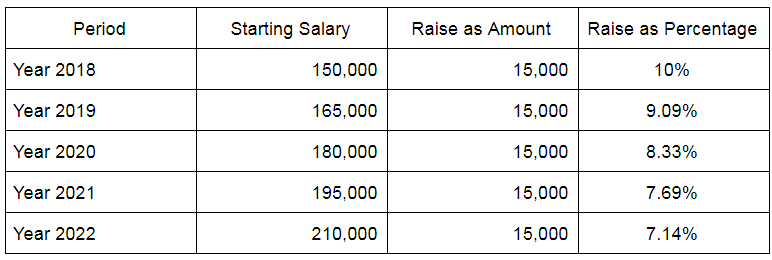
A valid raise percentage must be between -100 and 100, which is consistent with multi-raise percent. Budget raise can be managed and administered centrally at the employee type level rather than at the employee level. - Budget Raise Amount: Adjust the employee’s salary raise by amount.
When you adjust an employee’s raise by amount, the system calculates the percentage automatically based on the amount entered. In the example below, raise is entered for a single employee as an amount versus percentage. The result is that the system keeps the yearly raise constant and adjusts the percentages accordingly.
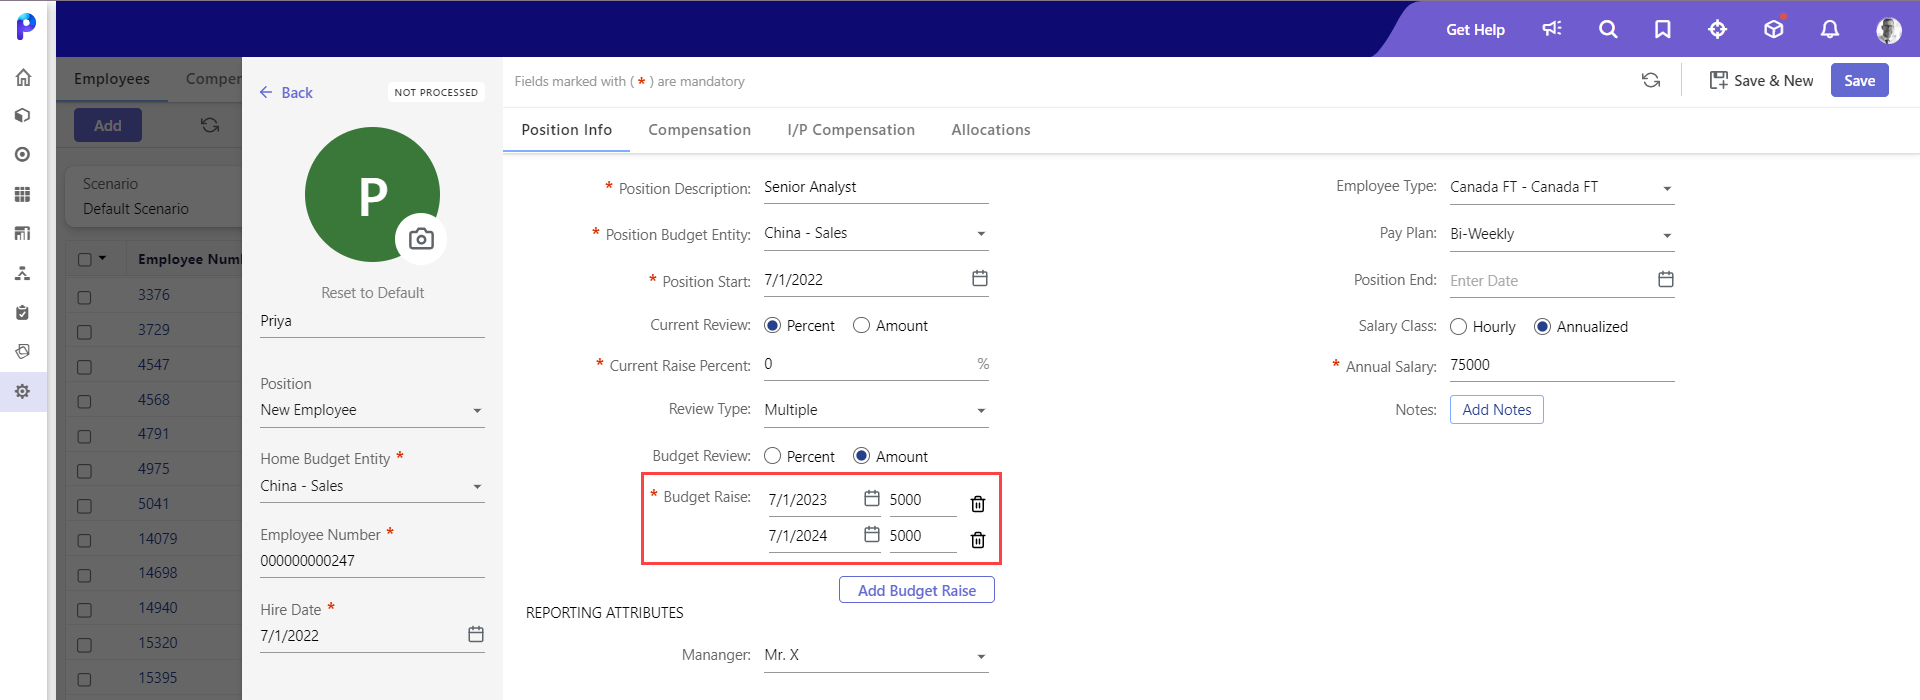
In the following example, the budget raise amount is specified multiple times for an employee with Review Type set as Multiple.
Budget Raise as Amount functionality is available on the Employee Add/Edit pages (for single and multiple employee raise amount) and Employees page (for single employee raise amount). Also, End users can access the Employee Add/Edit and List pages via the template opened from the Planning Control Panel.
For an employee, after you have specified the Budget Raise Amount and selected Review Type as Single, you can view the details in the Roster view (Employees page).
After you have entered Budget Raise Amount and set Review Type as Multiple, the details are not available in the Roster view as shown here.

You cannot load data for budget raise amount by using Data Load Rules. If you enter the budget raise amount for an employee and then data is loaded for that employee via Data Load Rules, the setting will be reverted to Budget Raise as Percentage.
- Budget Raise Percent: Based on anniversary dates. The Next Review Date determines the Budget Raise Date. For example, the next review date falls between the Scenario Start and End Dates. Type the percentage increase in merit that employees will receive.
- Employee Type: Select an employee type, which determines the compensation items associated with the employee.
- Pay Plan: The salary plan of the employee: monthly, weekly, and so on.
- Position End: Select the end, or termination, date of the position.
- Salary Class: Select hourly and provide hours/month and rate entry information. Alternatively, select Annualized and type an annual salary amount.
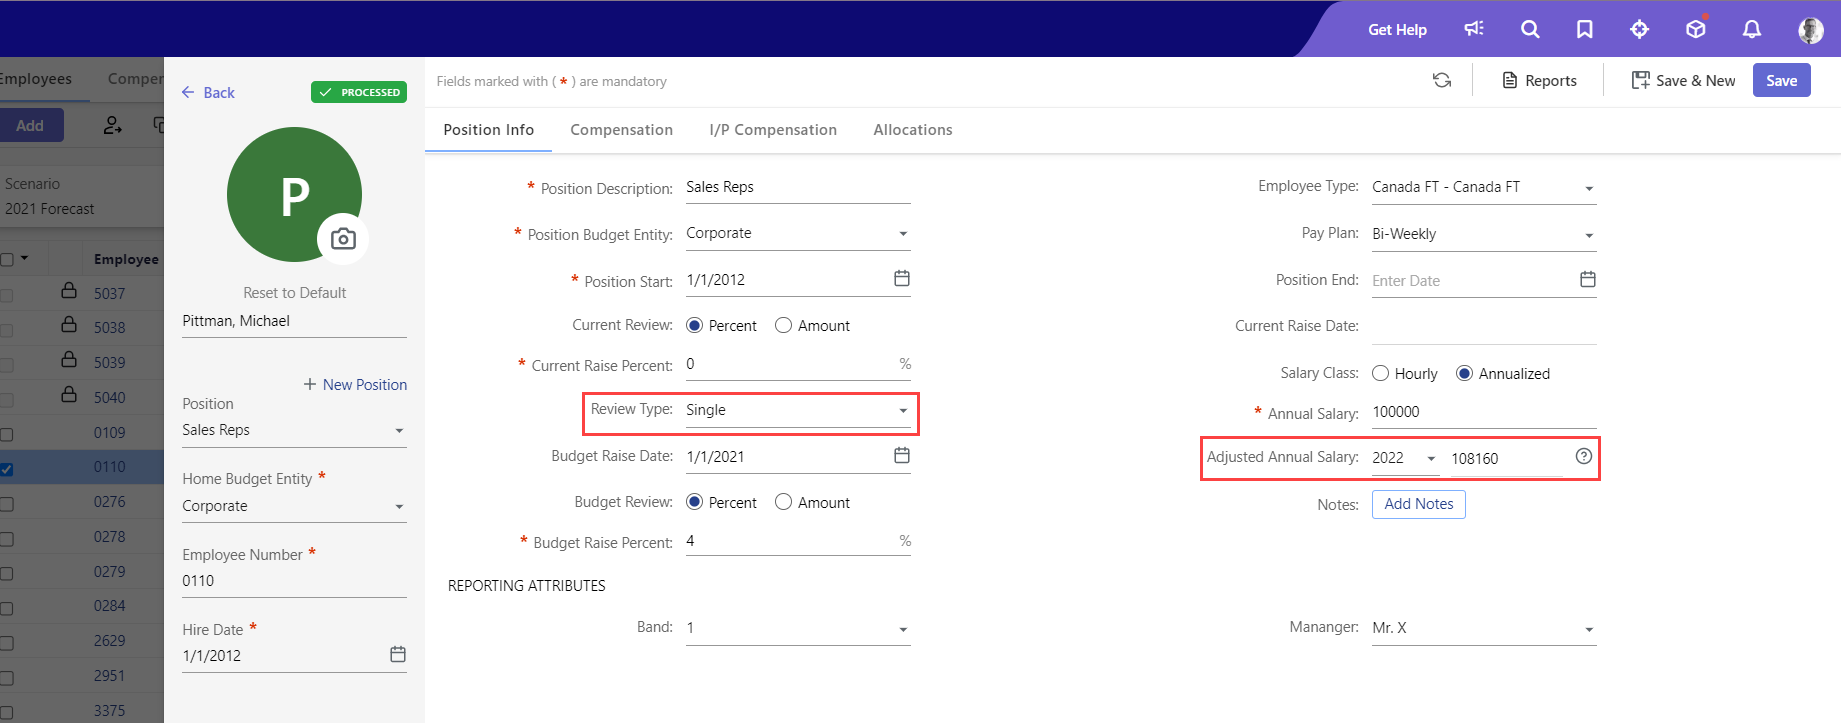
- Adjusted Annual Salary: This field displays the annual salary impact of employees each year, including the additional cost after calculating budget reviews. For instance, you may want to compute the yearly annual salary impact of an employee for different budget/forecast years starting with a $100K salary and an annual raise of 4.5%. End users can view and edit the adjusted annual salary of an employee by following these steps:
From the Planning Control Panel, open a Workforce template.- To add an employee, click Add. To edit an employee, click the required employee number hyperlink.
- From the Review Type field, select Single or Multiple.
If you select Single, follow these steps:- Select Budget Raise Date, Budget Review, and then type the Budget Raise Percent/Amount value.
- In the Adjusted Annual Salary field, select the required year. The Adjusted Annual Salary value is displayed for the selected year.
If you select Multiple, follow these steps: - Select Budget Review as either Percent or Amount.
- In the Budget Raise table, specify the Budget Raise Date and Budget Raise Percent/Amount.Note:You can add and delete raise dates and percentages/amounts by clicking the Add Budget Raise or Delete icons.
- In the Adjusted Annual Salary field, select the required year. The latest Adjusted Annual Salary value is displayed for the selected year.
- Add Notes: Add notes and attachments to employee positions for reporting purposes. For example, you can add a requisition for employee-related costs or make notes for new hires.
- Type notes in the Notes field. To attach a document, click Browse. Attachments are listed based on the date and time they were added along with the user who added the attachment.
- You can print notes by clicking Print.
- After attaching documents and/or entering notes, click Save. The following document types are supported: .gif, .png, .jpeg, .jpg, .tif, .tga, .doc, .docx, .xls, .xlsx, .ppt, .pptx, .txt, .rtf, .pdf, .csv, and .vsd
- Reporting Attributes: Used for managing additional information for employee position. Not used in compensation cost calculations.
Click the Compensation Items tab, and complete the following fields:
Note:
Compensation items are displayed based on the employee type assigned to the employee. Associated rates, amounts, and percentages cannot be modified by budget users and are set by users who have access to Maintenance > WFP.
- Select the Customize Compensation option to select and map the compensation items with an employee.
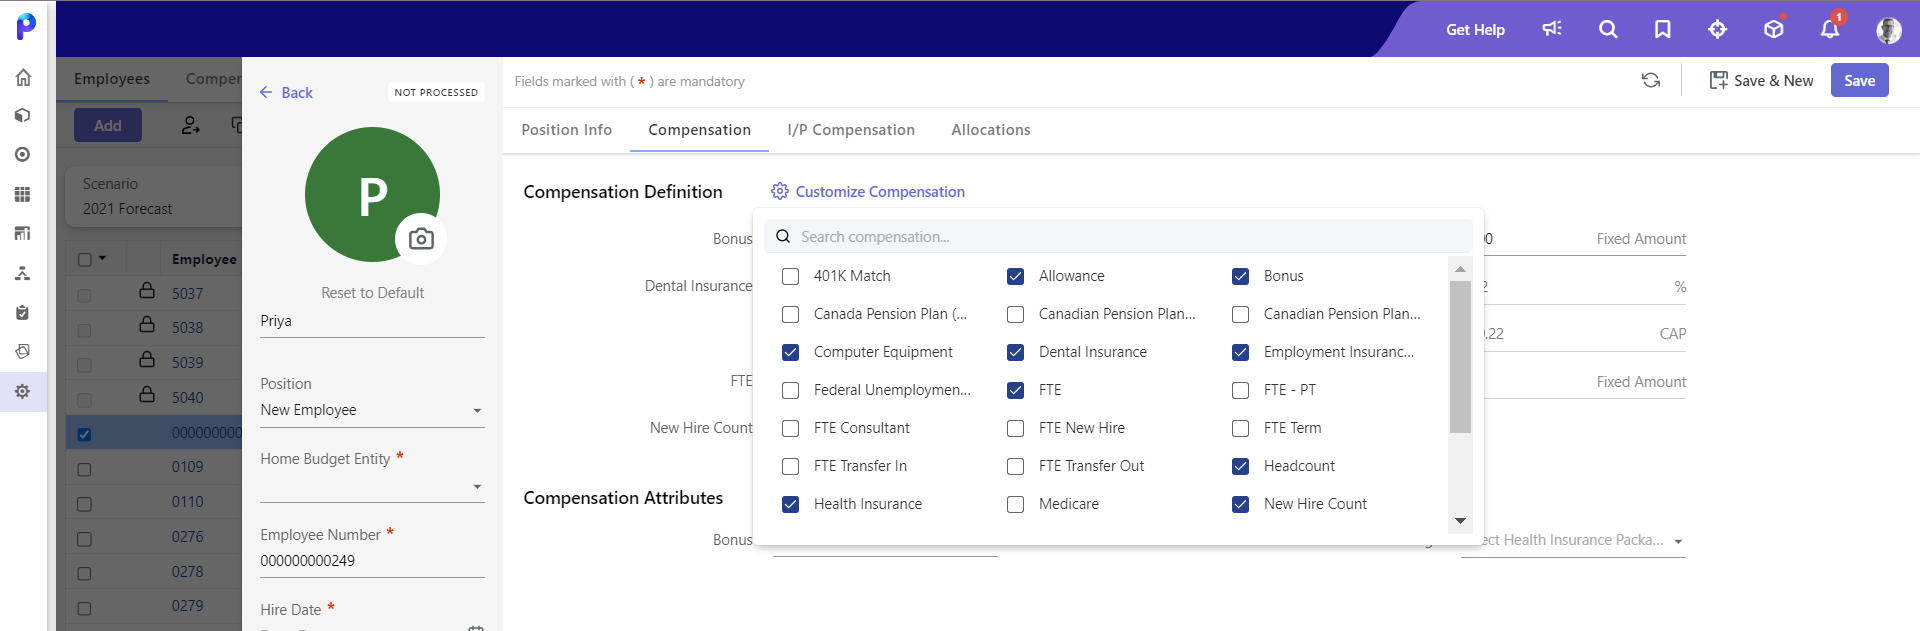
For the compensation items that vary annually, additional details are displayed. You can modify the Effective Date and Percentage amounts for these compensation items.
These modifications will not affect the compensation item setup and will only be modified for the employee you add or edit. - In the Compensation Attributes section, your available attributes will vary based on your setup.
Attributes are based on the compensation items mapped to the employee (and set up by your user who has access to Maintenance > WFP and on the Add Attribute page).
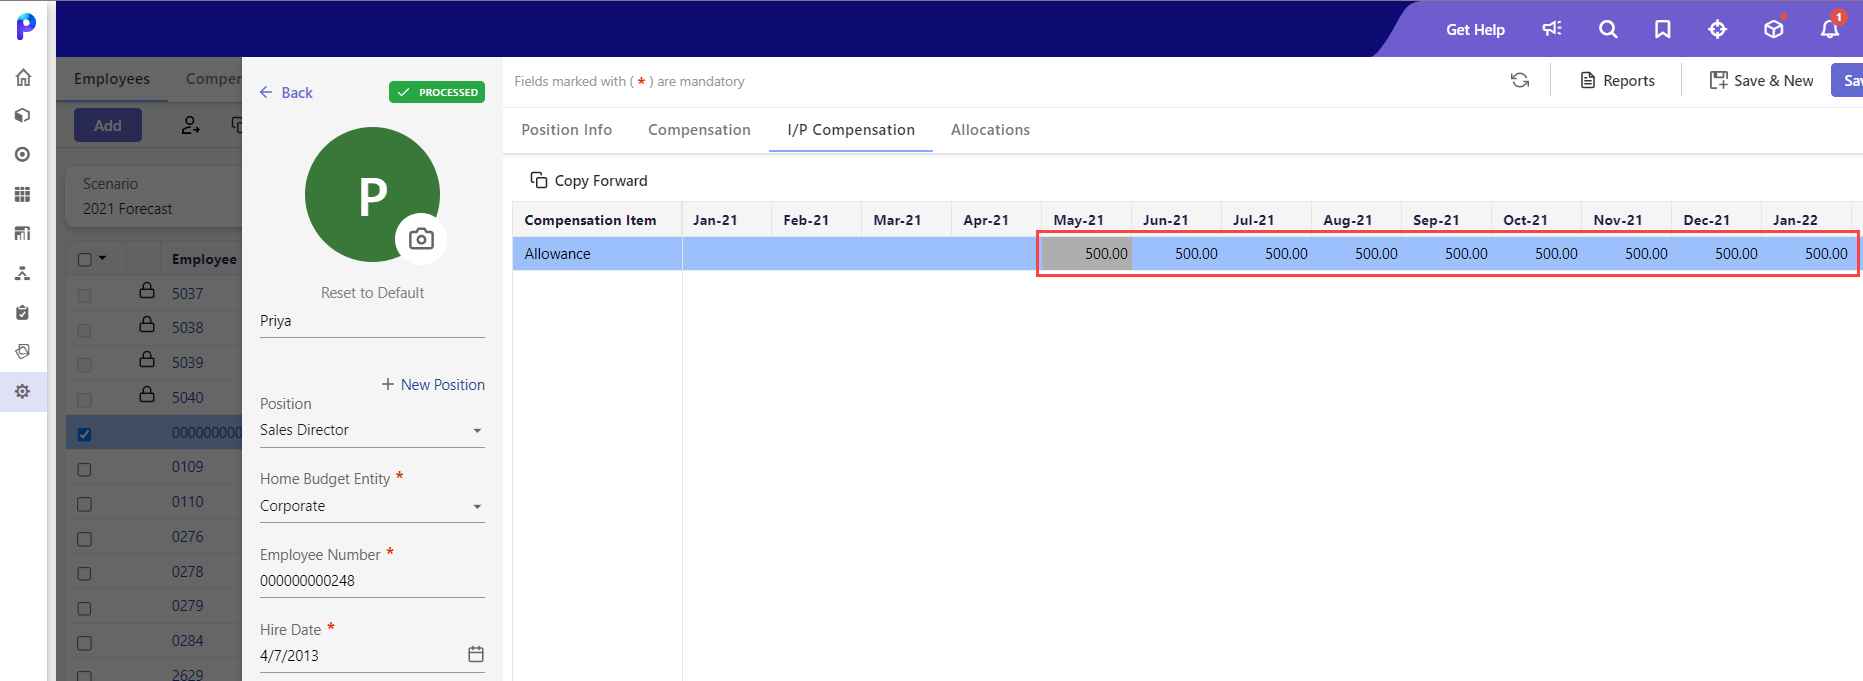
Click I/P Comp Items, and then perform the following actions:
- Input amounts by month: Cells for the periods outside of the scenario projection start or the periods outside of the position start/end date are locked from data input.
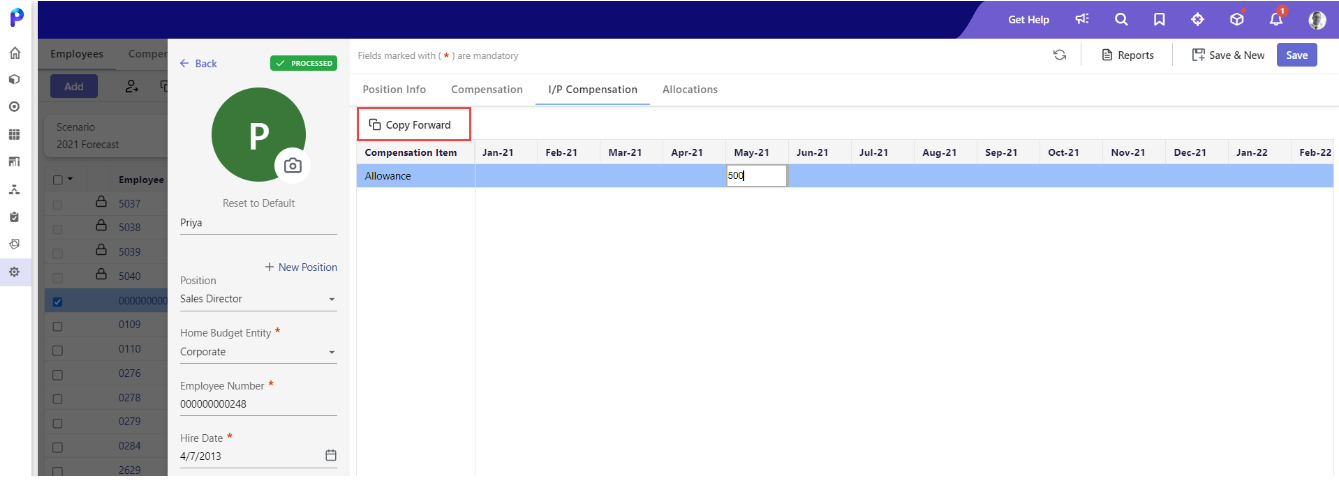
- Click Copy Forward to copy the cell data to other periods on any given row. Displays two decimal values by default.
Click Allocations and then perform the following actions:
Using Allocations, you can distribute employees amongst budget entities/segments (Department, Company, and so on) and compensation items.
- Click Add New Allocation to add additional allocation lines,
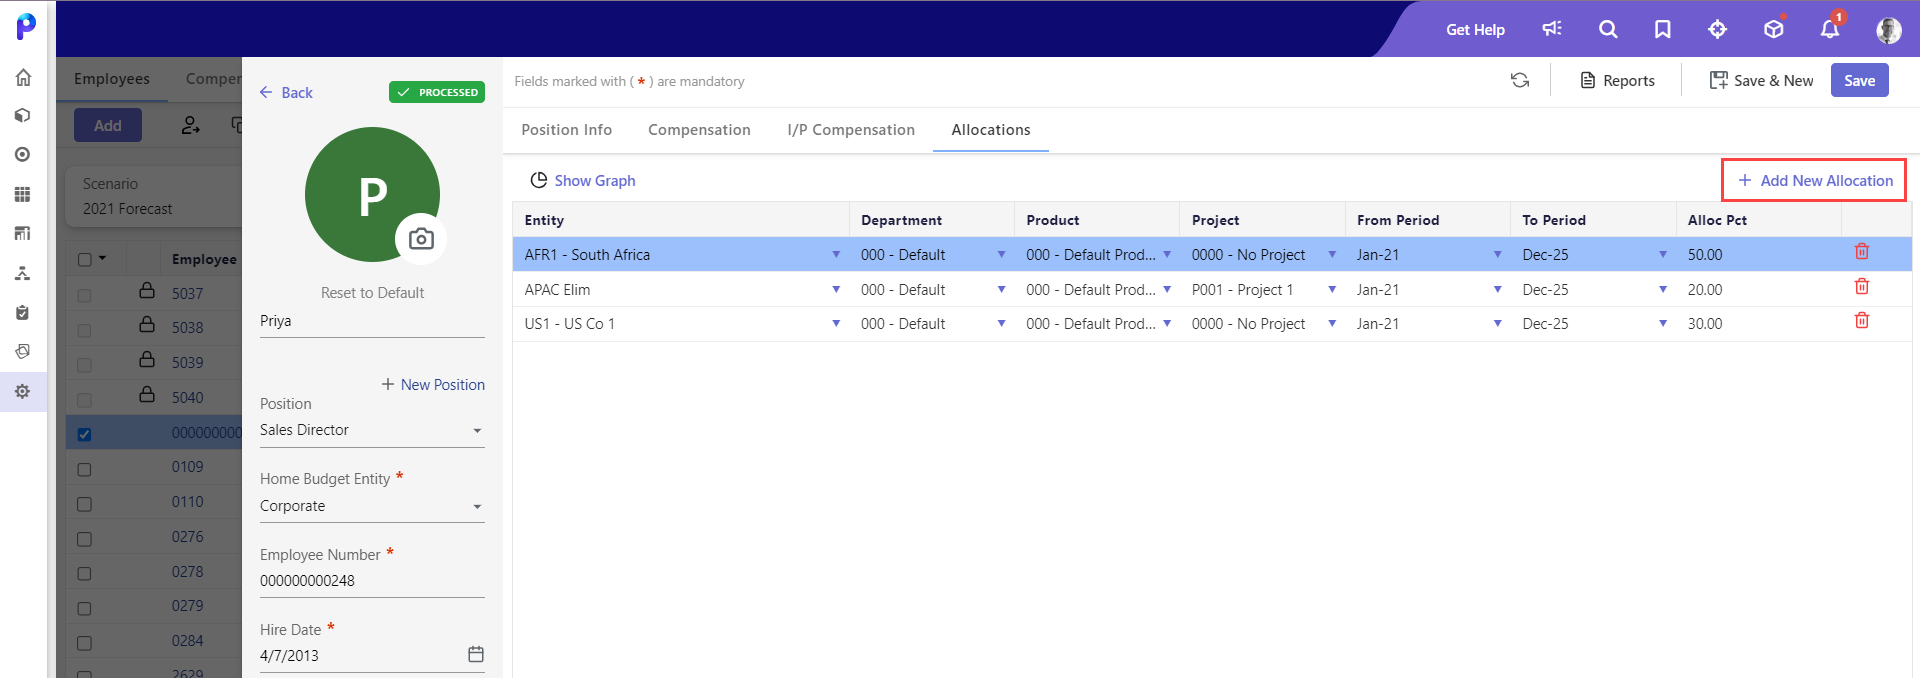
- Specify the required information in the fields as required. You can enter allocation percentages (Alloc Pct) with decimals. The Allocations grid displays up to two decimal values by default.
- Click the Show Graph option to view the graphical representations of the allocations.
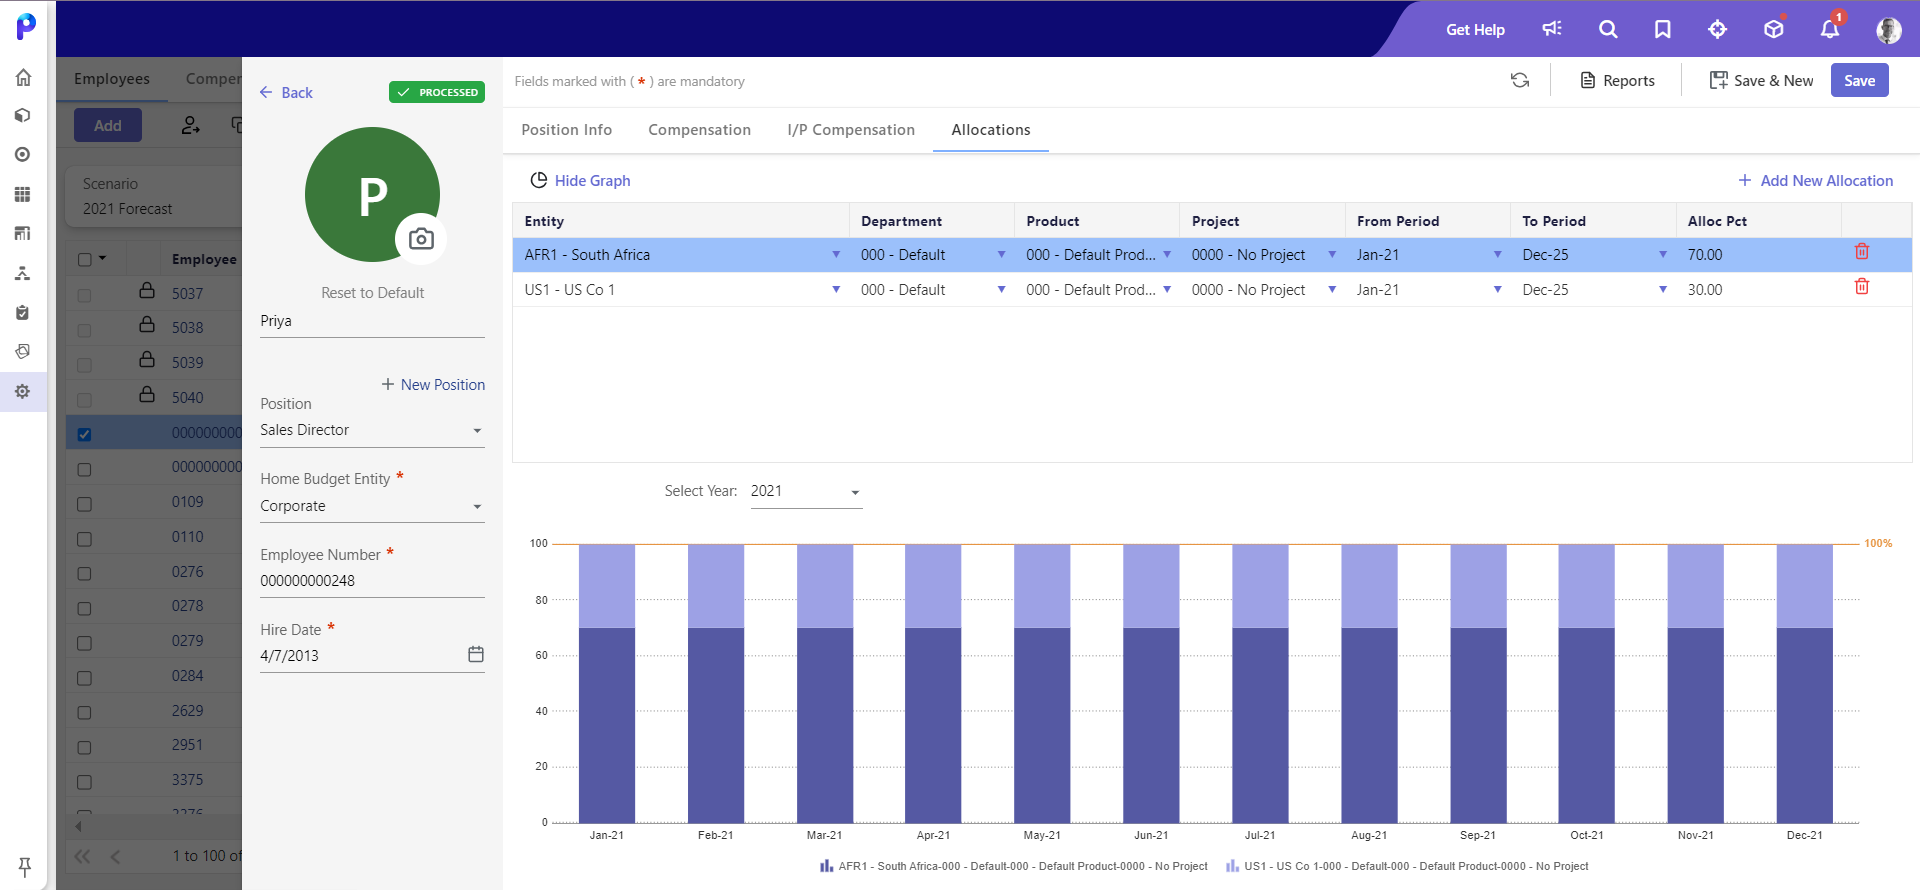
Employees can be allocated to multiple budget entities. Allocations contain compensation item-level detail when the user selects the By Compensation Item option as the employee allocation method on the Define Workforce Planning Budgeting Criteria page. Instead, if the user selects the By Department option, the Compensation Item column will not be displayed.
Note:
If you create a duplicate allocation (same compensation item, same segment combinations on multiple rows) on the Allocations setup page, Planful will identify the duplicates and consolidate the allocation to a single entry with an aggregated allocation of 100 percent.
Allocation Periods for Time-based Compensation Allocations:
Allocation periods are set up so that you can select from a planning scenario start period and allocate through the end date of the scenario, irrespective of the position start or projection start date. This flexibility allows you to set up allocations for employees associated with Forecast scenarios and assists with a copyback of allocations from a Forecast scenario to the Default scenario. All compensation calculations for employees still take place according to the position start and project start date setup.
You must set up allocations for the entire active duration of the employee position (position start and position end).
For example, if an employee's position starts on 6/4/2018 and ends on 1/5/2019, allocations for this employee's position must cover all periods between Jun-18 and Jan-19. If allocations are not provided, an error will occur and this error message will be displayed: “Allocation not provided for all periods.”
What to do after filling out all the tabs?
Once you complete filling all the tabs, click either:
- Save or Save & New
- Save to save employee details.
- Save & New to save employee details and add a new employee.
Click here to learn how to move employees from one cost center to another.
Process: Employees are automatically processed when employee data is updated from the Roster view (Employees page), Employee Add, Employee Edit, and Mass Update pages. Click here to learn more about automated processing.
Note:
Processing is performed in the cloud. You will receive a message after the processing has been completed.
Related Articles
Was this article helpful?