- 44 Minutes to read
- Print
- DarkLight
- PDF
Loading Data to Planful Summary
- 44 Minutes to read
- Print
- DarkLight
- PDF
This guide explores options available to load your data to Planful. .
The remainder of this document discusses each of the options along with best practices.
Web Services / Boomi - load all types of data
Integration Services - manage the Integration Process with Boomi from within the Planful application
APIs - a simple, powerful and secured way of importing or exporting data to and from the Planful application.
Cloud Services - depending on service (for example, Box and NetSuite Connect); load GL, Segment Hierarchy, Transaction, and Translations data
Data Load Rules - load all types of data
Transaction Details - load transaction or "daily" data
Actual Data Template - load actual data
Best Practices for Loading Data
Web Services / Boomi
Introduction
With Web Service APIs, you can configure Planful to import data from an external source. First you need to complete the Web Service Access page located under Maintenance Configuration Tasks to define security access for importing data and set up user notification so that users know when new data is loaded to Planful.
Web Services is one method in which your data added to the Boomi Atmosphere (an on-demand integration service) is loaded to Planful. A web browser is used to build, deploy and manage integrations. No software or hardware is required.
This portion of the document discusses:
Web Service Access
Complete the Web Service Access configuration task.
Access Web Service Access page under Maintenance > Admin > Configuration Tasks.
Click Web Service Access.
Click Enable for API.
Planful provides default URLs under Web Service URL. These URLs will be needed to connect with the Planful application through a session-state or state-free authentication.
From the list of available users, select users and click the arrow to map those you want notified when data is loaded.
Once Web Service Access is configured, you can create a Data Load Rule.
Navigate to Maintenance > DLR > Data Load Rules.
Click the New Data Load Rule tab.
Select Web Services as the Load Type on the New Data Load Rule page.
Use an external Data Integration tool (Boomi) to load data to the Planful system.
The steps will vary based on the external Data Integration tool used.
UnderstandingBoomi
Boomi Atomsphere is an on-demand integration service that makes it possible for Planful to integrate with a customers' general ledgers or ERP systems. Users can securely build, deploy and manage integrations using only a web browser.
Understanding the Boomi Integration Process
The main component in Boomi is the process. A process represents a business process- or transaction-level interface between two systems. An example of a process might be loading account dimension data to Planful. Processes in Boomi are depicted with a left-to-right series of shapes connected together like a flow chart to illustrate the steps required to transform, route, or manipulate the data from the source to the destination. Processes use connectors to retrieve and send data.
Processes are deployed to the atom which is a dynamic runtime engine. Once processes have been deployed, the atom contains all the components required to execute the integration processes from start to finish including connectors, transformation rules, decision handling, and processing logic.
Understanding the Boomi Interface
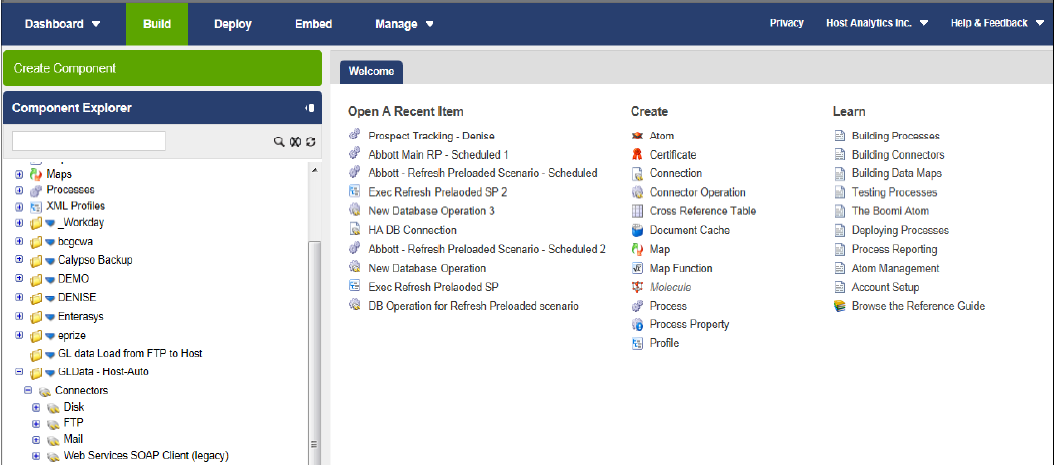
The lifecycle of any integration process would start from building it to managing it, and all the steps in between can be performed appropriately via the following menu options: Build, Deploy, Manage, and Account.
Build
Starting with the Build tab, Boomi Atomsphere applies the 'build' concept as a way to organize and control data processing. Integration requires data structuring to enable communication between the different applications. An integration service should allow structured data types to be extracted, manipulated, validated, and forwarded.
In order to integrate applications directly from the Web without coding, Boomi uses a built-in visual interface to create and direct process flows. This where an integration process is built.
Deploy
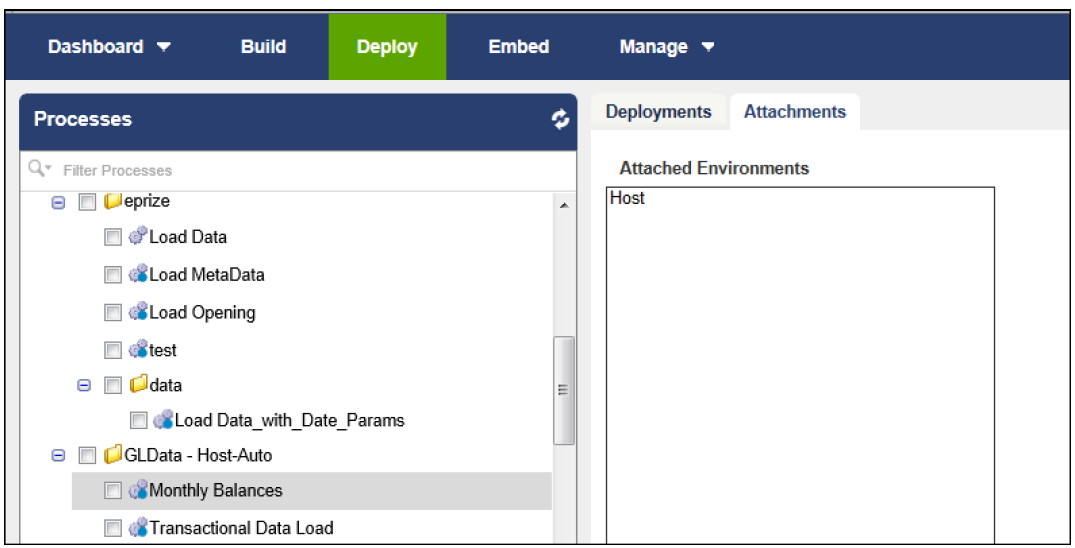
The Deploy tab allows users to specify on which atom(s) a process will run. A single process may be deployed to multiple atoms and a single atom can contain multiple processes. In the figure below, the Monthly Balances process has been deployed to the Planful atom.
An integration process is not deployed as the main version until all changes and testing have been completed. Once deployed, as shown in the figure below, each deployment is noted as unique version under the 'Deployments' section of the Deploy tab. Changes to the Build tab do not take effect until the new version has been deployed.
Manage
The Manage tab provides a view of process execution results, under Process Reporting. Data can be viewed and errors can be troubleshooted.

Also under the Manage tab, scheduling and the atom status can be viewed.

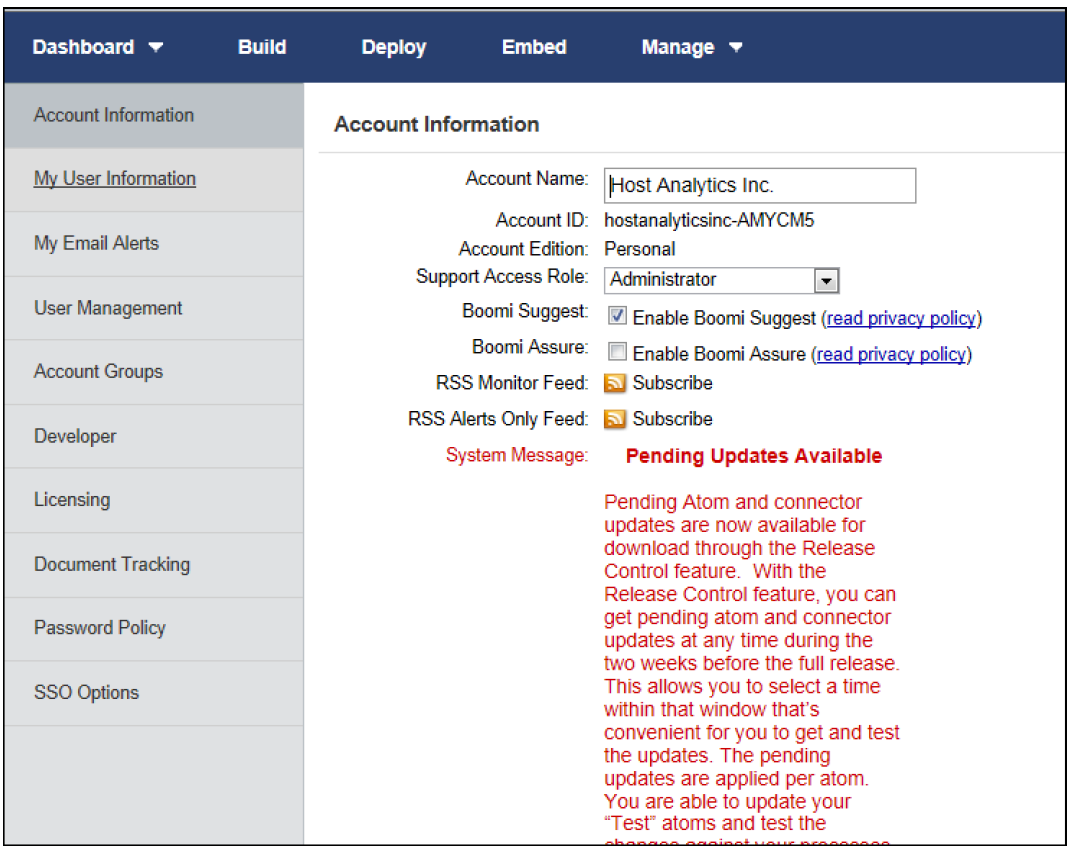
Finally, to view Account information, select the drop-down arrow next to the account name on the top right and select Setup.

Integration Types Explained
There are many types of Planful-supported integrations. The following documentation provides an overview of the entire integration for the simplest type: data file via SFTP or FTP.
Data File via SFTP
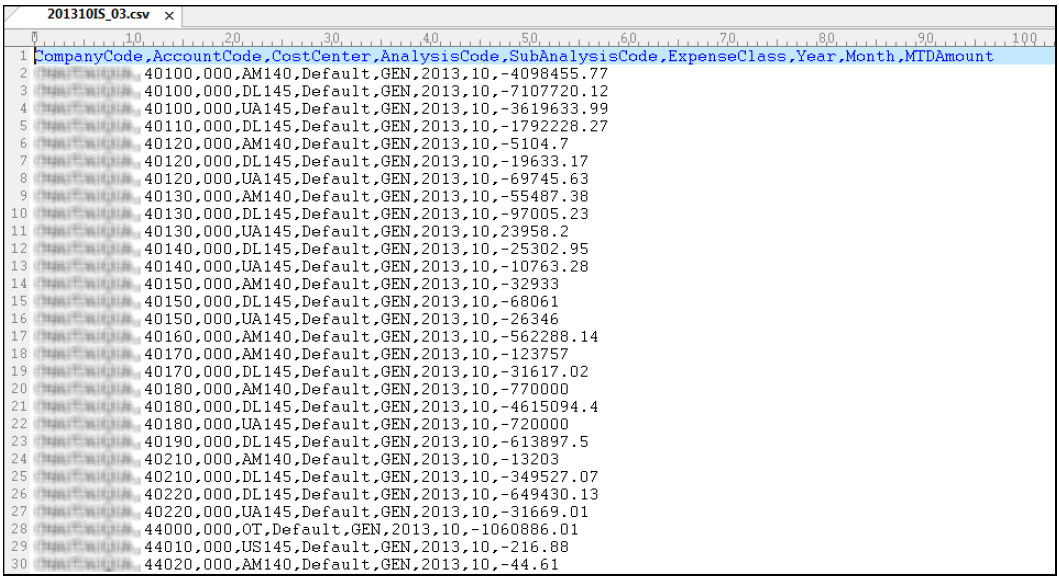
One of the most common integrations is a flat file containing data extracted from the customer's accounting system. The file which must be non-proprietary and delimited, is uploaded to the Planful SFTP site. Customer SFTP site credentials are created and supplied by the Operations Support Team.
The Integration Team reviews the file to ensure the formatting is correct and identifies the fields the customer wants to load into the Planful application.
The data load process is then created in Boomi Atomsphere. A connection is created to retrieve the customer file. In the figure below, the connection is named
HA SFTP Connection. This connection is from Boomi to the SFTP site using the customer's credentials.
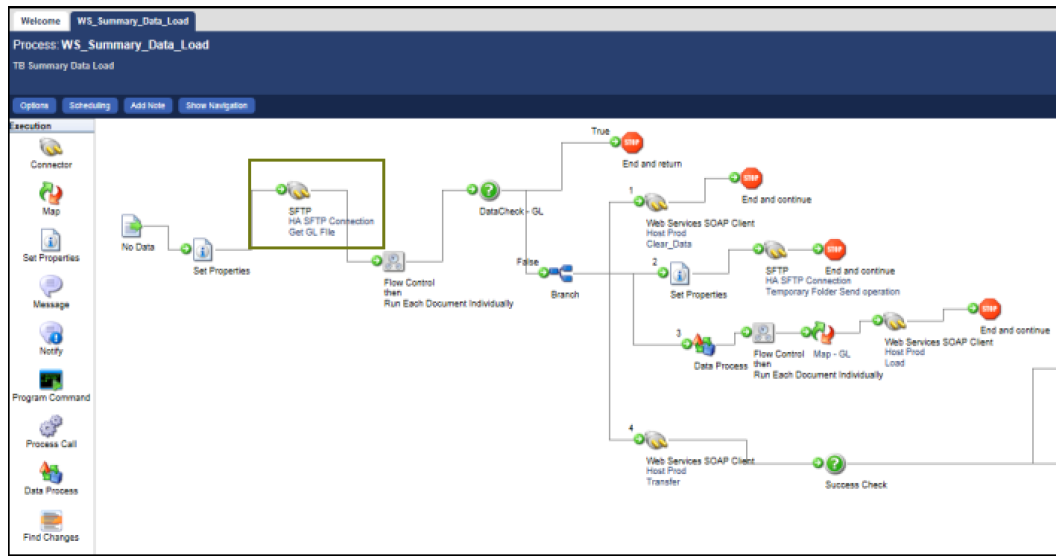
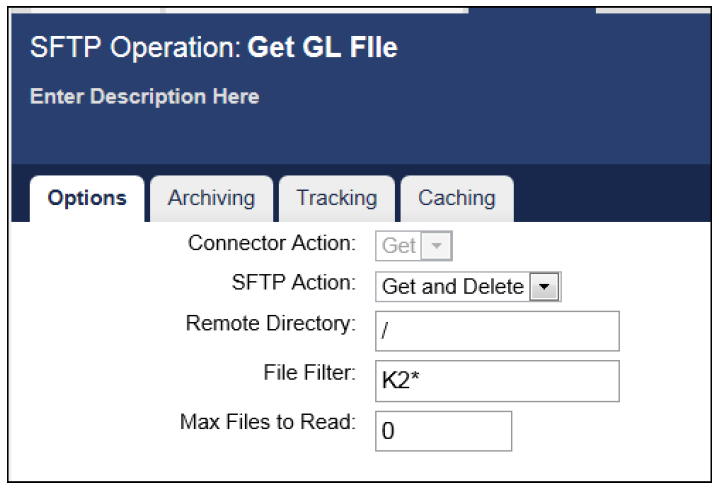
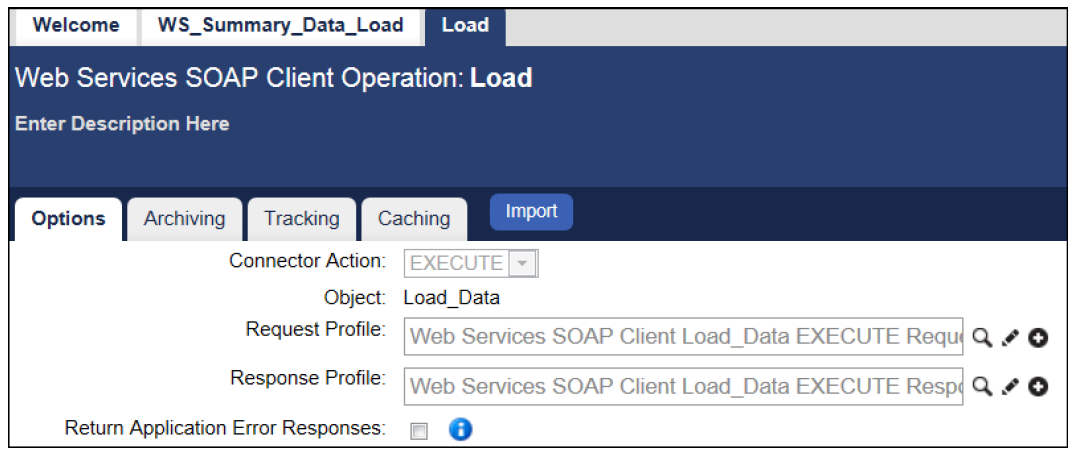
Within this connection, an SFTP operation is defined. In the figure below, the data load process will retrieve any file that begins with K2 and then delete the file.
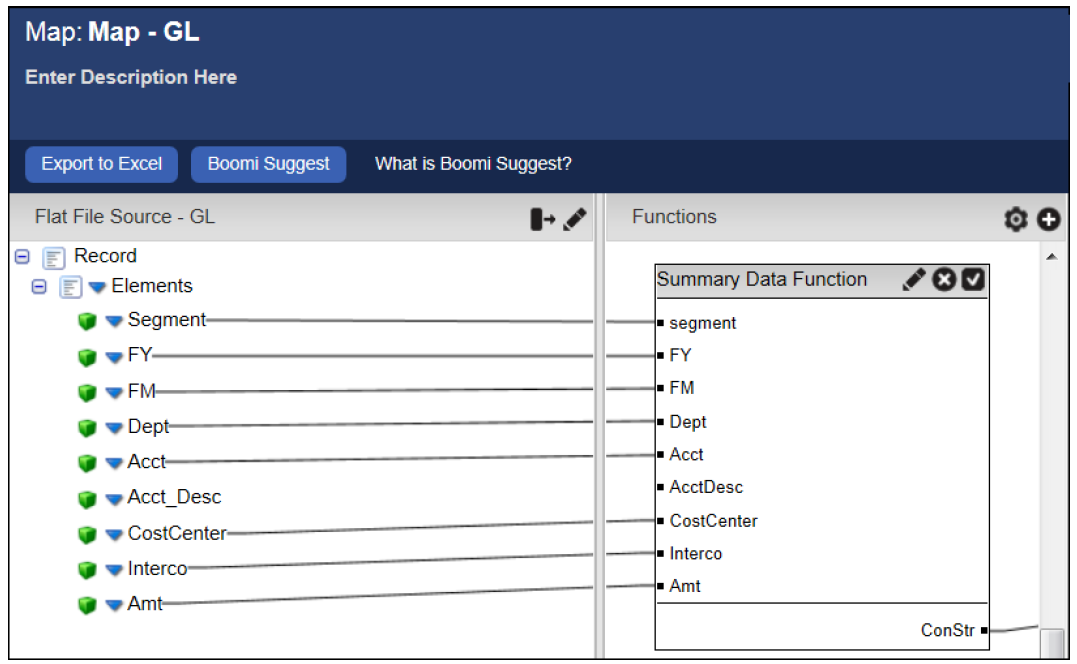
The fields are mapped in Boomi and mapped to the fields defined in the data load rule created in the Planful application. Then, via web services, the data is loaded into Planful.
Data Load
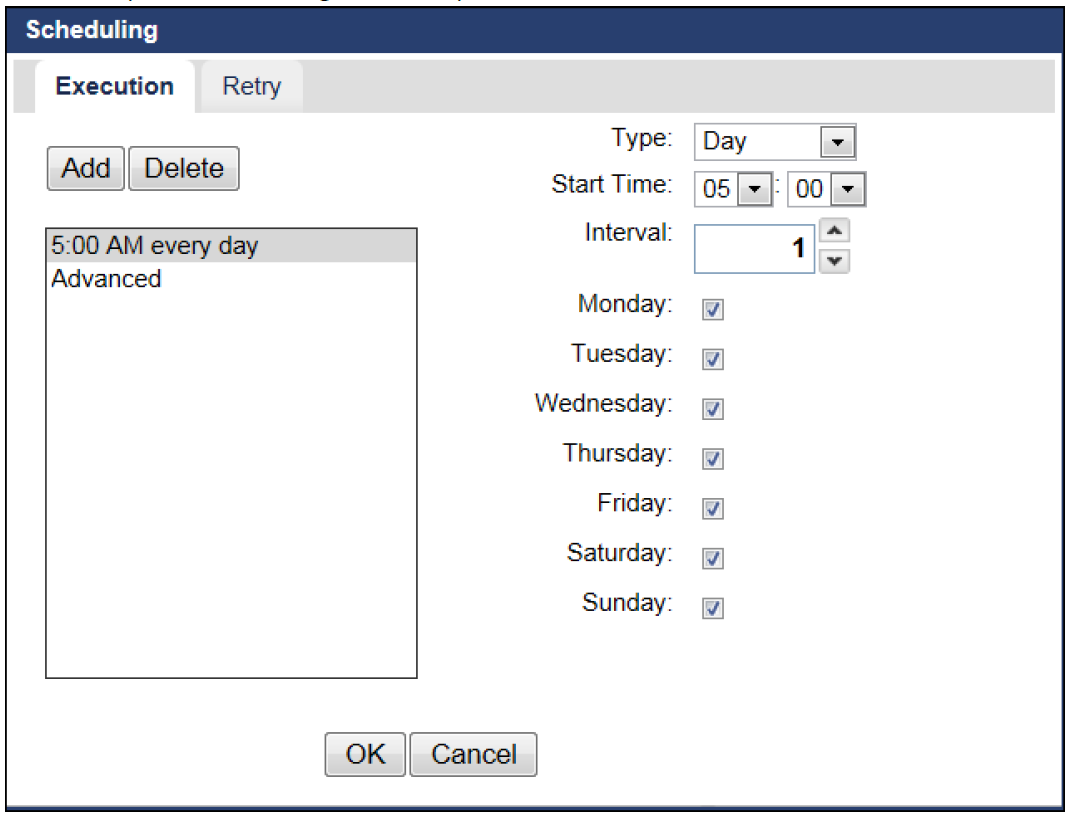
Two methods can be used to load data from Boomi to Planful: a scheduled data load or an On Demand web page. A scheduled data load automatically loads data based on the customer's business rules. For example, some customers want data automatically loaded after business hours each evening. while others want data loaded every few hours during the workday.
The On Demand web page places control of loading data into the customer's hands. Created by the Integration Team upon request, this method allows the customer to load data on demand.
With the On Demand web page, the customer enters Boomi login credentials, and the fiscal year and month they want to load. When Submit is selected, a data load process is started in Boomi.

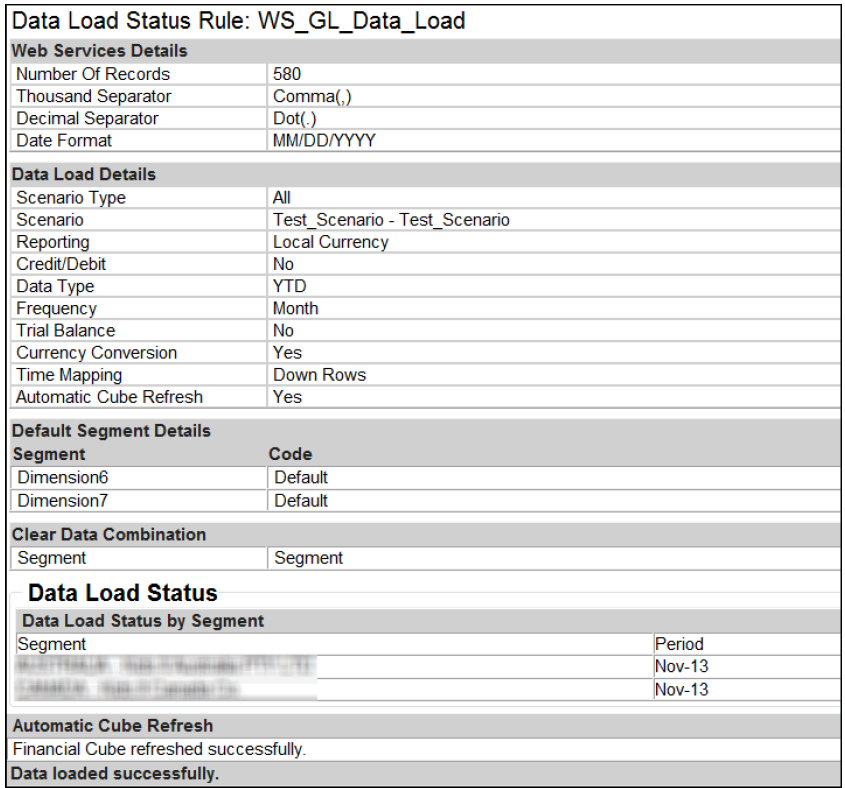
In either case, an email notification is generated by Planful informing the customer that the data was loaded successfully or not. An example of an email notification for a successful data load is provided in the figure below.
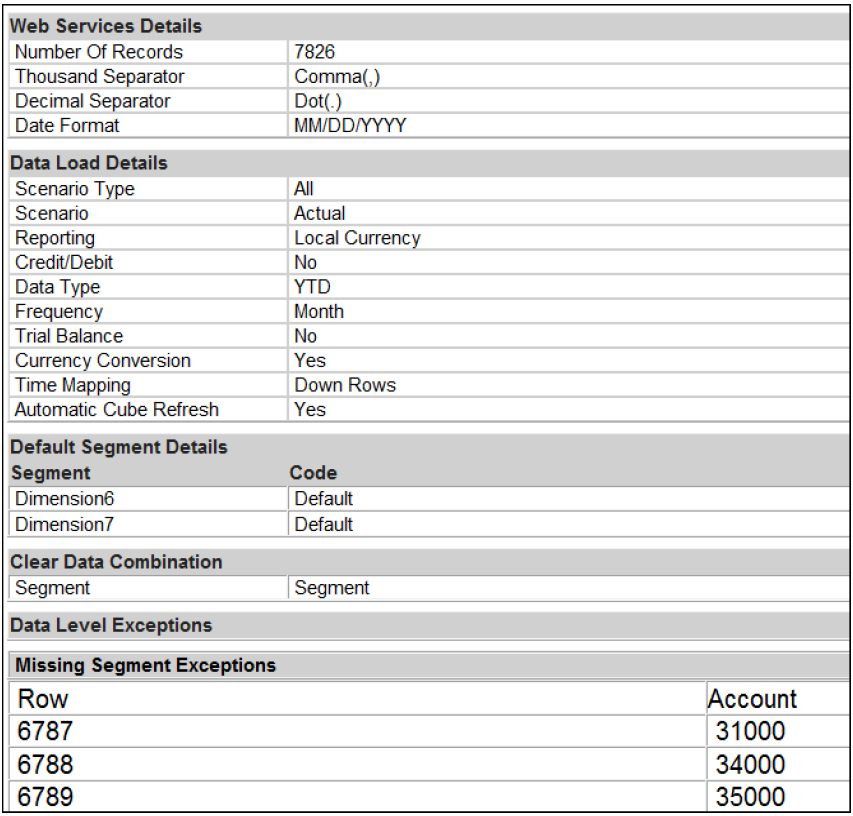
If the data load is unsuccessful, exceptions are listed. In the figure below, an example of an email for an unsuccessful data load lists missing accounts. In order for the data to load successfully, the accounts must be added to the Planful application and the data load must be rerun.
Glossary of Terms
Application Programming Interface (API) - programming instructions and standards for accessing web-based software applications or web tools.
Boomi Atom - a lightweight, dynamic runtime engine. Once an integration process have been deployed to the atom, the atom will contain all the components required to execute processes from beginning to end, including connectors, transformation rules, decision handling, and processing logic.
Boomi Atomsphere - allows for the integration of data directly from the web without installing software or hardware. Users can securely build, deploy and manage integrations using only a web browser. Boomi Atomsphere handles any combinations of software-as-a-service (SaaS) and on-premise application integration.
Connector - used in Boomi, connectors get data into and send data out of processes. They enable communication with the applications or data sources between which data needs to move, or in other words, the "end points" of the process. If working with a customer who wants to load a file from the SFTP site, the SFTP Connector would be used. To load data from a data load process in Boomi into Planful, a Web Services Connector would be used.
Web Services - a method of communication between two electronic devices over the web. Allows different applications from different sources to communicate with each other without time-consuming custom coding, and because all communication is in XML, web services are not tied to any one operating system or programming language.
Common Issues
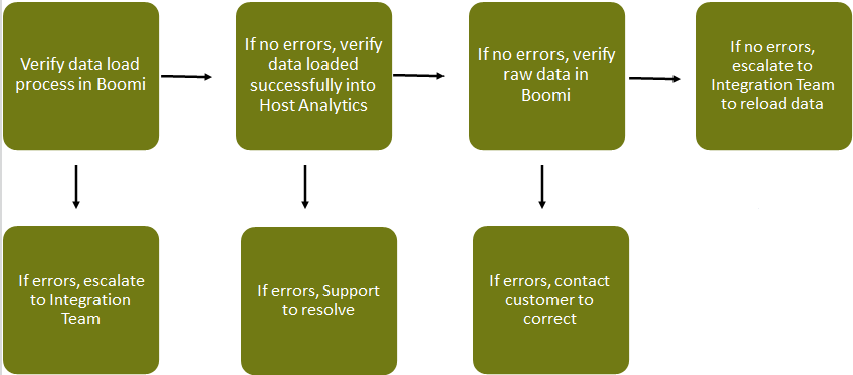
Integration issues experienced by customers comprise three areas: source (data from a file or database), Boomi, or Planful. The following flow chart illustrates the steps required to determine where the issue lies.
Troubleshooting Steps
Verify that the data load process was successful in Boomi.
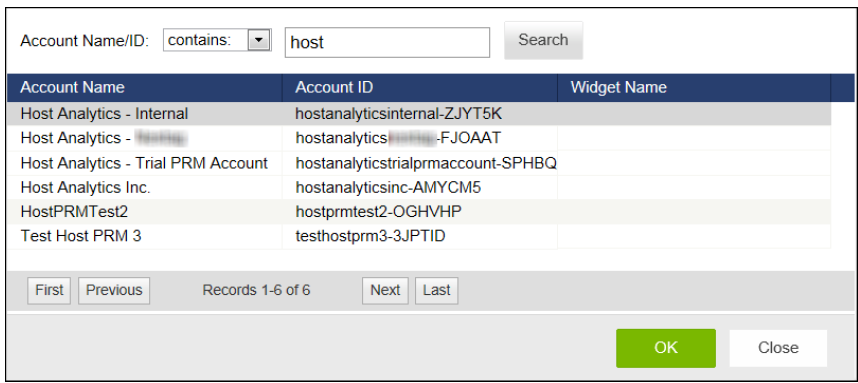
On the top right, click the account name, then select Switch Account.
Enter part of the account name and click Search.
Select the account name and click OK.
Select Manage , then Process Reporting.

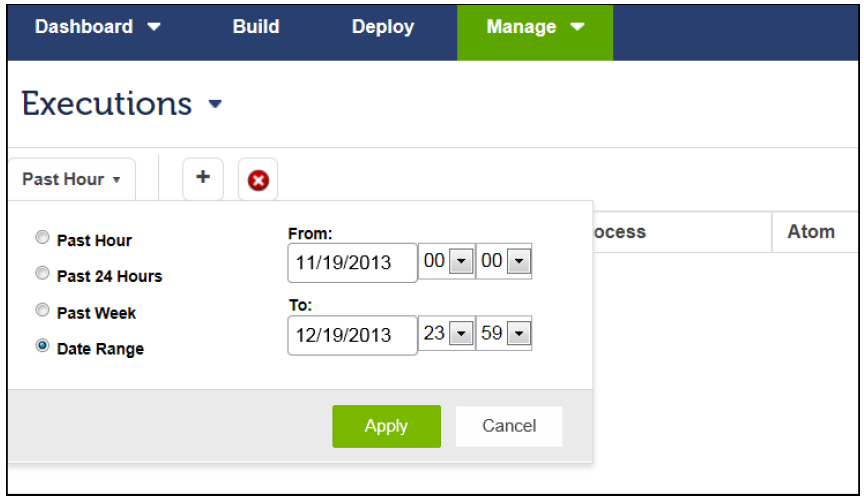
By default, all data load processes executed within the past hour are listed. To choose an alternate time frame, select the drop-down listing and click Apply.
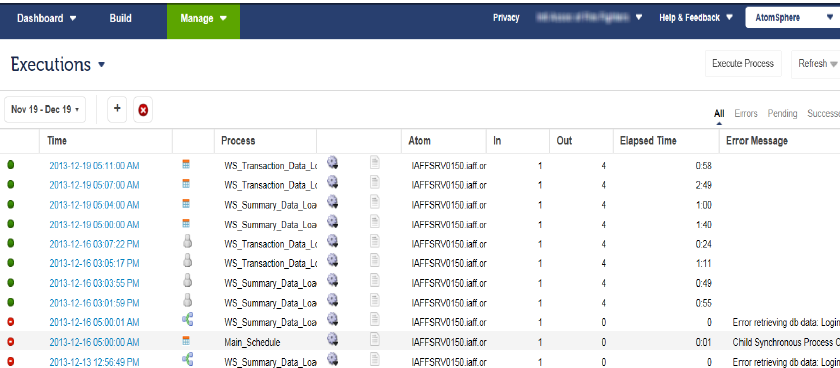
All data load processes executed during the selected time frame display. Each process has either a green dot which signifies that the process executed successfully or a red dot which signifies that the process executed with errors.
If there are errors, the issue is escalated to the Integration Team for resolution.
If there are no errors, the next step is to log into the customer's Planful application.
To verify that the data loaded successfully, select Maintenance > Data Load History.
Select the data load rule that was used to load the data. Use the From and To fields to narrow the search and click GO.
The data loads for the selected time frame display. There are two statuses: Pass and Fail . Pass indicates that the data load was successful while Fail indicates that the data load contained errors.
If the most recent data load status is Fail , select the failed data load and click the Detailed Report option.
The detailed data load log report displays.
If the most recent data load process is successful, select Maintenance > Load Data to verify that the period and/or year to which the customer is loading data is not locked.
If the period and/or year is not locked, select Maintenance > Reports > Process Cube & Dimension to process the cube.
If there are no issues, the next step is to verify the data in Boomi. Return to Boomi and select Manage > Process Reporting.
Under Executions , select the most recent data load process.
 Note:Default time frame is the Past Hour. If no data load processes display, select Past Week or enter a date range.
Click the date/time stamp to display the connections made during the data load process.
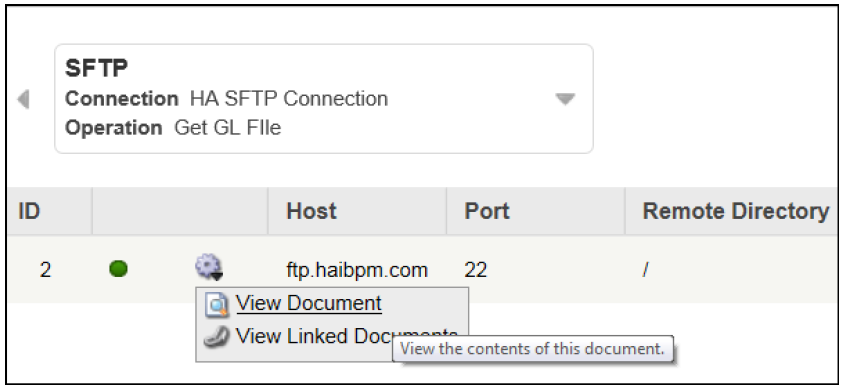
If the data load process uses a file, select SFTP, Connection HA SFTP Connection, Operation: Get GL File.
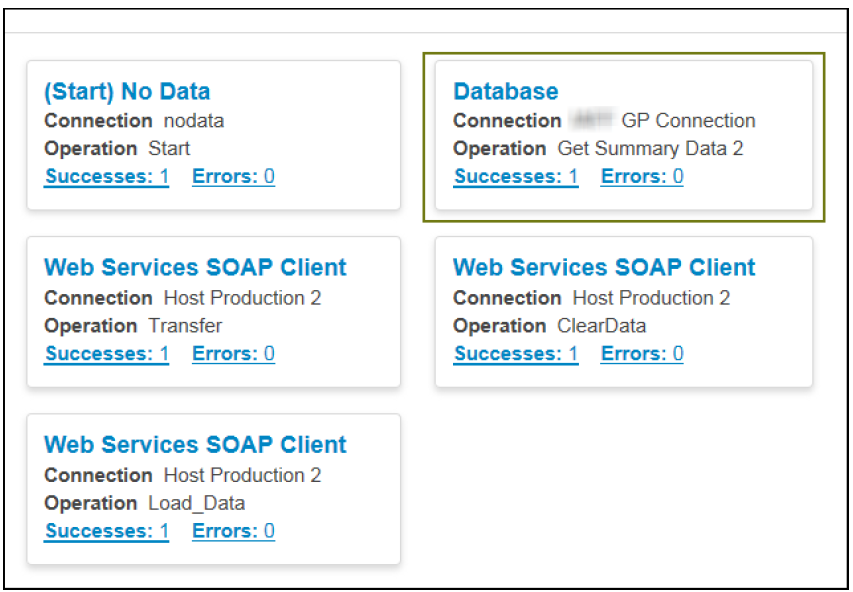
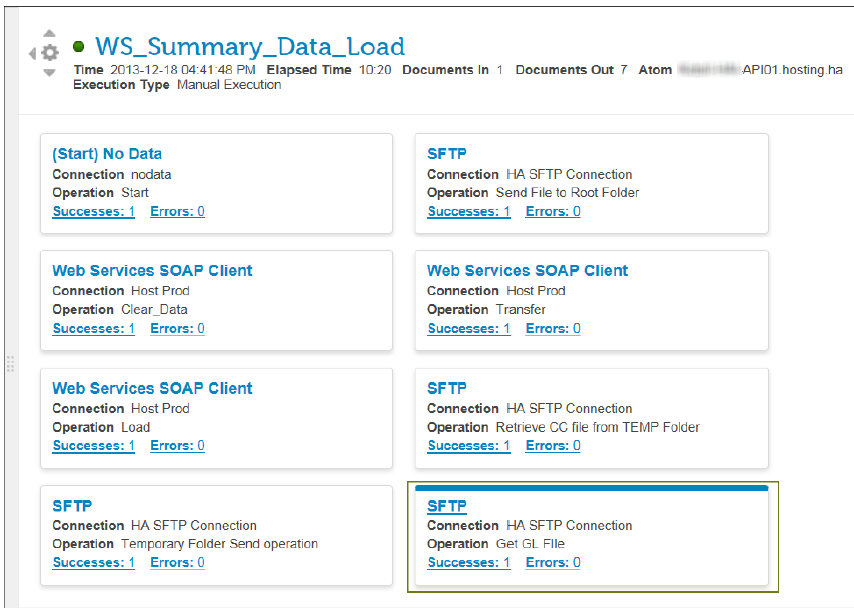 Note:If the data load process uses a database connection, select the Database Connection: GP Connection, Get Summary Data 2 (or the appropriate operation name) as shown in the figure below.
Click the cog wheel and select View Document.
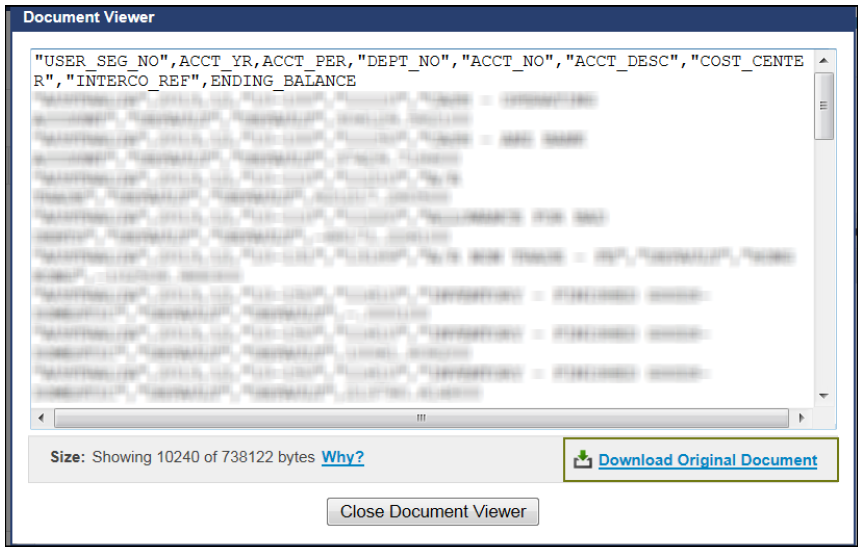
A partial view of the data displays in the document viewer once connected to the atom.
Select Download Original Document on the lower right side.
Click Save when prompted.
Open the file in Microsoft® Excel® or Notepad®. This data is pulled from the customer's source, either a file via SFTP or a database. Verify that the data is correct.
If there are errors, contact the customer to correct and reload.
If there are no errors, escalate to the Integration Team to reload the data.
Working with Planful APIs
Planful provides many Application Programming Interfaces (APIs). These APIS offer a simple, powerful and secured way of importing or exporting data to and from the Planful application.
For information, see the API Library.
Integration Services
Introduction
The Data Integration Services feature allows you to manage the Integration Process with Boomi from within the Planful application. Execute an Integration Process on-demand from Planful without needing to intricately understand Boomi, and, without the help of an IT professional.
Use the Integration Service to execute a custom Integration Process to load metadata, summary data, transactions data and operational data to Planful. This feature provides complete visibility into the type of data source and the data that is being loaded to the application and has full auditing capabilities as well as detailed status of each integration process.
First, you will need to configure the Integration Service on the Configuration Tasks - Cloud Services page and then you’ll configure the process for execution on the Integration Service page under Data Integration (DLR). Admins are required to provide navigation access to users who will need to access the Integration Service page. The steps below walk you through the setup and execution. There are three tasks you will need to perform, which are:
Completing the Integration Services Configuration Task
Setup the parameters for the integration as well as authentication information.
In Practice
Navigate to Maintenance > Admin > Configuration Tasks.
Open the Data Integration Configuration - Cloud Services task.
On the Cloud Services page, click the Integration Service task.
Enter the Account ID provided by Boomi.
Planful supports HTTP (RESTful) APIs that publish data in JSON format. Enter the request in the Rest API URL field.
Enter the username and password to authenticate the Rest API URL call.
Click Submit. The welcome screen appears.

Click Add . The Configure Process screen appears.
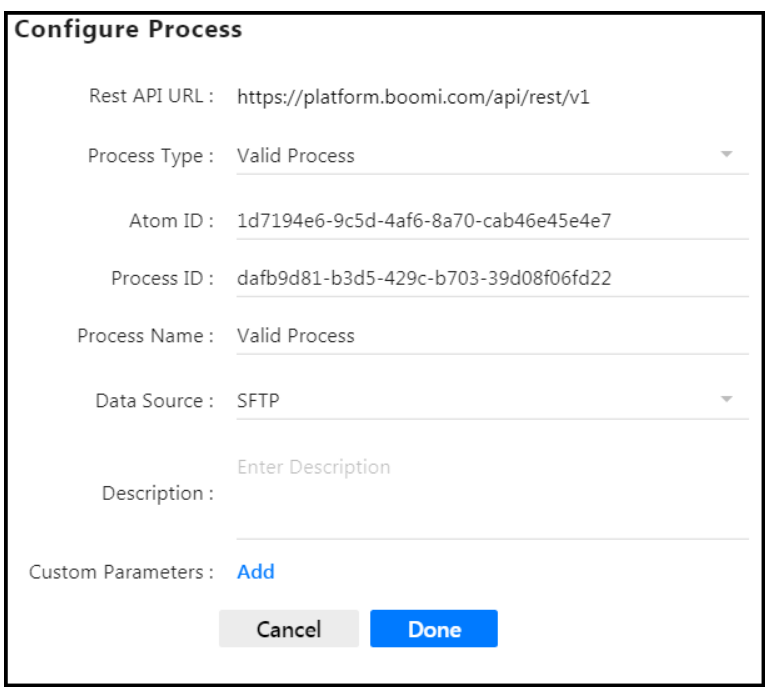
The Rest API URL is populated based on the URL you already entered during step 5. For Process Type , select the type of data you are loading. See examples in the screen below. For this example, Data - GL Data is selected.
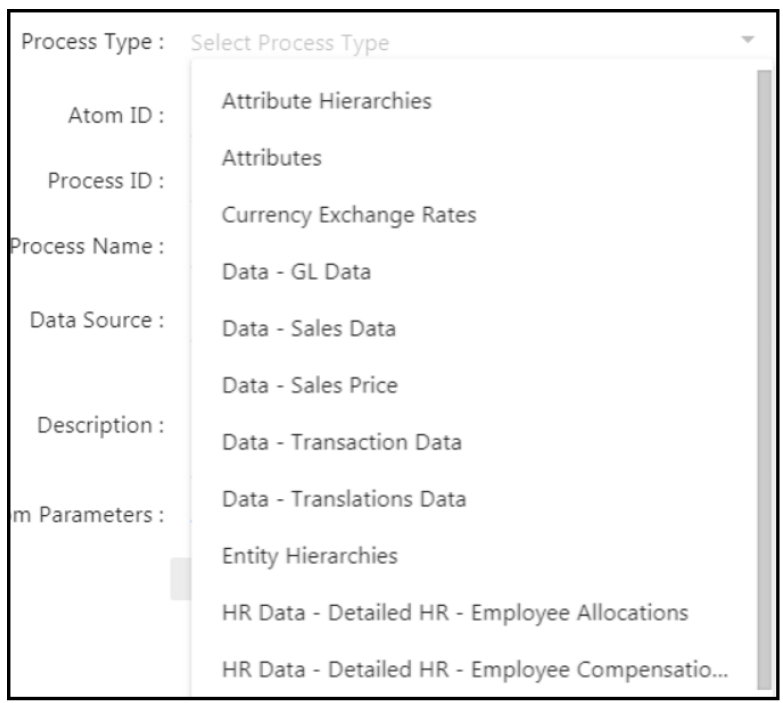
Enter an Atom ID provided by Boomi. The Atom contains all the components required to execute your processes from end to end, including connectors, transformation rules, decision handling, and processing logic. This ID is provided by Boomi.
Enter an ID or your choice to identify the process.
Enter a name of your choice to identify the process.
Select the source vender, Boomi, (where your data is stored) for the Data Source field.
Here is an example using SFTP:
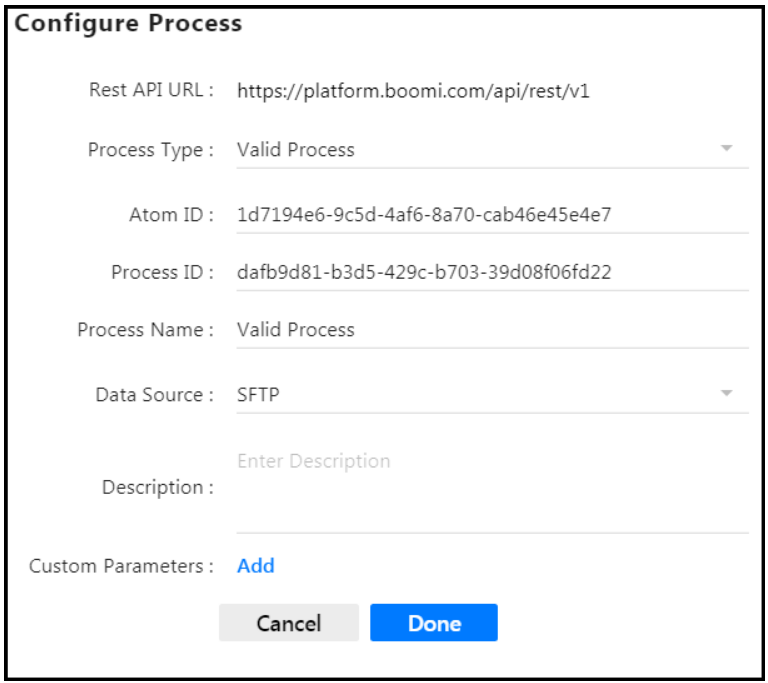
Enter a description of the process and click the Add button (optional) to launch the Custom Parameters page where you can set additional parameters. You might want to set additional parameters when you want to load data from different subsidiaries, for example, and need to identify each (Subsidiary A or B). Enter a name for the custom parameter and provide a label. Note that these two fields can be the same.
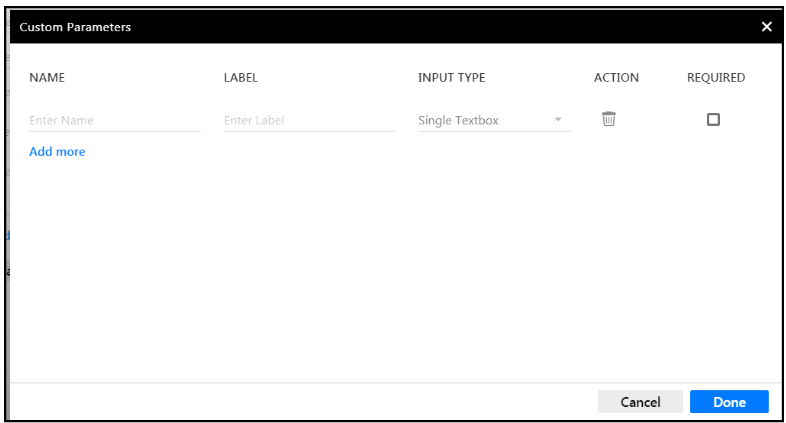
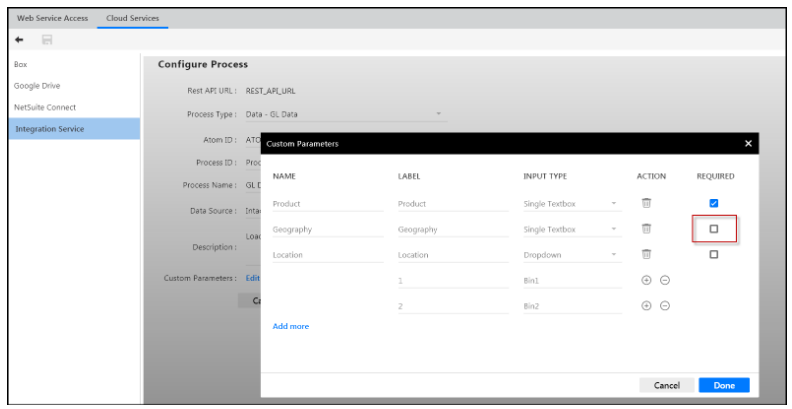
For Input Type , select to present the user with a textbox or a dropdown list box. If you select Dropdown , you will be prompted to enter selectable options. Select the Required checkbox as shown below. By selecting Required , users executing the process will be required to provide an input value for the parameter.
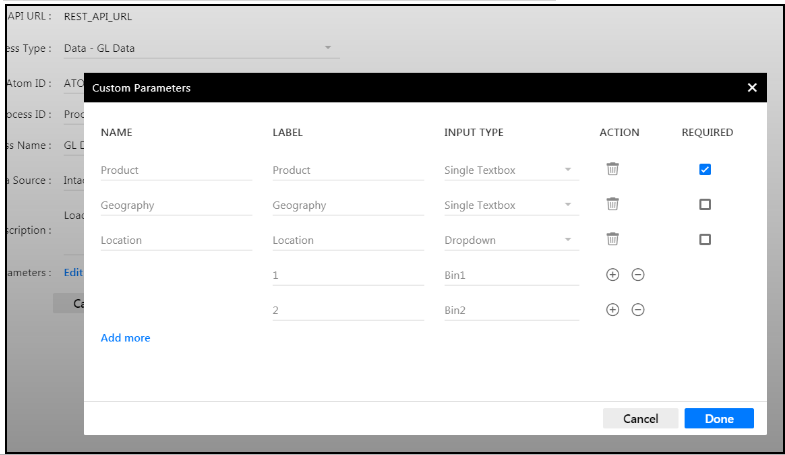
DO NOT select the Required checkbox as shown below. When you do not select Required, users have the option of completing the parameter when executing the process.
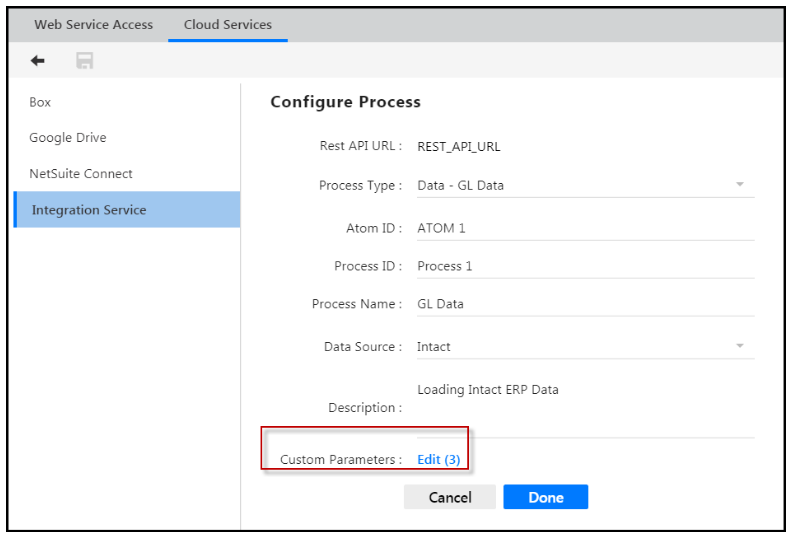
Click Add more to add additional custom parameters or click Done . Once complete, the number of parameters added (required or not) will display on the Configure Process page - Custom Parameters field as shown in the image below.
Working with Custom Parameters for Integration Service Processes
Once admin users have set up custom parameters (optional or required or both), users should follow the steps below to execute an Integration Services process.
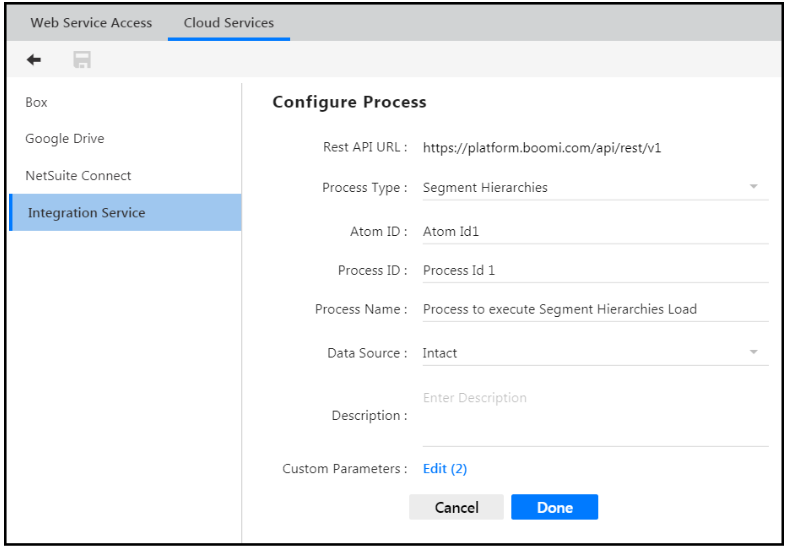
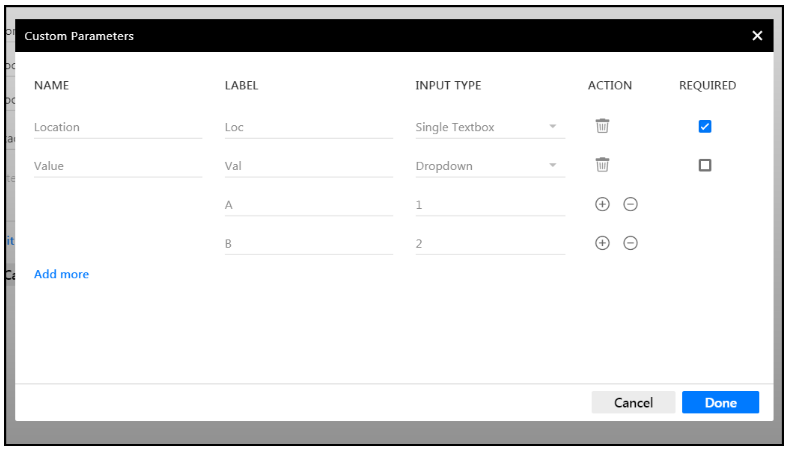
In this example, the Process to execute Segment Hierarchies Load is created as an Integration Service process as shown below. And, two custom parameters are defined; one being required and the other is optional (see second image below).
In Practice
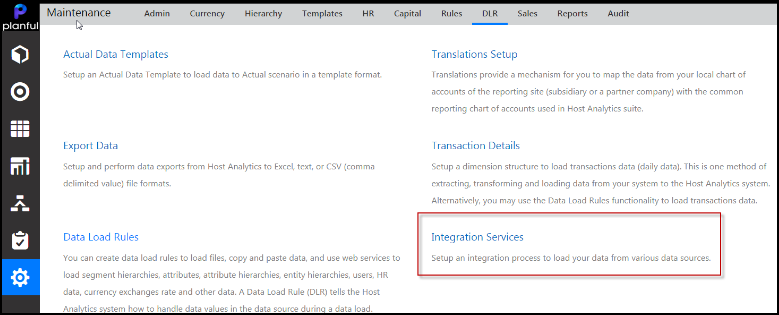
Navigate to Maintenance > DLR > Integration Services.
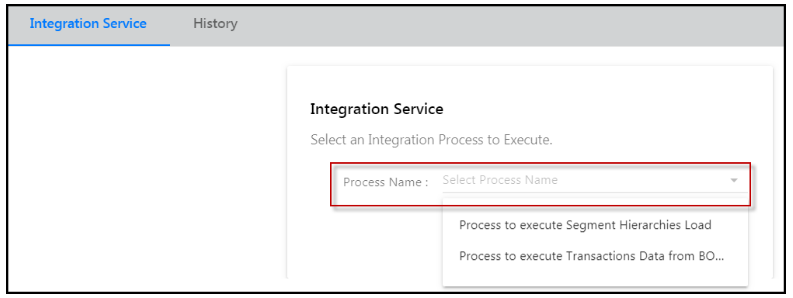
The Integration Service page is displayed. Select a process by name. Notice that the names in the Process Name list-box are populated from the processes defined on the Integration Process page.
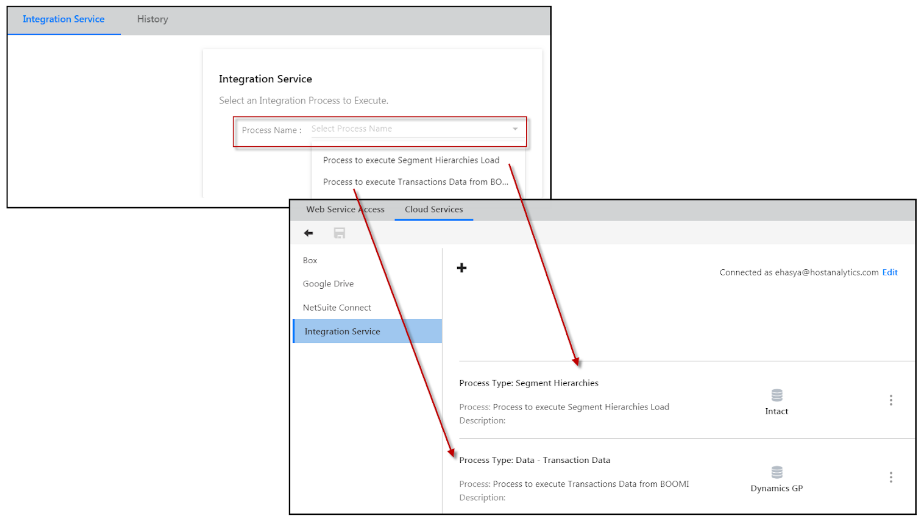
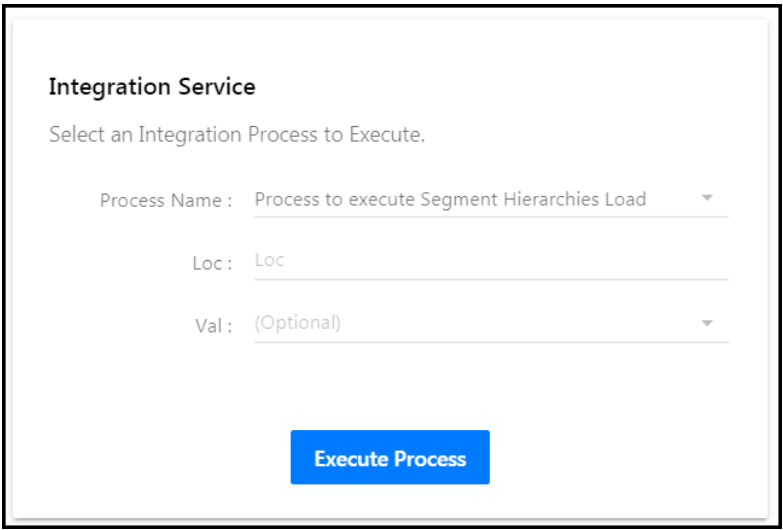
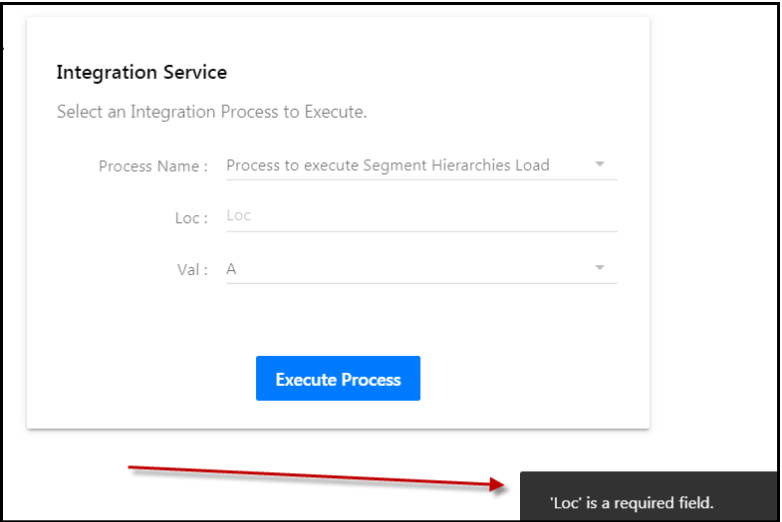
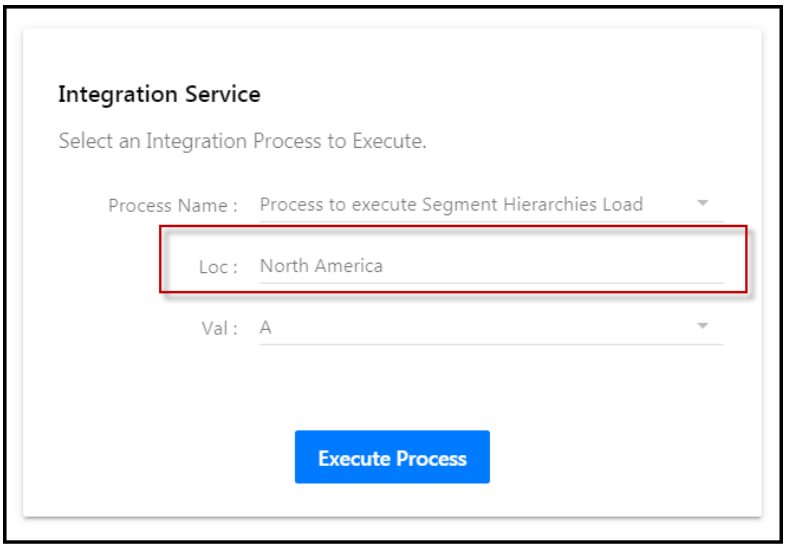
In this example, the Process to execute Segment Hierarchies Load is selected. Notice that the Loc (location) field is required, but the Val (value) field is optional. Required parameters are mandatory and the Integration Process will not execute without the parameter completed. Optional parameters are not required and it is up to the user as to whether the optional parameters are completed. If you execute the process without entering a value for the Loc field, the system will prevent it. The second image below shows the message that appears when a required field is not completed.
Complete the required fields (as shown in the 3rd image below) and click Execute Process.
You can view all processes by clicking the History tab, selecting a process name and the dates for which it was executed.
Providing Navigation Access to the Integration Services Application Page
Provide a user with access to the Integration Services application page where the user can set up processes for execution (to load data).
In Practice
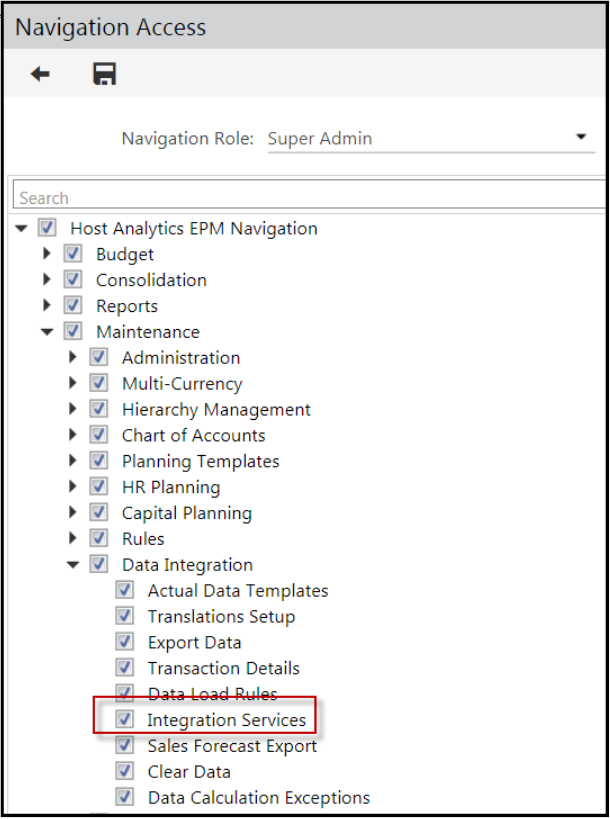
Access the Navigation Access page by navigating to Maintenance > Admin > User Management.
Click the Navigation Role tab and select the Navigation Access button to launch the Navigation Access page for a selected navigation role.
Select the Integration Services checkbox and click Save.
Adding an Integration Service Process
Define the data type you want to load and select the vendor you want to load data from.
In Practice
Access Integration Services by navigating to Maintenance > DLR > Integration Services.
The Integration Service screen appears. Select a process to execute.
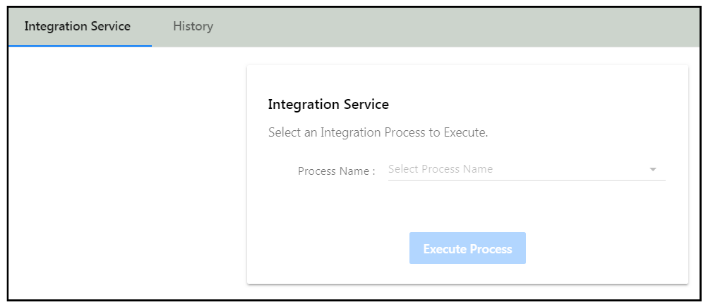
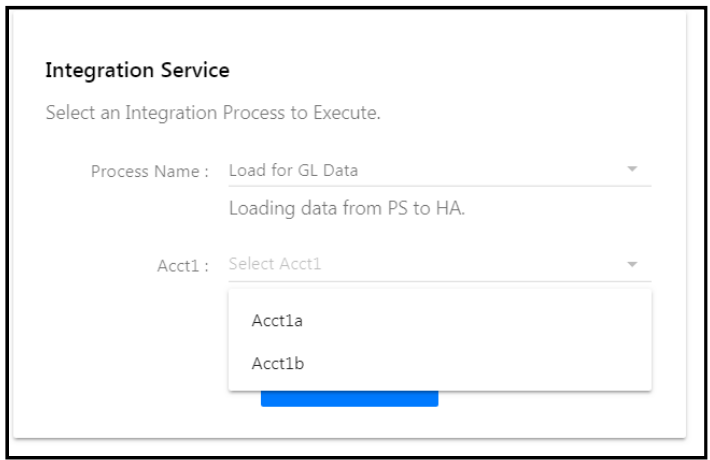
The Process Name list-box is populated based on the processes set up on the Configuration Tasks - Cloud Services page. In this case the process configured is called Load for GL Data. Select it.

Because a dropdown was configured for this process, select to load data for subsidiary A or B.
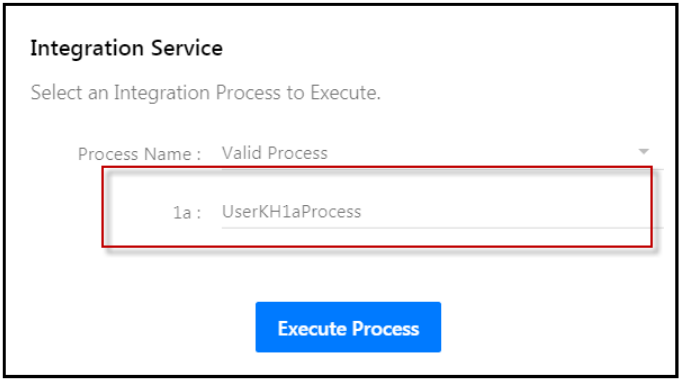
Here is an example where a textbox was selected and named “1a”. The user executing the process might want to enter details in the textbox as shown below.
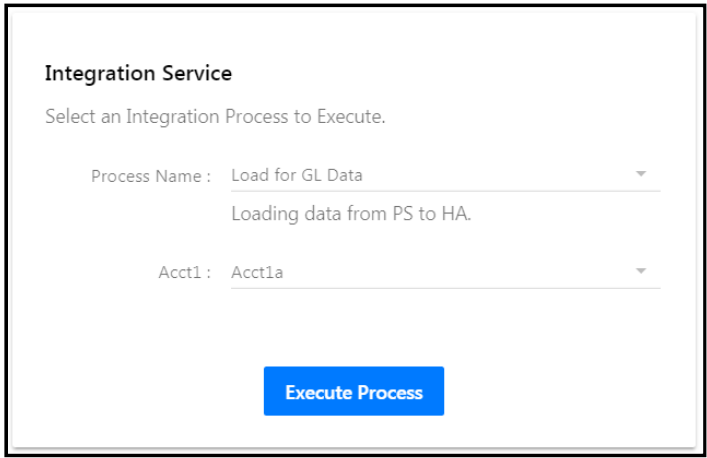
Click Execute Process to load the data.
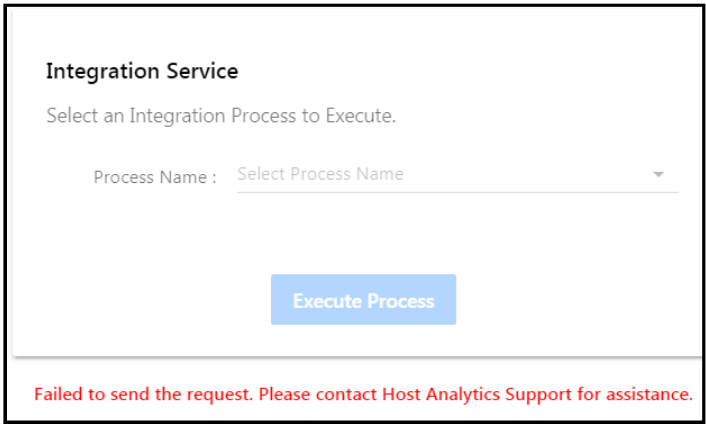
If the process fails, the following message appears:
If the process is a success, the following message appears:
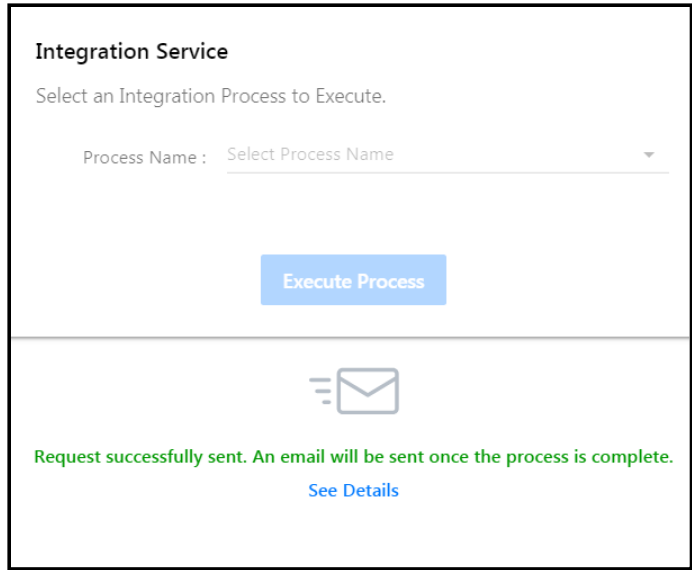
Click See Details or select the History tab and the page below appears.

Editing, Deleting and Copying Integration Service Processes
You can copy, edit or delete the configured processes (in additional to adding new processes). You can also select to add another configured process. If you copy a process, you can then edit it as needed.
In Practice: How to Copy an Integration Service Process
Navigate to Maintenance > Admin > Configuration Tasks.
On the Configuration Task page (under Data Integration Configuration), click Cloud Services.
On the Cloud Services page, select Integration Service.
Integration Service process are shown (an example is provided below). Select the three vertical dots for a process and select Duplicate.
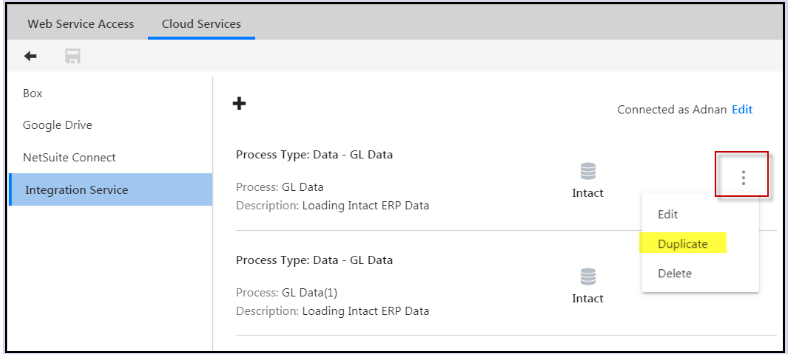
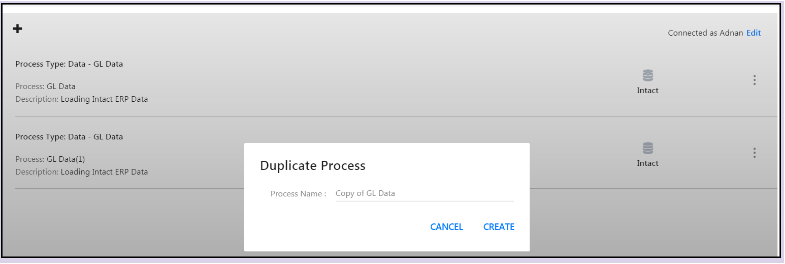
The Duplicate Process screen appears. The name of the process is the same name of the selected process you are copying, but it is preceded with “Copy of ”. You can keep this name or rename the process. Then, click Save.
Cloud Services
Introduction
Load GL and Translations data from Box, Google Drive, or NetSuite Connect to Planful. To do so, complete the Configuration Task accessed from the Maintenance menu.
Each of the fields you'll complete on the Cloud Services page is described below based on the service (i.e. Box).
Box
Select the Enable Cloud File Upload checkbox.
Enter your *Box user name and authenticate by clicking to authorize and entering a password. If you’re using oAuth, the oAuth page opens in a new window on the Configuration Tasks page. After completing the authorization, the window is closed and the User Name for Cloud Services is updated with the authorized email address. After you Grant access to Box, the Cloud Services User Name field is updated with the authorized email address.
Create a Data Load Rule. Click here to learn how to do so.
Schedule the Data Load Rule to load data from Box to Planful using Cloud Scheduler. Click here to learn how to do so.
You can have different email addresses with any domain name. All formats of personal and enterprise domains with multiple extensions can be used in email IDs. However, you must register your email ID with Box by becoming a valid user prior to configuration in Planful . You can edit your username at any time even if Data Load Rules created. These Data Load Rules will be automatically migrated to the new Box email ID.
Now, you can place a file in Box and create a Data Load Rule to load the file and its contents to Planful. The root folder name in Box for each user is updated with the <Environment Code_Application Name/Code>. You can delete the root folder, but doing so will result in a failure when running Data Load Rules.
Once Box integration is enabled, you will see Cloud Scheduler in the Maintenance menu and when clicked, Job Manager will be available. You can use Cloud Scheduler to schedule when the Data Load Rule loads data from Box to Planful.
Creating a Data Load Rule to Load a Box File
Click Maintenance > DLR > Data Load Rules.
Click New Data Load Rule.
Enter a Name and Description.
For Load Type , select Cloud File Upload.
For Load Item , select Data.
For Load Item , select from GL Data or Translation Data.
Complete the fields on the remaining Data Load pages as needed. Information on each of these fields and examples is provided in the Data Load Rules section of this document.
Scheduling the Data Load Rule with Cloud Scheduler to Load Data From Box
Click Maintenance > Admin > Cloud Scheduler.
Click Add to create a scheduled process to load the data automatically from Box using the Data Load Rule created.
Complete General Information.
Click Tasks.
Click Add Task.
For Task Type , select Data Load Rule.
For Task Name, select Box Upload or whatever you named the Data Load Rule.
If there is data required to be loaded prior to this data load, select dependencies.
Click Save and proceed with scheduling. For detailed information on each of the fields and examples of how to use Cloud Scheduler, click here .
Box Integration FAQs
Box integration automates the data load process in Planful. Place data files on a Box account and configure a Data Load Rule to load up the files from your Box account to Planful. Additionally, add Data Load Rules to a schedule to automatically load files during non-business hours.
- How is a Box account created?
There are 2 ways to create a Box account:
When you provide an e-mail ID in Maintenance > Configuration Tasks > Cloud Services and save it, a Box account is created automatically for the given e-mail ID. You will receive an e-mail to activate your Box account and create a password. This method can be used when the e-mail ID is created on Gmail, Yahoo, Hotmail, and Rediffmail domains.
You can create a Box account manually using https://app.box.com/signup/personal/ and later add the same e-mail ID in Maintenance > Configuration Tasks > Cloud Services and save it. The existing Box account is linked to Planful to enable the integration. This method can be used when the e-mail ID is created on enterprise domains like Planful.
If I already have an active Box account, can the existing Box account be used for integration with Planful?
Yes. If you use the e-mail ID for which the Box account was originally created in Maintenance, Configuration Tasks, Cloud Services, the existing Box account is automatically linked to Planful.
What type of Box account is created when Cloud Services is enabled in Planful?
A free Box account is created by default when Cloud Services is configured in Planful. With a free Box account, there is no restriction on the number of files stored. However, the total size of the files cannot exceed 10GB.
How are folders created in Box?
When the Maintenance > Configuration Tasks > Cloud Services settings are complete, a root folder (like SBX_HA in Sandbox, EPM_HA in Production) is created.
What happens if the Data Load Rule folders are renamed or deleted from Box manually?
Data loading for the deleted Data Load Rule will fail and details are displayed in Maintenance > Cloud Scheduler > Job Manager.
How are files uploaded in Box?
The Box administrator user can log into Box and access all folders/sub-folders automatically created from Data Load Rules. Files can be uploaded into these folders in the following ways:
Manually:
The administrative user can manually upload files into the folders.
The administrator can add collaborators to each individual file and the collaborators can manually upload files into the folders.
AutomaticallySync the box folder and save the data files to the sync folder.
E-mail the file from the source application to the box folder.
(https://support.box.com/hc/en-us/articles/200520228-Uploading-Files-to-Box-with-Email)
What happens if the Data Load Rule folder in Box does not contain any data files?
If the Data Load Rule folder in Box is empty when the Data Load Rule is processed, the data load for that Data Load Rule fails and the details are displayed in Maintenance, Cloud Scheduler, Job Manager.
What file formats supported does Box support?
Box supports all Adobe, MS Office, Open Office, Text, Word Perfect, Image, Audio/Video files for upload and preview. However, Planful supports import of data from .xls, .xlsx, and .csv formats. If a file type that is unsupported is uploaded in the Data Load Rules folders on Box, those files will not be loaded to Planful.
How many files can be loaded against a single Data Load Rule at a time?
Up to 50 files at a time.
How many users can be added on a single ‘Free’ Box account?
One administrator user and any number of collaborator users.
What is the maximum size of a file that can be uploaded on a ‘Free’ Box account?
Box allows files up to 250 MBs. However, a maximum size of 30 MB is recommended for Planful integration.
What happens to the files in Box folders after they are loaded to Planful?
Two default folders (Success and Failed) are created on Box when Box integration is opened via Planful. The administrator, by default, gets access to these two folders. Once a Data Load Rule is processed, the files from the respective folder are moved to the Success/Failed folders depending on the status of execution of the file load.
How are files deleted from Success/Failed folders?
There are two ways to delete the files:
Manually: Administrator accesses the folders and delete the files manually.
Automatically: In Maintenance, Configuration Tasks, Cloud Services, enable the Auto deletion of files option and the set number of days to the required number of days after which you want the files to be deleted automatically. Based on this setting, the system automatically deletes files from Success & Failed folders based on the configured number of days.
How can I upgrade to a paid Box plan?
You can upgrade to a paid Box plan by signing into your Box account and clicking on the ‘Upgrade’ link on the top right hand side of the screen. Or, ask Planful to help with the upgrade process by creating a support ticket.
Can I use Box for non-HA related data storage?
Yes, however, only Data Load Rule folders will be integrated with Planful. Other files will not be downloaded to Planful.
Does the Free Box account expire after some period?
Box accounts do not expire.
What type of data can I load using Cloud Services?
Cloud Services can be used for GL Data and Translations Data Load Items.
Best Practices
Set the Automatic Cube Refresh at the Define Overall Rule Settings step in the Data Load Rule to No.
Set up Cloud Scheduler so that the Scenario process is dependent upon the Data Load Rule.
Process the scenario after loading the Box file and have a separate task for each in Cloud Scheduler (shown in the image below).

Google Drive
Introduction
Similar to Box-based data loads, use Google Drive to load GL and Translation data. There is a maximum file size of 35M when loading data through Google Drive. Files larger than this will impact overall performance.
Integrating Google Drive
Navigate to Maintenance > Admin > Configuration Task > Data Integration Configuration > Cloud Services > Google Drive .
On the Google Drive page enter @planful.com as the Domain Name. Click Integrate with Google to register the Domain Name.
Enter the user name in the Account for Data Load Rules field.
Enter the email addresses of users you want to be notified in the Other E-mail Recipients field.
If you wish to delete files, select the Enable auto deletion of files after __ days check box and enter the number of days in the field.
Click Save
You can create a Data Load Rule. Click here to learn how to do so. Also, you can schedule the Data Load Rule to load data from Google Drive to Planful using Cloud Scheduler. Click here to learn how to do so.
Integrate with Google Drive
When you enable this feature, you can push Templates, Dynamic Reports and Report Collections to Google Sheets. To enable Google Sheet in the export settings, you have to complete the Google integration configuration.
You can leverage Google Drive functionality only with Google for work enterprise domain account. To start uploading and sharing files through Google account, the Google domain admin must complete this one-time setup.
Detailed Instruction
Log in to your Google for work Enterprise domain with the admin account in which your users will use the Google Drive integration features.
Login to Planful application and navigate to Maintenance > Admin > Configuration Tasks > Cloud Services > Google Drive .
Click on the Integrate With Google button.
If the domain is getting registered for the first time in the environment, then the popups are prompted in the following order. Click Accept or Next as applicable.
Finally click Launch App.
When there is no Integrate with Google option in the Google Drive screen, perform the following steps:
Log in to your Google for work Enterprise domain with the admin account in which your users will use Google Drive features (https://admin.google.com/). The Google Admin home page appears.
From the home page, select the Security option.
In the Security page, click the API controls option.
Under Domain wide delegation , click Manage Domain Wide Delegation.
On the Manage domain wide delegation page, click Add new.
Provide the following information in the respective fields and click Authorize.
Client ID : <<Client Id – Contact Planful's Support team for this information>>
OAuth Scope : https://www.googleapis.com/auth/drive
To make sure every scope appears, select the new client ID and click View details. If they do not, click Edit , enter the missing scopes, and click Authorize. Note that you cannot edit the client ID.
Creating a Data Load Rule to Load a File From Google Drive
Click Maintenance > DLR > Data Load Rules.
Click New Data Load Rule.
Enter a Name and Description.
For Load Type , select Google Drive File Upload.
For Load Item , select Data.
For Sub Load Item , select from GL Data or Translation Data.
Complete the fields on the remaining Data Load pages as needed. Information on each of these fields and examples is provided in the Data Load Rules section of this document.
Scheduling the Data Load Rule with Cloud Scheduler to Load Data From Google Drive
Click Maintenance > Admin >Cloud Scheduler.
Click Add to create a scheduled process to load the data automatically from Google Drive using the Data Load Rule created.
Complete General Information.
Click Tasks.
Click Add Task.
For Task Type , select Data Load Rule.
For Task Name , select Google Drive Upload or whatever you named the Data Load Rule.
If there is data required to be loaded prior to this data load, select dependencies.
Click Save and proceed with scheduling.
NetSuite Integration
To complete the NetSuite integration with Planful, you must first complete a one-time setup , which consists of 3 steps.
Configuration in Planful
Complete steps 4-6 once steps 1-3 are complete. The steps below are not a one-time activity.Creation of a Data Load Rule to Load Data Resulting from the NetSuite Saved Search
Configuration in NetSuite
To complete the Configuration in NetSuite step, complete 3 tasks.
Enable Features (i.e. Token Based Authentication)
1. Enable Features
Token based authentication between Planful and NetSuite is used to secure your connection between the two applications
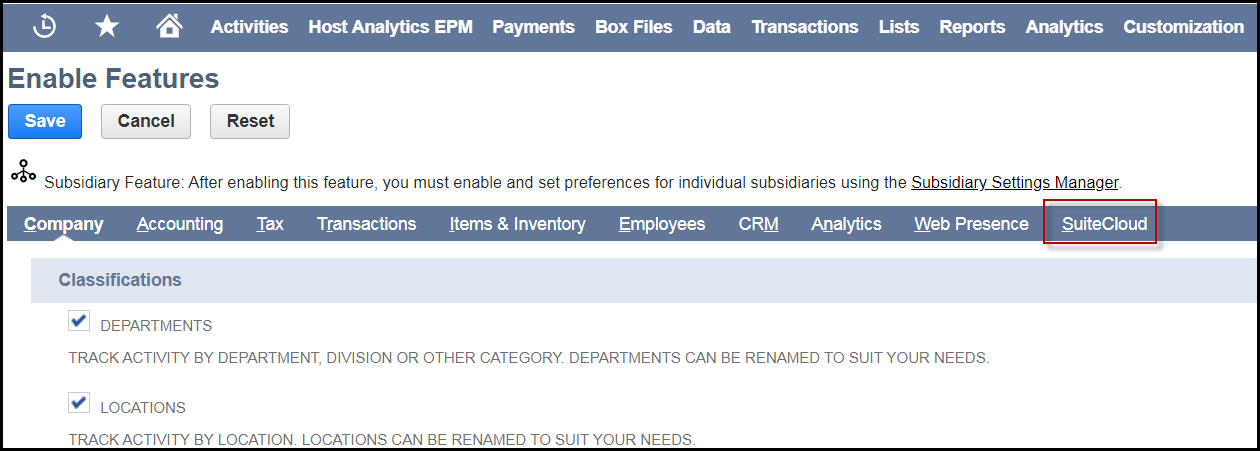
Navigate to Setup > Company > Enable Features.
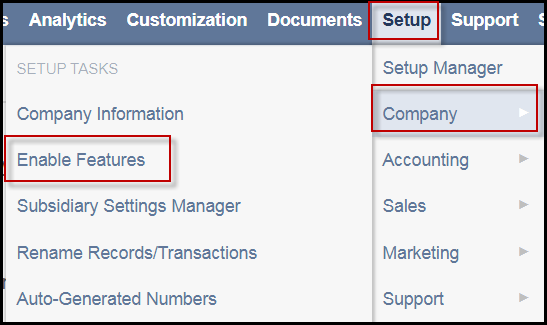
The last tab is SuiteCloud. Click it.
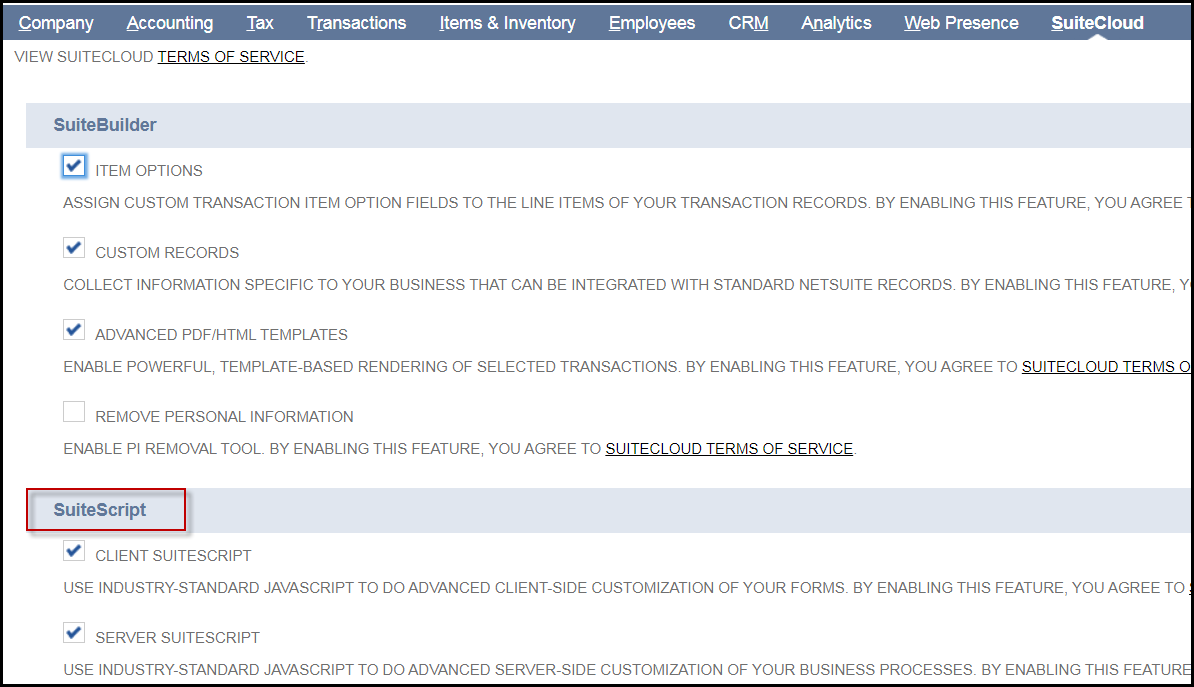
Scroll down to the SuiteScript section.
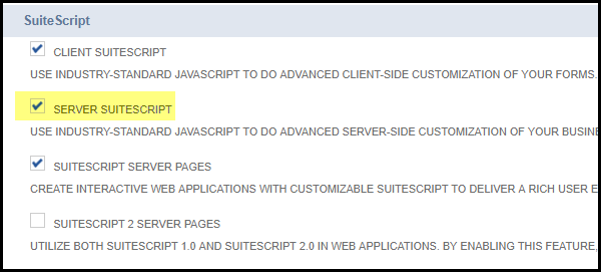
Select the SERVER SUITESCRIPT checkbox.
Scroll to Manage Authentication and select the TOKEN-BASED AUTHENTICATION checkbox and save.

2. Create an Integration Application
Completion of this task will result in generation of a Consumer Key and Consumer Secret. The screen will be displayed only once. Make note of the content displayed as it is to be used while setting up NetSuite Connect in Planful. Tip! Copy and paste the Consumer Key and Secret into Notepad.
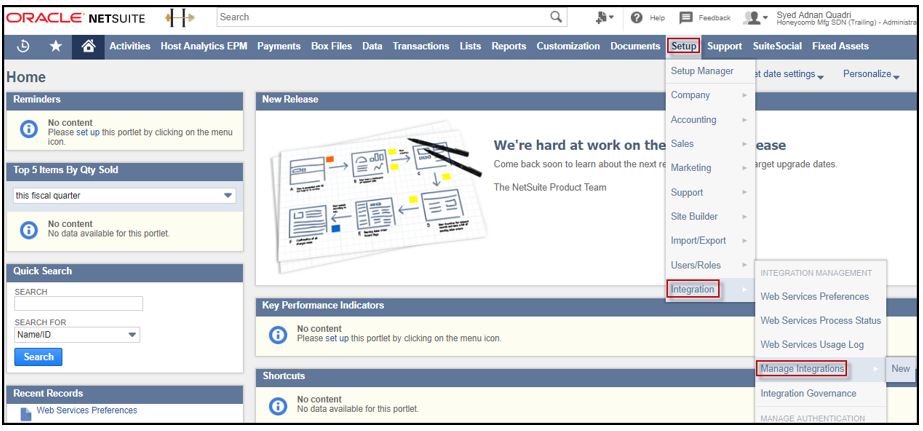
Navigate to Setup > Integration > Manage Integrations > New.
Fill in the name and select Enabled forState and Token-Based Authentication.
Click Save.
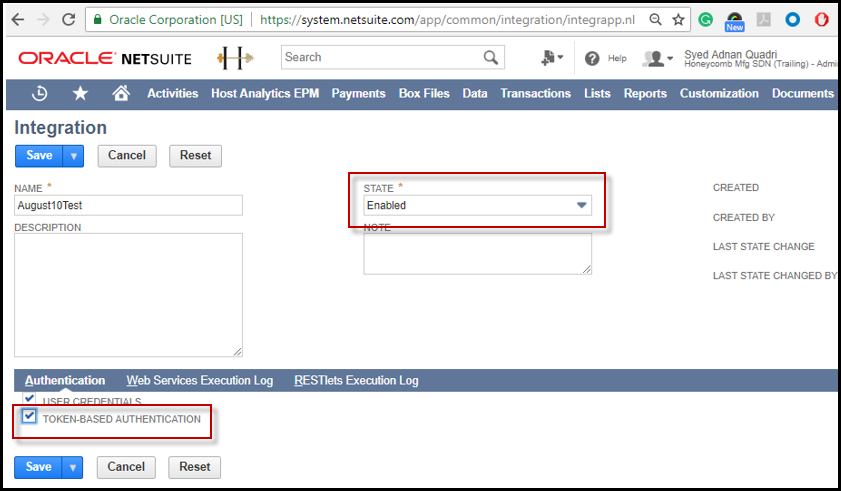
The Confirmation page appears. Copy and paste the Consumer Key and Secret into Notepad or some other application.
3. Generate an Access Token
Completion of this task will result in the generation of a Token ID and Token Secret.
If you are an Admin user, complete the steps under Admin User . If not, complete the steps under Role Level.
Admin User
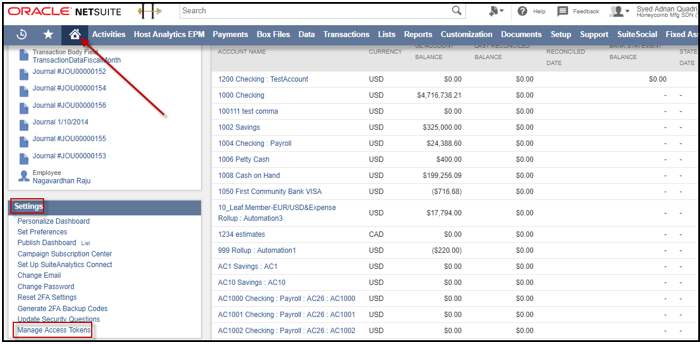
Navigate to Home > Settings > Manage Access Tokens.
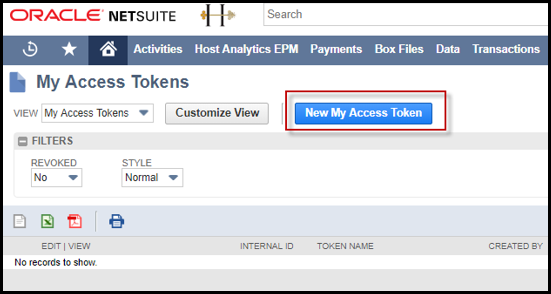
Click New My Access Token.
Select the Application Name and click Save.
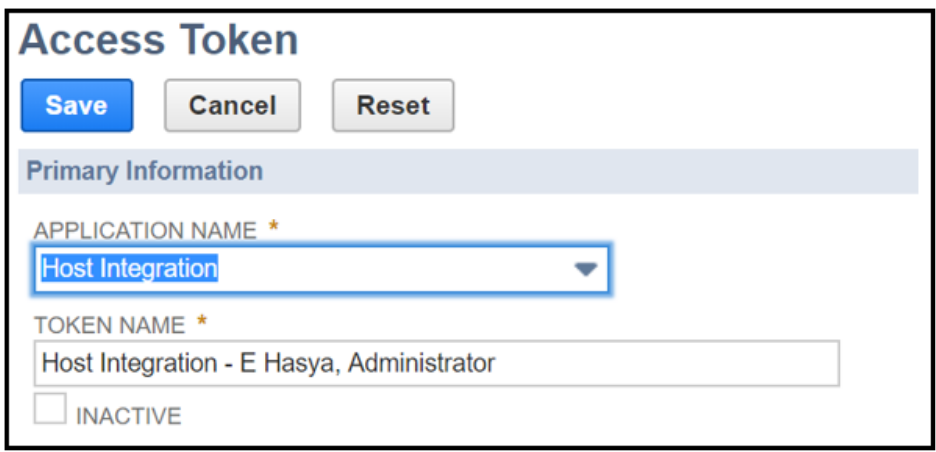
Role Level
Navigate to Setup > Users/Roles > Manage Roles.
Edit the Role mapped to the user by clicking on it.

When the Role page appears, click Edit.
Scroll down to Permissions.
Click the Setup tab and add the Permission of User Access Tokens and click Save.
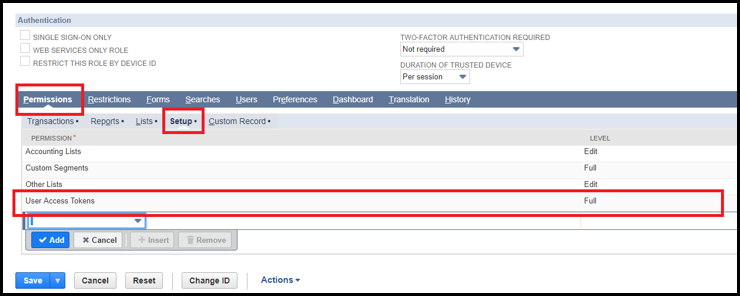
Generate the Access Token
Navigate to Setup > User/Roles > Access Tokens > New.
Select the Application Name that you provided in task 2. Select a User and Role. Click Save.
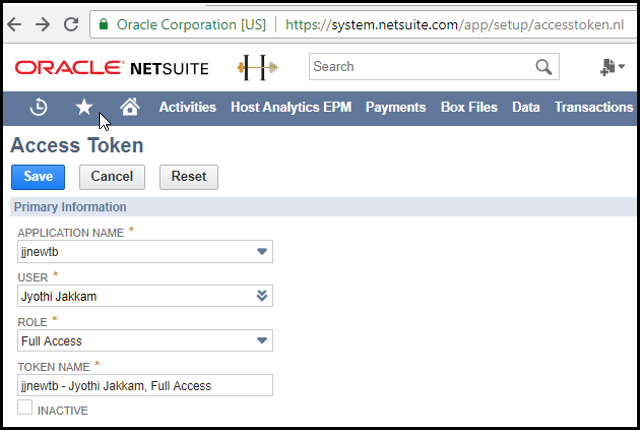
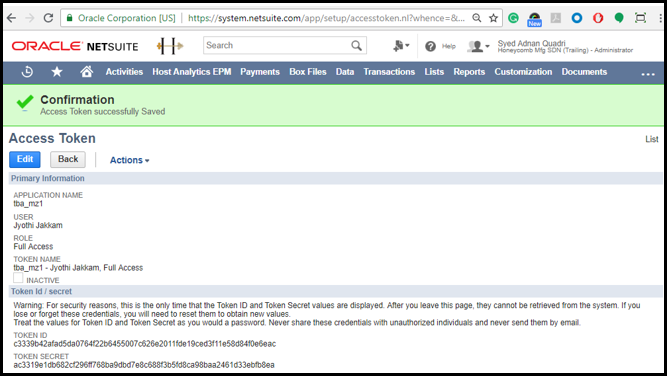
The screen below will be displayed only once. Make note of the information on this screen as it will be used while setting up NetSuite Connect in Planful. Tip! Copy and paste this information into Notepad
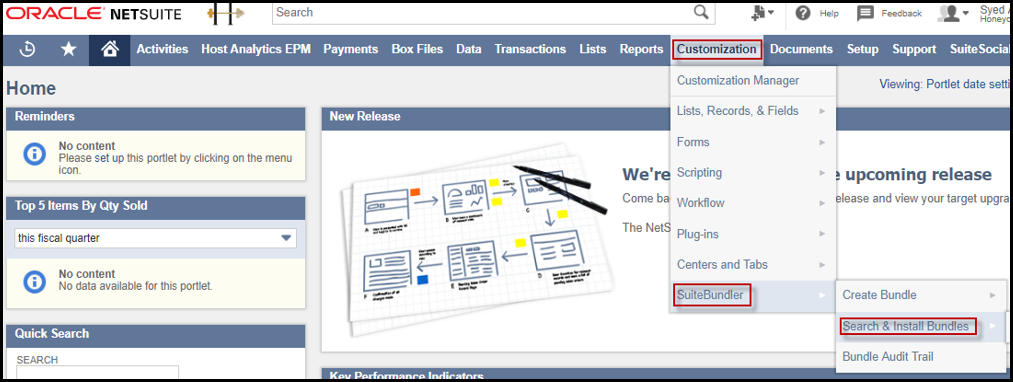
Install the Bundle for SuiteScript in NetSuite
Navigate to Customization > SuiteBundler > Search & Install Bundles.
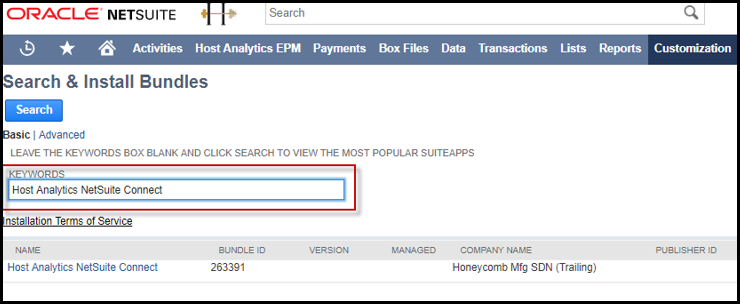
Find Planful NetSuite Connect and select it.
Click Install as shown on the screen below.

Once you click Install , the page below is displayed, click Install Bundle.
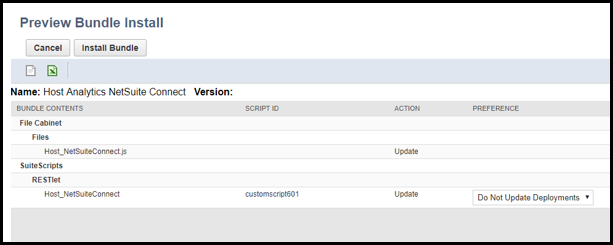
Find Planful_NetSuiteConnect within the NetSuite browser and click Page:Planful_NetSuiteConnect.

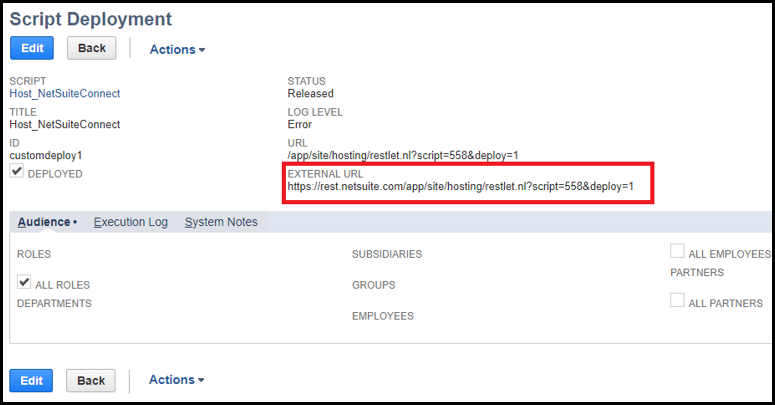
Click View.

Make note of the External URL as this information is used while setting up NetSuite Connect in Planful. Tip! Copy and paste this information into Notepad.
Configuration in Planful
Open Planful and navigate to Maintenance > Admin > Configuration Tasks > Cloud Services.
Click the NetSuite Connect tab as shown below.
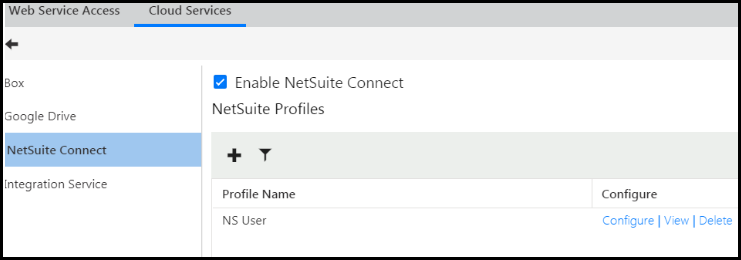
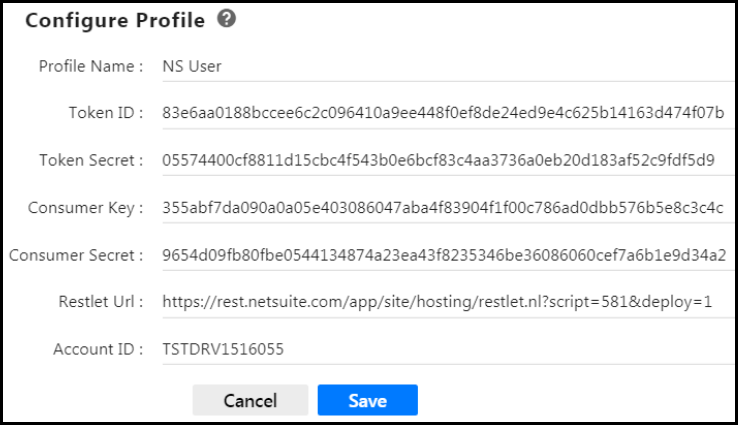
Click Add to create a NetSuite Profile. You need to create a profile to establish the connection between Planful and NetSuite. Data can be pulled from multiple NetSuite databases. You can create multiple profiles corresponding to each database. The Configure Profile screen appears.
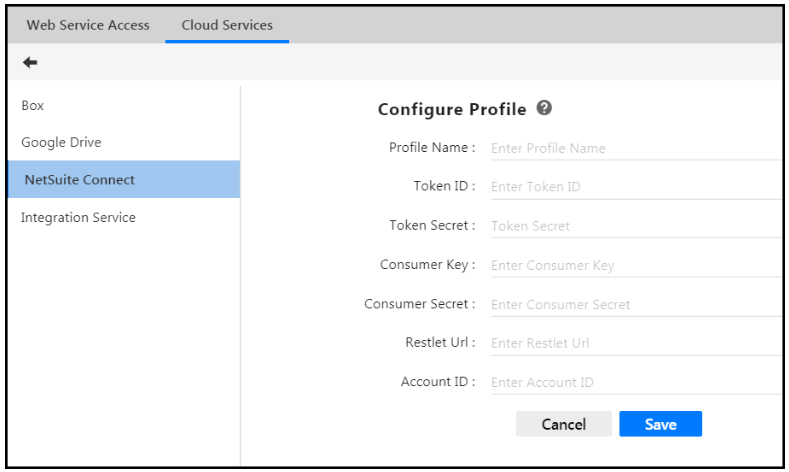
Enter a name for the profile.
Enter the Token ID and the Token Secret generated and provided by NetSuite. Tokens are used to authenticate and authorize data to transfer over the internet.
For Consumer Key and Consumer Secret , NetSuite provided this information. Consumer Key is the API key associated with NetSuite. It identifies the client.
The RESTlet url is the External URL. A Router is a RESTlet that helps to associate a URI to the RESTlet or the Resource that will handle all requests made to this URI. In plain terms this means that the url provides a route from Planful to NetSuite.
Enter your NetSuite Account ID in the Account ID field.
Click Save . Your configuration will look something like the image below.
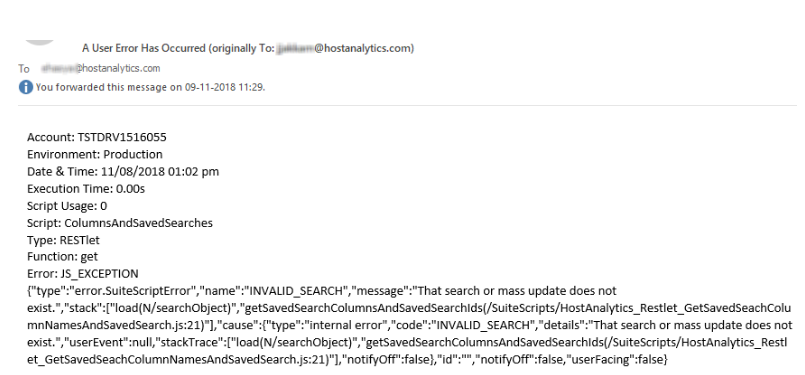
The Profile is created when all the details provided in the screen above are valid. Once the Profile is saved successfully, the NetSuite user will receive an email. The subject of the email will say, “A User Error Has Occurred”. Please ignore this email. This email will be sent using the user’s email and it will show up in the Sent folder.
To further explain, when you configure the NetSuite Profile in Planful, Planful sends the user credentials along with the Saved Search ID as ‘0’ and only upon receipt of the response (that there exists no Saved Search with the ID ‘0’) are the user credentials validated. This email will be sent every time a Profile is created, or an existing Profile is re-saved.
Create a Saved Search in NetSuite
Create a Saved Search to extract data from NetSuite that you want to load to Planful.
Navigate to Reports > Saved Searches > All Saved Searches.
Click to view All Saved Searches or click New to create another.
Select a Search Type. This is important because the field/column types that will prepopulate the saved search is based on Search Type. For example, if you select the Contact type, the saved search will prepopulate with Name, Email, Phone, etc in the Results column.
Create the Saved Search with the required columns that can be used to map to the columns in Planful while loading data.
NetSuite Saved Search Best Practices
- For GL Data and Transactions Data, only a Date type of column can be mapped to a ‘Date’ target column in Define Data Mapping step in Planful.
The date can be picked from the ‘Transaction Date’ in NetSuite.
To use Posting Period to map to date column in Planful, use the formula below of type Date in the Saved Search.
to_date(ConCat('01 ', {postingperiod}), 'dd.mm.yyyy')Any other field of type date can be mapped in Planful.
Note:When loading data to Planful using a given date range, the records with empty date values will not be loaded. This may happen when the NetSuite transactions have empty or null custom date fields which are used in the Saved Search and the custom date field being mapped in Planful.
If any of the segment members are blank in NetSuite transactions, for example, Location, then the formula below can be used to populate Null with default value. The below formula uses DEFAULT as a placeholder for the default value.
NVL({location.namenohierarchy}, 'DEFAULT')
RESTlet Limitations
The following record types are not supported:
| Record Category | Record Type |
|---|---|
Customization | CRM Custom Field (definition) |
Customization | Custom Record Custom Field (definition) |
Customization | Entity Custom Field (definition) |
Customization | Item Custom Field (definition) |
Customization | Item Options Custom Field (definition) |
Customization | Other Custom Field (definition) |
Customization | Transaction Body Custom Field (definition) |
Customization | Transaction Column Custom Field (definition) |
Customization | Custom Record Type (definition) |
Entities | Group |
Entities | Win/Loss Reason |
Lists | Budget Category |
Lists | Currency Rate |
Marketing | Campaign Keyword |
Other Lists | Lead Source |
Other Lists | Win/Loss Reason |
Support | Support Case Issue |
Support | Support Case Origin |
Support | Support Case Priority |
Support | Support Case Status |
Support | Support Case Type |
Support | Support Issue Type |
Transactions | Budget |
Transactions | Intercompany Transfer Order |
Website | Site Category |
Creating a Data Load Rule to Load Data Resulting from the NetSuite Saved Search
Now that configuration is complete, create a Data Load Rule (DLR) to load NetSuite Data via the Saved Search. Follow the steps below.
Navigate to Maintenance > DLR > Data Load Rules.
Click the New Data Load Rule tab.
Enter a name for the DLR.
For Load Type , select NetSuite Connect as shown below.
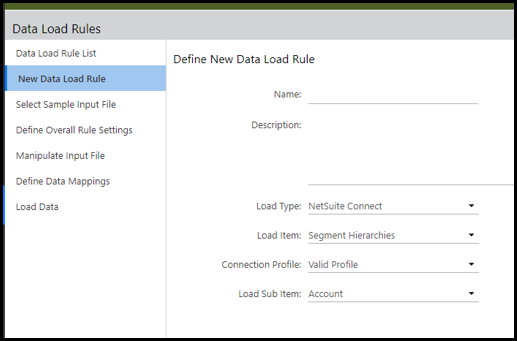
Select to load Segment Hierarchies, Currency Exchange Rates , GL Data, Translations Data or Transaction Data. These are the only supported load type items at this time.
For Connection Profile, select the name of the profile configured above. In this case it was called NS User.
Select a Load Sub Item and click Next.
Row with Header and # of Rows to Skip are read-only. Specify the # of Source Fields with the number of columns to be mapped in the Define Data Mappings step from the NetSuite Saved Search.
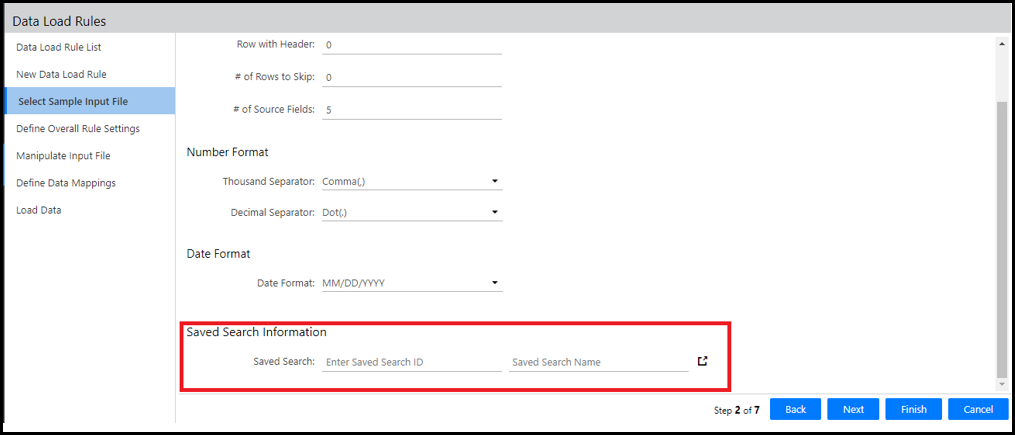
Enter the Saved Search ID or alternatively use the browse icon to select the NetSuite Saved Search in the ‘Select Sample Input File’ step.
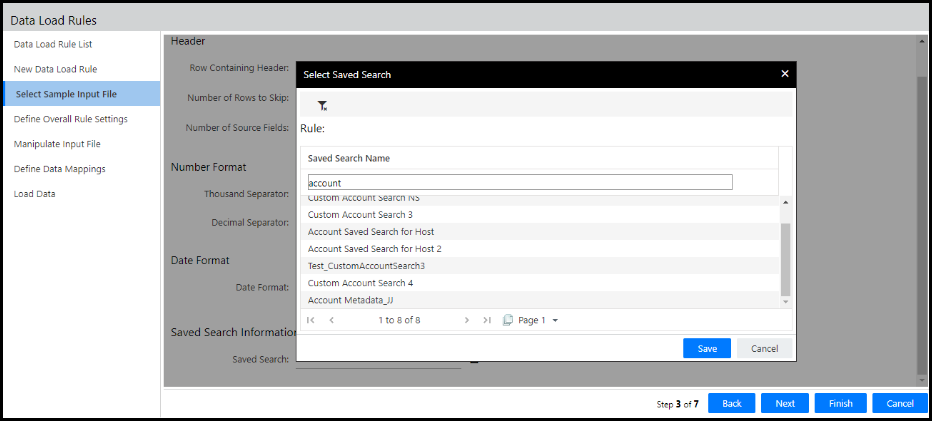
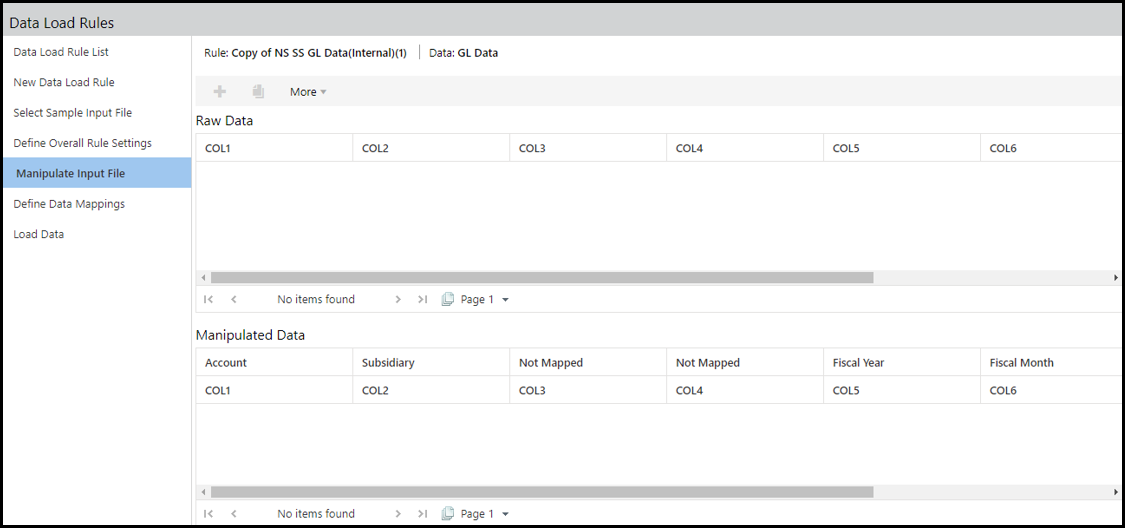
For the Manipulate Input File step, you can perform data manipulations, which allow you to change the way data is loaded from your source solution to Planful (the target). You can perform the following actions:
Add new column
Duplicate existing column
Edit Headers Name
Join Data
Split Data
Replace
Show Column Header
Manage Manipulations
Note:The Data Manipulations functionality is enabled only for the RESTlet mode and not applicable for the Web Services mode.- You can manipulate the data displayed in the Raw Data pane The manipulated data is displayed in the Manipulated Data pane.
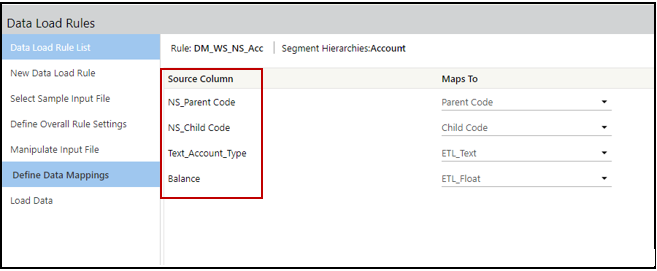
For the Define Data Mappings step, map the Saved Search Source Column to the column in Planful using the Maps To column. In the screenshot below, the GL Data or Transactions Data Load shows you where you can filter the data to be loaded at the segment level using a Filter Condition of ‘Include /Exclude ’ and segment codes as Filter Values with comma separated.
The NetSuite columns are displayed under the Source Column field in the Define Data Mappings page. The number of source columns is based on the value of # of Source fields in the Select Sample Input File step.
 Note:Level-based data load is enabled for the NetSuite Connect DLR in the Define Overall Rule Settings step. Also, the YTD (Year-to-Date) and Account Based options are enabled in the Data Type drop-down list for NetSuite Connect DLR.
Workaround for Existing DLR
The Data Manipulations functionality is applicable only to the NetSuite Connect DLR’s that are created after June 2019 Release and in the RESTlet mode.
For customers using the RESTlet mode prior to June 2019 Release or for customers who migrated to RESTlet mode from the Web Services mode, the workaround steps to enable the Data Manipulations functionality are as follows:
From the Load Type drop-down list, select any load type other than NetSuite Connect. For more information, see the Data Integration Admin Guide.
From the Load Type drop-down list, select NetSuite Connect.
When you navigate to the Manipulate Input File page, you can view the raw data and can perform the required Data Manipulations.
When you navigate to the Define Data Mappings page, you can view columns from NetSuite under the Source Column field.
Best Practices
Navigate to the Manipulate Input File step prior to the Define Data Mappings step to fetch the latest column header information and to preview the saved search data.
When the Process Flow is running, you should not navigate to the Manipulate Input File page of the DLR used in the Process flow.
Create a Cloud Scheduler Process in Planful
It is recommended that you create a Cloud Scheduler Process in Planful to run the DLR. To do so, follow the steps below.
Navigate to Maintenance > Admin > Cloud Scheduler > Process Flow.
Create a Process Flow and add tasks with the Data Load Rule task type.
Select the DLR just created and schedule it to run. Below is a screenshot of a Scheduled Process for GL Data where the Period selected is Current Financial Year.
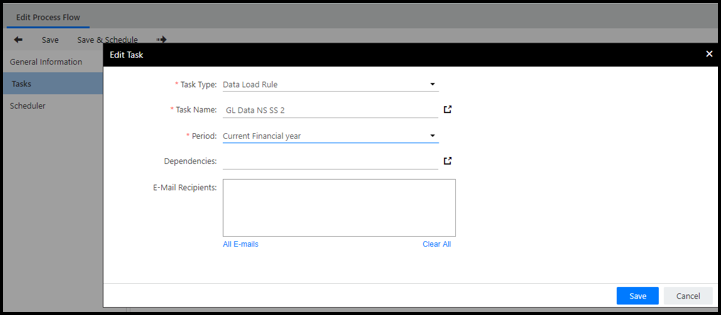
For detailed information on how to set up processes in Cloud Scheduler, see the Cloud Scheduler guide.
Data Load Rules
A Data Load Rule (DLR) tells the Planful system how to handle data values in the data source during a data load. You can create data load rules to load files, copy and paste data, and use web services to load segment hierarchies, attributes, attribute hierarchies, entity hierarchies, users, Workforce data, currency exchanges rate and other data. There are several steps to create a data load rule. These steps vary based on source and target data options.
See: Data Integration Admin Guide for detailed information on Data Load Rules
Transaction Details
Introduction
Setup a dimension structure to load transactions data (daily data). This is one method of extracting, transforming and loading data from your system to the Planful system. Alternatively, you can use the Data Load Rules functionality to load transactions data.
You can also load Transaction data using Translations. Information on how to do so is provided below.
Loading Transaction Data with Translations
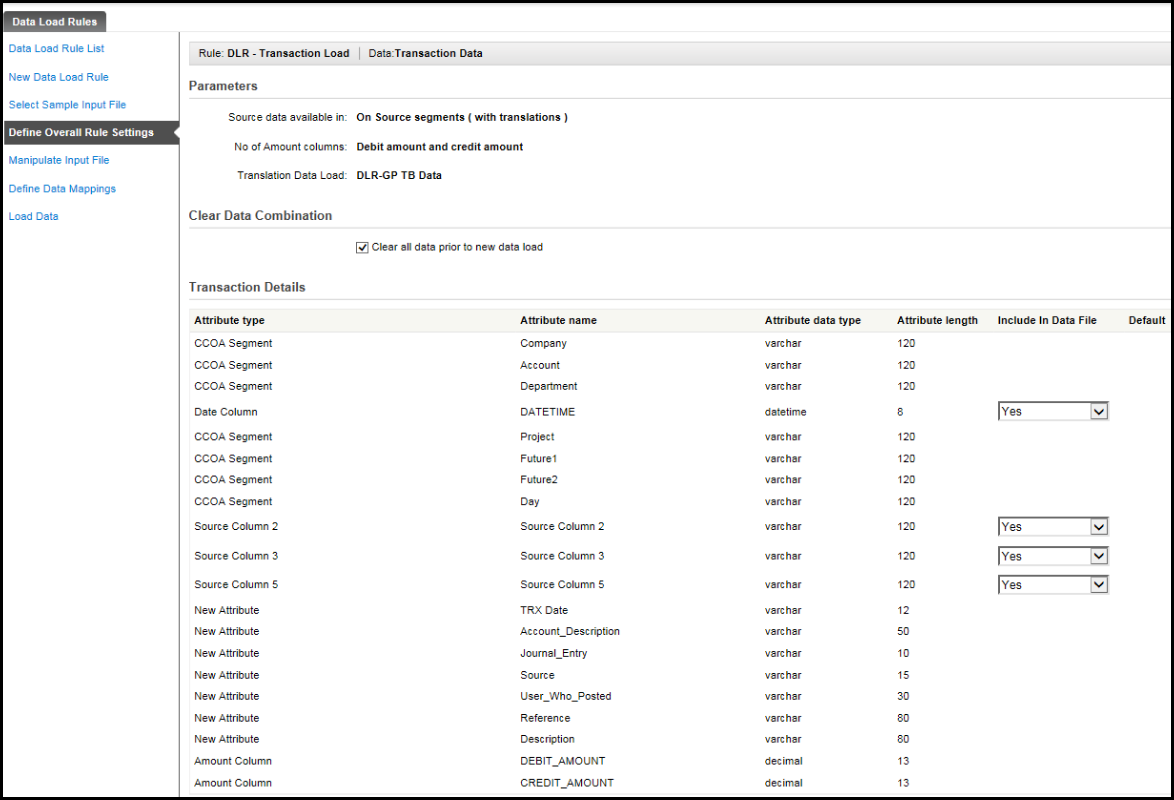
Access the Transaction Details Setup page under Maintenance, DLR (Data Load Rules).
For Source Data, select On Source segments (with translations).
For Translation Data Load , select the main data load rule used to load data with translations.
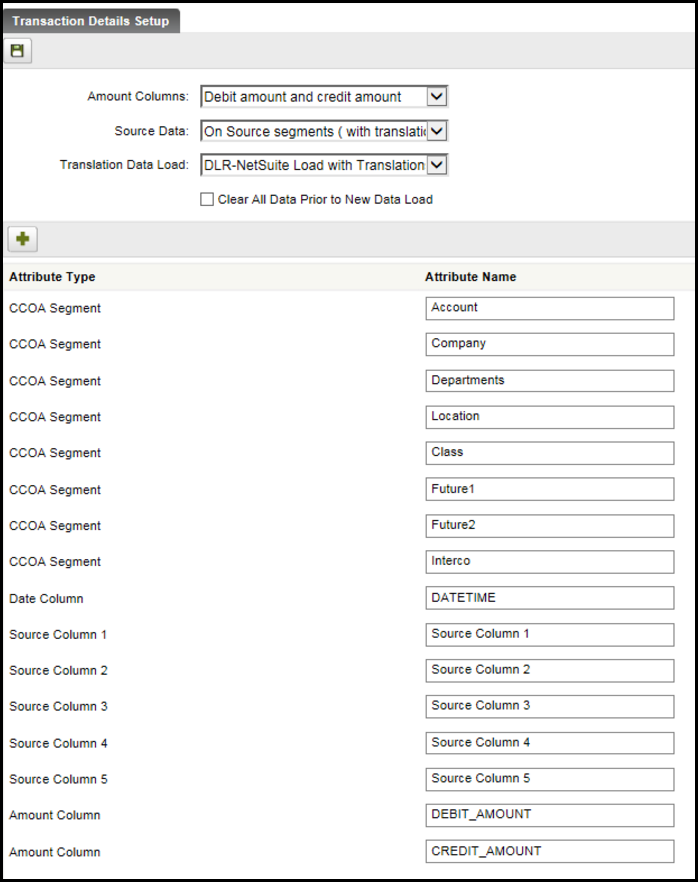
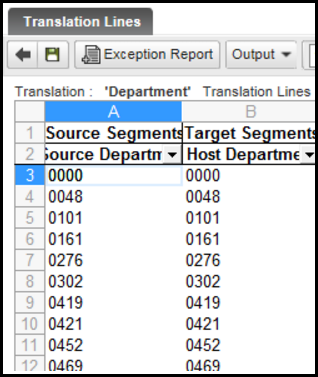
Each segment must be included. All the translated columns will be shown after the segment columns, followed by the transaction detail columns, followed by the amount columns. This references the main data load rule. This data load rule used translation tables for account, department and company segments and loaded to default values for the other segments.
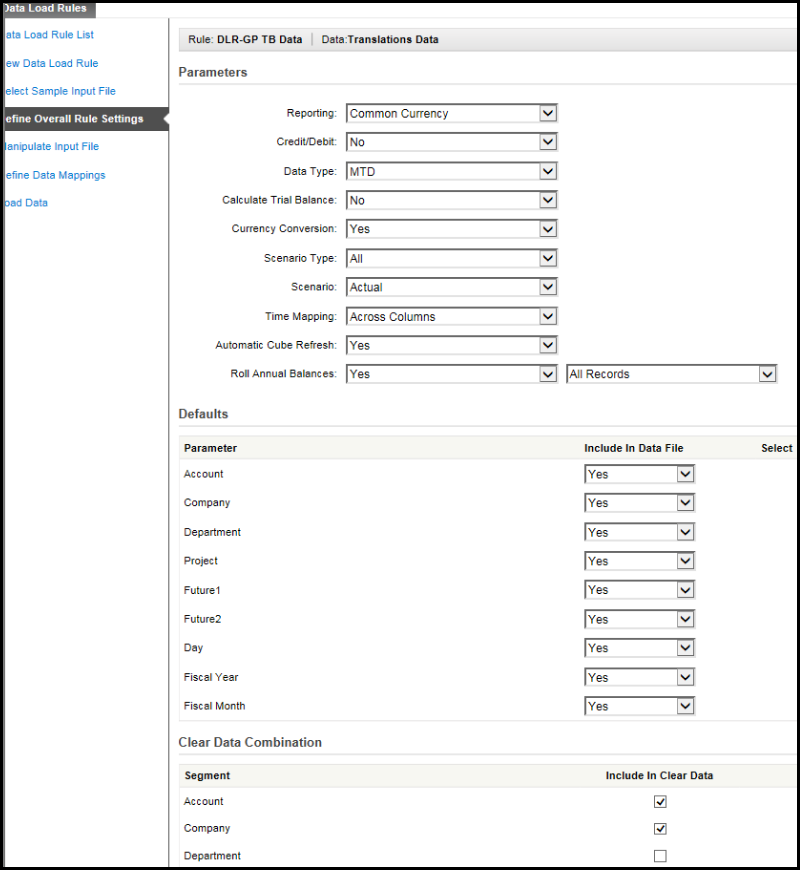
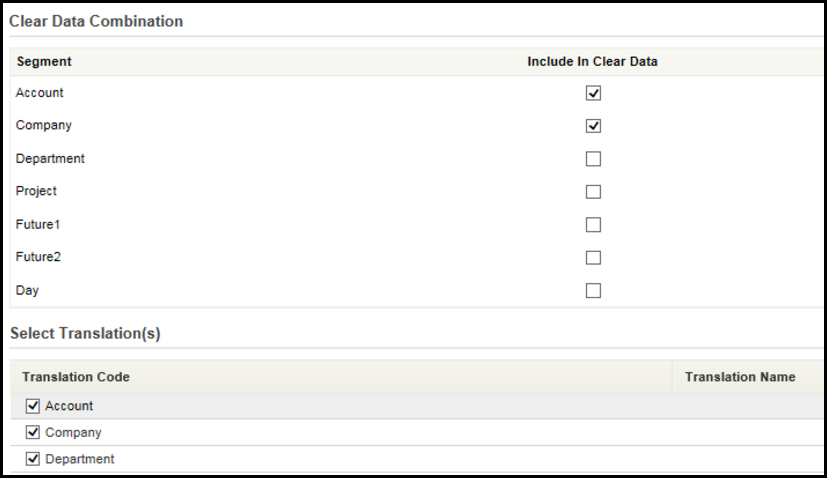
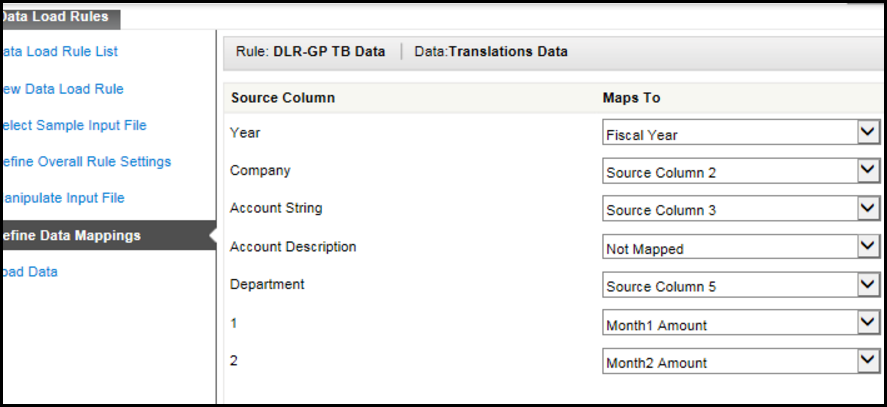
To load transaction data, add the segments to the translation table which had previously been set at default values.
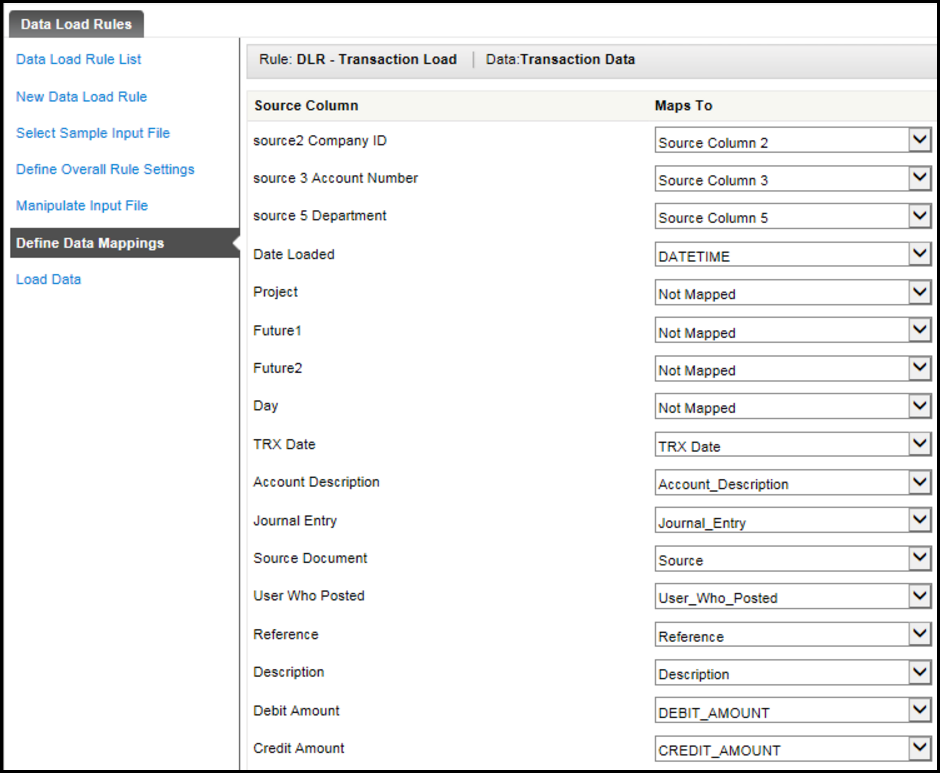
The following segments had to be loaded to the translation table in order.
Account
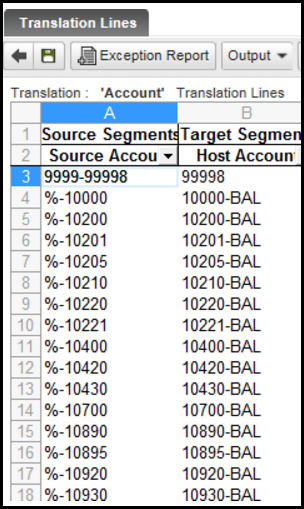
Dept
Company – 4 segments loaded to Default
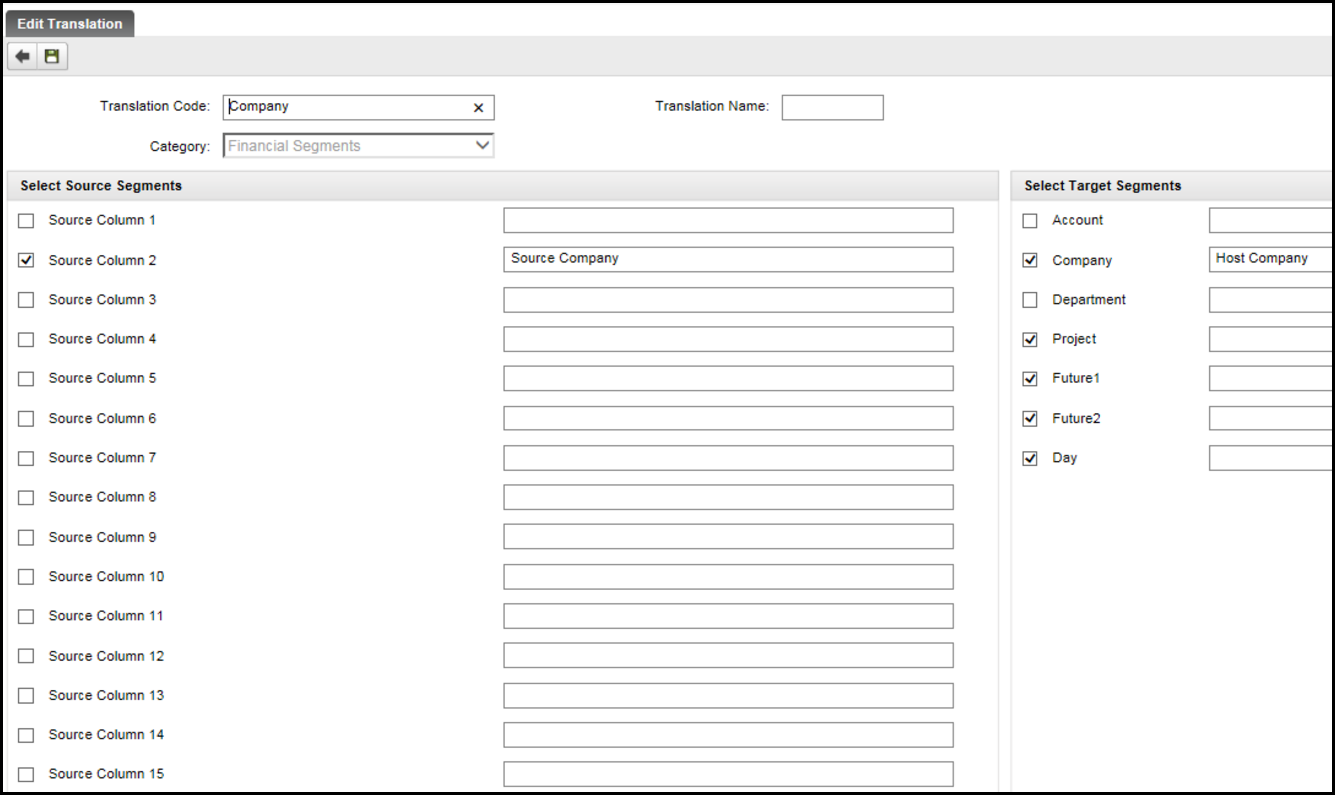
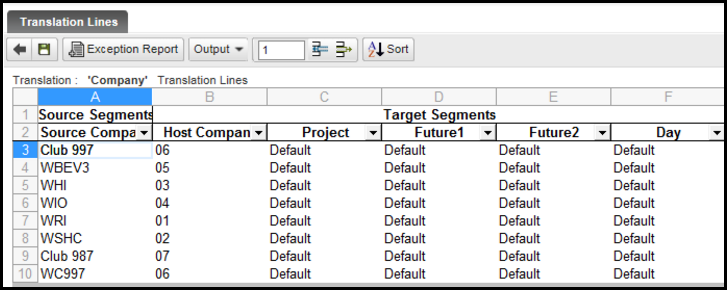
In the Translation data load rule, the three translation tables were mapped.
Asian Characters in Transaction Data Loads
You can load Transaction data with Chinese, Japanese, Korean and Malay characters using a Translation or GL Data Data Load Rule. Once loaded, you can view the data in the Dynamic Report Transaction Report by drilling through to transactional data.
You must contact Planful Support to enable this feature. Once enabled by Support, complete the steps below.
Complete the following steps:
Contact the Planful Support team to enable this feature.
Access the Transaction Details Setup page by navigating to Maintenance > DLR > Transaction Details .
If the User defined attributes are not present in the existing Transaction Details Setup, you must add them using the ‘+’ icon before saving the Transaction Details Setup. Please note that as per the existing behavior, if any changes are made to the Transaction Details Setup screen before saving, then the earlier Transactions loaded are lost.
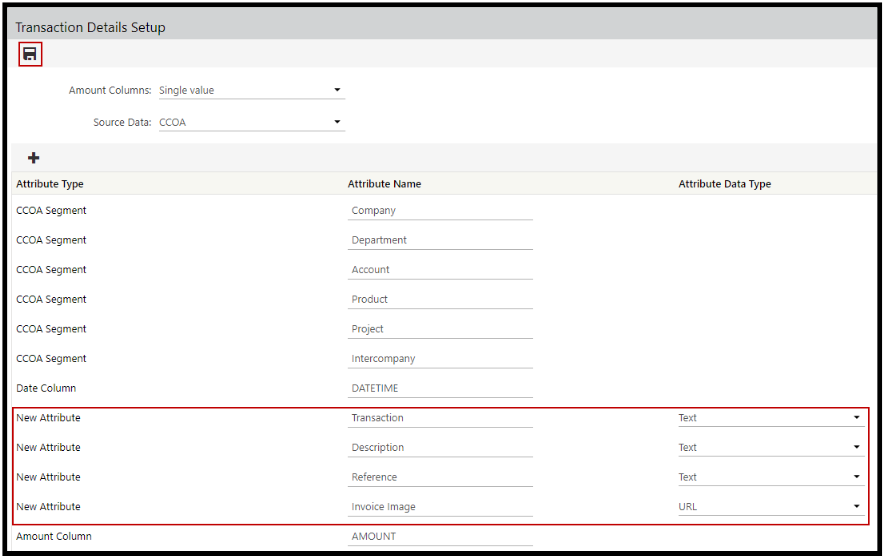
Asian characters can be loaded to user defined attribute columns only. You cannot load data with Asian characters to segment members. To add a new user defined attribute, click the add ‘+’ icon and select Text for Attribute Data Type. Select URL to enter a web hyperlink .
For Attribute Length , enter up to a maximum of 4000 characters.
Click Save.
Access the Data Load Rule and load Transaction Data for the GL Data/Translations Data that has been loaded. If using the File Load type, ensure that when the Excel load file is saved, the Save As format option is either CSV UTF-8 (Comma delimited) (*.csv) or Unicode Text (*.txt).
Create a Dynamic Report to view the Transaction Report. The image below displays a Dynamic Report (with drill through enabled for Transactions). To view transactional data with Asian characters, double-click and the Transaction Report displays (also show below).
If you are an existing customer and require a migration of the existing Transaction data, then the transaction data needs to be reloaded.
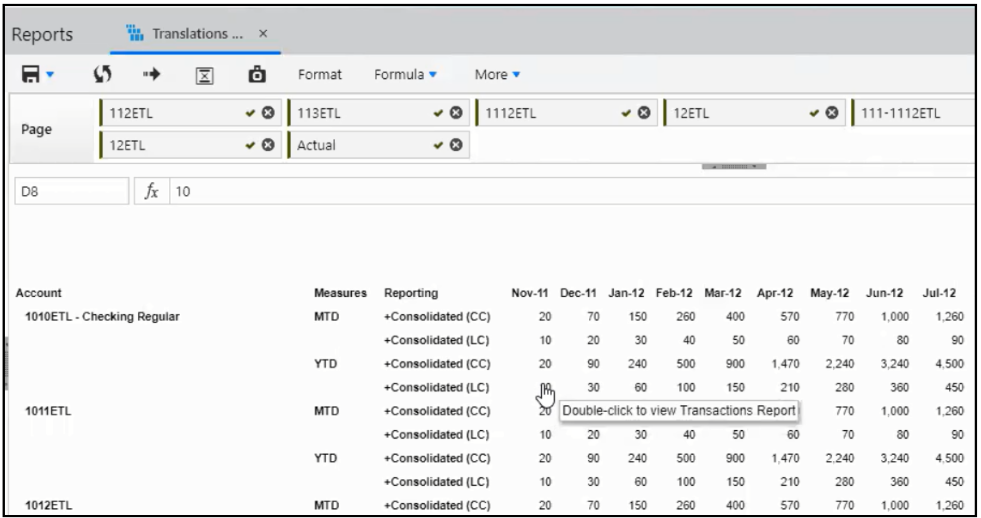
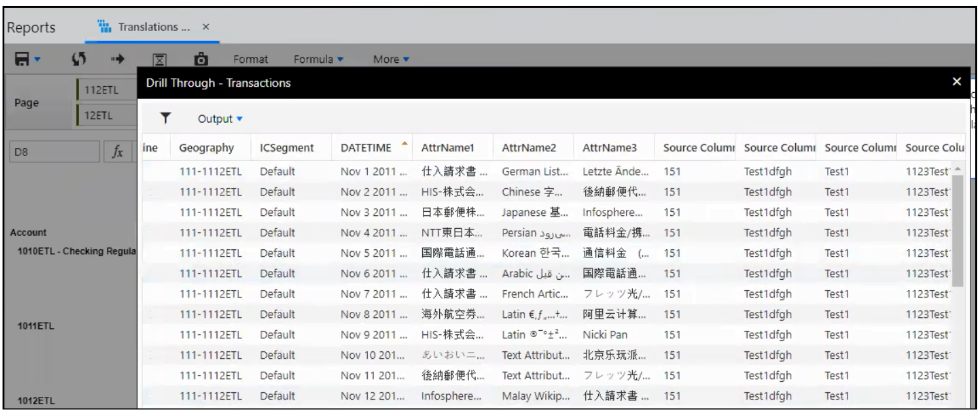
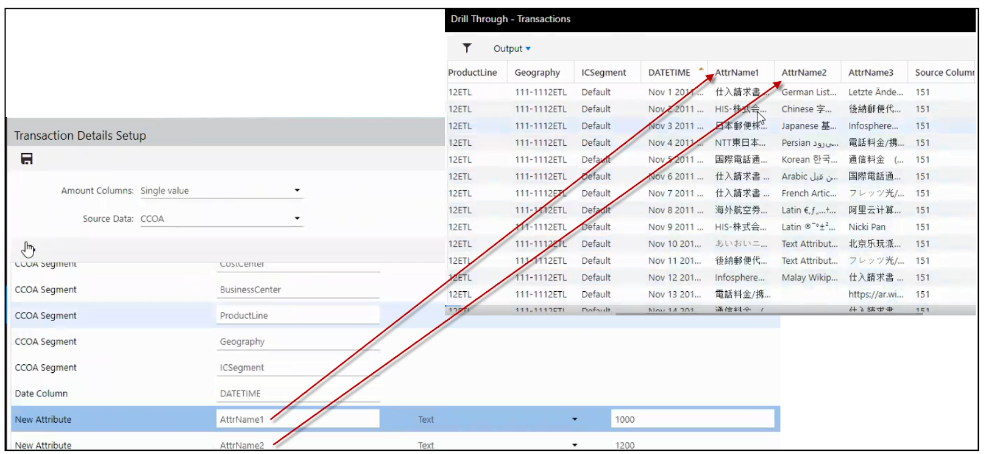
In the image (below) you can see how the attribute columns map between the Transaction Data and Transaction Report.
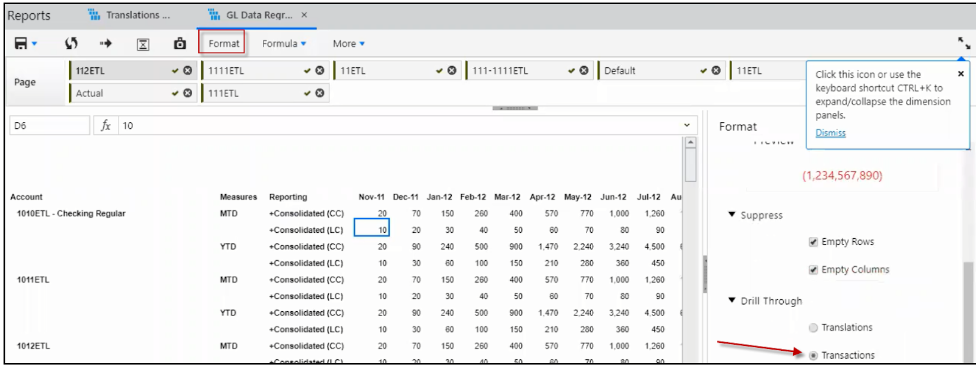
Make sure you enable Drill Through to Transactions for the Dynamic Report. To do so, click Format and select Transactions as shown below.
Translation Data Load
To load transaction data with Asian characters using translations, set up a Translations data load rule. For information on how to do so, see the Transaction Details: Loading Transaction Data with Translations topic in this guide.
Actual Data Templates
Introduction
Using this approach, data is loaded into the Planful suite via data input templates in which data is manually entered. Administrative users can design and publish the data input templates, which are then accessed by end users who input data into the templates.
This approach is recommended when the data needs to be loaded into Planful suite from several disparate General Ledgers with significant dissimilarities in the chart of accounts and the data translation mappings from the subsidiary general ledger data to the common reporting chart of accounts do not exist or would be hard to create.
How to Load Data With Actual Data Templates
To load data with Actual Data Templates, perform the following steps:
Navigate to Maintenance > DLR > Actual Data Templates.
Click Add.
Enter the template name.
Select template parameters. These parameters are common to all new templates unlike the COA Segment members which are populated based on the segments defined on the Configuration Tasks page.
The scenario is fixed as you can only load data to the Actual scenario.
Select the reporting currency; which means you will load data in local or common currency.
Select Yes for Apply Credit Debit if the data contains credit account numbers in positive form, else select No.
For Data Type, select MTD to allow the opening balance and net change accounts for the data load period for all accounts (balance and flow), select YTD to allow a year to date amount for each period for all accounts, or select Account Based to allow a mixed format with YTD amount for balance accounts and net changes for flow accounts.
For Enable Opening Balance, select Yes to include an opening balance column in the Data Load interface.
Display Line Code - Select Yes to display the code column details.
Select COA Segment members that you want included in the ETL (extract, transform, and load) data file/ data load definition.
Click Save and return to the Actual Data Template List page.
Ensure the template you just added is selected and click Template Setup.
To design the template with a structure (data lines), you have several options:
Insert line types. L lines allow data entry or calculations to be performed for the row. Reference and destination accounts may be applied to a line. Change the line type to a Header (H ) or Calculated (C ) line. C lines allow calculations to be defined for a row within the template design, preventing budget users from modifying the formula. Destination accounts may be applied to a calc line. H lines allow you to format sections or provide additional spacing.
Populate the template line by mapping them to segment combinations. Select Mappings, Destination Account. Destination accounts are used for saving the budget or forecast data entered or calculated in a selected budget template against a General Ledger account. These lines display with a DA.
Populate the template line by referencing an account from another template. Select Mappings, Reference Account to look up of data from another template. For example, payroll accounts may be looked up from the Workforce template. These lines display with an RA.
Select Mappings, Reference Cube to open the Rule page to look up data from the cube. For example, you can look up total revenue for all sales departments within a legal entity. These lines display with an RC.
Mass load data by selecting Mappings, Mass Load. The Mass Load page is enabled where you can select members to load based on dimension member parameters you select. These lines are also labeled with an L.
Set the format for the template; number, currency or percent.
Using an Actual Data Load Template to Load Data to Consolidation
In the example below, an Actual Data Load template is added. On the Template Setup page, the structure is defined.
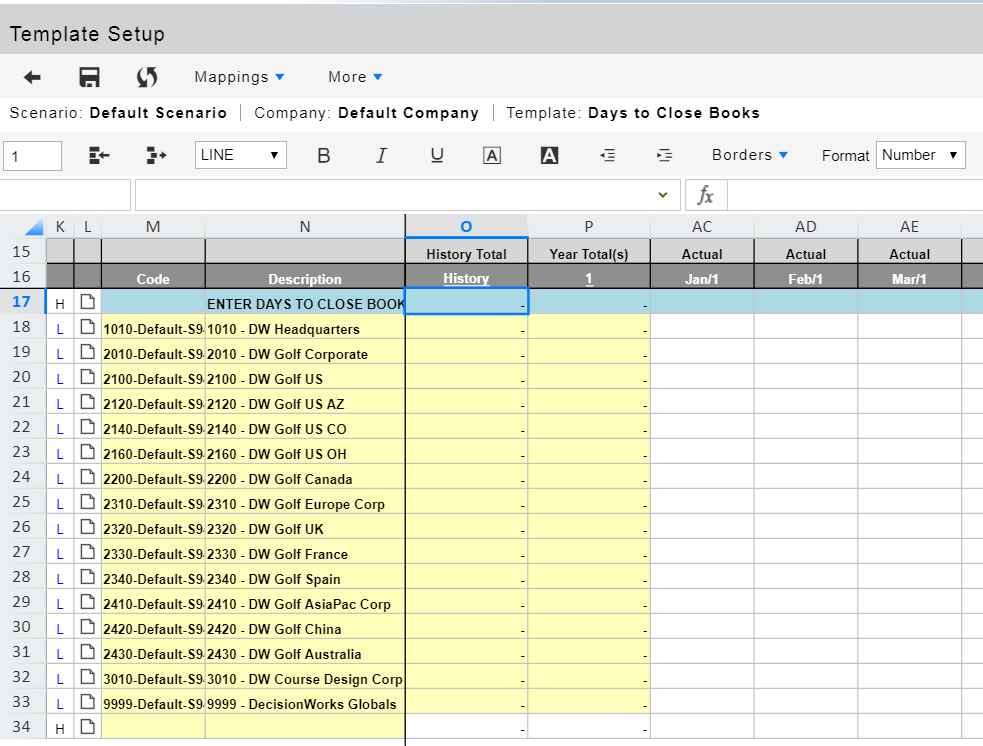
In the Consolidation Control Panel. company 1010-Corporate is selected. The Actual Data Load process is displayed.
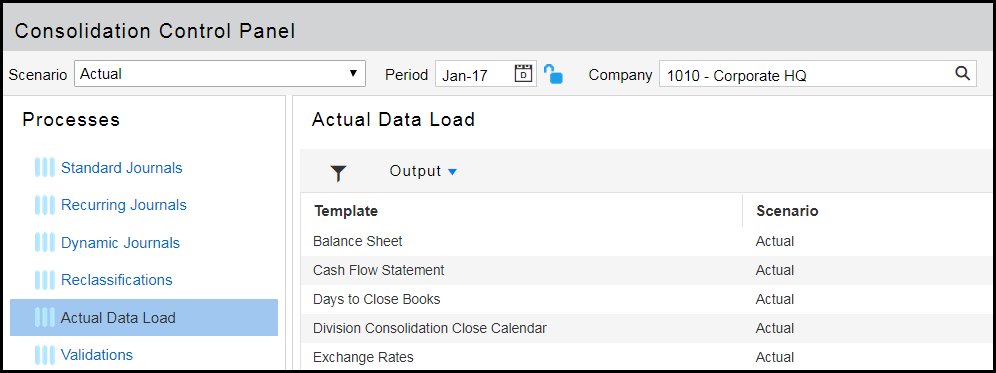
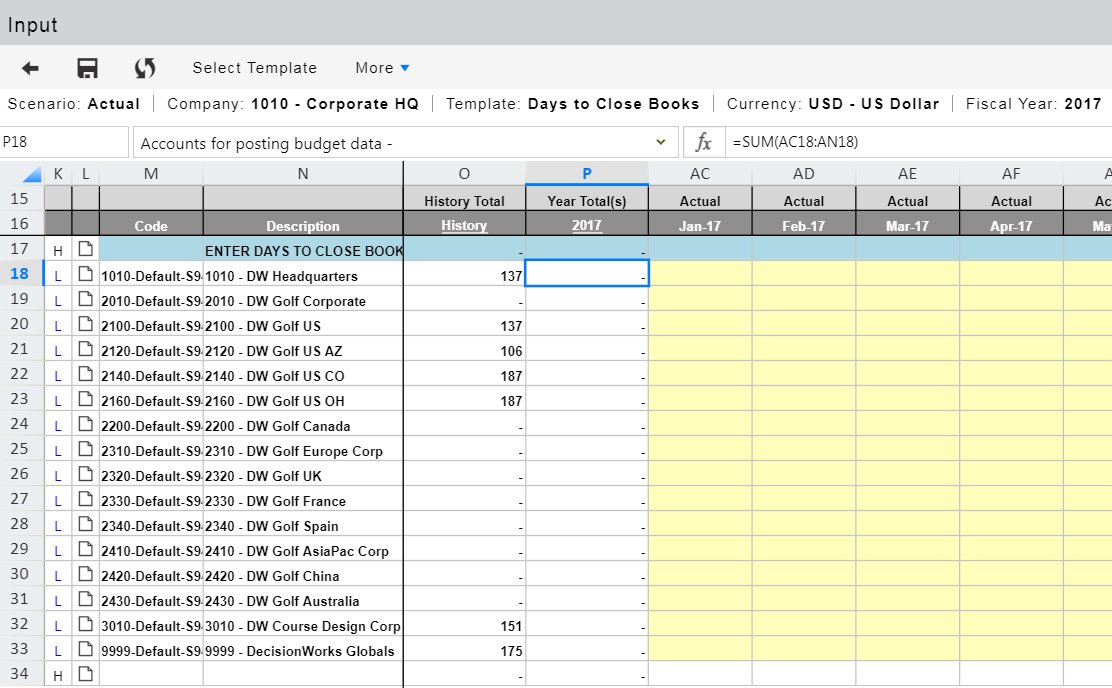
The Days to Close Books template is selected for input.

The Days to Close Books template is displayed so that Consolidation end-users can enter data.
Best Practices for Loading Data
The recommendation(s) or best practice for loading data into the application is that it should be sequential. For example, if you load Oct-19 after loading Dec-19 data, then you need to load through Dec-19 to calculate the MTD/QTD/YTD correctly in Reporting.
We strongly recommend that a single Data Load Rule is used when loading data for a fiscal year / scenario, loading data for same GL combinations using multiple DLRs will result in incorrect results in Reporting.
Make sure that appropriate segments are enabled as part of Clear Data Segment combination fields.
If you have a DLR set to load data as a specific measure (say MTD for all account types), the best practice is to not change the measure setting after having loaded data into the system.
After the data is loaded and validated in the application, access the Lock Data screen under Maintenance > Reports> Lock Data. Lock the periods so that data for the data for those periods is not manipulated by any further loads.
The Verify Data report will show the numbers loaded based on the Data Input Type property set for an account in the application and you may have to use a Dynamic Report to view MTD or QTD or YTD amounts for an account.
When loading exchange rates via Data Load Rules, the best practice is to the load FX rates only for those periods and currencies which have a change in rate(s). Loading the rates with the “Apply Currency Conversion ” option enabled in the data load rule deletes the existing data set, which reconverts currency and recalculates the numbers. It is advised that the rates are loaded in a chronological period order. After the rates are loaded, numbers validated and the period(s) are closed from accounting perspective, the recommendation is to lock the historical periods using the Lock Data screen (if it is the “Actual” scenario) to avoid accidental data deletion.

