- 25 Minutes to read
- Print
- DarkLight
- PDF
Loading Data to Planful
- 25 Minutes to read
- Print
- DarkLight
- PDF
Overview and Cheat Sheet
Completing Configuration Tasks told the system how you want your Structured Planning application configured (you defined the chart of accounts, fiscal year, and so on). Now, data needs to be loaded to that structure.
This following options are available to load your data to Planful.
Web Services / Boomi - | Loads all types of data. With Boomi, use secure connectors. Take advantage of Protocols and API integration tools. |
Cloud Services | Depending on service; loads GL, Segment Hierarchy, Transaction, and Translations data. |
Actual Data Template | Loads actual data for Consolidation application in a template format. |
Translations Setup | Loads data that needs to be translated. For example, if your organization operates with multiple companies with disparate general ledgers using different schemas of chart of accounts, data translations or mappings are required for the data to be loaded into the Planful suite. |
Transaction Details | Loads transaction or "daily" data, which might include translations. |
Data Load Rules | Loads all types of Data. .This built-in solution utilizes data load rules to extract, transform, and load your data to Planful . |
Data Calculation Exceptions | Instructs Planful , during the data load process, to take default values for missing data for periods where no entries are posted. |
See the Admin Guide to Loading Data to Planful
For information on all Planful APIs, see the API Library
Actual Data Templates
Actual Data Templates
Using Actual Data Templates, data is loaded into the Planful suite via data input templates in which data is manually entered. Administrative users can design and publish the data input templates, which are then accessed by end users who input data into the templates.
This approach is recommended when the data needs to be loaded into Planful suite from several disparate General Ledgers with significant dissimilarities in the chart of accounts and the data translation mappings from the subsidiary general ledger data to the common reporting chart of accounts do not exist or would be hard to create.
Loading Data with Actual Data Templates
To load data using Actual Data Templates:
- Navigate to Maintenance > DLR > Actual Data Templates.
- Click Add.
- Enter the template name.
- Select template parameters. These parameters are common to all new templates unlike the COA Segment members which are populated based on the segments defined on the Configuration Tasks page.
The scenario is fixed as you can only load data to the Actual scenario.
Select the reporting currency; which means you will load data in local or common currency.
Select Yes for Apply Credit Debit if the data contains credit account numbers in positive form, else select No. For Debit Accounts, accounts loaded are displayed with the correct signage in reports. For example, if you want to see a negative number for a debit account, load a negative number for that accounts. For Credit Accounts, the number loaded is negated and stored that way. So, if 100$ is loaded, the number is stored in Planful as -100 (100x-1). When you run the Verify Data report, the number is displayed as -100. When you run a Dynamic Report, the number is again multiplied by -1 making the resulting value displayed in the Dynamic Report $100. If you select No, for Debit Accounts, the data is displayed as is in reports. For example, if you want to see a negative number for a debit account, load a negative number for that account. However, if you select Yes, for Credit Accounts, and load 100$, 100$ will be shown in Verify Data, but in Dynamic Reports, -100$ will be shown.
For Data Type, select MTD to allow the opening balance and net change accounts for the data load period for all accounts (balance and flow), select YTD to allow a year to date amount for each period for all accounts, or select Account Based to allow a mixed format with YTD amount for balance accounts and net changes for flow accounts.
For Enable Opening Balance, select Yes to include an opening balance column in the Data Load interface.
Display Line Code - Select Yes to display the code column details.
- Select COA Segment members that you want included in the ETL (extract, transform, and load) data file/ data load definition.
- Click Save and return to the Actual Data Template List page.
- Ensure the template you just added is selected and click Template Setup.
- To design the template with a structure (data lines), you have several options:
Insert line types. L lines allow data entry or calculations to be performed for the row. Reference and destination accounts may be applied to a line. Change the line type to a Header (H) or Calculated (C) line. C lines allow calculations to be defined for a row within the template design, preventing budget users from modifying the formula. Destination accounts may be applied to a calc line. H lines allow you to format sections or provide additional spacing.
Populate the template line by mapping them to segment combinations. Select Mappings, Destination Account. Destination accounts are used for saving the budget or forecast data entered or calculated in a selected budget template against a General Ledger account. These lines display with a DA.
Populate the template line by referencing an account from another template. Select Mappings, Reference Account to look up of data from another template. For example, payroll accounts may be looked up from the HR template. These lines display with an RA.
Select Mappings, Reference Cube to open the Rule page to look up data from the cube. For example, you can look up total revenue for all sales departments within a legal entity. These lines display with an RC.
Mass load data by selecting Mappings, Mass Load. The Mass Load page is enabled where you can select members to load based on dimension member parameters you select. These lines are also labeled with an L.
- Set the format for the template; number, currency or percent.
Using an Actual Data Load Template to Load Data to Consolidation
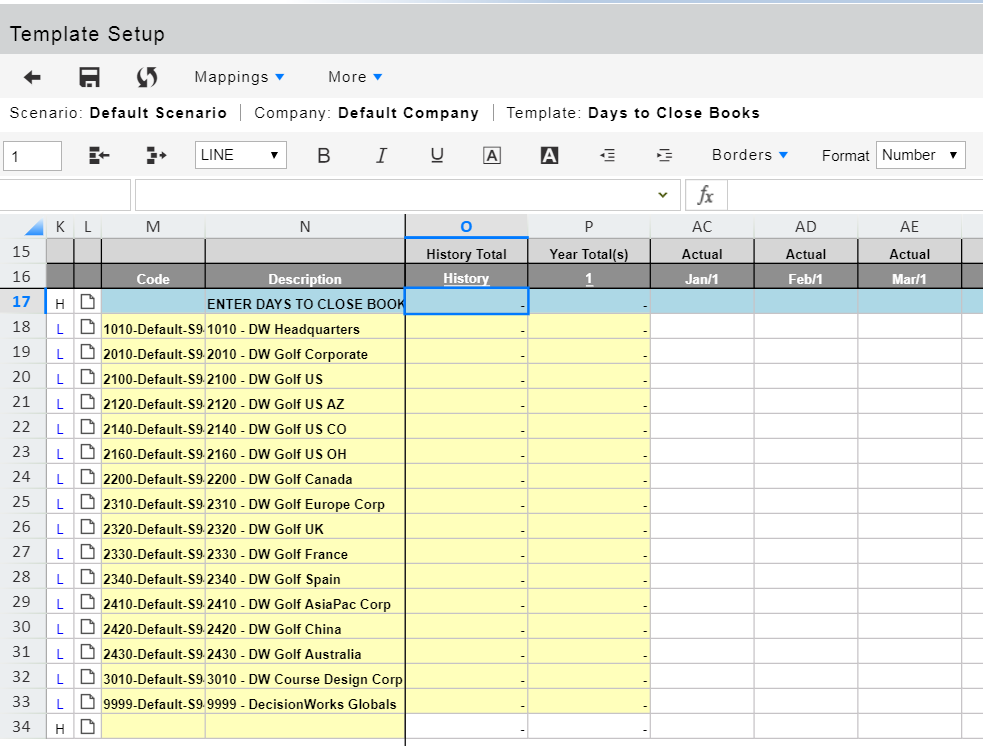
In the example below, an Actual Data Load template is added. On the Template Setup page , the structure is defined.
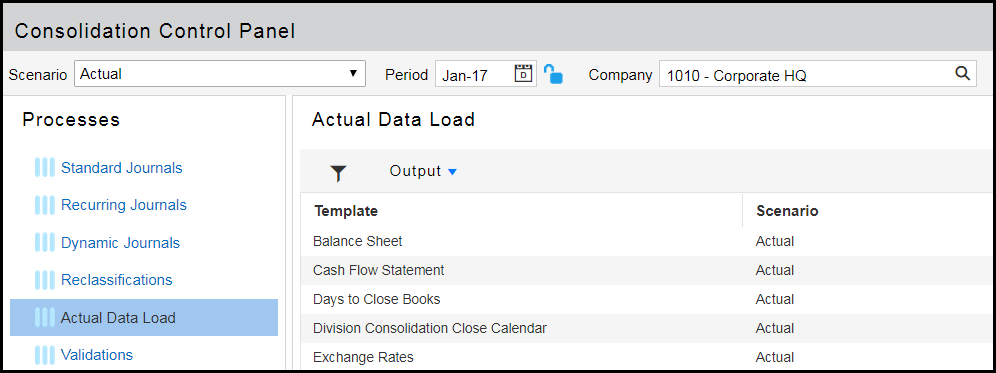
In the Consolidation Control Panel. company 1010-Corporate is selected. The Actual Data Load process is displayed.
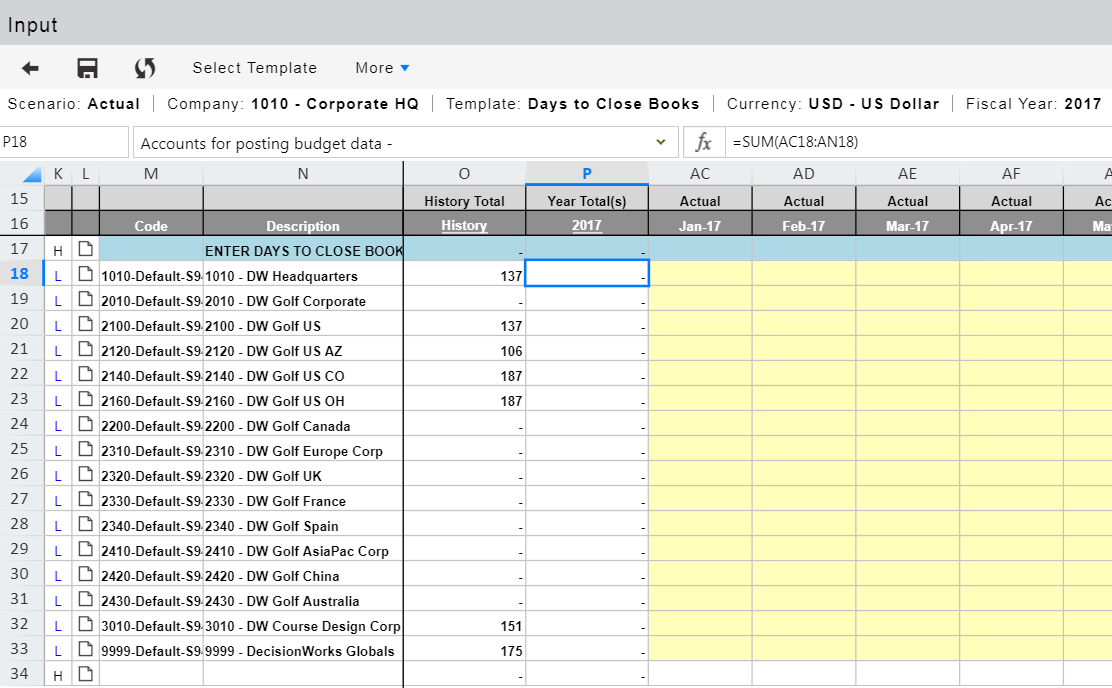
The Days to Close Books template is selected for input.

The Days to Close Books template is displayed so that Consolidation end-users can enter data.
Description of Fields on the Actual Data Through Template Page
Setup a data load template. Select mapping options and design the layout or structure of the template.
Adjust column widths by dragging the lines (similar to an Excel spreadsheet). Once saved, the column widths are saved to the template. Column widths are not user specific.
Selections Available Under Mappings | |
|---|---|
Account Mapping | Maps template rows to segments. Select one of the following options:
Note: Map multiple template rows or reference multiple accounts at once.
|
| Selections Available Under More | |
Account Reports |
|
Line Type list box | Set the line type of each line in the template by selecting the appropriate type. Select from the following options:
|
Format | Apply number, currency, or percent formatting to rows. |
Decimals | Apply up to 6 decimals per row. |
|
|
Translations Setup
What are Translations
Translations provide a mechanism for you to map the data from your local chart of accounts of the reporting site (subsidiary or a partner company) with the common reporting chart of accounts used in Planful.
If your entities do not use a Common Chart of Accounts, you must provide data load files with your native chart of accounts. A Translation will be required to map your native chart of accounts used in your source data load file against the Common Chart of Accounts.
Translation Models include;
- Translating all native Source Chart of Accounts to the Common Chart of Accounts.
- Translating a single source segment to the Common Chart of Accounts.
- Translating source segments to Common Chart of Account Segments with Multiple varying Translations.
With Translation models of type 1 & 2, Data load definitions use a single Translation file for mapping. With the Translation model type 3, Data load definitions use multiple Translations to make up the complete COA definition.
Description of Fields on the Translations Setup Page
Access the Translations Setup page by navigating to Maintenance > Data Integration > Translations Setup.
Add - Add a translation and open the Add Translation page to map source and target segments. You can translate the following:
All native Source Chart of Accounts to Common Chart of Accounts
Single source segment to Common Chart of Accounts
Source segments to Common Chart of Account Segments with Multiple varying Translations
Edit - Edit a translation and open the Edit Translation page to edit mapped source and target segments.
Delete - Multiple lines can be deleted at a time by using Shift or Ctrl keys for row selection.
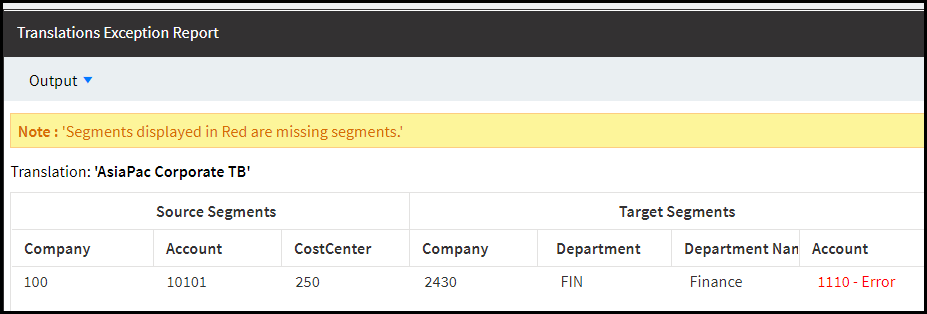
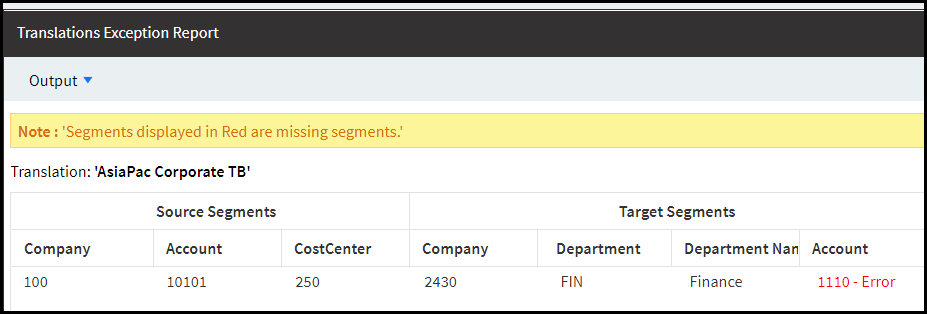
Translation Lines - Run the Translation Lines report. Once complete you will receive a notice. Download the report and open in Excel. You can also run the Exception Report from here, which displays missing segments in red as shown below.
Source Segments - The segments you are translating data from.
Target Segments - The segments you are translating data to.
Data Load Rules - The associated Data Load Rule where the translation is used.
Category - The type of segment; Financial, Currency, etc.
How to Add a Translation
- Navigate to Maintenance > DLR > Translations.
- On the Translation List page click Add.
- On the Translation Add page enter a code to identify the translation.
- Enter a name for the translations and pick the category from which you will be translating segments. In the example below, Financial Segments is selected.
- For each source segment you select enter the value of the target segment. In the example below, source column 1 in your system maps to the Company segment in Planful.

- Save and navigate to Maintenance > DLR > Data Load Rules.
- Add a new Data Load Rule to load segment members.
- On the Define Overall Rule Settings page of the Data Load Rule definition, you will select the translation defined on the Translation page as shown below.
Using Wildcards to Define Complex Translations
The following table provides a list of wildcard characters(used to define complex Translations) allowed when defining Translations along with a description of each.
Wildcard Character | Usage Pattern | Action | Description |
|---|---|---|---|
% | 123% | Allow | All source segments beginning with 123. |
%123 | Allow | All source segments ending with 123. | |
%123% | Allow | All source segments containing 123. | |
123%% | Deny | More than one ‘%’ not allowed in sequence. | |
? | 123? | Allow | All 4 digit source segments beginning with 123. |
?123 | Allow | All 4 digit source segments ending with 123. | |
?123? | Allow | A 5 digit source segments containing 123 in the middle. | |
123?? | Allow | Multiple ‘?’ are allowed in sequence. All 5 digit source segments beginning with 123. | |
~ | 100~200 | Allow | All source values from 100 to 200 (both numbers inclusive). |
~300 | Deny | ‘~’ is not allowed as the first value in a source definition. | |
500~ | Deny | ‘~’ is not allowed as the last value in a source definition. | |
200~100 | Deny | To value must be > than From value. | |
100~200~300 | Deny | Multiple ‘~’ not allowed in a single source definition. | |
100~~200 | Deny | Multiple ‘~’ not allowed in a sequence. | |
100~?? | Deny | ‘~’ cannot be used with any other wild card character. | |
%~100 | Deny | ‘~’ cannot be used with any other wild card character. | |
% | 100%? or 100?% | Deny | '%’ & ‘?’ cannot be used In a sequence. |
%100? | Allow | All source segments containing 123 in the middle and one character after. | |
?10%1 | Allow | All source segments containing 10 in the middle and one character before and ending in 1. |
If an incorrect combination of wildcard characters is used in Translation Lines, exceptions are generated when you save.
The precedence of wildcard characters for applying Translation Rules is %, ~, and specific\exact character match. This means the system will first apply % to all applicable Translations, followed by ~, and exact character match.
Example: 1
Translation lines are defined with wildcard characters as follows.
Source Segment | Target Segment |
|---|---|
10% | 1010 |
1000 ~ 1999 | 2010 |
10? | 3010 |
1050 | 4010 |
In data loads, the source segment is automatically mapped based on the Translations. Each time the Translation Rule is applied, the previous values for Segment Mapping are updated with the latest values.
Source Segment | % Applied | ~ Applied | Applied | Exact Match Applied | Final Target Segment Mapping |
|---|---|---|---|---|---|
100 | 1010 |
| 3010 |
| 3010 |
1000 | 1010 | 2010 |
|
| 2010 |
10000 | 1010 |
|
|
| 1010 |
105 | 1010 |
| 3010 |
| 3010 |
1004 | 1010 | 2010 |
|
| 2010 |
1050 | 1010 | 2010 |
| 4010 | 4010 |
Example 2:
Translation lines defined with wildcard character '?':
Source Segment | Sub Account | Target Segment |
|---|---|---|
101 | 2001 | 1010 |
1?? | ??? | 2010 |
In data loads, the source segment is automatically mapped based on the Translations. In this case, because line #1 is more specific that line #2, Source Segment 101 is mapped to 1010 instead of 2010.
How to Copy and Paste Translation Lines
In Excel, select the line(s) you want to paste in Planful and copy as shown below.
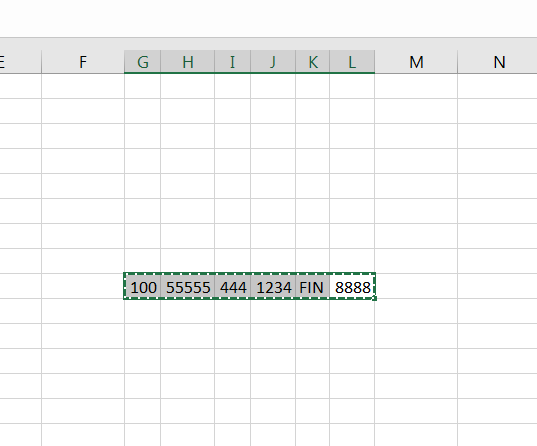
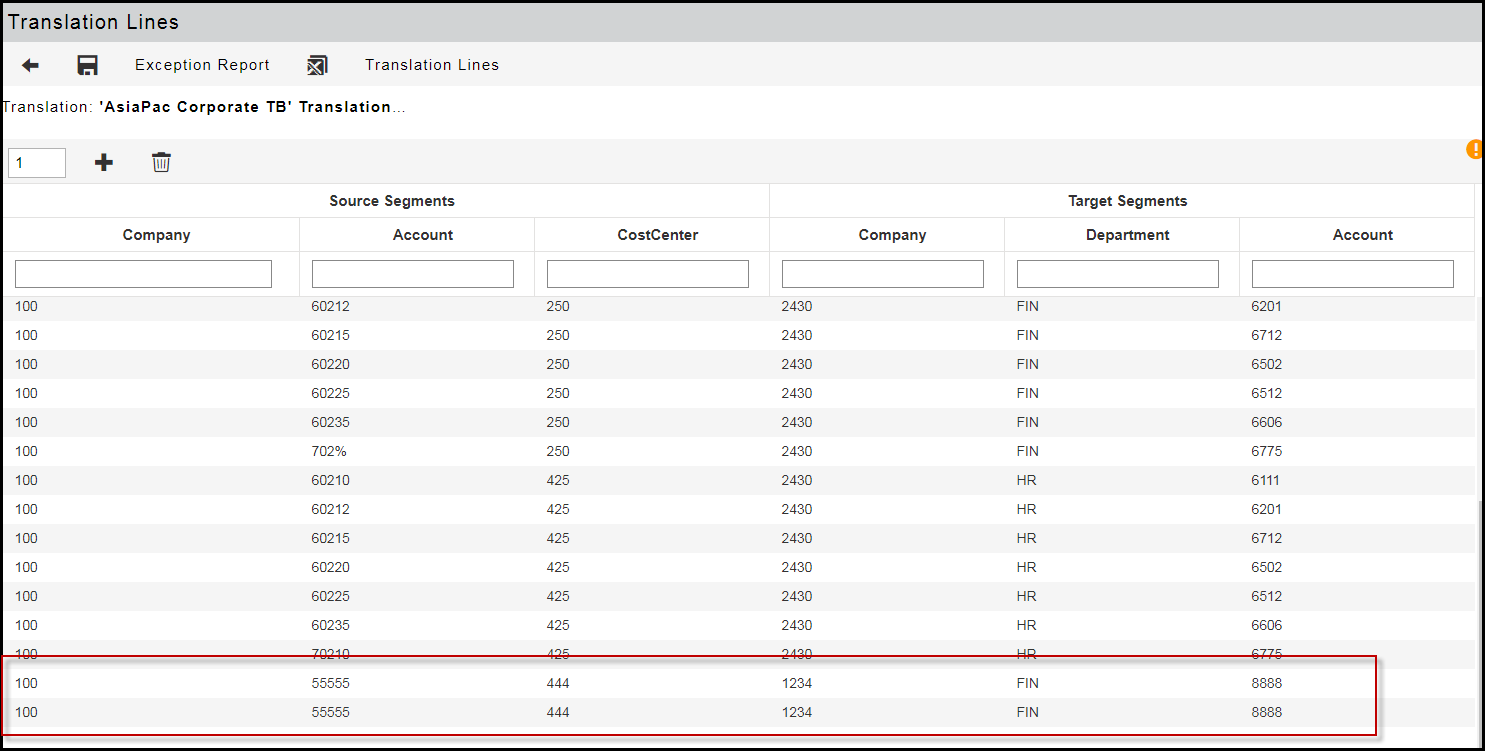
In Planful, add the number of lines you want to paste on the Translation Lines page.
Select the first cell in the first line as shown below.

Perform a CTRL+V. Notice there are now two lines with account 5555; the original line and the one just pasted.
Translations - Best Practices
Do not use blank spaces and special characters in the mapping.
When creating multiple translations for a data load, preserve the order of the source segments columns across different translations.
All Common Chart of Account segment members used in the Translation should exist in the application. If any segment members are missing, an exception report will be generated highlighting all missing segments.
Export Data / Export Data Setup
Why and How Should I Use Export Data / Export Data Setup
Use the Export Data and Export Data Setup pages to export data from Planful to Excel, text, or CSV (comma delimited value) file formats. Navigate to Maintenance > DLR > Export Data to access these pages.
Export Data Setup
File Type - Select the output type: Excel (.xls, .xlsx), text (.txt), or CSV (comma delimited value).
First Row has Column Names - Specify whether you want the first row to contain the column name or not.
Data Format - Specify whether the periods should be present for Columns or Rows.
Add - Insert a new column.
Column - Displays the default and possible columns that need to be present in the export data. Account, Company, Department, ICSegment, and Amount are default items. If you select the data format as Periods on rows, the Fiscal Year and Fiscal Month are mandatory fields.
Header Name - Specify a header name for the inserted column. If you want a blank header name in the export file, enter #Blank#.
Value - Specify the period for Fiscal Year, Fiscal Month, and Additional Column. For Fiscal Year, specify YY/YYYY/Century. For Fiscal Month, specify MM/Month name (first 3 characters)/Month name (full name).
Active - Allow or do not allow the field in the data export. By default, Account, Company, ICSegment, Department, Amount, and Scenario are selected.
Once all fields above are complete, click Save & Next.
Export Data
Scenario - Select the scenario from which that data will be exported. When the Actual scenario is selected, Start Month and End Month fields are available for selection.
Measure - Select a measure, which reflects the data according to your selection in the data export:
MTD - Export data based on a monthly measure.
YTD - Export data based on a yearly measure.
Account Based- Export data based on a specific account.
Company Hierarchy - This hierarchy displays the Company Main and all the members associated with it. Select the segment from which you want to export data.
Common Currency - Applies common currency (CC) to the data. If you select this option, all the dimensions with a CC are taken into consideration.
Local Currency - Applies local currency (LC) to the data. If you select this option, all the dimensions with a LC are taken into consideration.
Select Report Ids - Enable the Reporting Hierarchy to select a particular Reporting Dimension instead of considering all the consolidated dimensions.
Reporting Main - Displays the Reporting Main and all the members associated with it. Select the segment from which you want to export data.
Transaction Details
Transaction Details
Load "daily" transactional data. The source columns are associated with the translations defined. Access the Translation Details page by navigating to Maintenance > DLR > Transaction Details.
Description of Fields on the Transaction Detail Page
Clear all data prior to new data load
If you enable Clear all data prior to new data load when the transactional data is loaded, the system will clear all the data for Actuals and the distinct time periods available in the new data load file.
If you disable Clear all data prior to new data load, the system will clear pre-existing transactional data with following conditions:
Scenario will be Actuals.
The distinct time periods available in the new data load file.
The segment combinations available in the new data load file.
No of Amount columns
Specify how many amount columns are required.
A Single Value creates one amount column.
A Debit amount and credit amount creates two columns, one for debits and one for credits.
Source data is available in
Select the location of the source data.
If the source data resides in the source segments, select the translation to apply to the transaction as the Translation Data Load field is opened for this selection.
Translation data load
Organizations that operate multiple companies with disparate general ledgers using different schemas of chart of accounts require data translations or mappings for the data to be loaded into the Planful suite.
Select the translation you would like to apply to the transaction, which copies the structure from the Data Load Rules that you select here (if you use Translations as the source).
Remember, a translations, is a way of translating or rendering data. For example, one might translate data from a local currency to a common currency.
Attribute Type
The Common COA (Chart of Accounts) segment defaults are displayed based on the setup on the Define Financial Segments page
Attribute Name
Enter the name of the attribute based on the segments defined for the Common COA and attributes setup for those segments. For example, some Common COA names are; Company, Account, Project.
Attribute data type
varchar - Select this option to associate a data type with a variable character field. Variable character fields have a user-defined length and can hold letters and numbers.
URL - Select this option to load a reference URL. You can click the URL hyperlink when you view the Transactions Drill-Through reports.
Attribute length
Enter the maximum amount of characters for the field.
File extension
Select the file extension type of the file you want to load. The options are CSV (comma delimited value), txt, and xls. If you select .CSV, or .txt, the following options are opened:
Column Delimiter – Separates each column with the selection you make (comma/tab/semicolon).
Row Delimiter – Separates each row with the selection you make ({CR}{LF}/{CR}/{LF}semicolon/comma/tab).
Text Qualifier – Differentiates the field data from the delimiter with double or single quotes.
First row has column names
Specify whether you want the first row to contain the column name or not.
Please select a file
Select a CSV, txt, or xls file type from your desktop to load to Planful.
Data Load Rules
See the Data Integration Admin guide for examples and steps to perform all types of data loads using Data Load Rule functionality.
Data Calculation Exceptions
See the Data Integration Admin guide for information.
How to Configure Data Calculations
This configuration setting instructs the system to take default values for missing data for periods where no entries are posted.
- Navigate to Maintenance > Admin >Configuration Tasks.
- Select the DLR Data Calculations configuration.
- Select to apply the calculation exceptions to all scenarios or selected scenarios.
- If All Scenarios is selected, select MTD or YTD for Flow Accounts and Balance Accounts. This setting is used to calculate and post values by Data Load Rules for periods where no data is posted.
- If Select Scenarios is selected, click Add to select scenarios you want to apply data calculations to. Then, select MTD or YTD for Flow and Balance Accounts.
What do I do Once Data Calculation Exceptions are Configured
Once configuration is complete, specify accounts to apply data calculation exceptions to. Access the Data Calculation Exceptions page by navigating to Maintenance, DLR, Data Calculation Exceptions.
The application page is divided into 2 panes; left and right. All accounts from your account hierarchy are listed on the left pane. All company dimensions from your company hierarchy are available on the right pane.
How to Apply Data Calculation Exceptions to Companies and Accounts
- In the right pane, click the Add button to enable the Add - Company with Data Calculation Exceptions page. On this page, select company dimension members you want data exceptions applied to based on the configuration. To select several members at once, hold down the shift key.
- Set MTD or YTD for Set Zero Default Value.
- Click Copy To to set the value of the account for the dimension. When the Copy To - Accounts page opens, select the accounts you want to apply the exception to. Click Copy.
- Click Save.
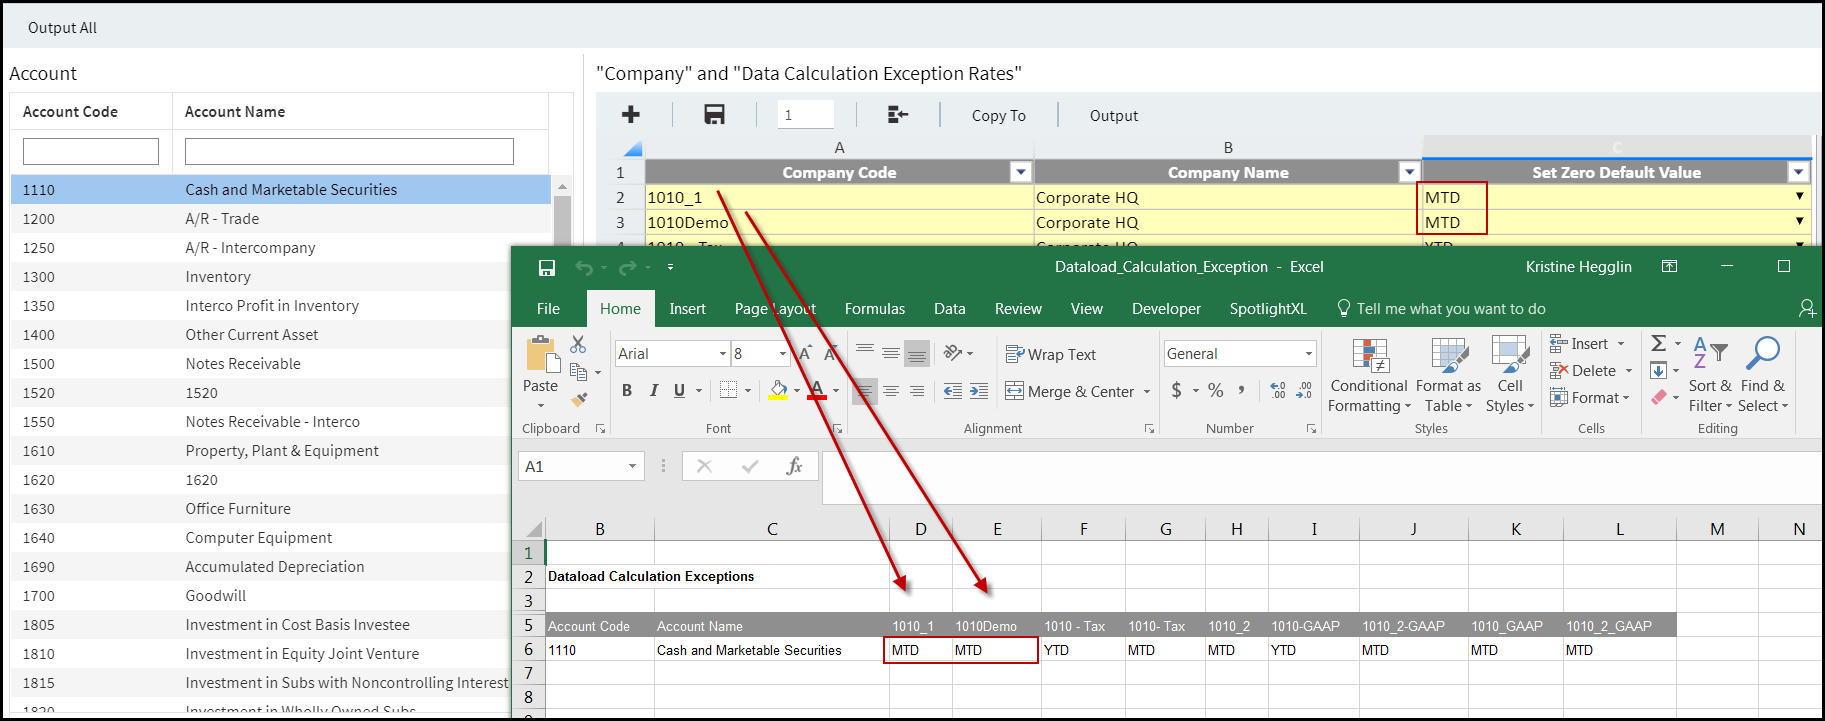
Click Output. In the output below, you can see that the Copy To account selected is 1110 Cash and Marketable Securities. And, each of the company dimensions are listed with the associated zero default value selected
Additional Data Load Topics
Verify Data
After loading data using Data Integration functionality, use the Verify Data page to confirm the accuracy of the postings and verify where data has been sourced from. Verify Data can be accessed by navigating to Maintenance > Reports > Verify Data.
GL and Translations Data is displayed only.
How to Verify Data was Loaded to Planful
After loading data using Data Integration functionality, it's important to confirm the accuracy of the postings and verify where data has been sourced from. To verify loaded data, complete the following steps:
- Navigate to Maintenance > Reports and click Verify Data.
- Select a scenario.
- Select dimension parameters.
- Click the Run button.
- Review data records via the spreadsheet that is opened once you click Run.
Description of Fields on the Verify Data Page
Run
Once you’ve selected dimension parameters, click to display all records.
Selection Criteria
View the grid only. Click again to view the dimensions, hierarchy and grid.
Display
Select Code, Name or Label associated with the dimension parameters. Selecting Label displays the code and the name.
Scenario
Select the Scenario associated with the data loaded.
Dimensions
The dimensions associated with the selected scenario. Select the relevant member from the hierarchy. If sourcing data from Actuals, select a member from the Time dimension.
You can view a tree hierarchy with dimension members.
You can remove selected dimensions
Hierarchy
Select the entire hierarchy by clicking the checkbox located next to the structure. Expand and collapse the tree structure or perform a search for a specific members to associate with the dimension. You can select multiple members to associate.
Click Execute to enable the fields below. | |
|---|---|
Decimals | Configure 0 to 6 decimal places for selected cells. The default is set to 2 decimal places. |
Grid Actions | Select to turn the grid lines off or on. |
Freeze On or Off | Select to freeze or unfreeze the grid. |
Record(s) Per Page | Enter the number of records to display per page. |
Go to | Enter the page number of the page you want to view and click Go. |
Module | This column displays the source of the data, File Data Load (Data Integration, Template, etc. |
Template | This column displays the name of the template or Data Load Rule with which the data was loaded |
Data Load History
View successful and unsuccessful Data Integration - Data Load Rule processes. Access the Data Load History page by navigating to Maintenance > Audit > Data Load History.
Description of Fields
| Data Load Rule | Select the Data Load Rule for which you would like to view report log information. |
| Type | Select to view audit log data for all data loads, those that failed, or those that were successful. |
From / To | Select From and To period dates to view related report log details. |
| View History | Generates results based on selection criteria. |
| Close | Close the Selection Criteria pane. |
| Detailed Report | View the Data Load Log Report, which contains detailed information, such as the name of the loaded file, the number of records loaded, the data type, and time mapping information. Exception Report - click to view the Data Load Exception Report, which contains information on data loads that were not successful. |
Output | Download or print the output. |
Grid | |
Start Time | Displays the time at which the Data Load Rule process started. |
Description | Displays details about the execution of the Data Load Rule process. |
End Time | Displays the time at which the Data Load Rule process was completed. |
Status | Indicates whether the data load was successful or not. |
Record Count | Displays the number of records loaded in the Data Load Rule |
Run Id | Displays a unique key associated with the Data Load Rule. You can use the Run Id when you contact the Support team for Data Load Rule related issues. |
User | The user that performed the data load. |
Status Message | Displays the name of the data load rule. This column is no longer be available in the grid. However, the Status Message column is available in the exported or printed Data Load History report. |
How to Load Zeros Through Data Load Rules to Reflect in a Template
Loading zeros through the Data Load Rules will not reflect 0 in the template. If you want data in a template to display as a zero (0) versus a dash (-) in a template, load 0.000001 (1 as sixth decimal) versus 0 via Data Load Rules. The Data Load Rule will indicate data was successfully loaded and the values will be shown when the template is opened.
The values is a template can be zeroed manually as well.
Auditing Data Integration
Planful provides different levels of user auditing for a variety of Data Integration tasks as well as other tasks. Auditing options are:
Use the Data Load History to view successful and unsuccessful Data Integration - Data Load Rule processes. Use the View Audit Log to select areas of the application which you would like to view the actions taken by a selected user.
Data Load Missing Segment Member - Opt In Feature
This feature, available by request, eliminates data load failures due to missing segment members. Missing segments represent those that are not in Planful, but exist in the data files loaded to Planful. For example, during a web service file load, if Planful encounters segment members that are not in the system, the load will fail. However, you may now take advantage of this feature, which adds missing segment members automatically. Please contact Planful Support if you would like to take advantage of this feature.
How it Works
Let's say segment member Account X exists in a data file you are loading to Planful. However, Account X is considered "missing" because it does not exist in Planful. With this feature, the system (Planful) will add Account X with default properties. Upon completion (of the data load), you will receive an email indicating which segment members where created/added. At this point, you may modify the default properties of the added Account X as well as position it properly within the tree structure. Then, rerun the Data Load Rule so that all data loads as intended.
To ensure that the account properties can be changed, enable “Enforce changing the account properties when the data is available” on the Maintenance - Security Administration page.
See Also: Opt-In Features and Functions
Limitations when Loading Data
GL Data and Transaction data load through the Planful Data Load Rules interface (copy / paste option ) =15K records with Across Columns in Select Sample Input File page.
GL Data and Transaction data load through the Planful Data Load Rules interface (File Load) – suggested limit is a file size of 10 MB (approximately 110K records).
GL Data and Transaction data load through Web Services - suggested limit is a file size of 40 MB (approximately 400K records)
Employee compensation type data loads – suggested limit is approximately 15K records.
Best Practices for Loading Data
The recommendation(s) or best practice for loading data into the application is that it should be sequential. For e.g., if you load Oct-16 after loading Dec-16 data, then you need to load through Dec-16 to calculate the MTD/QTD/YTD correctly in Reporting.
We strongly recommend that a single Data Load Rule is used when loading data for a fiscal year / scenario, loading data for same GL combinations using multiple DLRs will result in incorrect results in Reporting.
Make sure that appropriate segments are enabled as part of Clear Data Segment combination fields.
If you have a DLR set to load data as a specific measure (say MTD for all account types), the best practice is to not change the measure setting after having loaded data into the system.
After the data is loaded and validated in the application, access the Lock Data screen under Maintenance > Reports> Lock Data. Lock the periods so that data for those periods is not manipulated by any further loads to those periods.
The Verify Data report will show the numbers loaded based on the Data Input Type property set for an account in the application and you may have to use a Dynamic Report to view MTD or QTD or YTD amounts for an account.
When loading exchange rates via Data Load Rules, the best practice is to the load FX rates only for those periods and currencies which have a change in rate(s). Loading the rates with option “Apply Currency Conversion” enabled in the data load rule would delete the existing data set which is currency converted and recalculate the numbers afresh, and It is advised that the rates are loaded in a chronological period order. After the rates are loaded, numbers validated and the period(s) are closed from accounting perspective, the recommendation is to lock the historical periods from the UI using Lock Data screen (if it is “Actual” scenario) to avoid accidental data deletion”.

