- 3 Minutes to read
- Print
- DarkLight
- PDF
FTP/SFTP Connector
- 3 Minutes to read
- Print
- DarkLight
- PDF
Pre-Requisites
Contact the Planful Support team to enable the EnableSftpDataLoads flag to access the FTP/SFTP option. Also, ensure that Ivy is enabled in your application before you start using the FTP/SFTP connector.
Introduction
Load GL data, translations, and transaction data from FTP/SFTP server to the Planful application.
Connect to your SFTP server within Planful Application
The initial step to integrate FTP/SFTP involves a one-time configuration on the Cloud Services page. To perform the configuration, please follow these steps:
- Navigate to Maintenance > Admin > Configuration Tasks.
- Click Cloud Services under Data Integration Configuration on the Configuration Task List page.
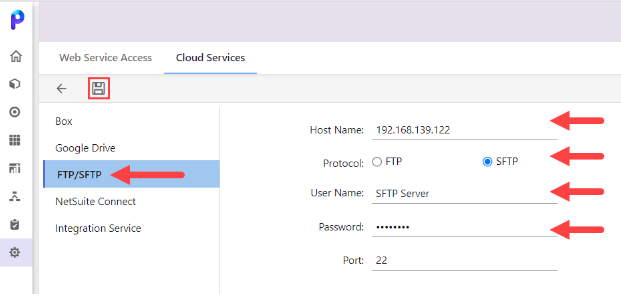
- On the Cloud Services page, click FTP/SFTP.Note:The FTP/SFTP edit feature requires activation through the Planful Support team.
- Enter your IP address in the Host Name field.
- Choose the FTP or SFTP radio button to indicate your preferred Protocol.
- Enter your FTP/SFTP server User Name and Password to grant access to the Planful application to load data.
- Click Save.
Upon successful server configuration, the system will automatically generate three folders: Input, Success, and Failure, in the configured server. Each DLR you create in the Planful application in FTP/SFTP data load type will automatically create new folders with the DLR name within all three (input, success, and failure) folders.
- Input - Within this folder, place the data file into the corresponding DLR’s folder to execute the Process Flow in the Planful application.
- Success - If the Process Flow is successfully executed, the data file located in the corresponding DLR folder within the Input folder will be moved to the corresponding DLR folder in the Success folder.
- Failure - If the Process Flow fails, the data file located in the corresponding DLR folder within the Input folder will be moved to the corresponding DLR folder in the Failure folder.
Create Data Load Rules (DLR) to Load FTP/SFTP File
DLR creation helps to load data from the FTP/SFTP server. To create DLR, follow the steps below:
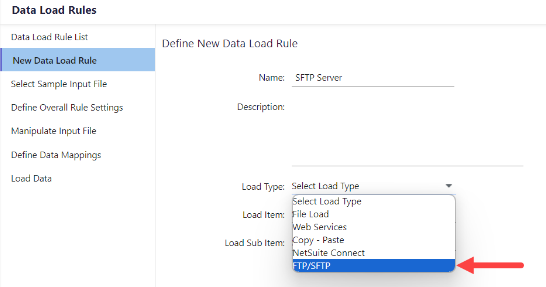
- Go to Maintenance > DLR > Data Load Rules.
- Click New Data Load Rule.
- Enter a Name and Description (not mandatory).
- For Load Type, select FTP/SFTP.
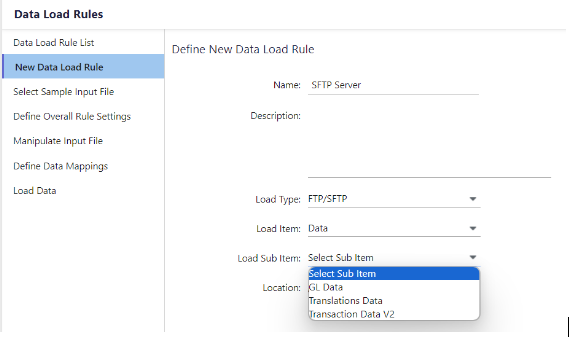
- For Load Item, select Data.
- For Sub Load Item, select either GL Data, Translation Data, or Transaction Data V2.
Complete the fields on the remaining Data Load pages as needed. Refer to Creating New Data Load Rules for detailed instructions. Once the DLR is created, a sub-folder with the DLR’s name will be created in all the input, success, and failure folders on the server.
For instance, if you named a DLR “DLR Data” in the Planful application, the DLR folders will be created in the input, success, and failure folders on the server with the name “dlr_data” (spaces are replaced with underscores). Now, you can add the data file to the specific DLR folder. You can add a total of 20 files to the DLR’s folder, with each file having a maximum capacity of 1GB.
Schedule and Execute the DLR with Cloud Scheduler from the server
Users can execute the Process Flow in Cloud Scheduler once DLR data is added/updated in the DLR’s sub-folder. Process Flow is a set of tasks to be executed in parallel or sequentially. A Process Flow can be scheduled to run once or can be recurring.
To schedule and run the Process Flow in Cloud Scheduler, click here.
After the Process Flow is executed, the status will be either Successful or Failure. If the Process Flow is successfully executed, the data file located in the corresponding DLR folder within the Input folder gets moved to the corresponding DLR folder in the Success folder. If it fails, it gets moved to the corresponding DLR folder within the Failure folder.


