- 10 Minutes to read
- Print
- DarkLight
- PDF
Dynamic Planning Analyze Task
- 10 Minutes to read
- Print
- DarkLight
- PDF
Overview
The Analyze task provides functionality to perform speed-of-thought analytics by selecting a model and an associated view, refreshing the data in the model, zooming in and out of the model, keeping or removing certain aspects of the view, and pivoting the dimensions at will.
When you select Analyze, the Data, Design View, and Design With subtasks are available.
Subtasks
Each of the subtasks is described below with a link for more detailed information.
Data - Select models, select associated views, and explore model data.
Design View - Create or edit the current view for a model. Customize it by setting properties and assigning user group access.
Design With - Select a custom reporting option.
Report - Open a new tab and create a formatted report based off the current view. Customize it by setting properties, assigning user group access, and designing the layout of the report.
Excel Report - Open a new tab and create an Excel Report based off the current view.
PowerPoint Report - Open PowerPoint and copy the current view into a blank presentation.
Word Report - Open Word and copy the current view into a blank document
Secondary-Click Menu
When using or designing views, you can use a right-click (for right-handed users) or left-click (for left-handed users) on your mouse to see a popup SpotlightXL menu. Using this menu, you can quickly lay out and place dimensions and data cells where you want Hindemith a View, select a dimension member cell and press the secondary mouse button. The normal Excel popup menu appears, and you see a new SpotlightXL item at the top of the menu. It expands to show a submenu with the following commands:
Zoom In
Zoom Out
Keep Only
Remove Only
Pivot
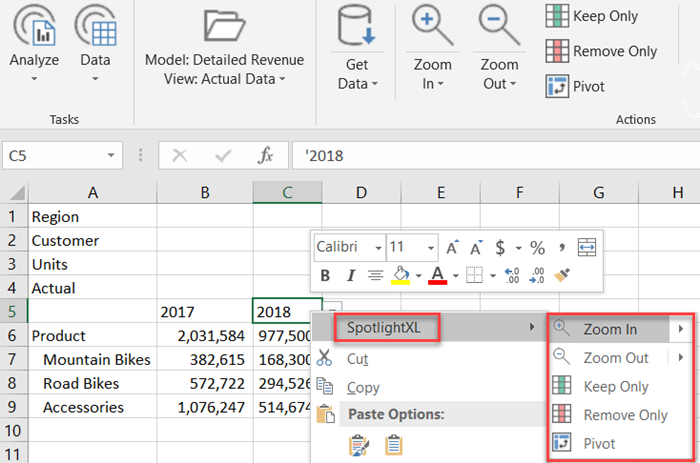
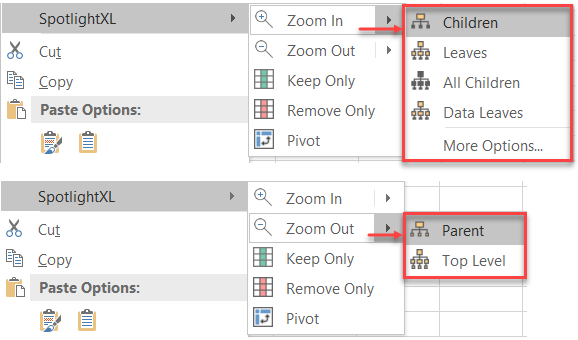
Zoom In and Zoom Out expand further to show the same submenu items as are on the main menu ribbon.
Dynamic Commentary
Overview
You can collaborate within Dynamic Reports, Spotlight Web (Analyze and Report), and SpotlightXL (Analyze and Report), and Excel Based Reports using the Dynamic Commentary functionality.
You can perform the following:
Add cell level comments.
Edit, Delete, or Resolve comments.
Post comments for a combination of dimensions at leaf level, rollup level, and calculated members.
Add users, text, #tags, and hyperlinks in the comments.
Assign tasks and track their status from Task Manager.
Mark Task as Complete in the Comment(s) pane.
View all comments in the application and perform actions such as Delete and Highlight in Comments Manager.
You can view an indicator wherever a comment is posted in the report. You can include the following in a comment:
Add a user - Type + and select the required username to tag the user in a comment. When you type + , username suggestions are provided automatically for the ease of selection. A notification is sent to the tagged user. You can turn off the notifications if required.
Add # tags - Type # to find the most used tags in a comment.
Add URLs in a comment.
How to Post a Comment
Select the report, click the More list-box, and select Show Properties. The location of the report is displayed in the Properties pane.
In Practice
Navigate to the More drop-down menu in the SpotlightXL tab and click the Comments On option. By default, the Comments On option is displayed in all existing and new SpotlightXL Excel Based Reports. A new Comments section with the Comments option is displayed in the SpotlightXL tab.

Select the required cell and click Comments. The Comment(s) pane is displayed.
Enter the required text and click Comment. The comment is saved and displayed in the Comment(s) pane.
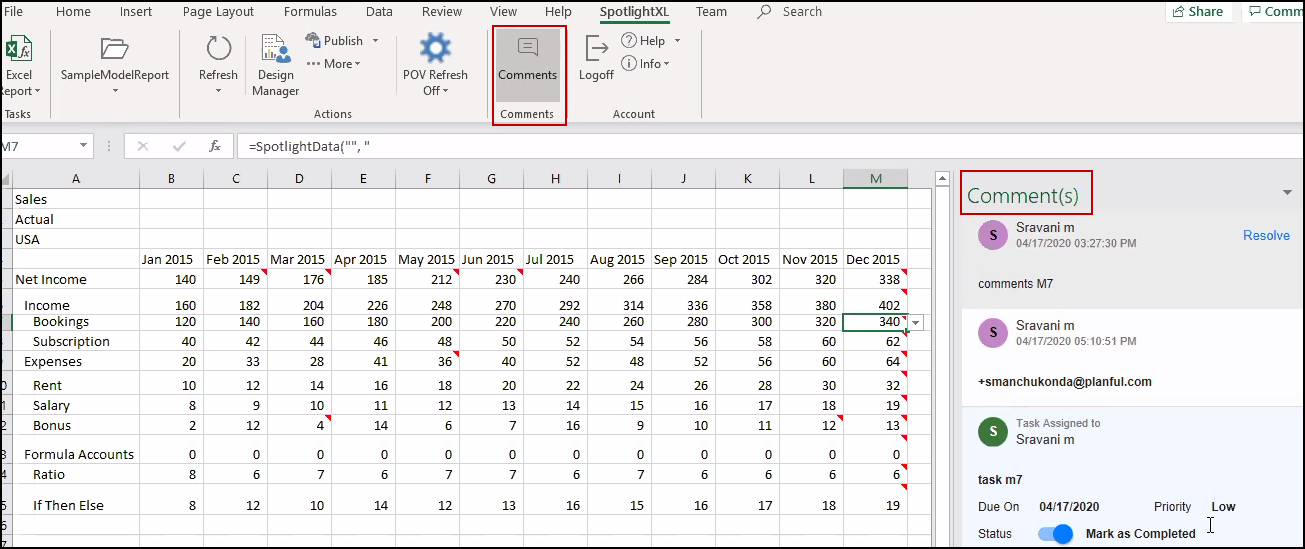
You can view an indicator wherever a comment is posted in the report.
How to Edit a Comment
Click the icon on the right-hand side of the comments pop-up window and select Edit from the menu list.
Make the required changes and click Save.
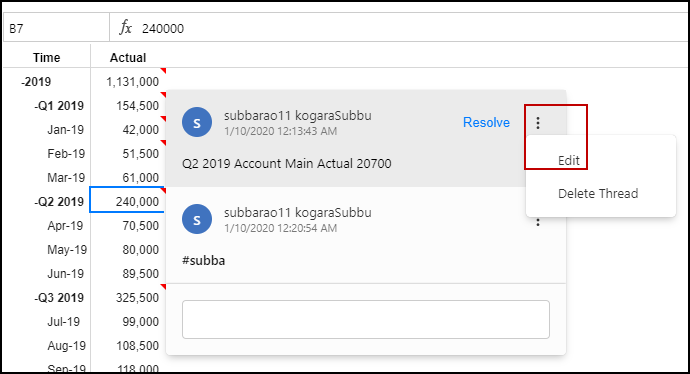
You can only edit the comments posted by you. The administrator can update comments posted by any user. You can edit comments from anywhere (Dynamic Reports, Spotlight Web (Analyze and Report), and SpotlightXL (Analyze and Report), and Excel Based Reports) within the application irrespective of where you posted the comment.
How to Delete a Comment
Click the icon on the right-hand side of the comments pop-up window and select Delete Thread from the menu list. A confirmation message appears.
Click Confirm to delete the thread.
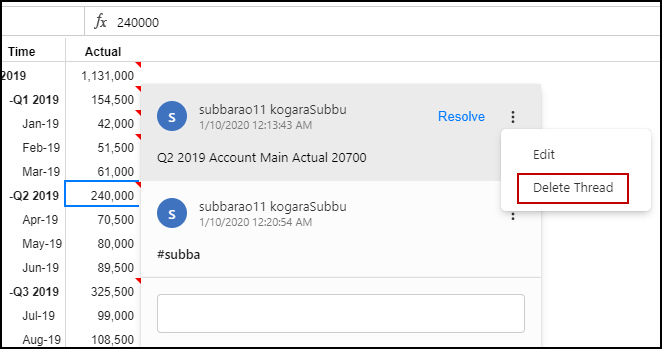
You can only delete the comments posted by you. The administrator can delete comments posted by any user. You can delete comments from anywhere (Dynamic Reports, Spotlight Web (Analyze and Report), and SpotlightXL (Analyze and Report), and Excel Based Reports) within the application irrespective of where you posted the comment.
How to Resolve a Comment
You can resolve a comment thread by clicking Resolve visible in the first comment of the thread. Resolved comments are not displayed in the reports or when the report is exported. Once you resolve a comment, the visual indicator is not displayed on the cells.
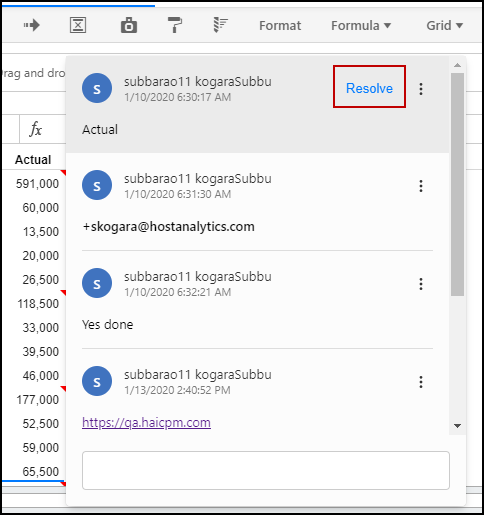
You can resolve the comments from anywhere (Dynamic Reports, Spotlight Web (Analyze and Report), and SpotlightXL (Analyze and Report), and Excel Based Reports) within the application irrespective of where you posted the comment.
You can view the resolved comments from the Comments Manager page. An icon is displayed next to resolved comments as shown in the image below.

Use the Filter icon to filter resolved comments in the grid. Also, you can delete resolved comments using the More option. The image below shows the filter icon in the upper right-hand corner of the screen.

Once a comment is resolved, you cannot reopen, edit, reply, or highlight that comment. However, a new thread can be started for the same cell.
How to Assign a Task
Right-click in the required cell and select Comment. The pop-up window appears.
Enter + and type the user name.
Select Assign.
Enter the following details:
Add task title
Due On - Select the required to date.
Priority - Select any of the following:
Low
Medium
High
Click Comment. A notification is sent to the mentioned user.
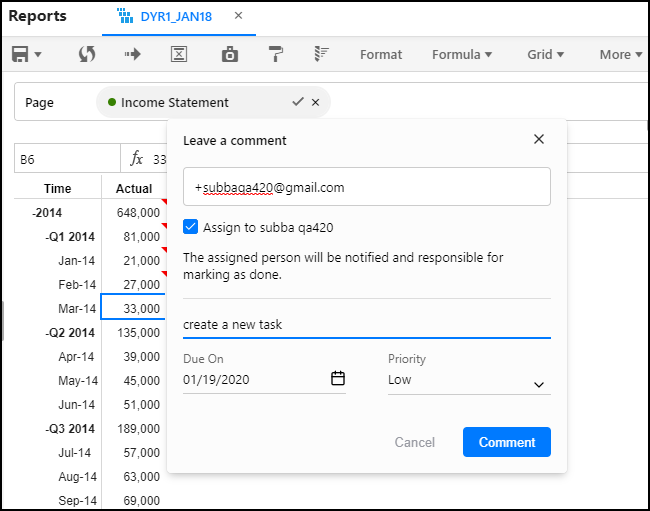
The assignees and admin will have access to the assigned tasks. You can view the task details from Task Manager.
Mark Task as Completed in Comments Pop-up Window
You can change the status of any of your assigned tasks to Completed directly from the Comments pop-up window using the Mark as Completed toggle.
Only Assignee, Reporter, or Administrator can mark the status Completed using the Mark as Completed toggle. The Mark as Completed toggle is available in Dynamic Reports, Spotlight Web - Analyze and Reports, SpotlightXL - Analyze, Reports, and Excel Based Reports. The following image shows the status of a task marked as completed using the toggle.
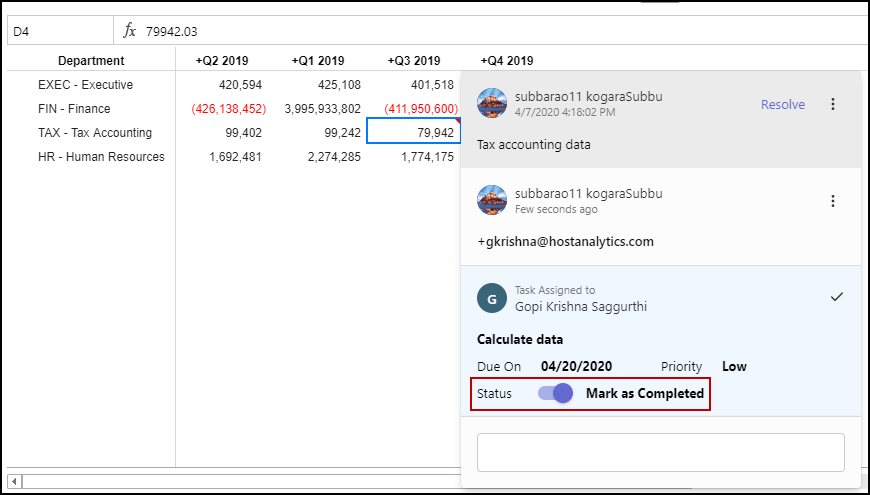
When you mark any task Completed from the Comments pop-up window, the same status is automatically updated for the corresponding task in the Task Manager page.
How to Email Notifications for Dynamic Commentary
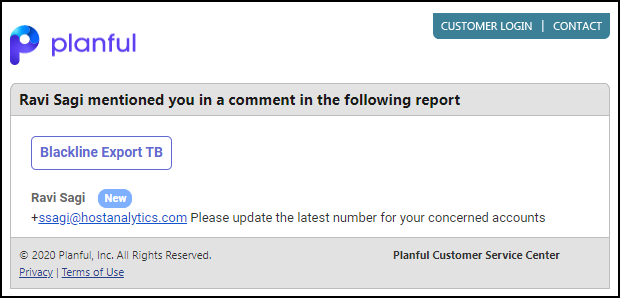
You can configure email notifications for the Dynamic Commentary functionality from the My Setting page. This functionality helps you track actions in the Dynamic Commentary functionality and keeps you up to date by providing email notifications for the selected action based on your requirement. You will receive email notifications with hyperlinks to directly navigate to the respective product area. This helps you access reports and tasks quickly from emails.
The email hyperlink redirects you to the corresponding artifact (for example, a Dynamic Report, a SpotlightXL View, or a SpotlightXL Report) from which the comment was posted and also opens the corresponding Comment pop-up window.
If the email notification is regarding an assigned task, the email hyperlink redirects you to the corresponding task in the Task Manager page.
The image below displays an email notification for Dynamic Commentary.
In Practice
To configure email notifications for Dynamic Commentary, click your Profile Name, navigate to My Settings > General tab and then select or deselect the required check box under the Enable Email Notification for the Dynamic Commentary section.
The following actions are available for which you can enable email notifications:
All Actions - Select this check box to enable email notifications for all actions available in Dynamic Commentary. By default, this check box is selected.
Replied to My Comment - Select this check box if you want to receive email notification only when someone replies to your comment.
Mentioned on Comment - Select this check box if you want to receive email notification only when someone mentioned you in any comment.
Assigned Task - Select this check box if you want to receive email notification only when someone assigned you any task.
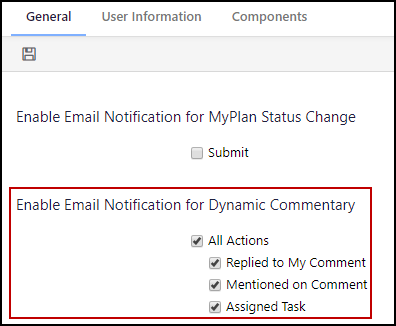
You will receive email notifications only for the selected actions. By default, all check boxes are selected.
How to Edit a Task in Task Manager
The tasks created from a comment are editable from Task Manager. This is applicable to the information mentioned in the Comment pop-up window. If you edit any of the task information from Task Manager, the updated information will be reflected in the Comments pop-up window.
If a task is completed, then a tick mark is visible on the Comments pop-up window against the respective task name.
If you change the assignee from Task Manager, the assignee details in the Comment pop-up window is not updated. If a task is deleted from Task Manager, it is removed from the Comment pop-up window, however, the user mentioned in the comment is retained.

How to Extract Comments with the Dynamic Commentary Option
You can extract comments from a range of cells in an Excel Based Report and save them in a new cell. This allows you to view comments from multiple selected cells in one place.
You can use the Dynamic Commentary option under the More drop-down menu in the SpotlightXL tab (as shown in the image below). When you click this option, the Dynamic Commentary pop-up window is displayed where you can select the required cells in the Select Cells field to extract comments.

The Dynamic Commentary pop-up window provides the following three check boxes to define additional configuration settings:
Display only Highlighted Comments - Display only the highlighted comments in the Dynamic Commentary cell. By default, this check box is not selected.
Display Username and Date - Display the username and date for each comment in the Dynamic Commentary cell. The date and time are converted to the user’s timezone. By default, this check box is not selected.
Wrap Text - Wrap or enclose the selected cell’s content if the text in the cell overflows the cell boundary.
You can select a range of cells from multiple rows and columns, and extract comments in single or multiple cells. You can add multiple Dynamic Commentary cells in a report. The #tags, hyperlinks, and the tagged username are displayed as plain text in the Dynamic Commentary cell.
In Practice
Select the cell where you want to extract comments.
Navigate to the More drop-down menu in the SpotlightXL tab and click the Dynamic Commentary option. The Dynamic Commentary pop-up window is displayed.
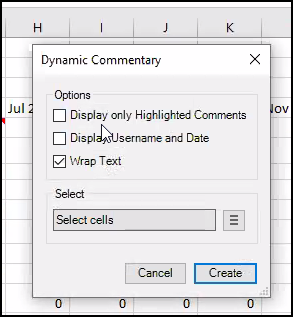
Select the following check boxes based on your requirement:
Display only Highlighted Comments
Display Username and Date
Wrap Text
Select the required cells in the Select Cells field. The SpotlightXL pop-up window is displayed.
 Note:You can only select up to 78 cells.
Select the required cells and click OK. The Dynamic Commentary pop-up window is displayed.
Click Create , and then click Refresh. The comments are extracted in the selected cell.

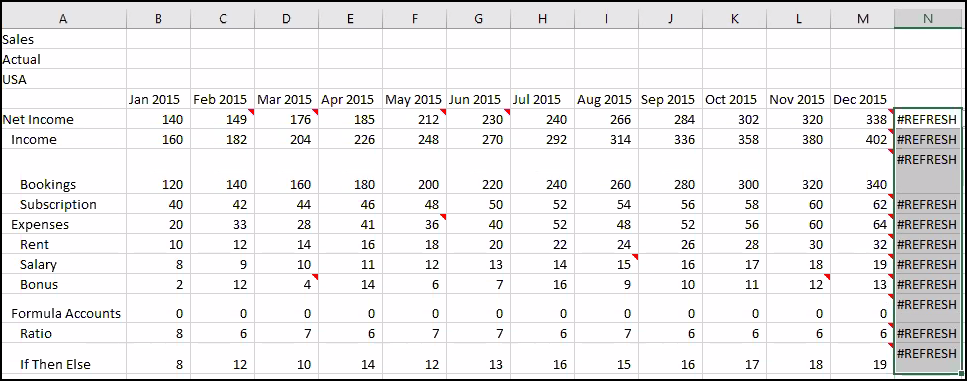
If you select a row and extract all comments to the Dynamic Commentary cell, then you can quickly extract all comments in the adjacent rows by dragging down the Dynamic Commentary cell.
Follow these steps to drag the Dynamic Commentary cell:
Select the Dynamic Commentary cell.
Rest your cursor in the lower-right corner so that it turns into a plus sign (+).
Drag the fill handle down the cells that you want to fill as shown in the image below.
See also:

