Ivy
- 10 Minutes to read
- Print
- DarkLight
- PDF
Ivy
- 10 Minutes to read
- Print
- DarkLight
- PDF
Article summary
Did you find this summary helpful?
Thank you for your feedback
Ivy is Planful’s proprietary framework for unified, smarter, and faster data handling across data integrations, planning, consolidation, and close processes in the Planful structured planning application. Ivy engine simplifies data collection, validation, processing, and reporting while ensuring security, accuracy, and consistency.
Ivy is available for all the new customer applications provisioned after April 2022. In addition, Planful is incrementally rolling out Ivy for all the qualified existing customers in the upcoming months. If you want to know the status and eligibility requirements/recommendations, contact Planful Support or your Customer Success Manager.
Limitations:
Ivy is currently not supported for applications where the configuration for Fiscal periods per year is greater than 12 periods or when Shared Mode is configured.
Guiding Principles
Ivy applies the following guiding principles for calculations:
- Ivy applies built-in computation to derive account balances across time periods in conjunction with the Scenario used. The balances are recomputed accurately for all the future periods when the data is entered in a non-chronological order. This is a major advancement over the legacy.
- Ivy recognizes the significance of no activity periods on specific account balances and brings out a unique way of handling the built-in calculations for no activity periods. The computations set MTD = 0 or YTD = 0 honoring the data input type property or Load type for Data load Rules. The account balances are calculated for the applicable periods within the fiscal year.
- Ivy computes and manages currency conversions depending on the currency configurations and exchange rates set up in the application. Currencies are calculated only when the exchange rates are provided for the scenario in the Planful application. It honors any currency exception configurations for the legal entity or account and the Currency computations are maintained for both MTD and YTD balances, depending on the account and the data input type.
- Ivy uses a new Translation engine for faster data processing while using translations with your Structured planning data load rules. Note that when you have overlapping translations that qualify for the different mapping to your Planful chart of account segments, the new Translation engine leverages the last mapping for the data load. For details on the Translation setup, click here.
- Ivy maintains an improved precision up to the 6th decimal value of all the numbers and calculations.
- In addition, Ivy enables Planful to offer more advanced features and functionality in the future. Below are some of the advanced features only available with the Ivy upgrade.
- Additional Application Functionalities based on Ivy Framework
You can use the Ivy option and update to the Ivy framework on your own.

Do the following if you want to enable the Ivy framework:
- Select the Ivy option from the Configuration Tasks list.
- Select the Enable Ivy checkbox. The Automatic Data Refresh checkbox appears.
- Select the Automatic Data Refresh checkbox, and it is mandatory to go through the Ivy summary and instructions.
- Select the acknowledge checkbox after the summary. This enables the Agree and Apply Changes button.
- Click the Agree and Apply Changes button to enable the Ivy framework.
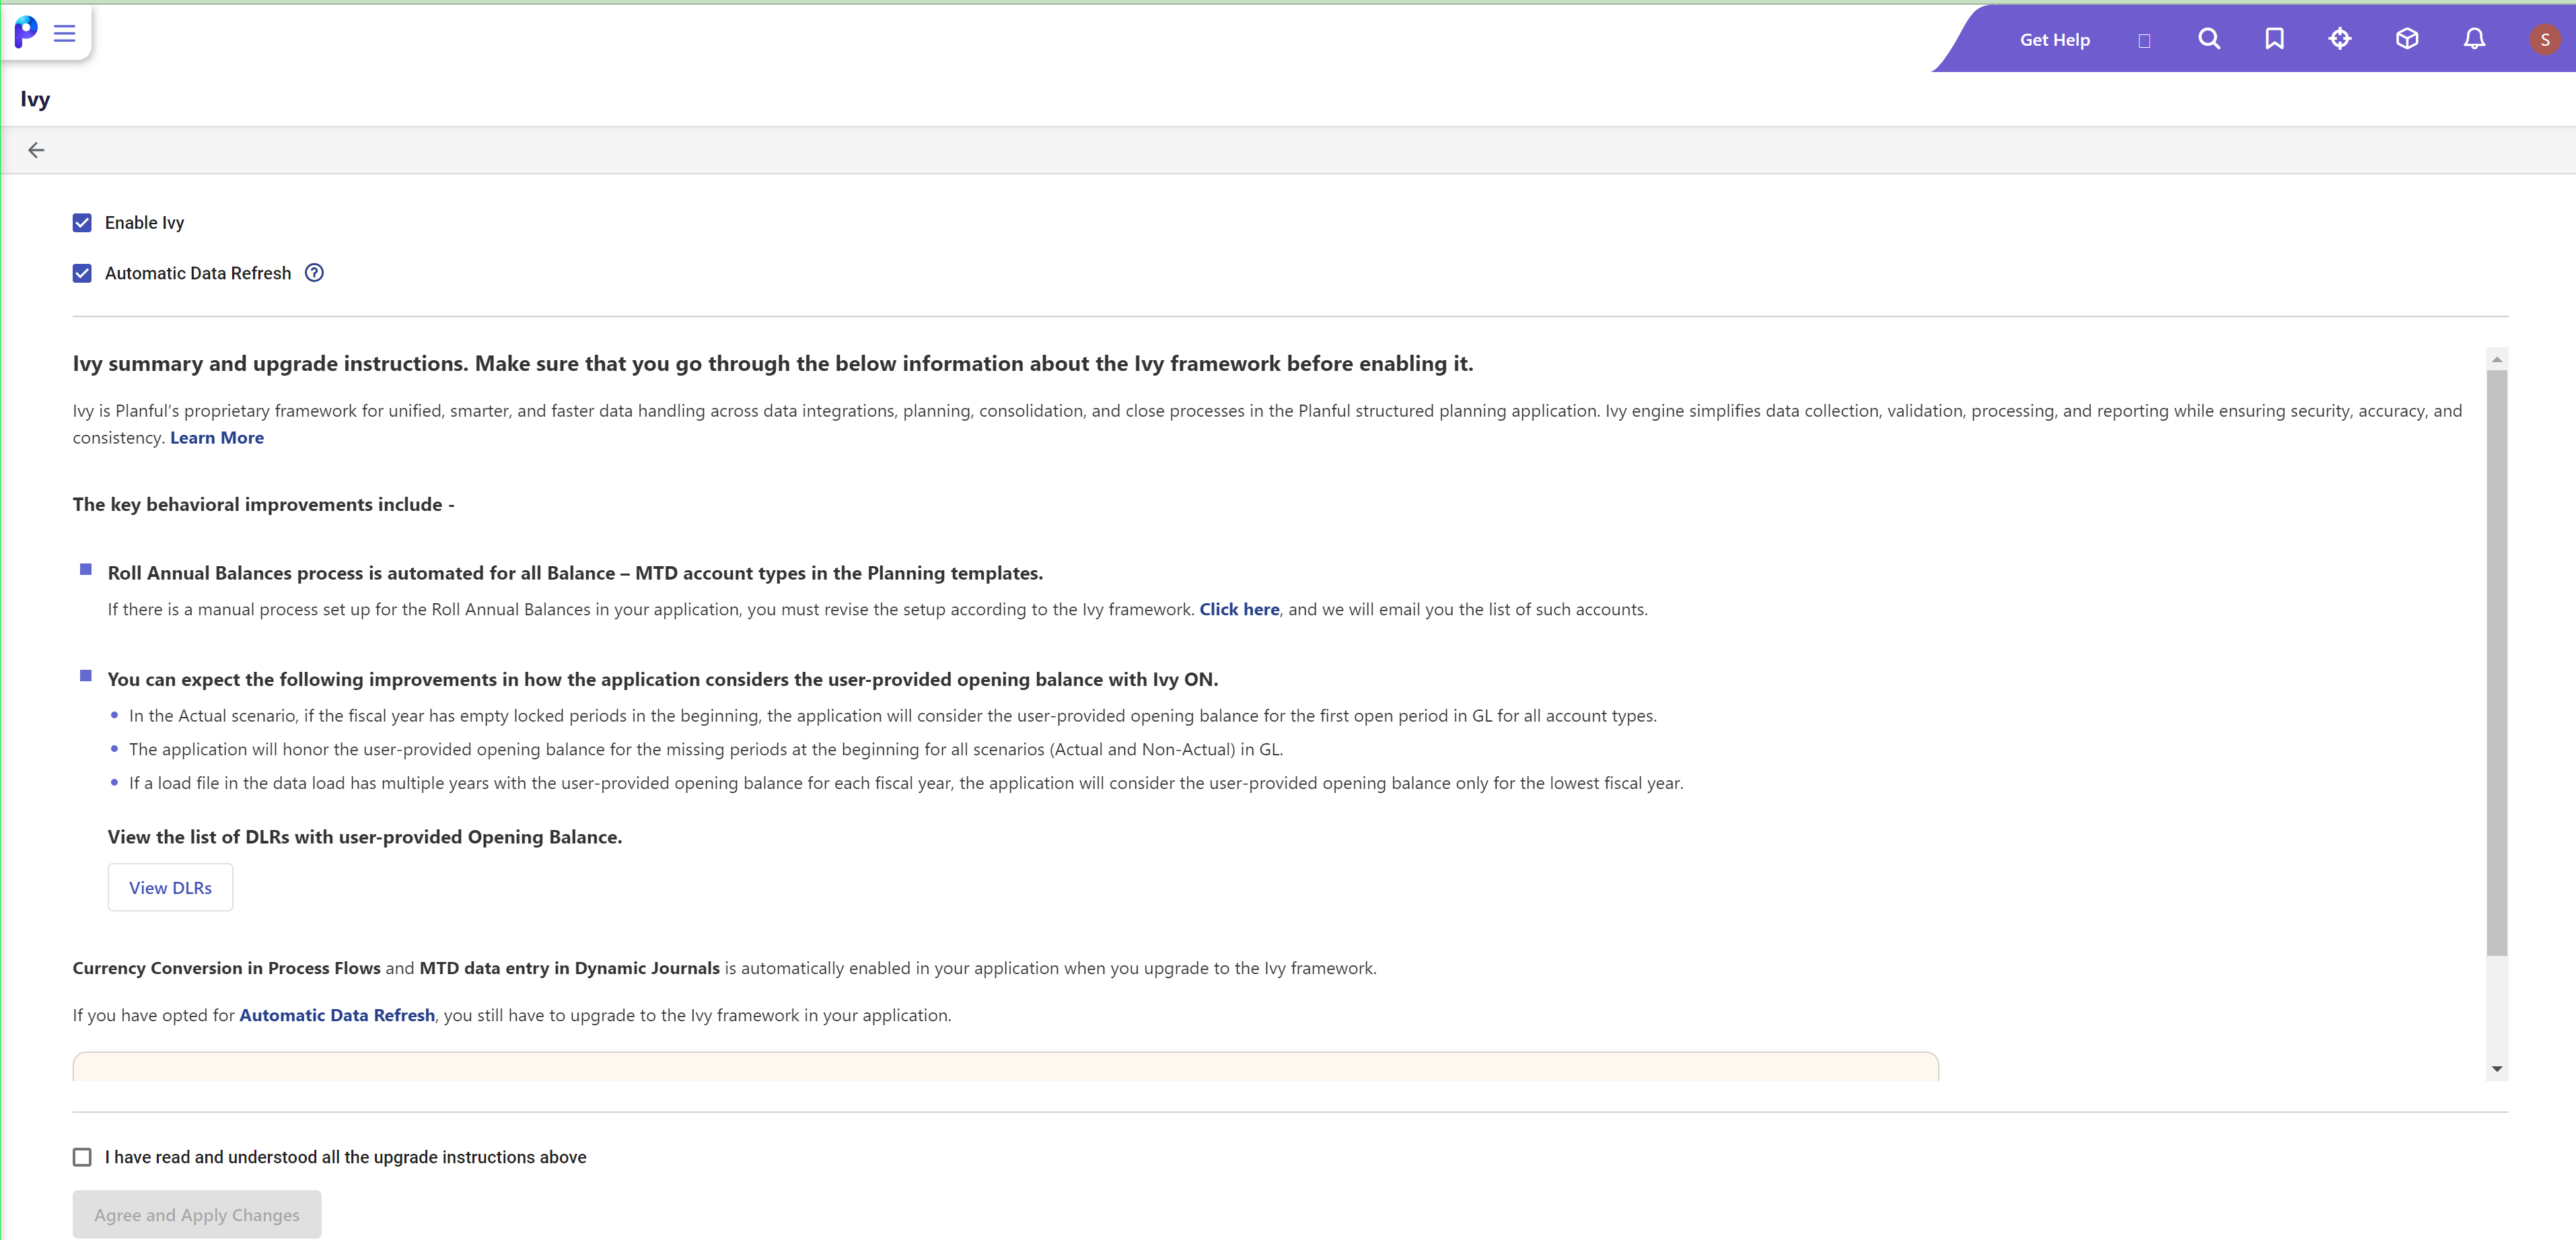
Note
You cannot disable this framework after enabling it.
Planful customers who have upgraded to the Ivy framework will have a few additional functionalities supported in the application. The functionalities are as follows:
- Currency Conversion in Process Flows
- History in Drill Through reports
- Automatic Data Refresh
- Dynamic Journals MTD data posting support
Currency Conversions Option in Process Flow
The Currency Conversions option is available as a new task type when creating a new Process Flow from the Cloud Scheduler > Process Flow screen. You must upgrade to Ivy to view the Currency Conversions option in the Task Type drop-down.
Business Value
Until now, the multi-currency reporting was not available for Planful Structured Planning users, and the existing currency conversion process with consolidations was too slow resulting in a lag between the data loads and multi-currency reporting.
Adding Currency Conversions in Process Flow makes multi-currency reporting accessible to Structured Planning users. Now, the currency conversion process leverages the Ivy framework, resulting in faster processing time from Local to Common Currency, Interim Currencies, and Reporting currencies.
In Practice
Accessing Currency Conversions Task Type
- Go to Maintenance > Cloud Scheduler.
- Click the Process Flow tab.
- Click the Add Process Flow icon.
- Click the Tasks tab, and select the Task Type drop-down. You can view the new Currency Conversions option added in the drop-down menu. Select Currency Conversions and provide the following information in the respective fields. These fields are mandatory:
- Task Name - This field is mandatory. It is automatically updated when you select a Scenario, Company, and Period. By default, the Scenario + Company + Period is taken as the Task name.
- Scenario - Click the icon adjacent to this field and select a scenario. The scenarios are listed based on your Scenario security settings. This field is mandatory.
- Company - Click the icon adjacent to this field. You can select a roll-up or leaf member. When you select a roll-up member, the currency conversions process happens to all the leaf members under the roll-up member. This field is mandatory.
- Period - Select a period from the list. You can run the currency conversions process for the selected period. The options available are Current Month, Previous Month, Current Financial Year, and Custom Period. When you select Custom Period, you can provide the From and To dates from the respective date pickers. This field is mandatory.
- Dependencies - Select any dependency if the currency conversion task is dependent on any other process.
- This field is optional.
- Email Recipients - You can provide the email address of the users to whom you want to send an email notification when the Currency Conversions are processed based on the Process Flow schedule. This field is optional.
- While executing Currency Conversions, the Scenario is locked to avoid conflicts. Once the Currency Conversions are processed, you can find the process details in the Detail logs screen.
After completion of the Currency Conversions, an email notification is sent to the users configured in the Process Flow against the task. An email is sent every time the task is executed for the Currency Conversions.
History Feature in Drill Through Report
You can view the history of the data changes on the source data. From the Drill Through report, you can double click on any record to view the history. You can view the information like who changed the data, the timestamp of the data change, and the details about the changes.
Note
Along with being on Ivy Framework, make sure that the Planful support team has enabled this feature in the backend to use this feature.
Business Value
A Drill Through report provides a detailed analysis of the source data, notes associated with the source data, and a drill-down of the roll-up members. Though this is useful information, the history of the source data was not available. Therefore, a History feature has been introduced to verify the updates made to the source data. It provides information like who changed the data, the timestamp of the data change, and the details about the changes.
In Practice
Accessing History from Dynamic Reports:
- From the left menu, click the Dynamic Reports option.
- From the File Cabinet dropdown menu, select the required folder. The reports related to the selected folder are displayed.
- Click the required report to view the report details.
- Double click on the cell for which you want to view the related Drill Through report.
- Double click on any record in the report.
- The History of the record is displayed, or an appropriate message is displayed if the record has no data change history.
- Accessing History from Dashboards
- From the left menu, select the Dashboards option.
- Click on any dashboard to view the related chart details.
- Right-click on any parameter of any chart and click Drill Through to view the related Drill Through report.
- Double click on any record in the report.
- The History of the record is displayed, or an appropriate message is displayed if the record has no data change history. Disable the History toggle to stop the detailed view.
Automatic Data Refresh
Note:
Automatic Data Refresh functionality is available for release to your Production environment if you opt in. Contact the Support team to enable this feature in Production.
The Automatic Data Refresh functionality for Dynamic Reports updates data whenever data is modified in templates. This avoids manual processing of data. The functionality is applicable only for Financial cube.
The modified Run icon is displayed whenever the data being displayed in the report is not up to date. A call-out displays the time at which the data was updated. Once you click the Run icon, the report is updated with the latest data.
Prerequisite: Ivy needs to be enabled in the application. Contact the Planful support team of your customer success manager to know about how to get access to this functionality.
Note:
The Automatic Data Refresh functionality is not supported in the application where Org by Period or Flow Dimension is enabled.
Automatic Data Refresh is triggered for the following scenarios:
- When data is modified in templates
- When data against the reference account column is deleted or the template column is deleted from the template
Manual Cube processing is required for the following scenarios:
- When data is updated through the Simulation Engine
- When data is refreshed for Actual or Closed periods
- Data Seeding
- When a Scenario is edited for the History or Closed periods
- When a template is deleted
- When an entity is mapped or unmapped within the template
- When employee processing is done in the Workforce Planning templates
- Global Fields input
- Data loaded via DLR but Automatic Cube Refresh Setting not selected in Rule Settings.
- Clear Data in DLR.
- All Consolidation Processes except Standard Journals, Dynamic Journals, Elimination, Reclassification, and Non-Controlling interests.
- Deletion of Journals or Journal lines needs manual processing.
The following table displays detailed information about the Automatic Data Refresh functionality.
| Category | Supported | Not Supported |
|---|---|---|
Reporting Areas | Financial | Workforce |
Processes/Templates | Global Template Single Copy (with or without Overwrite Mode) Global Template Entity Copy Line Item Allocation Block Capital Time Sets Initiatives Templated based HR Workforce Planning Actual Data Templates | All Data Integration All Consolidation Exchange Rates |
Scenario | Budget Forecast Plan Actual | Preload Budget Data Seeding Refresh Closed Periods Preload Data |
Actions | Input Lines Update Lines Delete Lines Allocations in Workforce Planning | Global Fields Input Delete Template Simulation Engine Template Entity Map / Unmap |
Dynamic Journals MTD data posting support
With this release, the MTD (Month-to-date) posting type entries enable you to post Dynamic Journals based on the month’s activity. The Month-To-Date (MTD) posting type entries for Dynamic Journals evaluate entries based on the month’s activity, whereas the Year-To-Date (YTD) posting type entries evaluate the entries based on the cumulative balance for the line items.
Note:
The Posting type field is disabled after you add the Dynamic Journal. You cannot change the Posting type after adding the Dynamic Journal.
Note:
To use the MTD posting type, contact the Planful support team for additional guidance on how you can access this functionality.

Business Value
The Month-To-Date (MTD) posting type entry for Dynamic Journals helps you to post Month-to-Date (MTD) balances by using a Dynamic Journal and evaluate entries based on the month's activity.
In Practice: Add a new Dynamic Journal
- In the Consolidation Control Panel, under Processes, click Dynamic Journals. The Dynamic Journals grid appears.
- Click the Add icon. The Add Dynamic Journal dialog box appears.
- On the Properties tab, specify the required information for the following fields:
- In the Code field, enter a code of your choice.
- In the Name field, enter a Dynamic Journal name.
- In the Period field, select the month and year range. During the selected time period, the Dynamic Journal is active.
- In the Posting Type list box, select the MTD or YTDposting type.Note:MTD (Month-to-date) evaluates entries based on the month’s activity; whereas, YTD (Year-to-date) evaluates the entries based on the cumulative balance of the line items.
- In the Reporting list box, select whether the Journal is a Dynamic JE (CC) or a Dynamic JE(LC). A journal can be in common currency or in local currency.Note:A local currency is often used by a company's subsidiaries and then converted to a common currency for consolidated reporting purposes.
- If you are adding an Unbalanced Journal, select the Unbalanced Journal check box. In Unbalanced Journals, debits are not equal to the total of the credits.
- To navigate to the Journal Entry tab, click Next or click the Journal Entry tab. The grid displays segment columns based on the application configuration and user's security. To set up a journal entry, perform the following steps:
- To add a new row, click Add.
- To set up the values for each column, do any one of the following:
- Specify the required values directly in the UI.
- Paste the copied line items from an MS Excel spreadsheet to the journal entry grid.
You can copy or paste all values, including description, segments, and debit or credit values. Use shortcut keys (Ctrl+C and Ctrl+V) to perform this action.
- To build a formula for the journal entry, perform the following steps:
- Click Rule in the journal entry row. The rule pane appears.
- Build a formula by using Simple Rule or Advanced Rule:
- Simple Rule —For the dimensions for which you want to select a member, open the selection pane and select the member.
- Advanced Rule —In the left side box, expand the member hierarchy, select the member, and then click the Add icon. Repeat the same procedure to select the function in the right side box. Click the tick (√) icon to verify the syntax of the formula.
- To save the rule, click Save
- Click Save.
Was this article helpful?