- 18 Minutes to read
- Print
- DarkLight
- PDF
Model Design
- 18 Minutes to read
- Print
- DarkLight
- PDF
This document describes how Dynamic Planning integrates with Planful Structured Planning, Consolidation, and Reporting (PCR) applications. This is the traditional method of integrating with PCR.
Dynamic Planning pulls data from the Structured Planning, Consolidation, and Reporting applications
Users can analyze and report on the data.
Users can drill through rollup data in Dynamic Planning to see the original data aggregated from Structured Planning, Consolidation, and Reporting.
Users can modify the data within Dynamic Planning and then write the data back to Structured Planning, Consolidation, and Reporting applications.
Definitions
Dynamic Planning : the Dynamic Planning product. Dynamic Planning connects to the Financial Reporting cube in Structured Planning, Consolidation, and Reporting only at this time. It does not connect to the Sales cubes.
Horizon : an internal name that provides a pathway to access Structured Planning, Consolidation, and Reporting applications for Metadata download.
Soap : an internal name that provides a pathway to access Structured Planning, Consolidation, and Reporting applications for Data download.
Tenant Code : this is the code for Structured Planning, Consolidation, and Reporting applications and represents the way you identify which application you want to download from. The Tenant Code is not necessarily the same as the Tenant Name for Structured Planning, Consolidation, and Reporting applications.
Source model : a model called HACPM_Financial. It connects to the specified Structured Planning, Consolidation, or Reporting application and stores the entire set of metadata that exists in that application. It is the conduit to get data into the Master/Target model.
Master model: a model with a name of your choice. It is also called the Target model as it is the target of the metadata and data to be copied from the Source model.
Target Model Design
Decide which dimensions from HACPM_Financial you want to use in your Target model, and then decide what type of dimensions they will be. Here are the two types:
Key: dimensions and members will change; generally more dimension members
Value: dimensions and members that don’t change much and that are always populated with data; generally fewer dimension members.
Ensure that your application has enough capacity to store the Target model you intend to define.
Multiply the Member Count for all Key dimensions together. This number is your minimum Master Model Keys value. For example, if you are expecting your Key dimensions to have membership of Account=80, Company=10, Department=60, Product=30, Project=40, then your Master Model Keys value must be equal to or greater than 57,600,000.
Multiply the Member Count for all Value dimensions together. This number is your minimum Master Model Value Block Size value. For example, if you are expecting your Value dimensions to have membership of Scenario=3, Time=15, Measures=2, then your Block Size must be equal to or greater than 90.
Go back to Manage > Application Administration > Application Settings and increase the values, if necessary, to Master Model Keys and Master Model Value Block Size to accommodate the capacity that you expect to have in your Target model. Save your changes.
Model > Setup
In Practice
Under Model, select Setup. This clears the screen of information that you may have been viewing before.
Now delete “New Model” and type in the name for the Target model.
Set the Type to Master.
Change Data Tracking is an optional feature that marks leaf-level data as dirty whenever it is changed, such as through user input, calculations, or data load. When the next full aggregation (Aggregation, None) is performed, only the rollups with dirty leaf-level data are aggregated. This makes full aggregations faster.
Enabling Change Data Tracking is helpful in cases where users are updating one or two department’s data and need to run a full aggregation to see the data rolled up against all departments. Once Change Data Tracking is enabled, the application will track which data blocks are changing. When a full aggregation is run, instead of running the aggregation for the entire model, the system will run aggregation only for the blocks that changed (in this case, the departments that changed and the dependent rollup members), so the total aggregation process will take less time.
There are steps to complete if you want to Enable Direct Access to PCR. Access the Using Direct Access (aka Direct Connect) to PCR Financial Reporting for more information.
Next you define the dimensions that you want in your Target model in the Dimension and Type list.
List the names of the dimensions from the Source that you want to use. You can use the same names as Structured Planning, Consolidation, and Reporting applications or you can change the names. You will map one name to the other when you do the Mapping.
List the names of any new dimensions you want to use in your Target model.
Specify the type for each of the dimensions: Key or Value.
- Save. The Master model is then created, and the Created On and Created By fields are populated.
At this point, you have a Source model that has been generated. And you have a Master/Target model that has been created at the highest level (dimensions only), but not generated. You cannot generate the Target model until members are defined.
Model > Map
Here you specify which members of the Source dimensions will be copied to the Target/Master. You need to be familiar with the detailed outline of the Source and know what you want to achieve in your Target outline before continuing this process. You do not have to enter each member name because you can use filters to designate which members to copy.
In Practice
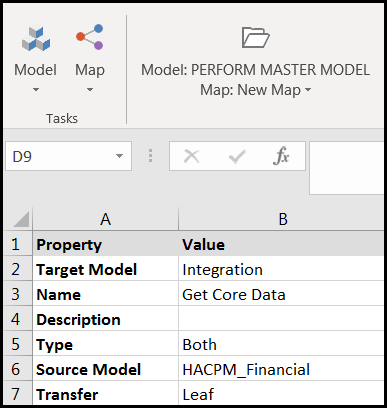
The Target Model is the name of the Master model you created in the previous step.
The Name lets you give this mapping a name so you can re-use it.
The Type indicates what should be copied from the source: the metadata, the data, or both. For first-time mapping, select Metadata or Both. The Data type is used for Write-back.
Hints :
If you want to test your Target outline for effectiveness for the user first, select Metadata so you can experiment with the resulting outline. Note that Selecting Metadata/Leaf or Metadata/All will not require the Data Download step described below. You will only need to Generate the Model in order to move the metadata into the Target.
If you expect the data that will be copied to take a long time, you may want to copy just Metadata first, and then copy Both at a different time, such as overnight.
Eventually you will likely have more than one map defined for the model. But note that only one of those maps can include metadata as part of its definition (ie. type Metadata or Both).
The Source Model is HACPM_Financial.
Transfer = Leaf or All. Select Leaf. The All option is not applicable to Data Integration with Structured Planning, Consolidation, and Reporting applications. The Structured Planning, Consolidation, and Reporting applications store only leaf-level data, so there is no way to transfer parent data from Structured Planning, Consolidation, and Reporting applications. Parent data is created only within Dynamic Planning using Calculations.
Source to Target Map Table
Here you must list all the dimensions from the Source (HACPM_Financial) under Source Dimension, whether or not you intend to use them, with exceptions noted below.
Hint : To get a list of all the Source dimensions, save your Map before you have specified any source dimensions, then go to Model > Setup, select HACPM_Financial, and then copy the dimension names to the Clipboard. Then open a new temporary workbook and copy the dimension names there as a holding place (remember to omit AttributeHierarchy and Attribute, and optionally omit BudgetEntity). Return to the original workbook, return to Model > Map, specify the Target Model and Map Name, then paste the dimensions from the temporary workbook.

Optional : Next, list all the dimensions that are new in the Target model (ie. not copied from the Source) under Target Dimension. Set Source Dimension, Source Filter, and Source Value to None. Target Filter must be set to Dimension Filter and Target Value should be one of the members of the dimension.

For Source Dimensions that you do not plan to use in your Target model, set Source Filter to Dimension Filter (to filter it out) and specify one member from the source dimension where the data will come from. Then specify None for the Target Dimension, Target Filter, and Target Value. If plan to read and write data back and forth between Structured Planning, Consolidation, and Reporting applications and the Dynamic Planning application, the member you choose from the source dimension must be a leaf member. If you select a parent member, you will not be able to write back data to that member. In the screenshot below, IC Segment Main is a parent member, so you cannot write back data to it later.

In the first row of the table, there are drop-downs to assist you with selecting the best option for each mapping. In the second and following rows, there are no drop-downs but you can copy/paste the first row to the remaining rows.
Source Filter options
The Source Filter column defines both what metadata is copied into the Target and what data is copied.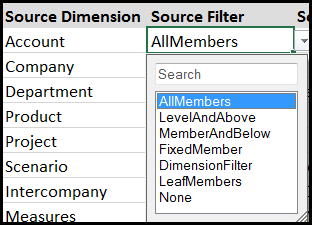
When you Use this Source Filter… | This Metadata Is Copied | This Data Is Copied |
AllMembers | All members of the dimension will be copied. | Leaf-level data of the dimension will be copied. |
LevelAndAbove | All the members in the specified member level and their parent levels will be copied. | If the members in the level specified are leaf members, their data will be copied.
If the members in the level specified are parent levels, Dynamic Planning aggregates the leaf level data from the Source in order to populate the level specified. |
MemberAndBelow | The member specified and its children will be copied. Any parent levels above the member in the dimension will not be copied into the Target. Note that if you had previously copied AllMembers for this dimension and generated the model, all other members will still exist in the dimension; they will not be removed. Rather, the member specified will be separated out into its own hierarchy but the other parts of the original hierarchy will still be there. To remove the excess hierarchy, go to Model > Setup, Clear Model, then go to Model > Dimension, and delete all members (except the root dimension member) and Save. Then the next time you use Generate Model, only the specified Member and below are copied. | If the member specified is a leaf member, its data will be copied. Since it has no children, no other data is copied.
If the member specified is a parent, grandparent, or more distant parent, only the data for lowest leaf levels are copied. |
FixedMember | The member specified will be copied. It will be a child of the dimension member. | If the member specified is a leaf member, its data will be copied.
If the member specified is a parent, Dynamic Planning aggregates the leaf level data from the Source in order to populate the member specified. |
DimensionFilter | This dimension will not be copied. | No data will be copied, but you still need to specify which one member affiliation should be used when copying. Since the source is a multidimensional database, all of its data items are affiliated with at least one member of each dimension. |
LeafMembers | All leaf level members of the specified dimension will be copied. | Data will be copied for all leaf members. |
None In this case, Target Filter Type must be DimensionFilter. | There is no dimension in the Source associated with the Target dimension being defined. | No data is copied because the data is originating in the Target, not the Source. |
Aggregation Operators
The following aggregation operators in Structured Planning, Consolidation, and Reporting applications are recognized and used:
+ The value of the member is added to the aggregate value of the preceding sibling member(s).
- The value of the member is subtracted from the value of the preceding sibling member(s).
~ The value of the member is ignored.
The following aggregation operators in Structured Planning, Consolidation, and Reporting applications are not recognized and are not used. Dynamic Planning assigns them the operator.
/
The following operator is available to you in the Dynamic Planning app. It does not come from Structured Planning, Consolidation, and Reporting applications:
- ! The value does not include the child member value in the consolidation to its own parent and it is not included in the rollup to any other dimensions either.
Source Value options
The Source Value column defines the starting point for the Source Filter choice.
If Source Filter is…
| Then Source Value should be… |
AllMembers
| None |
LevelAndAbove
| A number indicating the level in the hierarchy. The top (dimension) level is level 1. |
MemberAndBelow
| A member name |
FixedMember
| A member name |
DimensionFilter
| A member name |
LeafMembers | A parent member name. |
None
| None |
Target Filter options
The Target Filter usually is the same as the Source Filter, as listed below.
If Source Filter is…
| Then Target Filter should be… |
AllMembers
| AllMembers |
LevelAndAbove
| LevelAndAbove |
MemberAndBelow
| MemberAndBelow |
FixedMember
| FixedMember |
DimensionFilter
| None |
LeafMembers | LeafMembers |
None
| DimensionFilter |
Target Value options
The Target Value column defines the starting point for the Target Filter choice.
If Target Filter is…
| Then Target Value should be… |
AllMembers
| None |
LevelAndAbove
| A number indicating the level in the hierarchy. The top (dimension) level is level 1. |
MemberAndBelow
| A member name |
FixedMember
| A member name |
DimensionFilter
| A member name |
LeafMembers | A parent member name |
None
| None |
When you save, the system checks the mapping for validity.
At this point, you still have a Source model that has been generated, you have a Target/Master model that has been created at the highest level (dimensions only), and you have defined the way that Dynamic Planning should populate the Target/Master with members, data, or both. The Target/Master model is not yet generated, does not contain members, and does not contain data.
Populating the Source Model - Data Download
Power user access is required for these steps.
Data Download is a Type option on the Calculation page (accessed via the Model task and Calculation subtask).
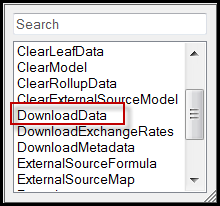
Select the Download Data (shown below) type, which will be executed when the Calculation is run. Dynamic Planning connects to Structured Planning, Consolidation, and Reporting applications, downloads data from Structured Planning, Consolidation, and Reporting applications, and fills in the data into the Source (HACPM_Financial).
Optimization
Data downloaded from the Structured Planning, Consolidation, and Reporting application is time-consuming. We have optimized this process to keep track of the last date that data was downloaded, and to download only what has changed since the last download date. This optimization is specifically for those using Scenario partitions in the Structured Planning, Consolidation, and Reporting application. This is useful in cases where some data changes frequently (such as Budgeting data), while other data changes rarely (such as Actual data).
The Scenario partitions in Structured Planning, Consolidation, and Reporting have a "Last Process Date." Dynamic Planning uses this date to track what date needs to be downloaded.
This optimization is handled internally by Dynamic Planning and no configuration settings are required from the Power user.
Manage > Application Administration > Request Status
Selecting this option opens the Request Status page, which shows the results of processes. After running Data Download, a new entry will appear at the bottom of the table. The type of operation is shown along with the start date and time, followed by its status. If the status shown is a partial completion, such as a percentage complete, click Refresh after a few seconds to track when the operation is complete.

If the status shown is a Failure, the error message is listed.
You can also use the Audit Log under the Manage, Application Administration menu.
At this point, you now have a Source model that has been generated and contains data, you have a Target/Master model that has been created at the highest level (dimensions only), and you have defined the way that Dynamic Planning should populate the Target/Master with members, data, or both. The Target/Master model is not yet generated, does not contain members, and does not contain data.
Clearing the Source Model
You use the HACPM_Financial Source model as an intermediary step to store financial data. You download data into HACPM_Financial and then use a map to copy the data into a Master model. After you have copied data into the Master model, you may not need it anymore. You can use the Clear Model menu command to clear data from HACPM_Financial.
For example, when you first set up your Master model, you may choose to download the last 5 years of Actuals data from Planful applications. After that, you will regularly download only this year's Actuals and Forecast data and next year's Budget data. The 5 years of older Actuals data is no longer needed in HACPM_Financial.
In Practice
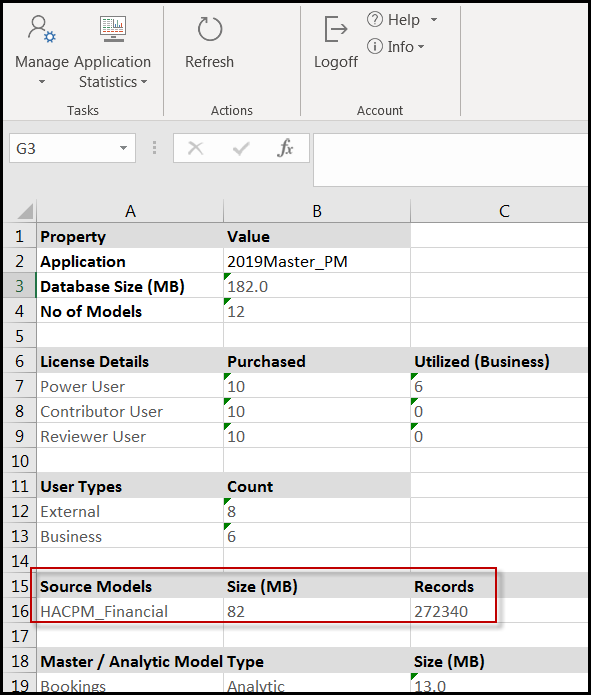
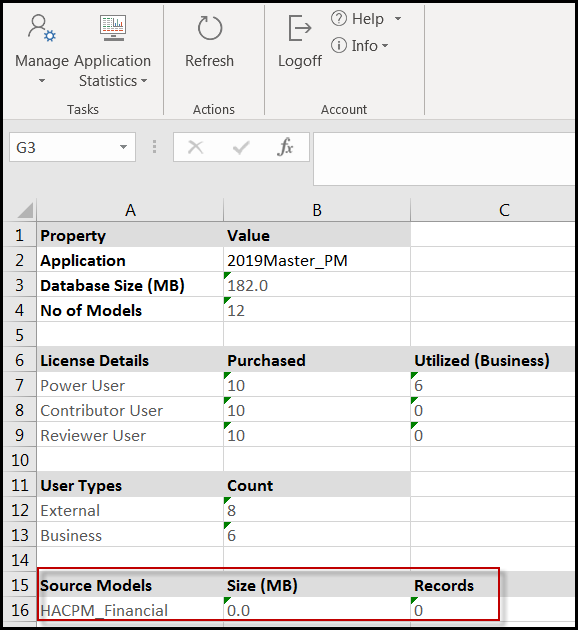
Select Manage > Application Administration > Application Statistics. In the image below, HACPM_Financial is a source model and contains data.
Select Model > Setup, then select HACPM_Financial from the Model drop-down. Notice that HACPM_Financial is a Source model.
Click Clear Model and then confirm that you want to clear the data.
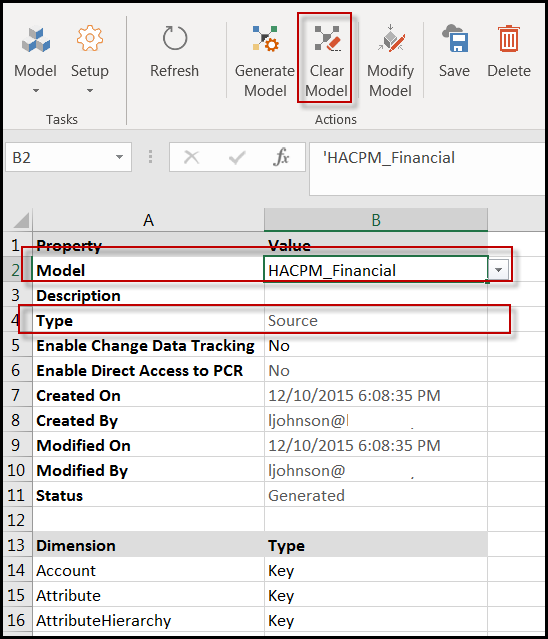
After clearing the model, note that the model is still Generated. This is different than clearing a Master or Analytic model.
Select Manage > Application Administration > Application Statistics. You see that HACPM_Financial now contains no data.
Populating the Target Model
Power or Contributor user access is required for these steps.
Model > Setup > Generate Model
In Practice
Select the Target/Master model from the list box.
Scroll down to the Maps section. You should see the name of your map, the name of the Source (HACPM_Financial), the name of the Target (the Master model), and the type of transfer.

Use Generate Model to move data from the Source to the Target.

When you click Generate Model, Dynamic Planning first checks to see if the values in your Application Settings page are adequate to accommodate the dimensions and members you will be downloading from the Source.
The value in Master Model keys must exceed the number resulting from the # of members in each Key dimension multiplied by each other. For example, if you are expecting your Key dimensions to have membership of Account=80, Company=10, Department=60, Product=30, Project=40, then your Master Model Keys value must be equal to or greater than 57,600,000.
The value in Master Model Value Block Size must exceed the number results from the # of members in each Value dimension multiplied by each other. For example, if you are expecting your Value dimensions to have membership of Scenario=3, Time=15, Measures=2, then your Block Size must be equal to or greater than 90.
If Master Model keys and Master Model Value Block Size are set to an adequate value, then model generation proceeds: members and/or data are moved from Source to Target/Master according to the options you set in the Map.
If Map Type Is | And Map Transfer Is | Data Download Does This | Generate Model Does This |
Metadata | Leaf or All | Nothing. | Populates the Target with the outline of members in the dimensions, both leaf and parent, that are defined in the map. No data. |
Data (It is recommended to use the Data option only for Write-back maps.) | Leaf or All | Downloads data from Structured Planning, Consolidation, and Reporting applications to HACPM_Financial. Dynamic Planning reviews all defined maps and downloads a superset of data that covers all maps. | Populates the Target with the outline of members in the dimensions, both leaf and parent, that are defined in the map. No data is copied. To get data, you will need to explicitly run the Map using a Calculation. See Viewing the Default Calculation below. |
Both | Leaf or All | Downloads data from Structured Planning, Consolidation, and Reporting applications to HACPM_Financial. Dynamic Planning reviews all defined maps and downloads a superset of data that covers all maps. | Populates the Target with the outline of members in the dimensions, both leaf and parent, that are defined in the map. Populates only the lowest-level member intersections with data. |
While the model is being generated, the status message at the bottom left of the Excel screen blinks. When complete, it says Ready. No messages are posted to the Request Status page.
At this point, you have a Source model that has been generated and contains data, and you have a Target/Master model that is generated, contains members, and may contain data depending on the Map type that you used.
Viewing the Default Calculation
Power or Contributor user access is required for these steps.
After generating the model, scroll down on the Setup page and you will see that Dynamic Planning has created one default calculation for you, with the same name as the model.

Model > Calculation
Select the name of your Target model from the Model list box.
Select that same name in the Name list box. This is the calculation that Dynamic Planning created and it has only one purpose, Aggregation.
Set Run in Background to Yes.
To be notified by email of the calculation’s successful completion, type your email address into the Success Notification and Failure Notification fields. When you run the calculation, you will receive email upon its completion.
Then click Save.
To aggregate the data, click Run.
Click Refresh to see the Last Run Status, showing the Aggregation started. When it is complete, clicking Refresh will show the successful completion and the number of seconds elapsed.
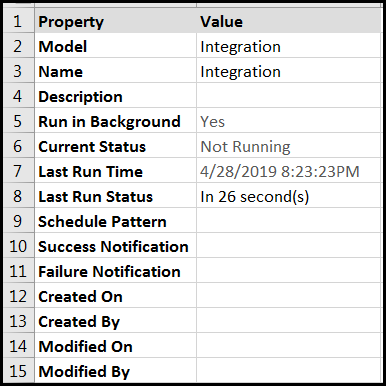
Now your Master/Target model is populated with both leaf-level and parent data, and it is ready to use in Views and Reports.
Maintaining and Refreshing the Model
Now you are ready to set up your environment for regular updates from Structured Planning, Consolidation, and Reporting applications. You will create two calculations to maintain the model:
Core App DW Download
Model Refresh
Power or Contributor user access is required for these steps.

