- 18 Minutes to read
- Print
- DarkLight
- PDF
Setup
- 18 Minutes to read
- Print
- DarkLight
- PDF
Overview
With the Setup subtask, you can create a new model or redesign an existing model. When you select the Setup subtask, an existing model structure may be displayed. Access the Setup subtask by selecting the Model task and the Setup subtask.
Actions Available
A description of the actions available for the Setup subtask.
 - This action moves a model from a Not Generated state to a Generated state, which completes the setup of the model. Once generated, you cannot edit the model structure unless you clear the model first. Generated models are available for analyzing and reporting. Models with a Not Generated state are not available for analyzing or reporting.
- Not Generated - for designing or editing a model.
- Generated - the model is ready for consumption by users (Analyze, Report).
 - This action moves an Analytic or Master model from a Generated state to a Not Generated state. This action must be performed before a generated model can be modified or deleted. When a model is cleared, all data is deleted. Dimensions and other artifacts are retained. When you are in the process of designing and testing a new model, you will Clear the Model and Generate the Model frequently. However, once a model is in production, these actions will be done rarely. This action operates on a Source model, such as HACPM_Financial, differently. It deletes all data but does not move the model to a Not Generated state. HACPM_Financial remains as a Generated model.
 - Add and/or delete dimensions from a model. When you add or delete dimensions associated with a Model, the modification affects ALL dependent artifacts. For example, if you delete a Company dimension from a Model, not only is the Model modified, but your associated reports and views are modified to reflect the deletion of the Company dimension because views and reports are dependent on the Model.
 - Lock a model to prevent modification or clearing. Analytic and Master models only can be locked. Models must be in a Generated state to be locked. Not Generated models cannot be locked.
See Also: The following information on how to update a dimension hierarchy with data without clearing the model first.
 - After a selection is made, click Refresh to view updated data.
 - Save a newly defined model structure. Or, save an edited model that has a status of “Not Generated”. You cannot save a generated model.
 - Delete a selected model. You cannot delete a generated model. You can delete models with the status of Not Generated, which are models in the process of being created or edited. This action deletes the model structure and dimension data. All associated formulas, calculations, maps, and reports are deleted along with the model. To delete a generated model, click Clear Model to return the model to a state of Not Generated and then click Delete.
This action is permanent and cannot be undone. Consider making a backup of the model before you delete it. Use Manage > Application Administration > Model Backup/Restore.
Spreadsheet Fields Descriptions
The spreadsheet fields on the Setup page are described below:
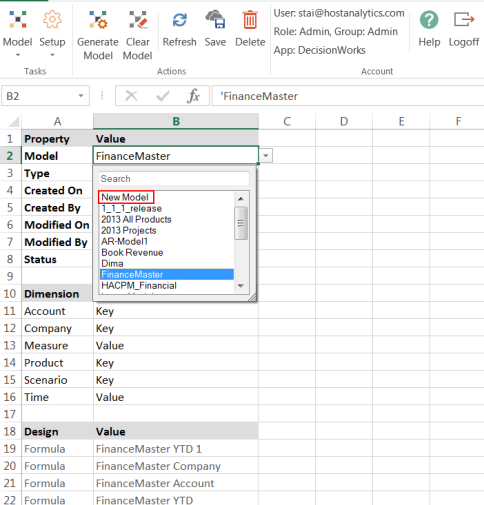
- Model: Select a model. To create a new model, select New Model from the Model list box. You can perform a list box search by entering the word, partial word, or the starting letter (for example, New Model, n, or new) in the search field of the list box.
- Description: Enter a description of the model. The model does not have to be locked to save the description.
- Type: Select Master or Analytic. The Master model represents model data pulled from the Planful Financial Cube and is the starting point for creating additional models. An Analytic model represents a sub-model that can be used for analysis or Dynamic Planning purposes.
- Enable Change Data Tracking: Enter Yes or No to enable or disable Change Data Tracking. When you enable this feature, Dynamic Planning assumes that all data in the model is clean and up-to-date. Therefore, you should always run a Full Aggregation before enabling this feature. See How to Use Change Data Tracking for more information.
- Enable Direct Access to PCR: Enter Yes or No to enable or disable Direct Access to PCR. This option is available only when you are first creating a model, otherwise it is grayed out. When you enable Direct Access, the model you create will be connected to the Planful Structured Planning, Consolidation, and Reporting (PCR) application data. For information on Direct Access to PCR, see Using Direct Access to PCR Financial Reporting.Note:HACPM is a special model that takes metadata and data from Planful Applications and then acts as a source for moving that data into a Dynamic Planning model. Enable Change Data Tracking is not available on HACPM.
- Created On: The date the view was created. This cell is populated by the system.
- Created By: The username of the user who created the view. This cell is populated by the system.
- Modified On: The date on which the view was last modified. This cell is populated by the system.
- Modified By: The username of the user who last modified the view. This cell is populated by the system.
- Status: The Status field is system-populated based on the actions you perform. A generated model cannot be deleted. Clear the generated model by clicking Clear Model and then delete the model. Only generated models are available for analyzing and reporting. Do not enter data in this field. Any data entered will be replaced with system data.
- Dimension: Enter dimensions to include in the model.
- Type: Select the cell to enable a list box where you can choose between two types of dimensions; Value and Key. You must have at least one Key and one Value dimension to generate a model. A Key dimension type will most likely change, unlike a Value dimension (for example, Time) that does not normally change. The very first cell under Type provides a list box when the cell is selected. For subsequent cells, type in a value or copy and paste the list box cell to add new types.Note:The key dimensions will be displayed in bold text and highlighted cells.
Design / Value: System-populated based data that cannot be modified. Information is based on model associations such as maps, calculations, and reports.
- Attributes: Attributes associated with the model.
- Name: The name of the attribute as defined on the Model > Attribute page.
- Dimension: The name of the dimension the attribute is associated with.
- Maps: The maps associated with the model where the model is set as a Target model as well as a Source model.
- Name: The name of the map as defined on the Model Map page.
- Source Model: The model you want to copy data and/or metadata from.
- Target Model: The model you want to copy data and/or metadata to.
- Type: The type of data mapped. There are 2 types of data; metadata and data.
- Metadata: Copy only metadata from the source to the target model.
- Data: Copy only data from the source to the target model. Both - copy both metadata and data from the source to the target model. Tip Lookups apply to Metadata.
- Transfer: Applies to dimension members.
- Leaf: transfer leaf level dimension members only to the target model.
- All: transfer all dimension members from the source to the target model.
- Writeback Process: Required to write data back from Dynamic Planning to Planful Structured Planning, Consolidation, and Reporting applications. See: Writing Data From Dynamic Planning Back to Planful Structured Planning, Consolidation, and Reporting Applications.
- Access Token: Required to move data from one Dynamic Planning application to another (within the same environment). For example, you have one application used to manage all corporate finance models and another application to manage all department finance models. Every quarter corporate pulls departmental budgets and forecasts from the department application finance models to the corporate application finance models to generate a consolidated profit and loss statement and balance sheet reports.
- Variables: Displays all variables used. See: Using Variables in Views and Reports
Formulas: Define formulas on any dimension member within a single dimension. No cross-dimensional formulas are supported at this time. You can have multiple formulas per model. Formulas are the building blocks of calculations. The calculation defines the logical order in which formulas are executed. - Name: The name of the formula as defined on the Model > Formula page.
- Dimension: The Calculation Description field is limited to 5,000 characters and for each step within the Calculation you can enter up to 1,000 characters. If the limit is exceeded, the application will truncate the text. The Variables column width in the Calculation is currently set to auto-fit.
Scopes: Define filters for a model’s dimension members. Defining a scope for each model improves performance and scalability by allowing you to perform calculations on a block of data versus an entire model.
- Name / Description: The name and description of the scope as defined on the Model > Scope page.
- Variables: You can use both variables and variable expressions.
Calculations: A Calculation, which identifies the order of execution for aggregations, formulas, maps, and more. Access the Calculation subtask by selecting the Model task and the Calculation subtask. - Name: The name of the Calculation as defined on the Model > Calculation page.
- Description: A description of the Calculation as defined on the Model > Calculation page.
- Run in Background:
- Yes - Run processes in the background (for example, an aggregation or calculation that will take a long time to execute). See the Request Status page, accessed by selecting the Manage task and the Request Status subtask, for process details.
- No - Do not run processes in the background.
- Current Status: This field is updated when No is selected for Run in the background and provides status information on the results of the run (for example, successful).
- Last Run Time: This field is updated when No is selected for Run in the background and provides run time and date information.
- Last Run Status: This field is updated when No is selected for Run in the background and provides information on the time to complete the most recent run. See Also: the Calculation page on how to schedule a Calculation.
Views: A View represents a custom starting layout for interactive query and analysis on a model.
- Name / Description: The name and description of the view as defined on the Analyze > Design View page.
- Enable Save: Yes – Allow users (members of the group that has access) to save changes to the model. This save will write back data to the model in Dynamic Planning. Users enable this option to allow for the execution of Calculations on save (see next option). No – Do not allow other users in the group to save changes to the model. No is the default.
- Calculation on Save: Include a Calculation, which provides the order in which the calculations take place. The calculation will be executed when you click Save. The calculation name should be provided in the available property. This property is dependent upon the Enable Save property. Unless Enable Save is set to Yes, this calculation will not be executed.
- Groups: Groups with access to the views.
Reports
- Name / Description - The name and description of the report as defined on the Report Design page.
- Enable Save - Allow users (members of the group that has access) to save changes to the model report.
- Calculation Model - When Enable Save is set to Calculation Model or All Models in the Report Properties.
- Calculation on Save - Include a Calculation, which provides the order in which the calculations take place. The calculation will be executed when you click Save. The calculation name should be provided in the available property. This property is dependent upon the Enable Save property when creating a model. Enable Save must be set to Yes to execute this calculation.
- Groups - Groups with access to the views.
Define the Structure of a Model
In Practice
- Select the Model task and the Setup subtask.
- In the Model Value field, select the model you want to edit, or select New Model and enter a name for the new model.
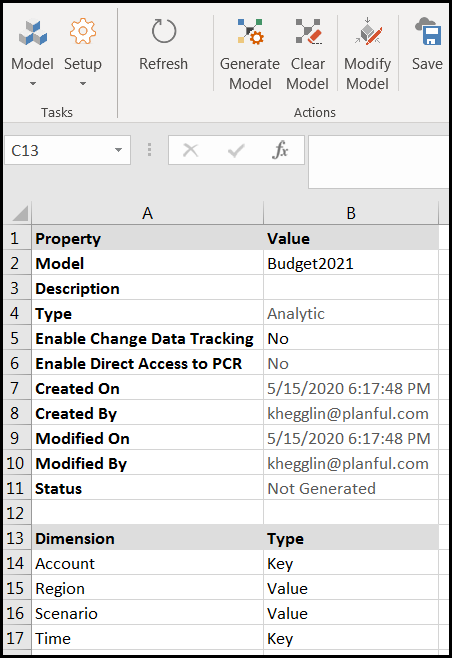
- In the Type Value field, select Master or Analytic. The Master model represents model data pulled from the Planful Financial Cube and is the starting point for creating additional models. An Analytic model represents a sub-model that can be used for analysis or Dynamic Planning purposes.
- Enable Change Data Tracking is an optional feature that marks leaf-level data as dirty whenever it is changed, such as through user input, calculations, or data load. When the next full aggregation (Aggregation, None) is performed, only the rollups with dirty leaf-level data are aggregated. This makes full aggregations faster.
- Select Yes to Enable Direct Access to PCR to connect directly to the Financial Reporting Area of PCR (Structured Planning, Consolidation, and Reporting).
- Created On, Created By, Modified On, and Modified By fields are populated automatically by the system when you save the model. Do not enter data in these fields. Any data entered will be replaced with system data when the model is saved.
- The Status field is system-populated based on the actions you perform. A Generated model cannot be deleted. Clear the generated model by clicking Clear Model and then delete the model. Only generated models are available for analyzing and reporting. Do not enter data in this field. Any data entered will be replaced with system data.
- Under the Dimension header, enter dimensions to include in the model.
- Under Type, select the cell to enable a list box where you can choose between two types of dimensions; Value and Key. You MUST have at least one Key and one Value dimension to generate a model. A Key dimension type will most likely change, unlike a Value dimension (for example, Time) that does not normally change. The very first cell under Type provides a list box when the cell is selected. For subsequent cells, type in a value or copy and paste the list box cell to add new types.
- Click Save. Notice that the Created On, Created By, Modified On, and Modified By fields are populated automatically after the first time you save a new model. For Status, Not Generated is displayed. Design and Value fields are populated beneath the model’s dimensions. A description of the data you might see under the Design and Value fields (which are read-only and cannot be modified) follows:
Creating a Staging Model
In Practice
- Create the Staging Model.
- Create a new staging model with the same dimensions as the source model.
- Create a map of type ‘Both’ to move all metadata and data from the source model to the staging model.
- Generate the staging model.
- Clear the source model and make necessary changes (i.e. adding a dimension / deleting a dimension).
- Move the data (leaf level only) into the source model from the staging model.
- Create a map of type ‘Data’ to move data from the staging model to the source model.
- Create a calculation to generate the source model and move the data from the staging model.
- Run aggregation or any other calculations as needed to make the source model available for analysis/reporting/modeling.
- Delete the staging model.
Adding a Dimension to a Model
In Practice
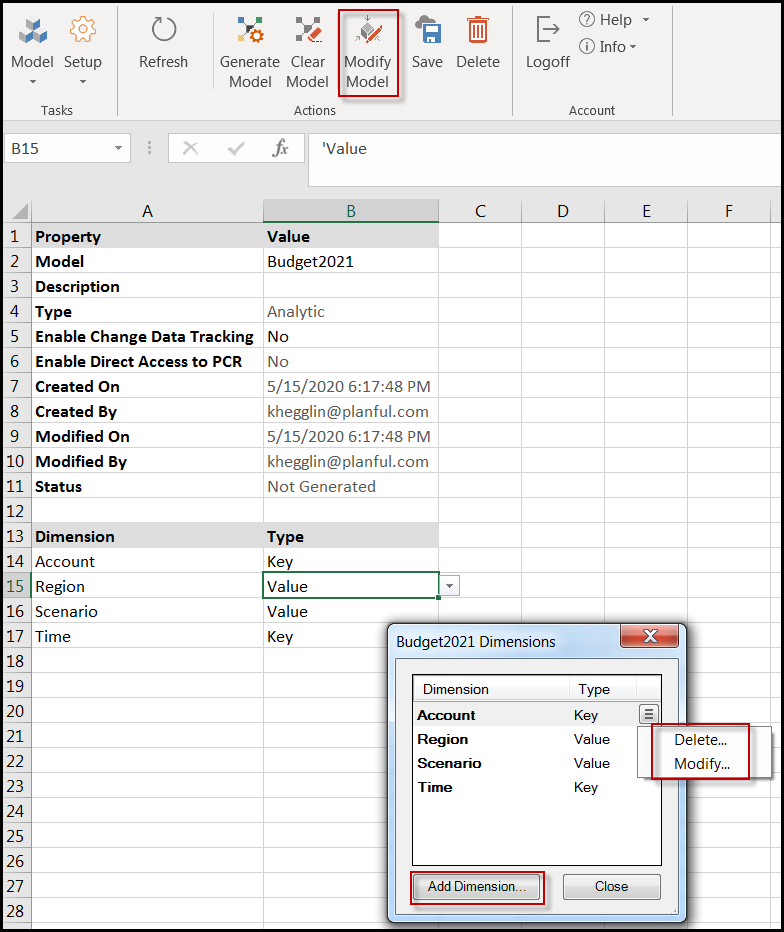
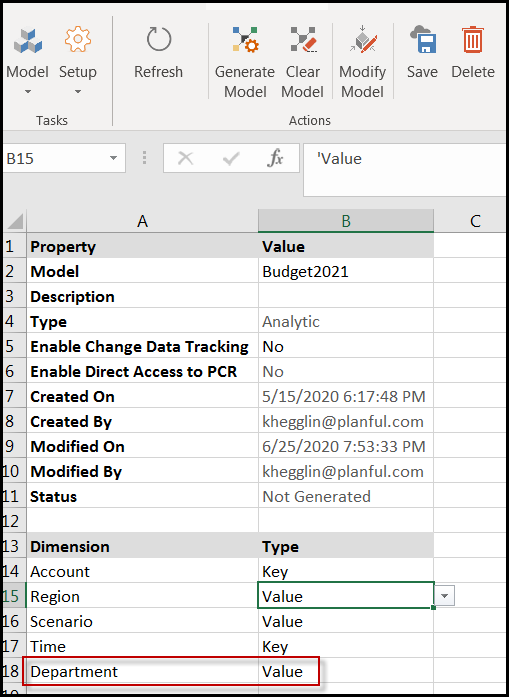
- Click the Modify Model action as shown below. The dimensions associated with the model are displayed.
- Click Add Dimension.
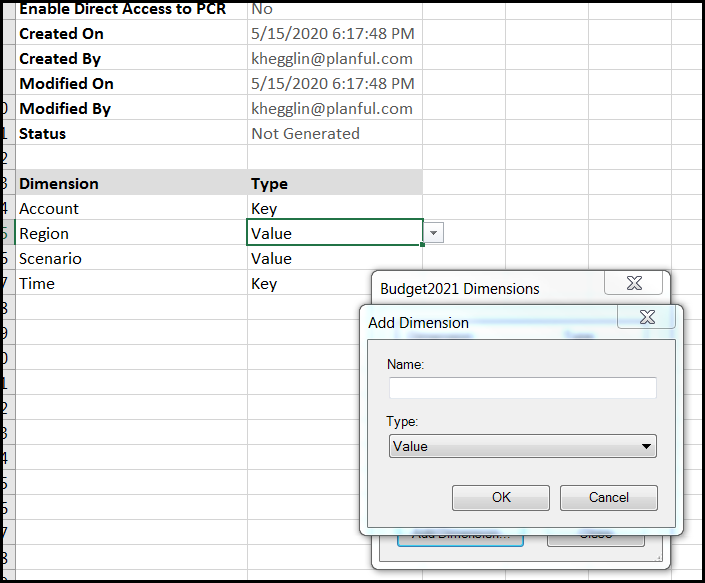
- Enter the name of the dimension you want to add and select whether it is a Value or Key dimension.
- Click OK and then Close the dialog page.
- The added dimension is updated in the Dimension list on the Model Setup page.
- Click Save.
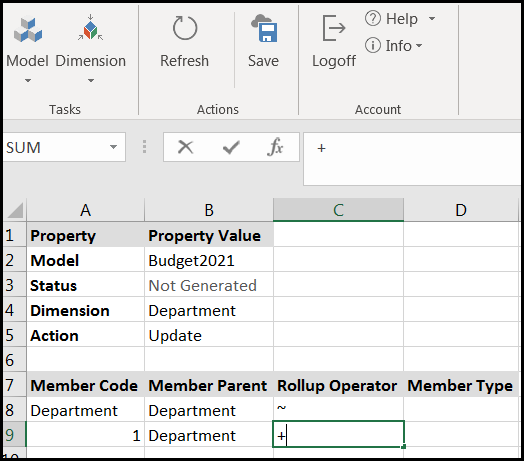
- Access the Model Dimension page and select the newly added dimension for the Model. In the example below, the Company dimension is added. Add members for the dimension and then click Save. Also, a root member with the name of the dimension is added. You can then add additional dimension members for the dimension and click Save.
- Access the Model Map page. Observe the new line for the added dimension. If you select the model with the new dimension as your Source Model, the Source Filter for the new Dimension (Department) is set to DimensionFilter and the Source Value is Department (the name of the root value). The Target Filter is set to None along with the Target Value. Similarly, if you select the model with the new dimension as your Target Model, the Target Filter is set to Dimension Filter with the Target Value as the root value. The Source Filter is set to None along with the Source Filter Value.
- Return to the Model Setup page and click Generate Model.
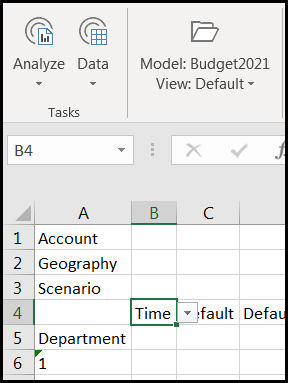
- Access the Analyze Data page. Notice the Company dimension member is now displayed in the Model View.
Deleting a Dimension from a Model
In Practice
- The model must be in a non-generated state. Click the Modify Model action as shown below. The dimensions associated with the model are displayed.
- Delete a selected dimension as shown above.
- When asked if you want to delete the selected item, click Yes
Modifying a Dimension
Key and Value dimension types can be modified. For example, if you originally assigned a Project dimension as a Key dimension, you can now change it to a Value type dimension. Similarly, if you assign a Project dimension as a Value type, you can now change it to Key.
To change a dimension from a Key to a Value or vice versa follow the steps below.
- Access the Model Setup page.
- Select the Model and click the Modify Model action.
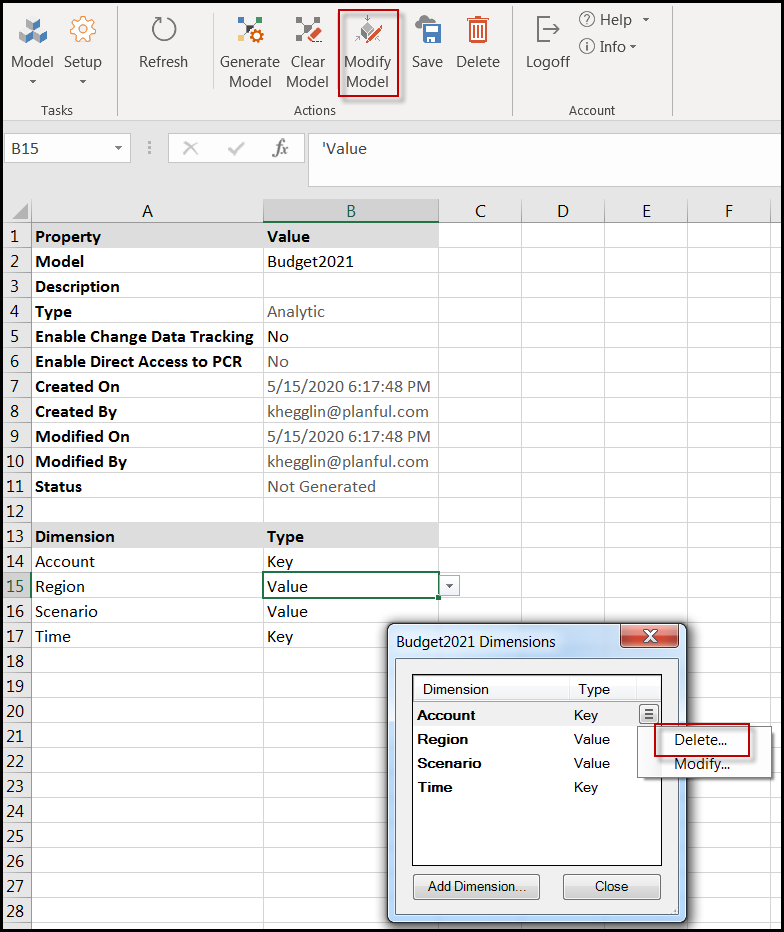
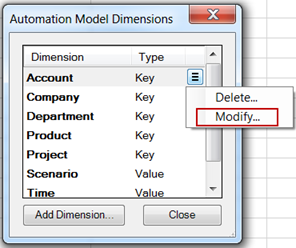
- Select the dimension you want to modify and click Modify as shown below.
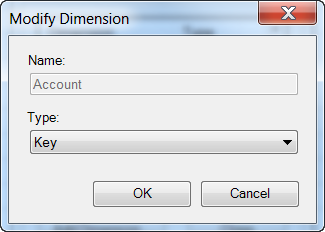
- On the Modify Dimension dialog page, select the new Type from the list box as shown below.
- Click OK and Close the dimension dialog page.
Locking a Model
- Access the Model task and the Setup subtask.
- Select a Generated model.
- Click the Lock Model action (which is only enabled when a Generated model is selected). Notice the Status of the model changes from Generated to Locked as shown below. Also notice that the Lock Model icon changes to Unlock Model.
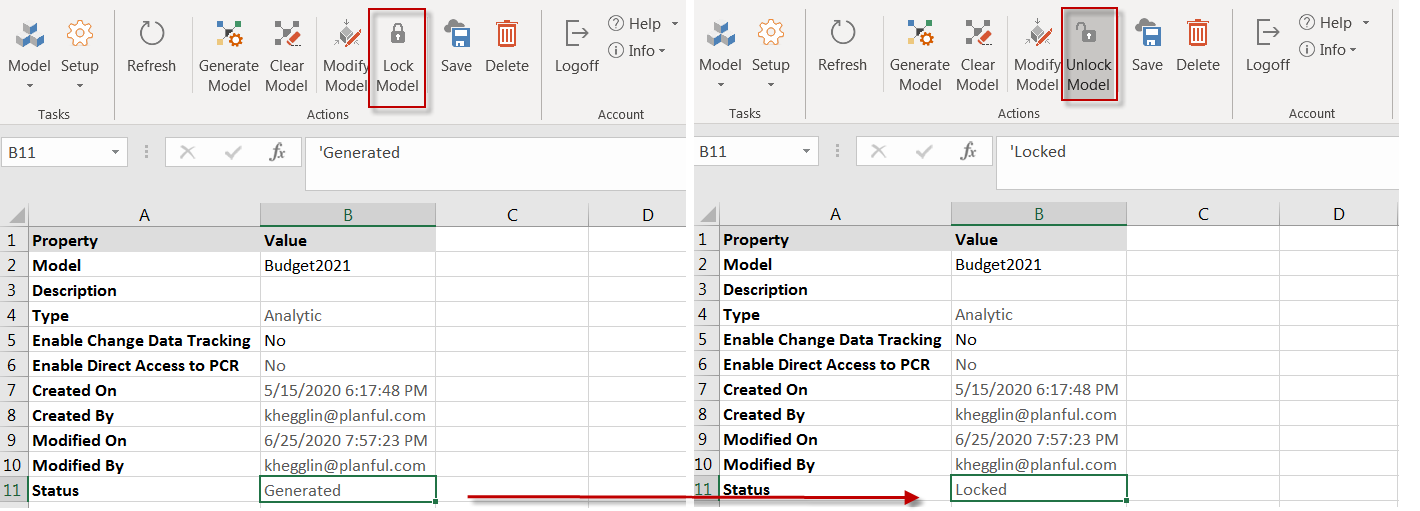
While locking a model ensures data integrity and prevents clearing the data, it also means that all data may not be saved/updated (see Saving Report Data to Locked Models and Saving View Data to Locked Models) from Views, Reports, Data Load, API Library, Calculation, and so on.
See: Saving Report Data to Locked Models and Saving View Data to Locked Models
Saving Report Data to Locked Models
If a report is associated with a locked model and the Enable Save property is set to All Models as shown below, users cannot save data from that report.
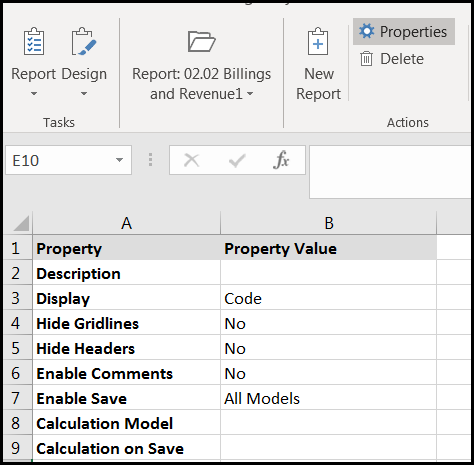
If a report is associated with multiple models, one of the models is locked, and Enable Save is set to All Models, users cannot save data from that report.
If a report is associated with a model that is locked, Enable Save is set to Calculation Model and Calculation on Save is based on the model that is locked as shown below, users cannot save data from that report.
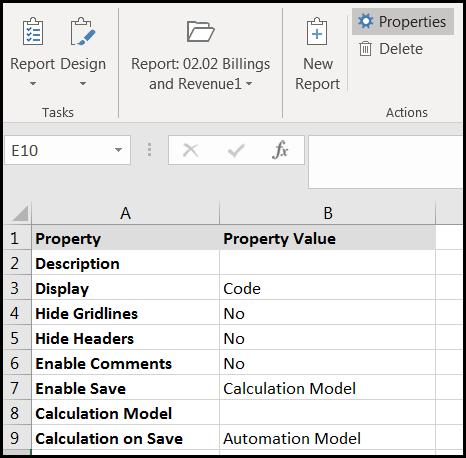
If a report is associated with multiple models (some that are) locked, Enable Save is set to Calculation Model, and Calculation on Save is not based on the model that is locked, users can save data from that report to the models that are not locked.
Saving View Data to Locked Models
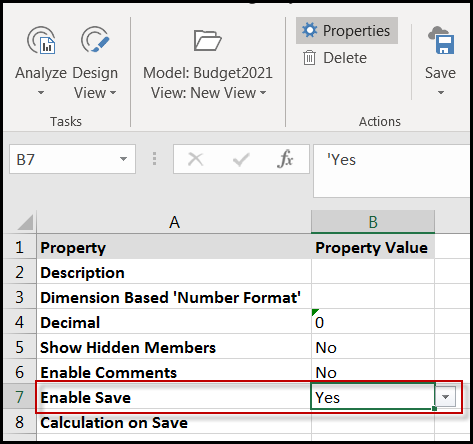
If Enable Save is set to Yes in a View on a model that is locked as shown below, users cannot save data from that view.
Functionality that can be used on Locked Models
- Append
- Set Display Label
- Set Dimension-Based Properties
- Attribute
- Set Attribute Mapping
Unlocking a Model
In Practice
- Access the Model task and the Setup subtask.
- Select a Locked model.
- Click the Unlock Model action.
Locking and Unlocking Models Using a Calculation
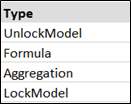
Another way to lock or unlock a model is to select the LockModel or UnlockModel type as a line item in a Calculation. Performing the lock or unlock in a calculation saves time as it automates the process. For example, you might want to unlock a locked model, generate a formula, run aggregation, and then lock the model once again. If this is the case, your Calculation might look like the following:
To Lock or Unlock a Model using a Calculation
- Access the Model task and the Calculation subtask.
- Select the model you want to lock or unlock.
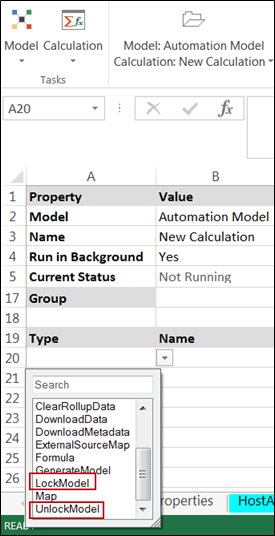
- In the Type list box select the LockModel or UnlockModel type as shown below.
Enable Calculation Execution Status Notification for Views and Reports Flag
The Enable Calculation Execution Status Notification for Views and Reports allows users to receive real-time notifications about ongoing calculations that may impact their Views and Reports.
When a user saves data to a view, it triggers a calculation associated with that view. While this calculation is in progress, the second user will receive a notification if they attempt to refresh or save data to the same view. Therefore, if any calculation is running on any model, it will display a notification when a user performs a refresh or save data operation on any views/reports of that model, regardless of whether the calculation is linked to that specific view/report.
In Practice: Enable Calculation Execution Status Notifications for Views and Reports Flag
- Go to Manage > Application Administration > Application Settings.
- In the Calculation Property section, set Enable Calculation Execution status notification for Views and Reports to Yes.

