- 7 Minutes to read
- Print
- DarkLight
- PDF
My Settings
- 7 Minutes to read
- Print
- DarkLight
- PDF
My settings offer users the flexibility to personalize their homepage, set their region, monitor system status, and manage their login information. Furthermore, users can install components and access the latest Spotlight Add-Ins.
Navigation: Maintenance > My Settings.
The General Settings page offers functionalities to streamline task management, customize user settings, and track system status.
Generate Tasks for all Artifacts
All Actions - This functionality prevents the creation of excess or granular-level tasks. When you select the Enable Workflow for this Scenario check box and specify the workflow definition, and then click Save, one workflow task is generated only for the roll up not for all the artifacts associated with the roll up. Initially, a forward task associated with the entity roll up is generated. After you complete this task, an Approve task or a task for the next stage is generated. By default, this check box is not selected.
User Settings
The User Settings section contains the following information:
- Home Page - This functionality helps you choose a home page from any of the assigned paths. Click the arrow, select one of the paths to display on the home page, and then click Save.
- DLR Regional Settings - This functionality helps read the date and decimal formatting of the data in DLRs. you can select a region from the drop-down.
- Culture Setting
- TimeZone Setting - The time zone is set to your local time by default. If you want to change the time zone, you can select it from the drop-down menu.
If you've made any changes to the settings mentioned above, click the Save icon to modify the changes.
System Status
The System status section contains links to the following information:
- Current system status
- Maintenance windows
- Historical application availability
- Service level agreements
On the User Information tab, you can upload a profile picture, change your name, change your password, change your secret question and answer, and enable two-step verification.
Set Profile Picture
To set/update the profile picture, follow the steps below:
- Click the Camera icon, and then click Browse to select an image from your system.Note:
You can upload any image with a maximum size of up to 1 MB. The image can be in JPG, JPEG, PNG, and GIF file formats.
- Adjust the selected image and align it as per the focus circle. The slider helps you zoom in and zoom out the image. Once you set the alignment, click Set Profile Picture.Note:To remove the profile picture, click Remove Picture. This option is available only when a profile picture is set.
Edit Name
To change the profile name, follow the steps below:
- Click the Edit option next to the profile name.
- Provide the new name in the respective First Name and Last Name fields.
- Click Save to change the profile name.
Change Password
When accessing the Planful application for the first time, you are prompted to change your password and enter a secret question and answer.
To change the password, follow the steps below:
- Click the Edit option next to Change Password.
- Provide the current and new passwords in their respective fields complying with the application's password policy.
- Click Save to change the password.
Following are some points to remember while setting up a password:
- Use 8-20 characters.
- Use a mix of upper and lowercase letters and at least one special character other than less than, equal than, back slash, forward slash, and left and right brackets.
- Do not use your user ID, user name, or name of your company
This information is applicable to Single Sign On (SSO) users for Offline Planning and Web Services configuration.
- If the Change Password option is not enabled for SSO users, contact the Planful Support Team to enable it in your application.
- The first time an SSO user sets their password, Planful will not check for a current password. Subsequently, SSO users will be asked for a current password. You can change your password only if you enter the correct current password. You will be notified if the password entered does not match your current password.
Change Secret Question
The secret question usually helps the application verify the authenticity of account owners when they forget their account’s password. To change the secret question, follow the steps below:
- Click the Edit option next to Change Secret Question.
- Select the required question from the list and provide your answer to the selected question.
- Click Save to update the secret question.Note:Do not share this question and answer with anyone, as it can compromise the security of your account.
Two-Step Verification
The Two-Step Verification process adds an extra layer of security to the application when you try to login to it. By default, this option is disabled while creating the account. If you want to activate two-step verification for the account, enable the toggle next to Two-Step Verification.
The admin user can enable two-step verification for any user from the Edit User page.
Navigation: Maintenance > Administration > User & Role Management > Select the user and click the Edit icon > Click the Enable Two-Step Verification checkbox.
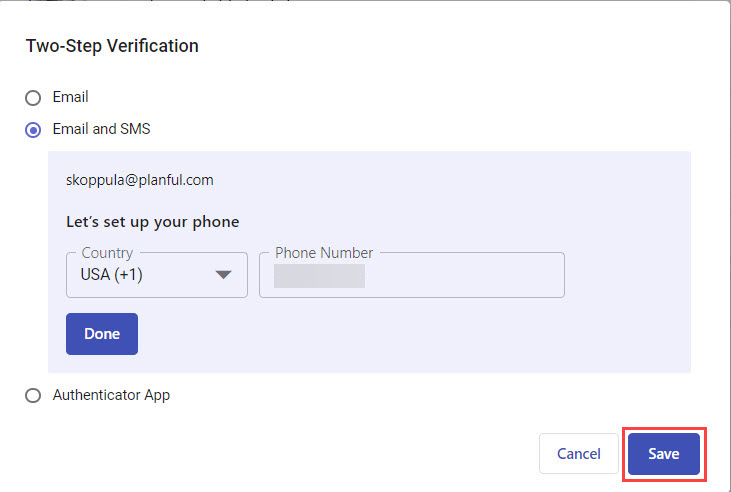
- Email: An OTP is sent to the registered email Id when you try to log in to the application. Use that OTP to authenticate yourself while logging in. This option is selected by default when you enable Two-Step Verification. Here you can see the registered email you have used to create your account. Click Save if you want to choose this for the two-step verification.

- Email and SMS: An OTP is sent to the registered email Id and mobile number when you try to log in to the application. Use that OTP to authenticate yourself while logging in. If your mobile number is not registered, you have to register your mobile number before saving this configuration. Once you have set up your phone and validated, click Save.

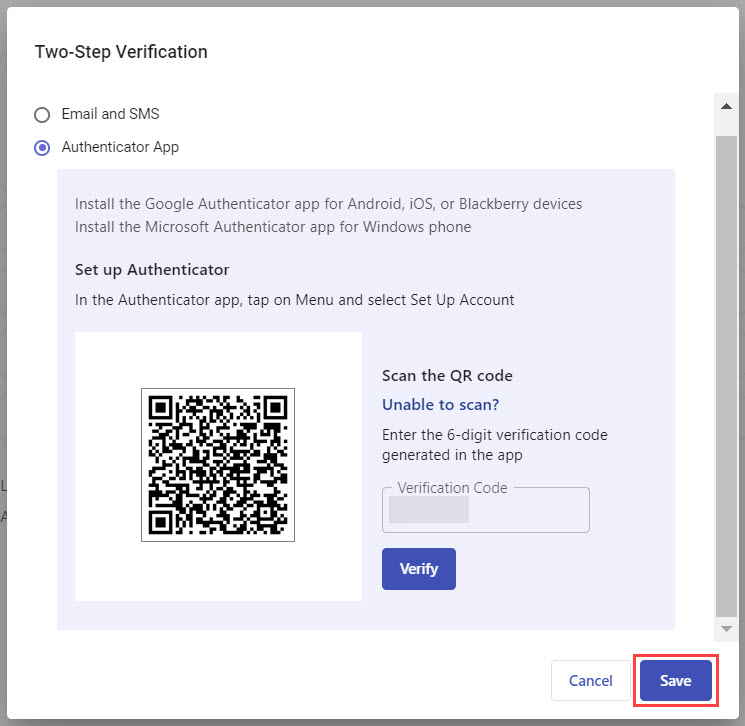
- Authenticator App: If you select this option, you have to configure an Authenticator App and use the unique code that the app provides to log in to the application.
Authenticator apps are mobile applications to generate time-based one-time passwords. A few of the authenticator apps include Google Authenticator, Microsoft Authenticator, and so on. So, when setting up the two-step verification with an authenticator app, you will link your account to the app by scanning a QR code or manually entering a provided code.
The app then generates a unique verification code that refreshes every few seconds. During login, you need to open the authenticator app on your smartphone or device, retrieve the current code, and enter it on the login page. Let's see a use case of how you can enable the Two-step verification using the Google Authenticator app, which you have already installed on your device. Open the application, enter the generated code from your device into the Verification Code field, and click Verify.
You can also scan the QR code. Scan the QR code on the screen, using the application installed on your phone, and a code is generated. Retrieve the code and click Verify. Once validated, click Save.
That's all it takes! Note:Authenticator apps work offline; their codes are independent of the internet connection or network signal.
View, download, and install components on your computer. Download Excel Planning Tools from this page to access the Planful Planning Workbook.
| Components | The software installed on your computer. |
Status | Indicates whether or not the software or tool is installed. |
Resource | Downloads may appear in this field. |
Offline Planning Workbook | View Offline Planning documentation. To use Offline Planning, you must have the following components:
Note: Windows Installer runtime and Net service packs are automatically downloaded and installed with the Offline Planning Tools installer. A formula that would normally work in Excel may not work within a Planful template. While Excel supports up to 64 nested IFs, it is recommended that you do not use more than five. A workaround is to split the formula into multiple rows and hide the rows that you don’t need. Download Install the Excel planning prerequisites including the Planning Workbook.
Offline Planning may or may not be available based on your subscription. |
Spotlight is an Add-In to Microsoft Excel, PowerPoint, and Word that provides access to all Dynamic Planning capabilities. You can install it in two ways:
Automated - Install Spotlight for Office once and get upgrades in future months automatically. This is the ClickOnce method.
Manual - Install Spotlight for Office the first time. When an upgrade is released, uninstall the old version of Spotlight for Office and install the new. This is the InstallShield MSI method.
Recommendation: We recommend that you get automatic upgrades by installing ClickOnce. However, if this is not preferred, then install InstallShield MSI and upgrade it manually with every release. We support backward compatibility of Spotlight for Office so you can upgrade the Add-In less frequently (but at least quarterly).
| If you are | And you want or have an automated installation: | And you want or have a manual installation: |
|---|---|---|
A New User | See How to Use the ClickOnce Installer for Automatic Upgrades. | |
An Upgrading User | Do nothing. |

