Setup Steps (in order of sequence)
- 37 Minutes to read
- Print
- DarkLight
- PDF
Setup Steps (in order of sequence)
- 37 Minutes to read
- Print
- DarkLight
- PDF
Article summary
Did you find this summary helpful?
Thank you for your feedback
Setup Steps (in order of sequence)
First: Scenario Setup/Data Trends - setup scenarios and data trends used in MyPlan.
Second: Module/Template Setup - setup modules and template for MyPlan use.
Third: Security Setup - configure security and different types of MyPlan users.
Fourth: MyPlan Configuration Setup - setup MyPlan interfaces for different types of usage.
First Step- Setting up a MyPlan Scenario and Data Trends
Scenarios are used in MyPlan to represent a version of your Budget, Plan or Forecast. They are created based on fiscal year. Generally, most companies have several scenarios that represent different iterations of Budgets and Forecasts. For example, you might create a scenario for current and future trends, with different drivers. For Budgets, you’ll set up a Budget Scenario Type and for a Forecasts, you’ll create a Forecast Scenario Type; both for a different purpose.
Detailed information on all steps to create a Budget or Forecast scenario and all fields on the Scenario Setup page are available in the Scenario Setup Guide. The Scenario Setup information provided in this guide is specific to setup required for MyPlan.
The foundation of MyPlan is built using compare scenarios. MyPlan uses Compare Scenarios to calculate and solve variances. It allows the user to not only quickly correct and adjust variances manually through data input, but it also gives the user the ability to have the system solve the variance for them. Below are the steps for setting up a Scenario for MyPlan.
Data Trends allow users to use prior, present or future data points to help them complete a budget or forecast, by looking at data from any given scenario and time period, in order to analyze and benchmark against their working scenario. Users can use this feature to make actionable decisions by knowing how and what should be Planned, knowing where they are going to ultimately Land, and most importantly have a clear picture of where they currently Stand.
Scenario Setup
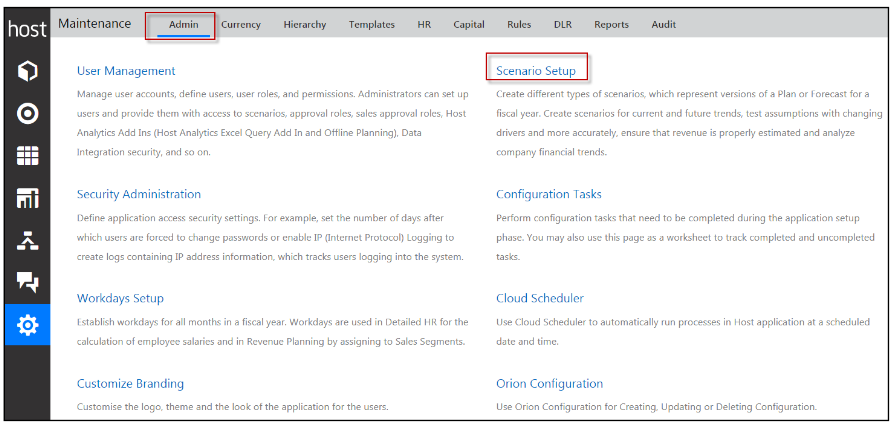
Navigate to the Scenario Setup page by selecting Maintenance > Admin > Scenario.
Click the Add button and select a Forecast or Budget scenario type. Once you have completed filling out all fields in the General Information section, click the Data Seeding tab.
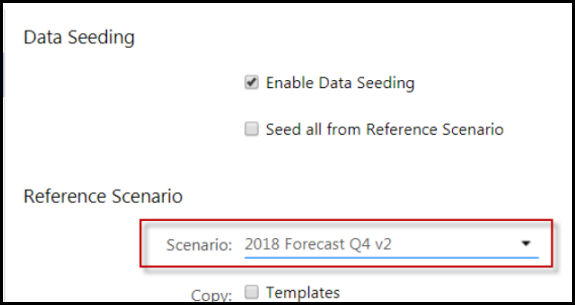
In the Data Seeding area, select Enable Data Seeding. Additional fields are displayed.
For Reference Scenario, select the scenario you want to use to populate the scenario you are creating. In this example, a budget scenario is being created, so you would use an Actual or Forecast scenario to pre-populate the data for MyPlan users (2018 Forecast Q4 is used in this example and shown in the screenshot below).
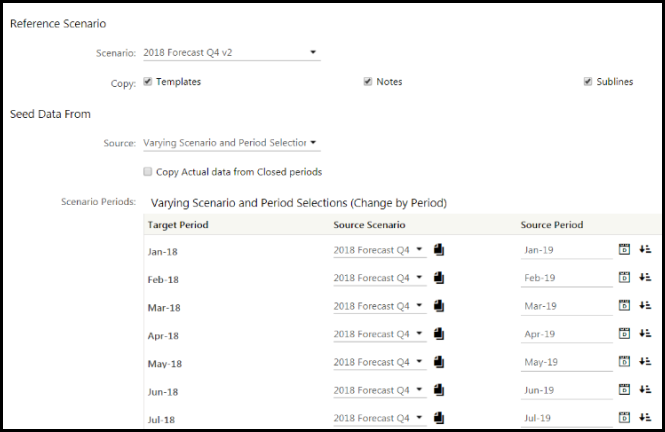
For Seed Data From, select the Varying Scenario and Period Selection. Fill in the Period mappings, select the source scenario (2018 Forecast Q4 v2), and source period as Jan-19. Instead of selecting each period, use the auto increment option to fill in the rest of the periods.
Click Save. The page below displays how the Data Seeding page should look for this example.
Click the Compare Scenarios tab. Compare scenarios are used to display comparative data from other scenarios such as; historical actuals, latest budget data, data from the prior budget cycles, and plans with budget targets.
The number of Compare scenarios allowed per scenario is determined during application configuration (Go to Configuration Task List page > Define Budget Parameters task shown below to see how your application was configured).

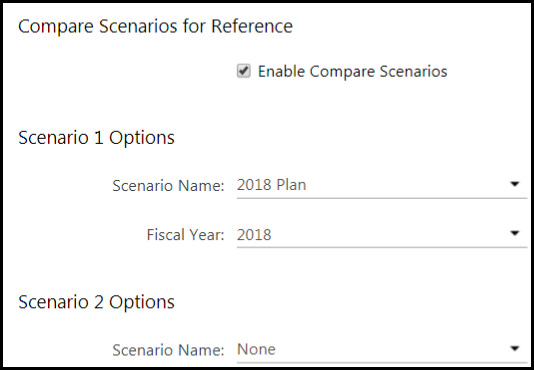
On the Compare Scenario screen, Click the Enable Compare Scenarios checkbox.
For each scenario option, select the compare scenario that you would like the input scenario to compare against. For example, If you are creating a 2018 Forecast scenario, you might compare this input scenario against a 2018 Budget.
.Click the Data Trends Setup tab and select Enable Trend. You will see the budget input years appear.
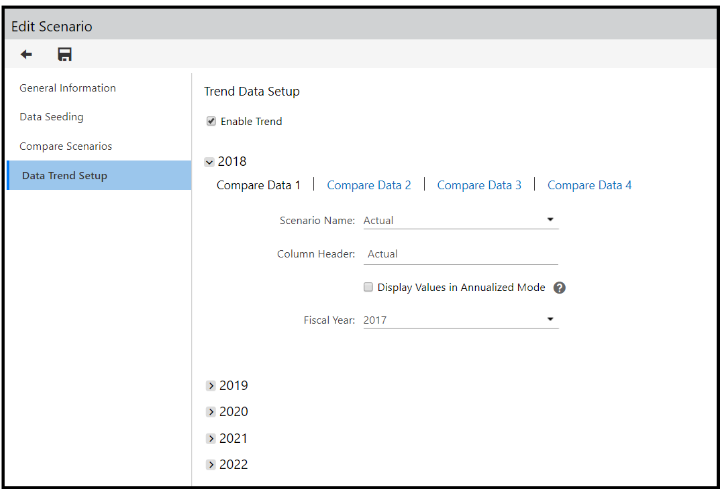
By default the system auto populates the compare data columns with the Actual scenario and the prior year. Use the Scenario Name and Fiscal Year selection (dropdown) to choose what other scenarios you would like to use as a reference for end users to compare against. Use the Column Header option to rename the scenario to something more user friendly (this in only an alias, you are not changing the actual scenario name). Complete for all budget input years based on the reference information you would like to show to end users.
For information on Display Values in Annualize Mode and Adjusting Factor, see Displaying Values in Annualized Mode and Adjusting Factor Explained
If you are creating a forecast, you will have to Navigate to the Scenario Setup page in Planful, by selecting Maintenance > Admin > Scenario. Select the forecast scenario you just created and execute the Refresh Closed Period Data action.
The final step is to create Data Load Rules (DLRs) and load data to the scenarios you just created. Information on loading data is available in the Loading Data to Planful Admin Guide.
Also, It is important that you do not display the same scenario in two or more MyPlan sections. One unique scenario per section is required. Sections are discussed later within this documentation.
Using Different Compare Scenarios Against Multiple Years
For Budget and Forecast scenarios, you can use different compare scenarios against multiple years. This functionality allows you to plan out years and future years using "what if" scenarios and set up a rolling forecast and compare each prior year results with current year results.
For example, let's say you've created a Q2 forecast scenario for years 2018 through 2020 (Q2 Forecast 2018-20). The data from this forecast needs to be compared with data from the Q1 forecast scenario (Q1 Forecast 2018-20). So, each year (2018, 2019, and 2020) for Q2 needs to be compared with the corresponding Q1 forecast scenario for the same years. To accomplish this, setup 3 Compare scenarios mapped to the source scenario and period as shown in the table below.
| Scenario | Compare Scenario |
| Q1 Forecast 2018 | Q2 Forecast 2018 |
| Q1 Forecast 2019 | Q2 Forecast 2019 |
| Q1 Forecast 2020 | Q2 Forecast 2020 |
Note:
Compare scenarios can be mapped to any scenarios and periods or to the same scenario and period or any such combination based on how you want data to display comparative data.
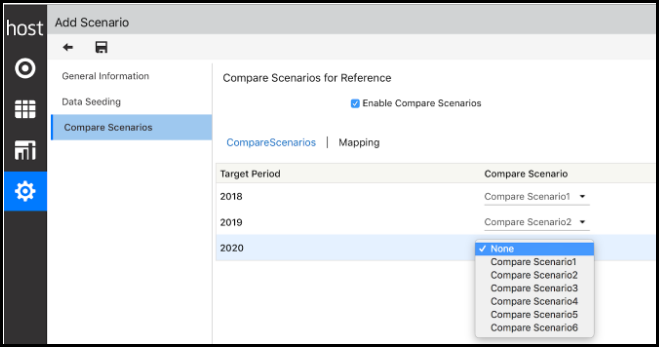
The last thing you will do is map the Compare scenarios to each of the fiscal years of the forecast scenario.
In Practice
This example shows you how to complete the setup.
Access the Scenario Setup page by navigating to Maintenance > Admin > Scenario Setup.
Click the Add icon to add a new scenario.
Click the Compare Scenarios tab and ensure Enable Compare Scenarios is selected.
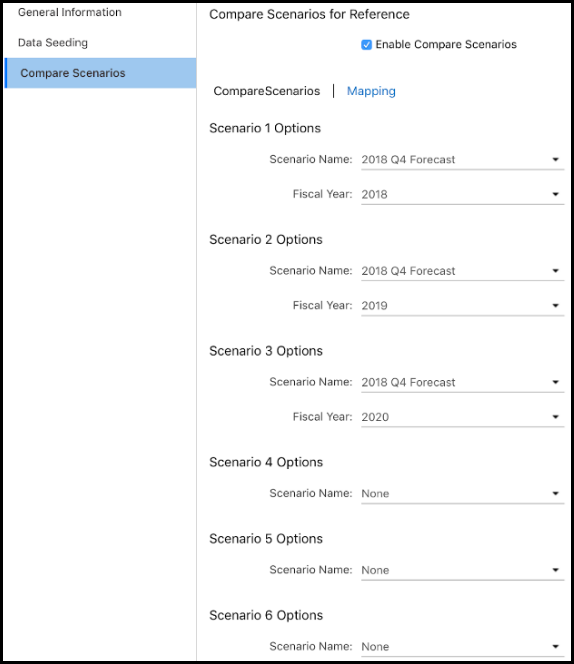
Click the Mapping link.
For each fiscal year in your budget plan or forecast (in this example there are 6 years), map a Compare scenario by selecting it from the list box. Click Save.
Due Date
MyPlan offers the ability to provide users with a Due Date in which a budget or forecast needs to be completed by. This option is simple to use. Click the Date selection to choose the completion data (see below). This should be done for all scenarios setup and intended for MyPlan usage. This feature cannot be used in the Planning application.

Budget Input Years
Budget Input years determine the number of periods available for input within a template and module. The number of budget input years, defined on the Define Budget Parameters Configuration task screen, also determines the number of quarters and years available in MyPlan selections. In the example below, 5 budget input years were selected when budget parameters were defined, which results in 20 quarters (4 per year) available for selection within MyPlan.
Note:
MyPlan will only show the first year of your input scenario (12 months for Budgets and 4 quarters for Forecasts) at any given time, which is by design. Remember the goal of MyPlan is to keep the interface simple for the casual business user. If more advanced users want to see more periods, navigate to the Planning application from the MyPlan interface. Note that appropriate access is required. Access is discussed in greater detail later on in this document.


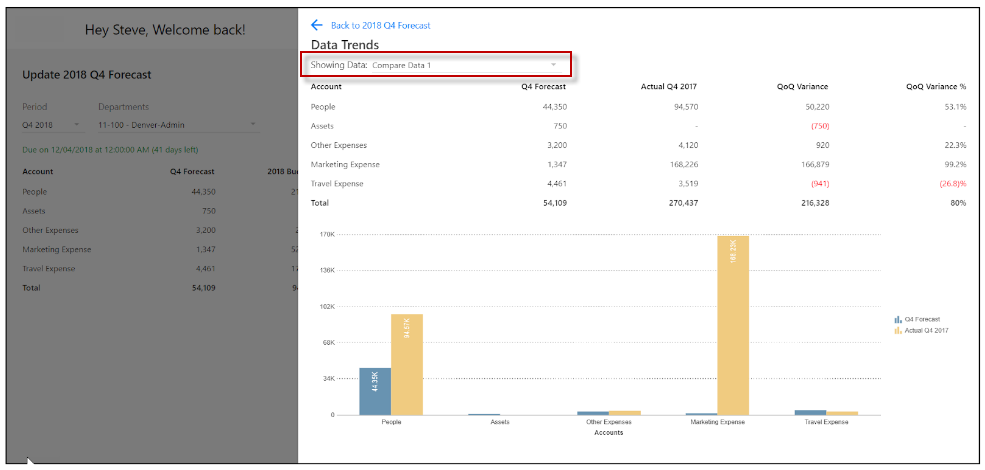
Displaying Data Trends
This section discusses how Data Trends are displayed in the MyPlan interface.
In Practice
Navigate to MyPlan, and select the three vertical dots Icon and then select Show Data Trends. You will see the reference scenario setup that you completed for each Compare Data element displayed. By default, Compare Data 1 will be the first compare scenario shown (see screenshot below).
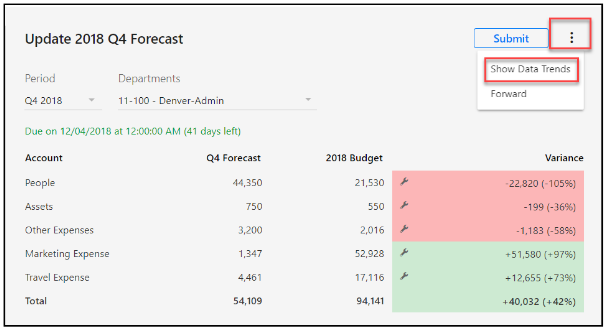
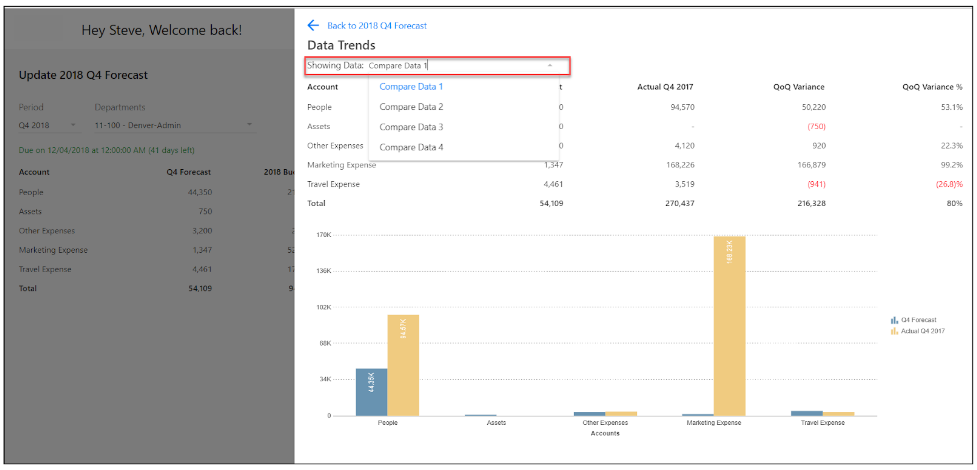
Select the Showing Data dropdown box to access the other Compare Data options.
Displaying Values in Annualized Mode and Adjusting Factor Explained
When you set up Data Trends and selected the first section to configure the Compare Data option, there is an option called Display Values in Annualized Mode and the option to add an Adjusting Factor (as shown in the image below). A brief description of these options is provided below.

Display Values in Annualized Mode
The Annualized Mode option is used when the Actual scenario, without a full year of data, is used for compare or trend analysis. In such cases, the application will adjust for periods without any data. For example, let’s say a user is generating a Data Trend for the Budget 2019 scenario. The user selects the Actual 2018 scenario for comparative values. However, the application only has Actual data for 9 periods in the Actual 2018 scenario. It is impossible to compare 12 periods of data in the Budget 2019 scenario with 9 periods of data in the Actual 2018 scenario.
If you are in this situation, use the Display Values in Annualize Mode option. When enabled, the application will calculate the average of the 9 periods of Actual data and use the result to populate the remaining 3 periods that were without data.
The calculation to extrapolate the average of 9 periods of data would look like this:
Original Actual 2018 Period Data
| P1 | P2 | P3 | P4 | P5 | P6 | P7 | P8 | P9 | P10 | P11 | P12 |
| 100 | 110 | 120 | 130 | 140 | 150 | 160 | 170 | 180 | No Data | No Data | No Data |
| Total P1 through P9 = 1260 -------1260/9=140 | 140 | 140 | 140 | ||||||||
After Annualizd Mode is Applied
| P1 | P2 | P3 | P4 | P5 | P6 | P7 | P8 | P9 | P10 | P11 | P12 |
| 100 | 110 | 120 | 130 | 140 | 150 | 160 | 170 | 180 | 140 | 140 | 140 |
Adjusting Factor
Adjusting Factor is the average value used and is calculated by the application. For example, If adjustment factor is 10%, then the average value will be calculated and an additional 10% will be added (i.e. $140 + %10 = $154). If you have 3 periods without data, the average (plus 10%) will be used to populate the periods.
Second Step- Module and Template Setup
Once again, MyPlan is primarily for the casual business user, so the goal is to keep budgeting and forecasting simple. It is a best practice to create MyPlan Only templates. These templates should primarily focus on simple data balance input. Admins should avoid drivers and complex calculations (simple summation is fine) when setting up templates. Simple balance input should be the ultimate goal for MyPlan templates. The MyPlan interface will only display twelve months at a time for data input and this is by design.
Recommended Template Setup
When adding templates for MyPlan consumption, it is important to design them around the following recommendations:
Create New Templates
Do not leverage existing application templates. It is recommended that you configure new templates for MyPlan. Some templates can be specific for different types of user configurations. More information is provided on this topic below.
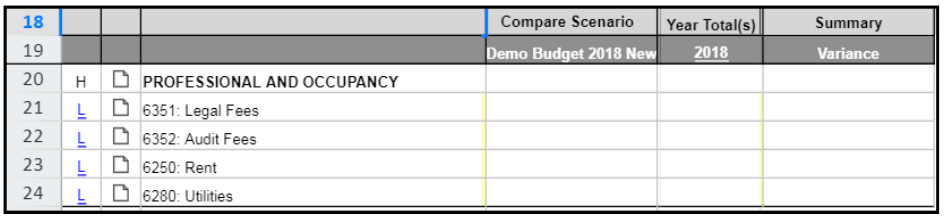
Sequence of Template Columns
Design templates so that the sequence in which the columns are displayed show MyPlan data correctly. The ideal sequence is (from left to right); Compare Scenario (remember MyPlan only uses one), Year Total, Variance.
GL String Data Must be Unique
In order to use MyPlan, GL string data must be unique and cannot be repeated across templates or modules. For example, if I have the following GL String 01.111.123 in template 1, I can’t have the same GL string (01.111.123) in template 2. If this happens the data will double and you will have inconsistent variance results. Additionally, do not use the same GL string across different modules. For example, if you have Gl string 01.111.123 in template 1, it is not recommended to have 01.111.123 as a destination account in the Workforce Planning module as well. Once again this will result in consistent variance results.
Keep the Overall Template Design Simple
Templates with a large number of columns and rows, or that contain a large amount of complex formulas (summation is fine) and drivers will not work appropriately with the MyPlan features. MyPlan is designed for ease of use; mostly simple balance inputs.
Ensure the Column Width are Set Correctly
Headers will not display properly if the column width is not set to the appropriate size in the original template when configured. Column widths can be changed in Contributor Mode by any user that has access to the template. It is important that users do not change the column width for any template once the template is setup and deployed.
Template Calculations
For templates linked to MyPlan, end users will have the ability to enter Excel formulas they would normally use in Planning templates. The only difference is that MyPlan templates will not show row numbers or column letters. End users can still type formulas by selecting a cell, entering an operator, and then navigating around to the appropriate cells to finish entering a formula.
Changing Template Accounts
If you want to change accounts in a template at any time, you must perform the following steps:
Navigate to Maintenance > Templates > Template Setup.
Select the template for which you want to change the set of accounts and click Setup > Template Setup.
Change accounts as needed.
Click Save.
Navigate to the Planning Control Panel and open and save the template in Input mode for all mapped budget entities. Or, run the Simulation Engine. For information on how to run the Simulation Engine, click here.
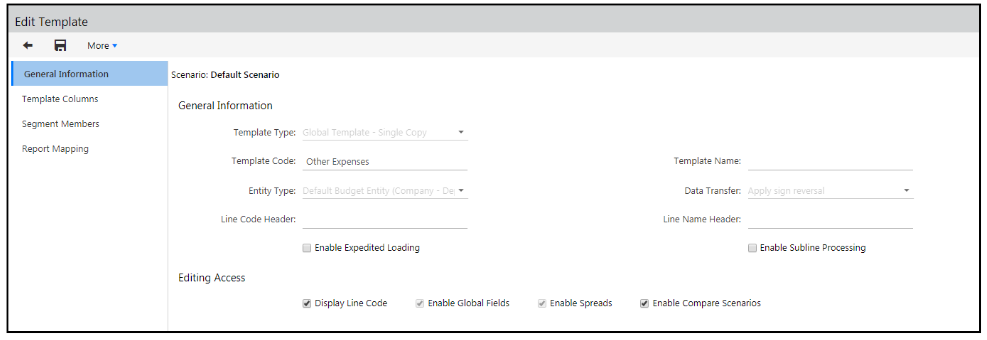
Setting Up a Global Single Copy Template
Currently, MyPlan only supports the GTSC (Global Template Single Copy) template. MyPlan will not work with the other template types. GTSC is the most powerful and most often used template type. Setting up a GTSC template to use with MyPlan must be configured within the planning application. Detailed steps to setup Planning templates as well as a description of the fields and example templates are available in the Planning Admin Guide. The steps below are for MyPlan template setup only.
Navigate to Maintenance > Template > Template Setup.
Click the Add template icon (“+”).
Select the template type drop down box, select the Global Template- Single Copy, and add a Template Code (Template Name is optional).
Click Save.
Next, select the Template Columns tab.
For Time Sets , select Custom Time Set.
Make the following selections when the Custom Time Set option is selected:
Time Set = All Months (Default)
Automatically generate Year Total and Variance columns. Or, manually set them up in Template Setup if the same template will be used in Contributor mode and for MyPlan.
Create the MyPlan template with or without summary columns. A simple template in MyPlan displays Year Total, Compare Scenario Total and Variance automatically and does not need to be defined in Template setup. The image below displays the Template Setup - Template Columns page.

The following image displays the same template in MyPlan with Total, Compare Scenario and Variance columns. The automatically generated columns appear in the MyPlan template only. These columns do not automatically appear in the templates in Contributor mode.
Automatically generated columns appear in MyPlan Template even though Summary columns are configured in the Template. Administrators do not have to disable summary columns.
Note:You cannot reference the Total columns to set formulas in templates.
Click the Segment Members tab.
Configure all necessary defaults for each dimension if needed. It is a best practice to add defaults for all dimensions that are not being used within the application (some maybe labeled future or placeholder elements) or the dimensions not needed for planning. Adding defaults will make configuring destination accounts within the templates easier. See sample screenshot below.
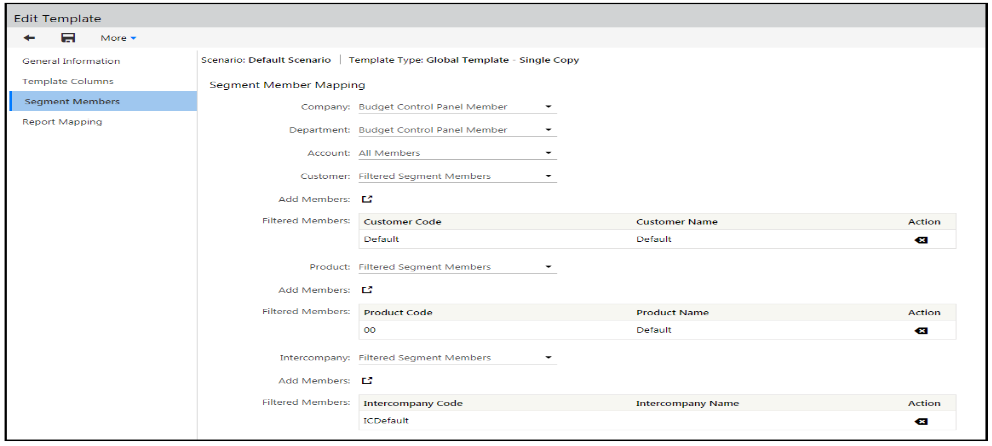
Click Save.
Note:The formula for variance in MyPlan Template is always - Variance = [ Total - Compare Scenario Total] . You cannot reference the Total columns to set formulas in templates.
Adding Destination Accounts With System-Defined Variances
The MyPlan interface is centered around working with variance. The variance columns and formulas are automatically generated so there is no need to set up formulas to calculate the variance for each column. Once destination accounts are added, you can view the formulas that support the calculation of variances by navigating to Admin > Templates > Template Setup and selecting the scenario and template. Then, click Setup > Template Setup to access the template.
Before you create variance formulas, you have to map your template from the Default scenario to the scenario you created above or the scenario you want to use the MyPlan Only templates against. You have to map the template to the scenario because you create a calculation from the compare scenario column and you can’t see the compare scenario column when the template is in the Default scenario
Workforce Planning Module Setup
MyPlan interacts differently with the Workforce Planning Module when compared with Planning. When headcount is added or adjusted in MyPlan, this information is passed to the Workforce Planning module. When Employee Types are created and Compensation Items (which have GL Accounts connected to them) are mapped to Employee Types, MyPlan recognizes the GL accounts mapped with those active Compensation Items. Active refers to the Compensation Items that are live and are being used within the planning process. In some cases there maybe some Compensation Items created that are not mapped to Employee Types. These compensation items are considered Inactive and MyPlan will not recognize these items, which is by design.
From a configuration standpoint there isn’t anything special that needs to be done for Workforce Planning. It is best practice to make sure you create compensation items that have GL accounts that are both meaningful for Planning and have been used for Actuals and other Compare scenarios.
For detailed information about setting up the Workforce Planning module, please see the Workforce Planning Admin Guide.
Capital Expenditure (CapEx) Module Setup
MyPlan has a direct connection to the CapEx Module. When Assets are added or adjusted in MyPlan, the information is passed to the CapEx Module. When admins setup attributes to capture information to collect asset data, these attributes are passed to MyPlan, and the admin can choose which attributes the user can input data against. The most important component of using the Capex Module with MyPlan is configuring a MyPlan Only capital template. The template should be easy enough for casual business users to easily add assets, which will calculate depreciation quickly.
Please follow the configuration below before this module is linked to MyPlan. Please note that the application functionality allows the ability to create multiple Capital templates, so it is a best practice for customers to have one MyPlan Only capital template for the casual business user and perhaps a second more advanced Capital template for power users.
The assumption is that you have all Assets and Asset Categories you need already setup. If not, please add those additional Asset and Asset Categories before you proceed to the next step. For more information on adding Assets and setting up Asset Categories please see the Capital Planning Admin Guide. It is also assumed that you either have a Capital template setup already, by a member of the Planful consulting team or a partner, that you can leverage. If not, please see the Capital Planning Admin Guide, for step by step instructions.
Note:
It is important that you avoid creating duplicate Asset Codes and Names. Also, if you add an Asset to a closed period, the depreciation for that Asset will not be calculated or posted against the closed period. If this happens, it will lead to a situation where you will not be able to quickly adjust variances, which is key functionality within MyPlan. So, it is best practice to NOT add Assets during closed periods.
CapEx Module Setup
Navigate to Maintenance > Template > Template Setup.
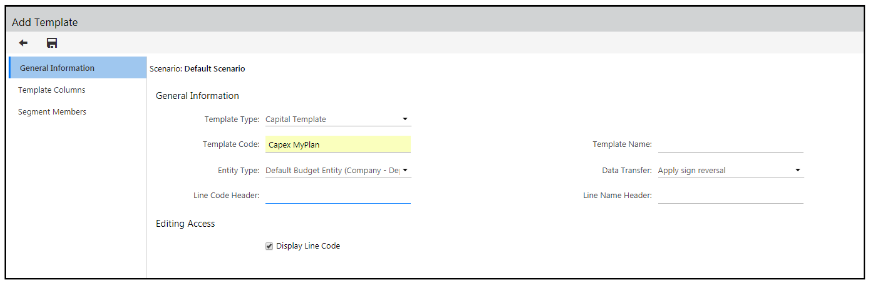
Click the Add template icon (“+”).
Select the Template Type drop down box, and then select the Capital Template.
Next, Enter the Template Code - Capex MyPlan, and the click the Save button on the toolbar.
Click the Template Columns tab. You will see the attributes that will be used during the MyPlan configuration setup.
Navigate to Maintenance > Capital > Asset Setup. Here you will have the ability to finish setting up your template.
In the Asset Setup screen, you can add assets and link them to an asset category, which will ultimately be linked to Finance Modes.
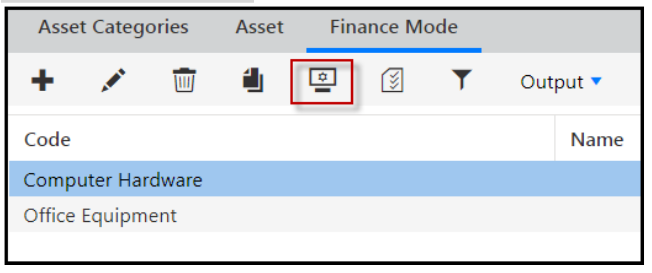
Click the Finance Mode tab. Map all necessary asset categories to the correct finance mode. Finance Mode is where you will be configuring you capital template. For MyPlan, it is best practice to configure one Finance Mode and then link all Assets Categories that you will be using to it.
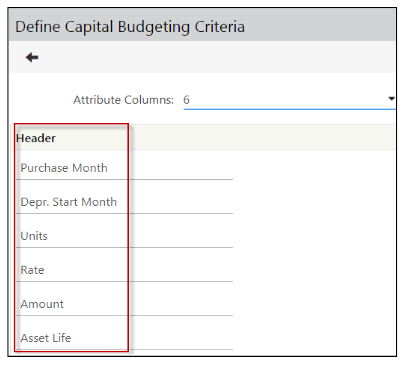
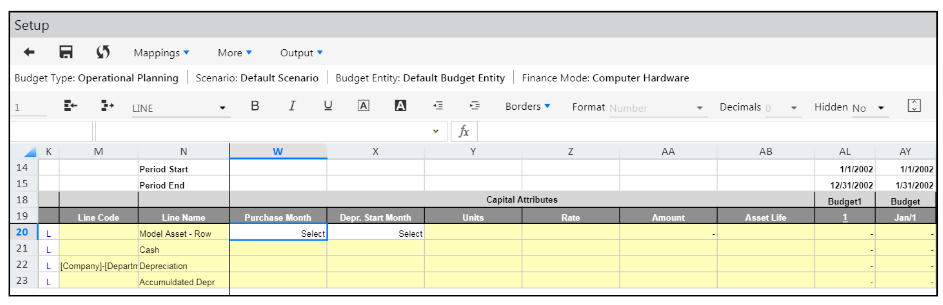
The ideal configuration for the input capital template is pretty straight forward. Ideally you would have configured your Capital Module with the following 6 attribute columns: Purchase Month, Depr. Start Month, Units, Rate, Amount, and Asset Life . This process should have been done during your application implementation. If not, you can enable this module with these parameters now. Navigate to Maintenance > Admin > Configuration Tasks > Define Capital Budgeting Criteria. Please review the Capital Planning Admin Guide, for step by step instructions. Below is a screenshot of the idea configuration.
Here is the template view after configuration.
The good news is if you already have the Capital Module configured, MyPlan will use your exact configuration. All you have to do is map those attribute fields (created in the Capital Budgeting Criteria section) to MyPlan during configuration of the MyPlan Interface. The MyPlan interface configuration is discussed later in this document.
Configuring Capital Templates for use in MyPlan
The ideal configuration for the Capital MyPlan Only template is shown below in the screenshot. If you have configured the Capital Budgeting Criteria section the same way as picture above, the column description should line up perfectly. If not don’t worry, once again, MyPlan will use the configuration you already have setup. The below description is specifically for new configurations. In the future we will deliver a “default” MyPlan Only template.
Column W should be Purchase Month
Column X should be Depre. Start Month
Column Y should be Units,
Column Z should be Rate
Column AA should be Amount (see the Rate X Units topic below)
Note:
Some of the column headers listed above my change due to your exact configuration. If you want a template with more advanced options and calculations (like milestone payments for example), you must create a separate Capital template to be used in the Planning side of the application, (not MyPlan).
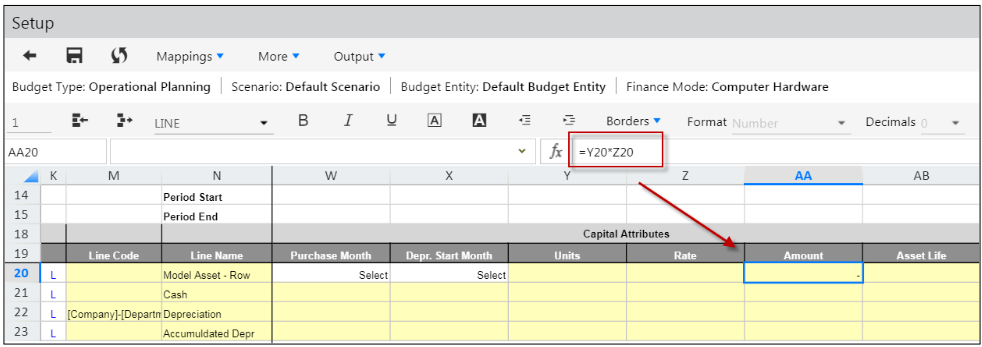
Rate X Units
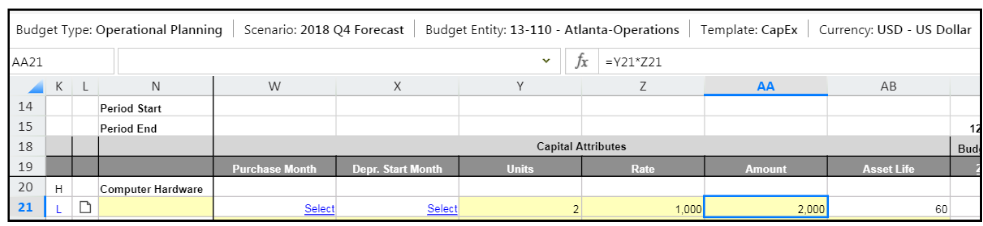
Ensure that you set up the formula for Units times Rate correctly so that the Amount column reflects the accurate total as shown in the Finance Mode (shown below) and the Capital template (opened from the Planning Control Panel also shown below).
Finance Mode Template Setup:
CapEx Template for Atlanta Operations opened from Planning Control Panel:
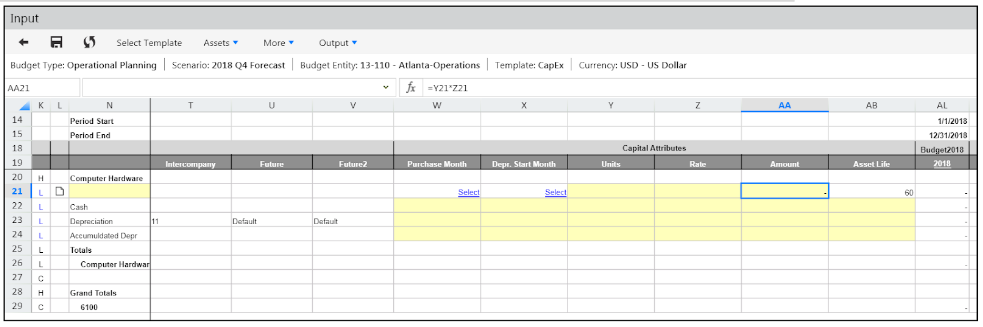
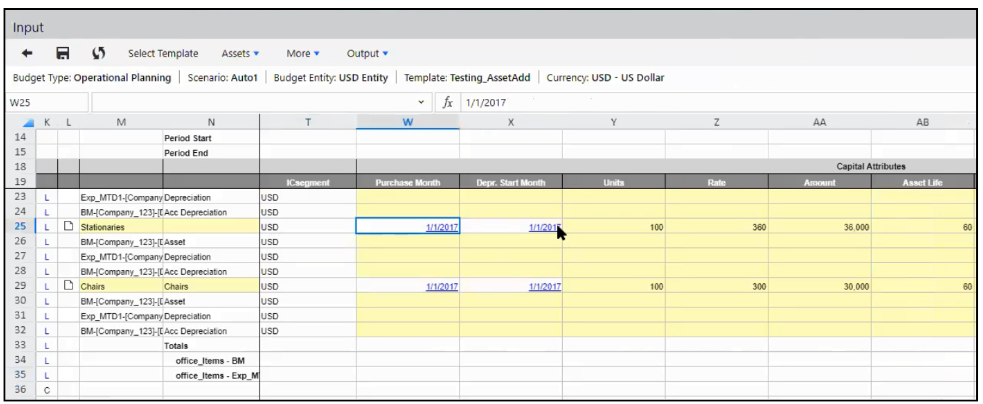
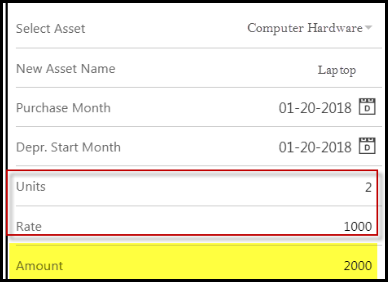
This configuration translates to MyPlan so that when users access the period and entity in MyPlan and add an asset (as shown below), Units times Rate will calculate the correct amount.
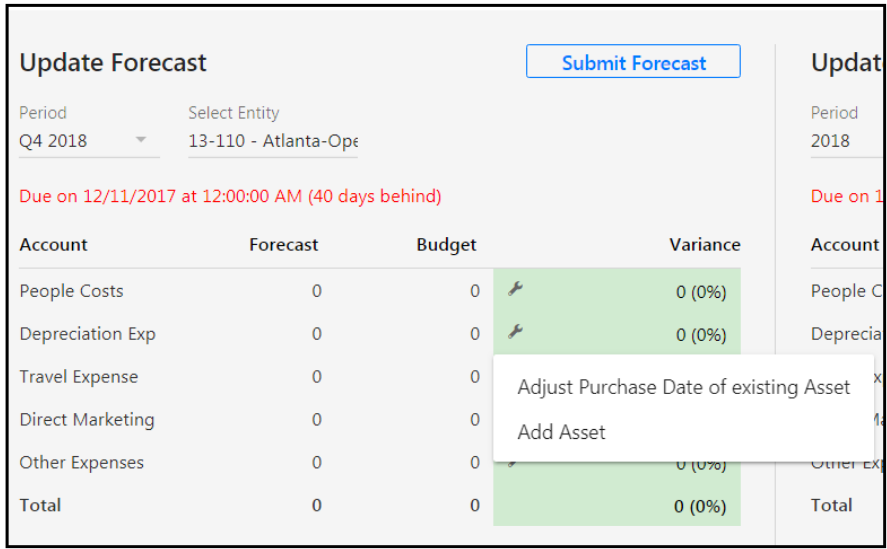
The information entered in MyPlan is written back to the Capital template in the Planning application when the user selects Submit as shown below. More information is provided on this topic later in this document.
MyPlan Account Mapping
The MyPlan Account Mapping screen provides visibility and the ability to control account data displayed in the MyPlan interface for Workforce Planning and Capital Planning. Once accounts are added to Workforce Planning and/or Capital Planning modules, they are displayed on the MyPlan Account Mapping screen.
It’s important to note that in general, Admin users will not need to access the Account Mapping screen. This screen is primarily for the following unique cases:
Case 1
Situation : Account mappings of Finance modes (Capital) or Salary Components (Workforce Planning) are modified subsequent to the posting of data.
Resolution : In this case Admin users need to access the Account Mapping page, click the Refresh button, then Save for each affected area (Workforce Planning and/or Capital).
Case 2
Situation : An Admin user wants to exclude certain account / segment combinations from MyPlan data and calculations. Or, an Admin wants to include certain accounts in MyPlan data; beyond the accounts that are mapped against the Finance Mode (Capital) or Salary Components (Workforce Planning).
Resolution : This use case is not yet supported in the current release and will be available in an upcoming release.
In Practice
Under Maintenance > Admin > Configuration Tasks , select MyPlan Account Mapping.
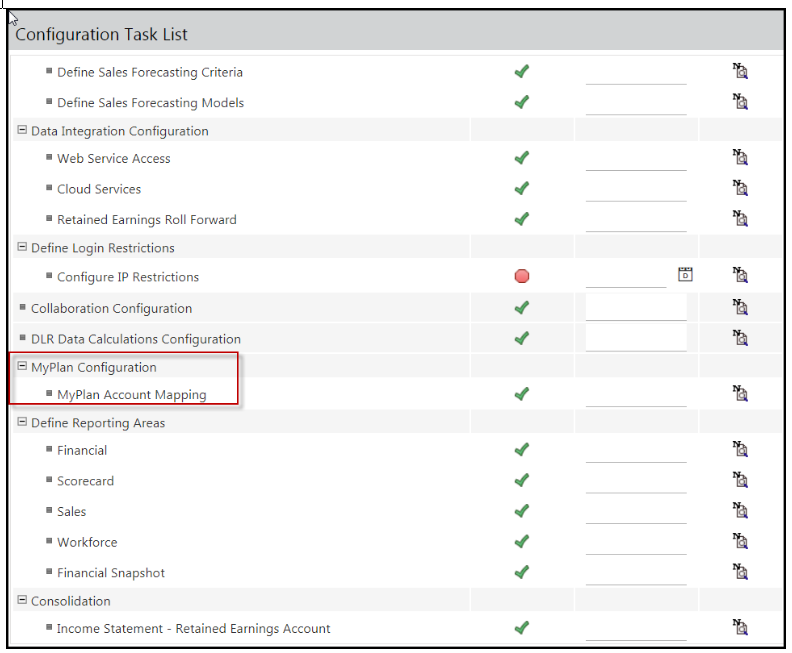
Account Mapping is enabled automatically and the screen below appears with account mapping details for Workforce and Capital Planning.
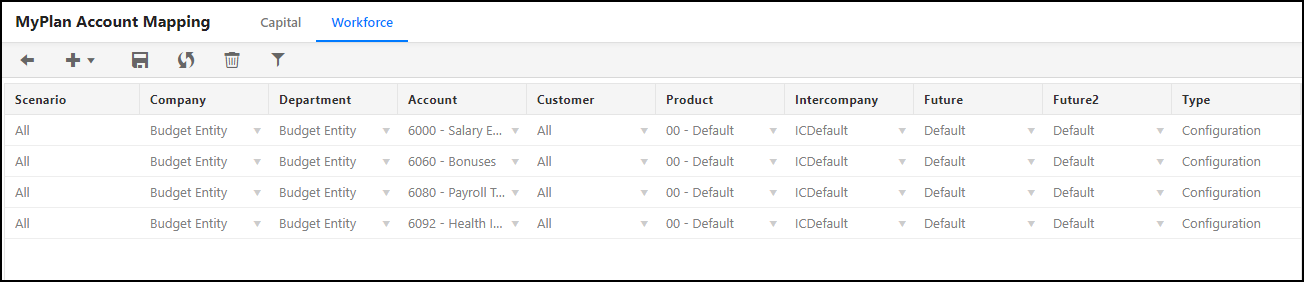
On this page, click the Workforce tab to view Workforce defined accounts or the Capital tab to view accounts specified during Finance Mode setup. Save the setup to activate these accounts. There are no additional configuration requirements needed. If a new compensation item is added with new accounts, for example, you must open and save this page as mentioned above. It is not updated automatically.
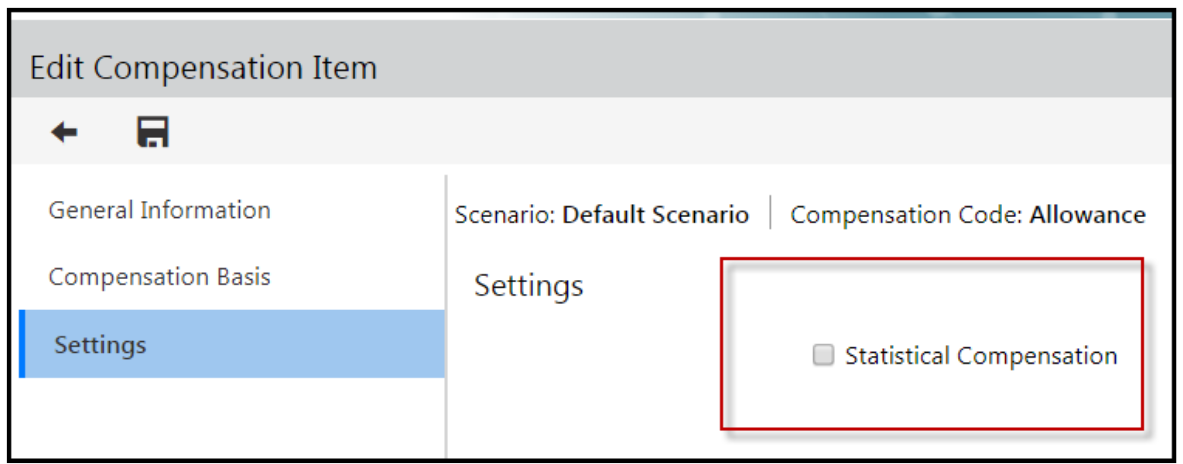
The data in the Workforce screen is populated from various sources. Using the screen above as an example, the scenarios displayed are mapped from the compensation items / accounts. Only statistical accounts are displayed. Accounts are identified as “statistical ” on the Add/Edit Compensation Item page. Access the Compensation Item Add/Edit screen by navigating to Maintenance > WFP > Workforce Planning Setup and click the Compensation Item tab. Edit or Add a compensation item. Statistical accounts must be selected for the compensation item account in the Settings tab as shown below.
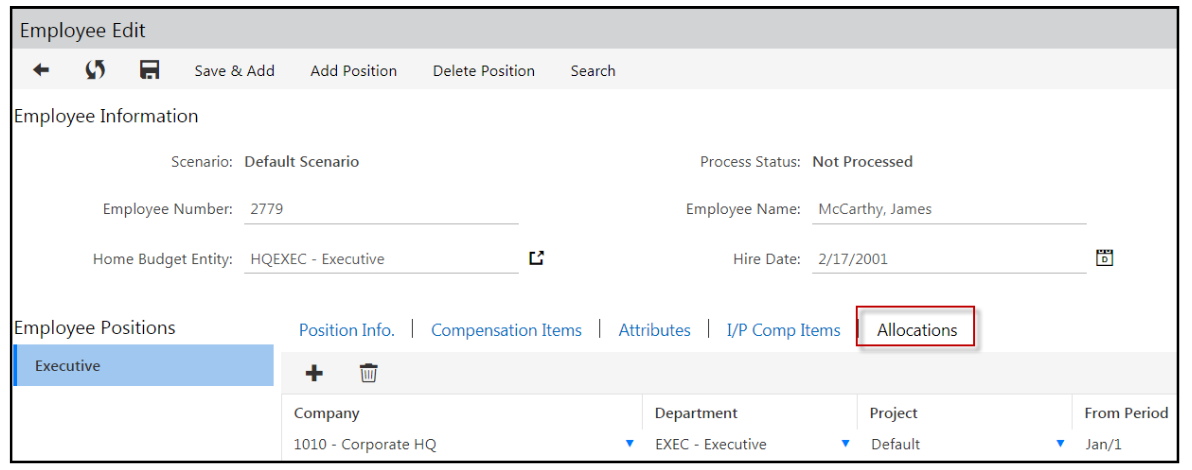
Fund1 and Location1 are populated based on Workforce Defaults (Workforce Defaults is accessed by navigating to Maintenance > WFP > Workforce Planning Setup > click the Workforce Defaults tab). Future, IC Segment, and Project segments are pulled from the employee allocations section (shown below) available when adding or editing an employee.
As mentioned earlier, the Capital screen is populated in full from defined Finance Modes.
Third Step- Security Setup
If you currently have the Planning application implemented, MyPlan uses the security you already have configured for users. This includes dimension security, scenario access, and entity and template security. However, if you do not have the Planning application security configured or want to make changes to security, see the information below. If you do not need this refresher information, please proceed to the next section called User Security Setup- Access to MyPlan Configurations.
Template and Entity Security Setup
Dimension Security Setup
MyPlan honors Dimension Security as applied to the Reporting area. Admins must make sure they copy Budget Entity Security to Report Security. The data displayed in MyPlan is filtered based on user privileges on the corresponding dimensions. MyPlan is enabled for the Financial and Workforce Planning Reporting Areas. So, all dimensions are available for those areas in addition to system-defined dimensions like Scenario, Time, and Measure.
To configure Dimension Security:
Navigate to Maintenance > Reports > Dimension Security.
Click the Dimension Security Configuration tab.
Select the Copy Scenario Security to Report Security checkbox when you want to apply scenario security (defined on the Scenario Access page) to report security so that each user has access to view specific scenarios in the Reporting module.
Select the Reporting Area to secure dimensions.
Selected the Financial Reporting area. A checkbox appears. Select the Copy Budget Entity Security to Report Security checkbox to allow the application to copy all budget entity security data to report security data.
Select the dimensions you want to secure by clicking the secure checkboxes. This activates dimension security so that you can apply it to users on the Dimension Security Setup page.
To apply Dimension Security to a User:
Click on the Dimension Security Setup page and then select a user.
Select the Reporting Area to select associated dimensions. Select the Financial option.
Once dimensions are displayed, select the dimension members that selected user should have access to from the hierarchy displayed in the right pane. Click Save.
Scenario Security Setup
Provide users with access to the scenarios you want them to view and edit in MyPlan.
To setup Scenario Security by User, please complete the following steps:
Access the Scenario Access page by navigating to Maintenance > Administration > User Management.
Select a User.
Click the More list box and select Scenario Access.
Select the checkbox next to the scenario you want the user to have access to. If you want the user to have access to all scenarios, select the Check All box.
Click Save to complete the setup.
To set up Scenario Security by Scenario, please complete the following steps:
Access the Scenario Access page by navigating to Maintenance > Admin > Scenario Setup.
Select a scenario and click the More listbox then select User Access.
Select the checkbox next to the users you want to have access to the selected scenario.
Click Save to complete the setup.
Entity and Template Security Setup
Templates must be mapped to scenarios and entities so that users can access them in MyPlan. Remember the goal is to have templates specific for MyPlan Only users. The below step is a refresher on how to map new templates to budget entities, secured by scenarios.
To map a template to a scenario:
Navigate to Maintenance > Templates > Template Setup.
Select the scenario you want to map the template to.
Click the Mappings list-box and select Template Mapping.
On the Template Mapping page, select the MyPlan only templates you want to add to the scenario and click Save.
Note:Scenarios must be forwarded to make them available for template mapping.
To map a template to an entity:
Navigate to Maintenance > Templates > Template Setup.
Select the Scenario.
Click the Mappings list-box and select Entity Mapping.
Select the template you want to map on the Entity Mapping page.
Select the entities you want to map the template to in the left pane, click the forward arrow, and the entity will display in the right pane called Mapped Entities.
Click Save.
User Security Setup
Access to MyPlan Configurations
MyPlan is directly integrated with Navigation Access. A new option called MyPlan has been added to the Navigation Access screen. Currently Navigation Roles will still apply with the usage of MyPlan. Admins must determine what users within their current Navigation Roles should have access to both MyPlan and the rest of the Planning application for data input. These types of users are called Contributor Users. If users only have access to MyPlan for data input, these users are called MyPlan Only users. If admins only want to give users access to MyPlan Only, they have the option of creating a new navigation role specific for MyPlan Only users. The steps listed below will first assume that you are giving access to Contributor Users (both Planning and MyPlan users), and secondly will address setting my MyPlan Only Users.
Complete the following steps to setup MyPlan security for Contributor Users:
Navigate to Maintenance > User Management > Navigation Role.
Select a power user role. In the screenshot below Budget Administrator is selected. Click Navigation Access.

After clicking on the selected navigation role, drill down (click the arrow) on the Budget selection. You will see the new selection called MyPlan. Check this box.
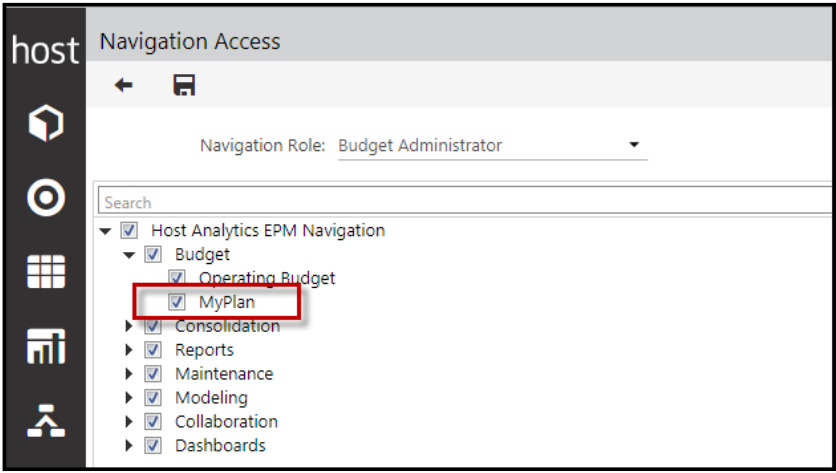
Next, click Save. Repeat the above steps for all navigation roles that need access to both MyPlan and the Planning application for data input. Remember this combination is called a Contributor User. For Contributor Users, both the Operating Budget and the MyPlan options must be selected.
Complete the following steps to setup MyPlan Only user security:
Navigate to Maintenance > User Management > Navigation Role.
Create a new Navigation Role by clicking the + sign.
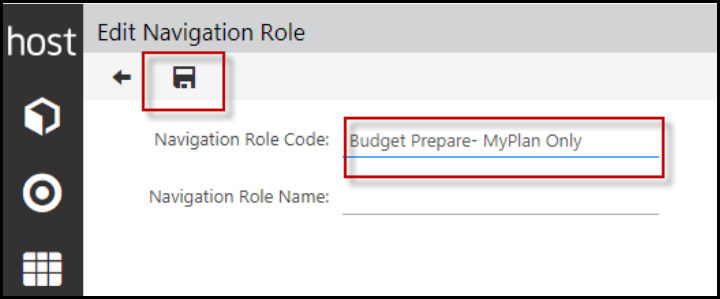
Add a code for the new navigation role. Ideally it should be something that ends in MyPlan Only. In the below screenshot Budget Preparer- MyPlan Only is the navigation role code. The navigation role name is optional.
Click Save.
Next, select the newly created navigation role and complete all the access needed for this role. When you come to the Budget selection, select MyPlan. Do not select the Operating Budget option. For MyPlan Only users, the MyPlan option should be the only option selected under the Budget Section.
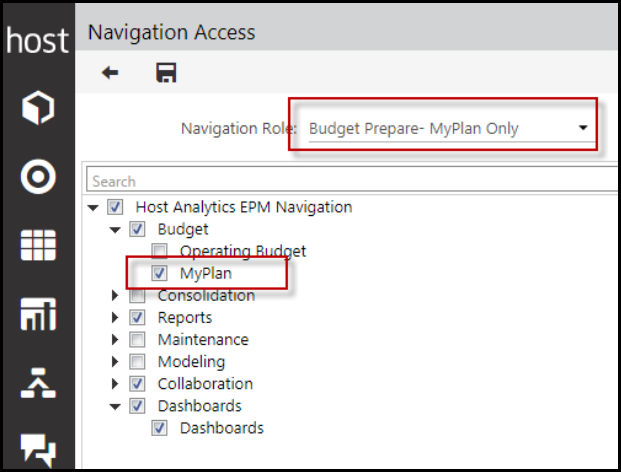
Click Save.
Fourth Step- MyPlan Configuration Setup
Within MyPlan you can have multiple configurations. Configuration of MyPlan must be done by the administrator of the Planning application. When you configure the MyPlan interface, you can have up to 3 sections. You can have all 3 sections with data values, all 3 sections with charts/dashboard values, mix and match sections, two sections only, .two sections with data values, two sections with charts, or mix and match. You can also have only 1 section.
It is a best practice to have 1 chart pane and 2 data panes. Having too many panes will prevent an optimal display of data. Configuring only 1 pane is a poor use of space.
It is a best practice to have Section 1 display charts and graphs and sections 2 and 3 display data.
First, you must configure sections in order to save the configuration.
When it comes to users, admins must map users to MyPlan configurations.
Budget Entity Access and Locking
MyPlan allows only one user at a time to work within a budget entity. This is similar to the Planning application. If a user is editing an entity and a different user goes into that same entity, the entity will be available in read only mode (all action buttons will be greyed out/disabled). Similarly, If the entity is in a forwarded state, the scenario is locked, or the template is in a forwarded state, the action buttons will be greyed out/disabled.
MyPlan Configuration
The goal of MyPlan is to have an Input scenario and then a Compare scenario for users to measure against. Please see the above MyPlan descriptions for additional information on this topic. It is important that each configuration has a unique scenario that users will be inputting data against and comparing against. The Compare scenario should a Plan, Budget or a Target.
Creating a MyPlan Configuration
From the planning application, navigate to Maintenance > Admin > MyPlan Configuration. The Configurations page is displayed.
The left pane displays current configurations. There are options to:
Select all configurations (you can also select one at a time)
Delete a selected configuration or all configurations
Add a configuration.
Sort configurations alphanumerically
Copy a selected configuration
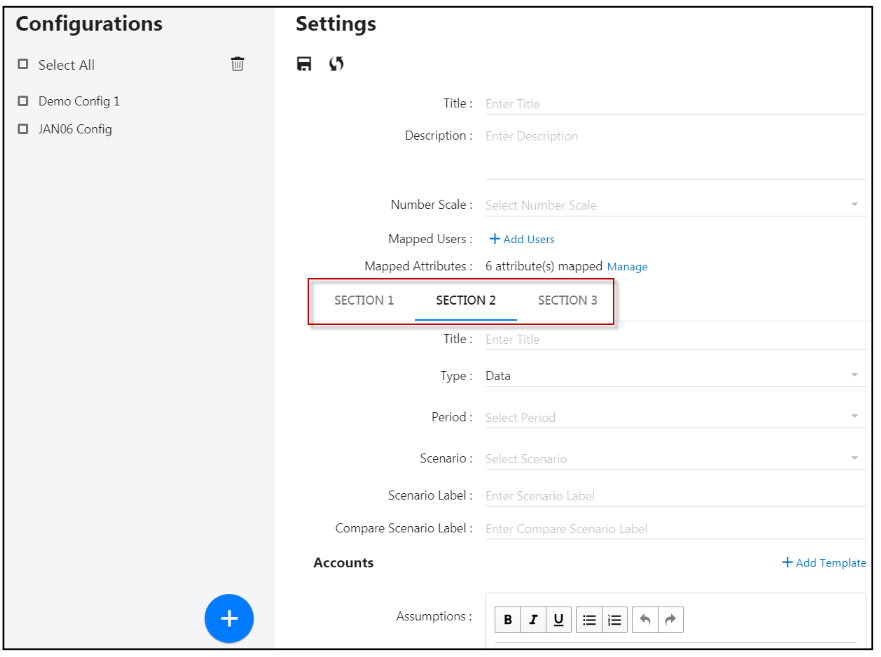
Click the blue Add button to add a new configuration.
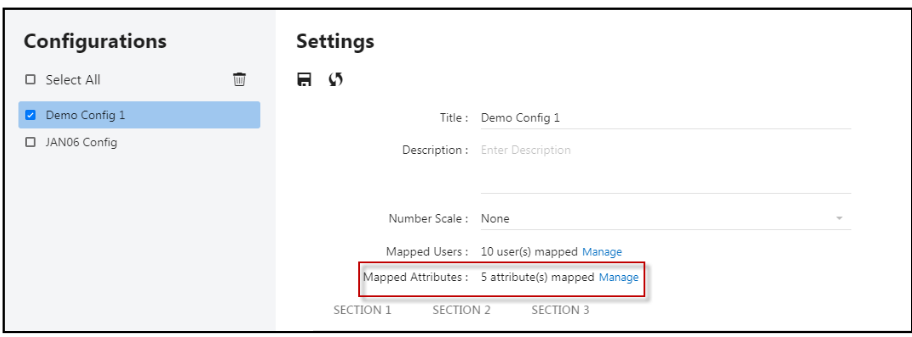
Once you click the Add button, the Settings pane is displayed as shown below. Add sections as needed. Each Section can be configured to display dashboards or data in any order and any combination. For example, Section 1 might display dashboards and Sections 2 and 3 may display data. Or, all 3 sections might display data. When a Section is selected, it is underlined with blue. For more information, see Dissecting the MyPlan Interface in the MyPlan End-User Guide.
Navigate to the Title field at the top of the Configuration page and Enter a Name for the new MyPlan configuration.
Next, Enter a Description for the configuration. Spell checker automatically looks for spelling errors as you enter description information.
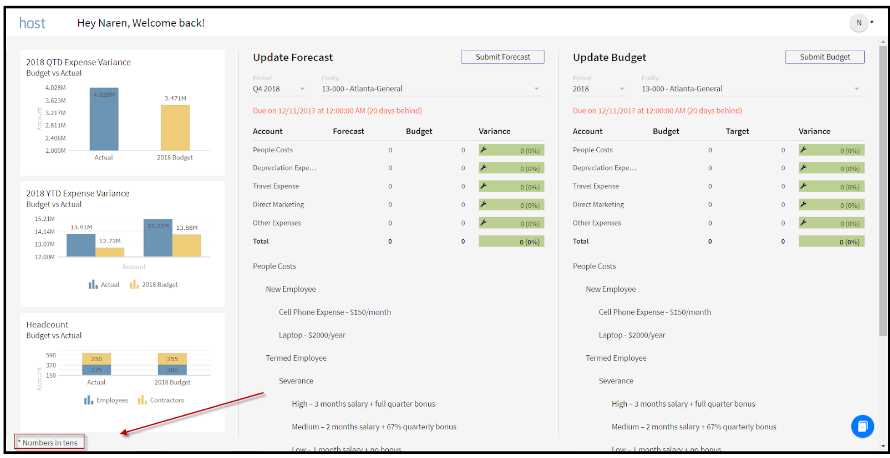
Navigate to Number Scale. For Number Scaling you have many options. Number scaling is applied per section. You can select a different number scale for each section. In the example below, Tens is selected. There is a note in MyPlan that lets the user know the scaled number selection. If no scaling is selected, there will be no note.
To add users to the configuration, click on the Mapped Users, Manage link. When you click Manage, the Map User page opens as shown below.
Search for users or scroll up and down to find users you want to map to the configuration. Only the Contributor and MyPlan Only users will be available for selection. You can add a user to multiple MyPlan configurations. See, Adding a User to Multiple Configurations.

The next item, Mapped Attributes is directly tied to the CapEx Module configuration. This is where you have to choose which attributes you would like the users to input data against when they choose the Add Asset action in MyPlan.
Click Manage in the Mapped Attributes section and the attributes you configured appear.
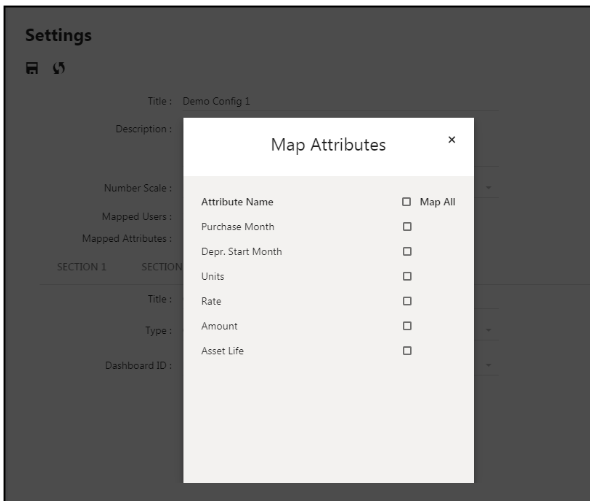
Select the attributes that you would like the users to input data against when they are entering new assets. In the below screenshot the following selections are made: Purchase Month, Depr. Start Month, Units, Rate, and Amount.
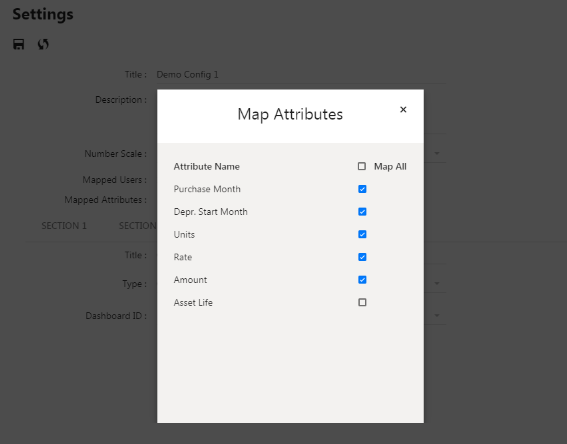
Click X to close the window. It is a best practice to test this configuration before you roll this out to users to make sure users do not select non-essential information.
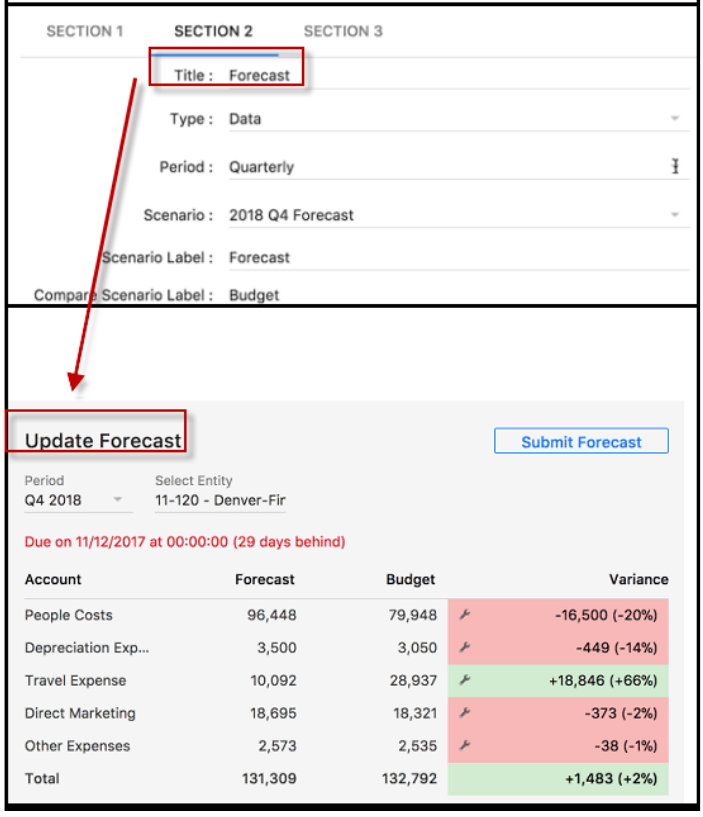
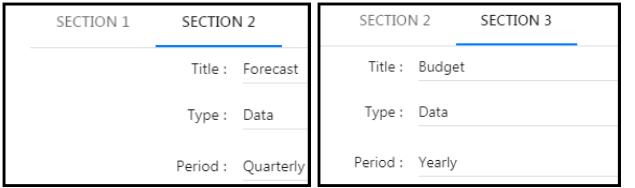
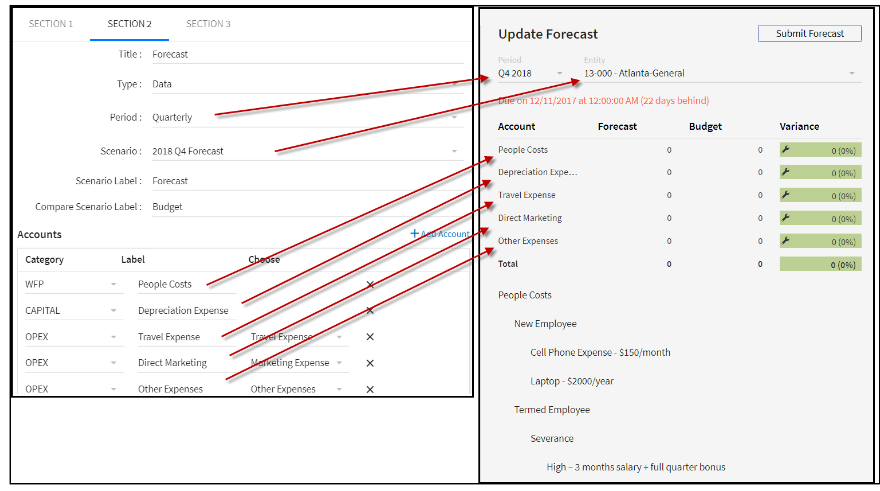
Next, for each section, enter a title to be displayed in the corresponding MyPlan section. In the example below, the title for Section 2 is Forecast and it is displayed in Section 2 of MyPlan.
For Type, you can either select Chart or Data. If you select Chart, you will be prompted to select a dashboard to display. Dashboards are created in the Dashboards application. A list of available dashboards is populated based on the dashboards created in the Dashboard application. There are specific requirements and best practices to create dashboards for MyPlan. See How to Create Dashboards for MyPlan.
If you select Data for Type, you’ll be prompted to select how you want period data displayed. The options available are Year and Quarter. In the example below, Quarterly is selected for section 2 and displays accordingly in pane 2 of MyPlan. Yearly is selected for section 3 and displays accordingly in pane 3 of MyPlan.
Data populated in a section is specific to the quarter or year selected. The number of quarters or years available for selection within MyPlan, is based on scenario periods and the number of budget input years defined when the budget configurations tasks were completed.
For example purposes, the following selections are made:
Section 2- Type = Data and Period = Quarterly
Section 3 - Type = Data and Period = Yearly
In Section 2, select the Scenario Label field and enter a name for the selected scenario. You can either choose to keep the original scenario name or name it something more user-friendly. In this example the scenario is named Forecast in section 2 (shown below).
Select the Compare Scenario Label field and enter a name for the selected scenario. You can either choose to keep the original scenario name or name it something more user-friendly. In this example the scenario is named Budget (shown below).
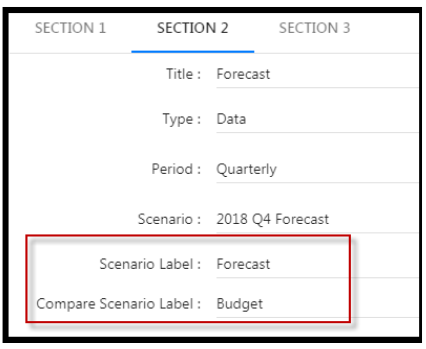 Note:The labels become the column names in MyPlan as shown below. The maximum number of characters per label is 12. Any additional characters will be truncated. Compare Scenario label and Scenario label cannot be the same (because they should be two different sets of data). In a future release you will be able to hover over a label to display the actual scenario name, even though you created an alias.
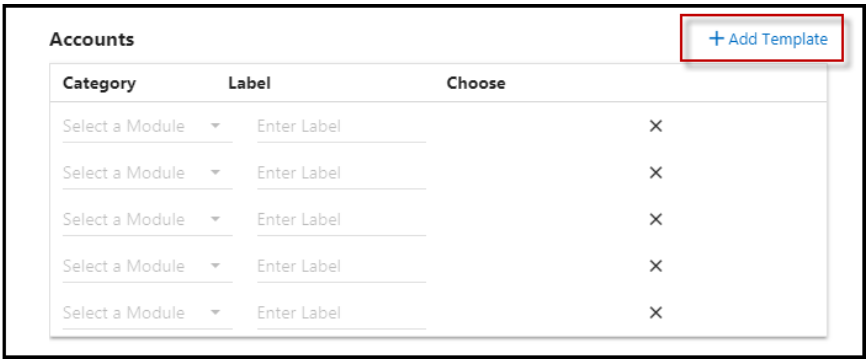
Now, you will connect the MyPlan Only templates, Workforce Planning and Capital Module. Click the +Add Template link once, to start the process of configuring templates and modules to the configuration.
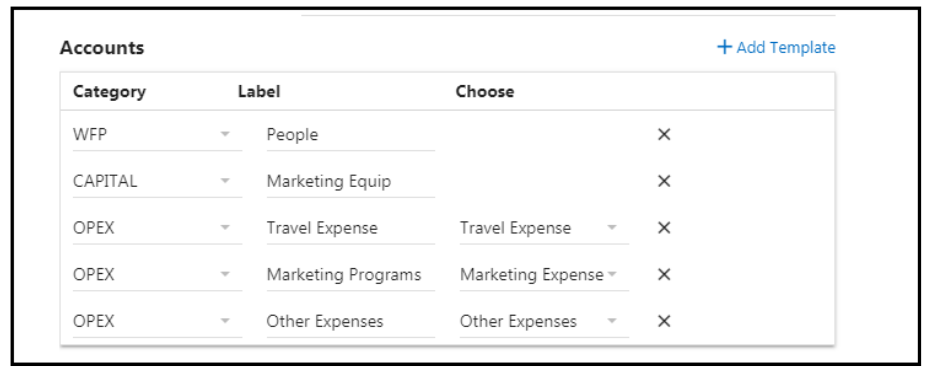
Once you have added a template line, three options will appear; Category, Label and Choose.
Category - provides you with the option to select a template or a module. All template selections are under the Opex category.
Label - provides you with the ability to apply a different template or module name/alias.
Choose - only applies to template. When you select the Opex category, you have to use this option to select the templates you would like connected to this line.
Note:It is a best practice to display no more than 5 templates per section. Additional categories may impact performance. It is best practice to configure 1 WFP module, 1 Capital module and multiple MyPlan Only planning templates. You can display each category in any sequence.
Click the +Add Template selection 5 times, this should bring in 5 total lines.
Click the Category drop down box (Select a Module) on the first line and select WFP.
Click in the Enter Label field and name it anything you like. In this example it is named People.
Click the Category drop down box (Select a Module) on the second line and select Capital.
Click in the Enter Label field and name it anything you like. In this examples it is named Marketing Equip because this configuration is built for the Marketing team.
Click the Category drop down box (Select a Module) on the third line and select Opex.
Click in the Enter Label field and name it anything you like (based on what template you will be connecting to this line). In this example, it is named Travel Expense.
Now, attach the Travel Expense MyPlan Only template from the Planning application to this line.
Navigate to the Choose selection, click the drop down, and select the Travel Expense template.
Repeat steps 21 through 24 for the fourth and fifth line, as shown in the below screenshot. This lines should be any additional open MyPlan Only templates you want to connect.
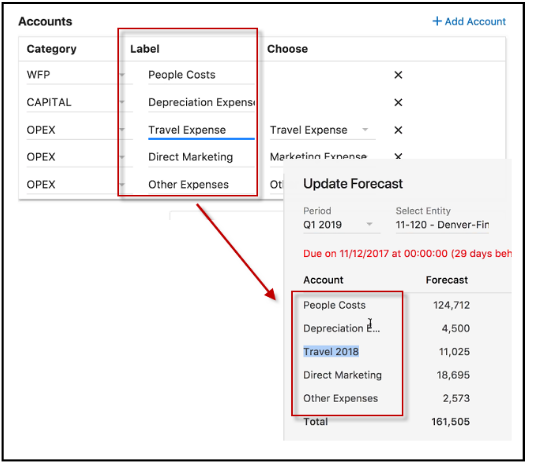
 Note:Any templates mapped to the scenario in the Planning application, will be displayed for selection under the Opex Category in MyPlan. This can vary by pane. If you change the scenario, the templates available for selection will be different depending upon those templates mapped to the newly selected scenario.
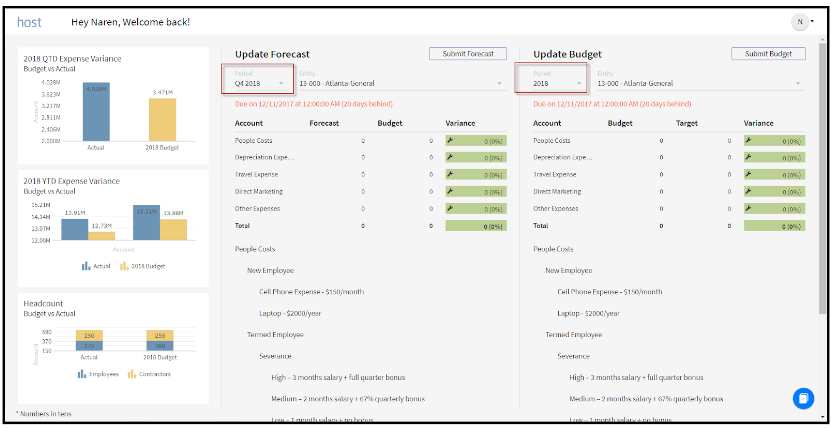
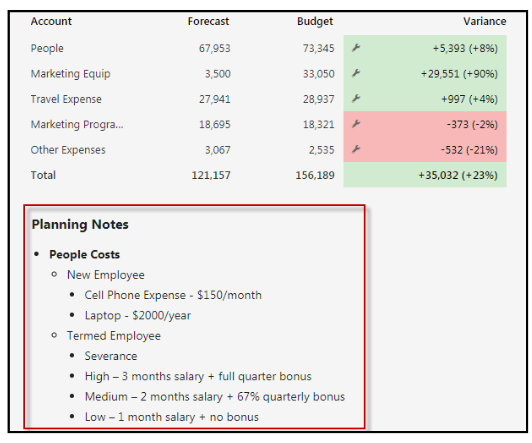
In the example below, you can see how the Configuration correlates to MyPlan output.
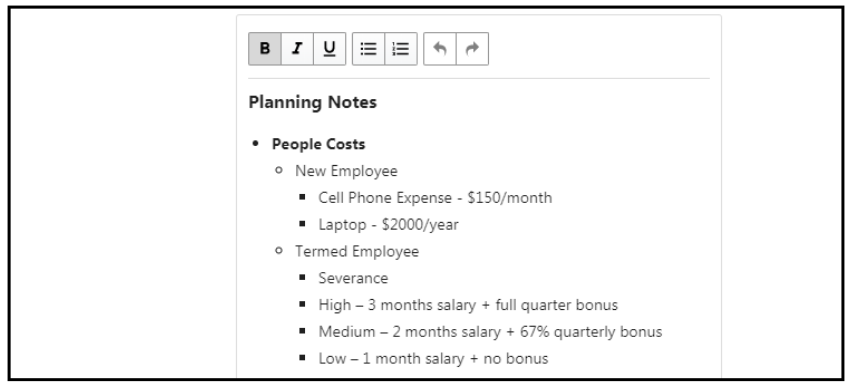
In the Planning Notes section shown below, use the text editor to enter notes displayed for users concerning important updates and messages related to the forecasting or budgeting process. Notes appear below the categories in the interface.
For this example, complete Section 1 with a dashboard chart (up to 3 charts are allowed and more information on this is provided in the How to create Dashboard for MyPlan section). Complete Section 3 with additional data elements (the configuration options are the same as those configured for Section 2 but you would use the budget or a different scenario based on your user needs and information you are trying to collect).
Note:As of now you have to configure all three panels in order to Save the configuration.
Adding a User to Multiple Configurations
Add a user to multiple MyPlan configurations and set different configurations for different scenarios, which will allow additional flexibility with how data, graphs or charts are displayed. Having multiple configurations allows you to produce “what if” analyses for the same scenario. For example, an Admin user creates 2 configuration profiles for the Forecast 2018 scenario, (Forecast 2018 A and Forecast 2018 B) and gives a user access to both configurations. Now, that user can perform a different set of actions in one configuration independently of the actions performed in the other configuration; providing the user with insight to different forecasted outcomes.
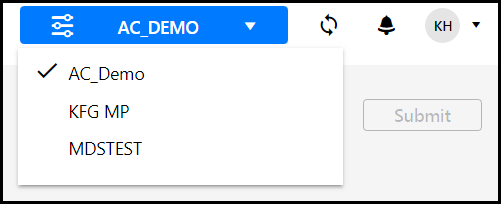
Users with access to multiple MyPlan configurations can swap between them in the MyPlan dashboard. Click the list-box shown below, to select a configuration.
Note:
Since all MyPlan Actions are stored in-memory, all actions performed will be retained even when switching back and forth between profiles.
In Practice: How to Add a User to Multiple Configurations
Navigate to Maintenance > Overview > MyPlan Configuration.
Select a configuration under the Configurations pane.
Under Mapped Users, click Manage and add the user.
Click Save.
Continue to add the user to other configurations.
MyPlan Account Configuration
Data available in a user's MyPlan is displayed based on account segments and mapped segments such as expenses mapped to assets. See the MyPlan Account Mapping topic for information on a comprehensive look at accounts used in the generation of MyPlan data.
MyPlan Configurations Sort & Copy
Sort and Copy MyPlan configurations. The Sort feature allows you to view configurations in ascending or descending alphanumeric order. The Copy feature saves time when creating new configurations as you can copy an existing configuration and make changes to the copied configuration.
In Practice: Sort
To sort configurations, access the MyPlan Configurations page by navigating to Maintenance > Admin > MyPlan Configuration.
Configurations are displayed in the left pane.
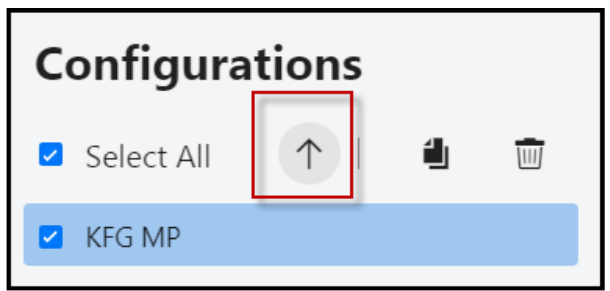
Click the up or down arrow (shown in the image below) to sort the list of configurations in ascending or descending alphanumerical order.
In Practice: Copy
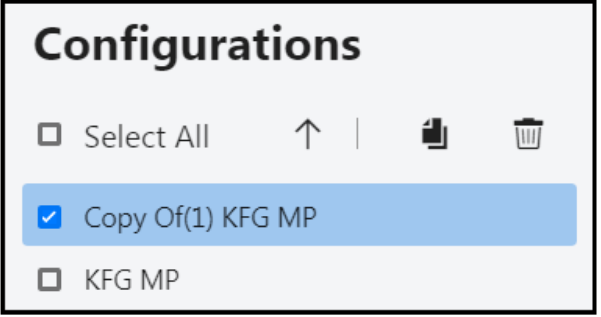
Select a configuration from the Configurations list by selecting the checkbox.
Click the Copy button.
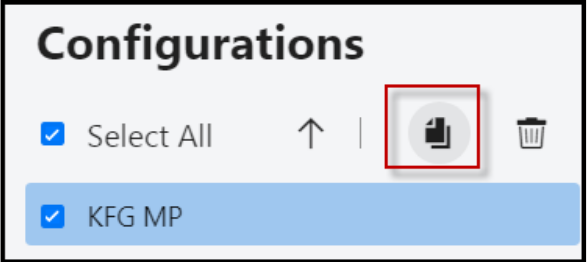
A copy of the configuration is made and a message is displayed. Open the copied configuration, and edit as needed.
Note:
Mapped users are NOT copied from source to target configurations.
Was this article helpful?