- 17 Minutes to read
- Print
- DarkLight
- PDF
Planning/Consolidation/Reporting Winter16 Release
- 17 Minutes to read
- Print
- DarkLight
- PDF
This document describes new features and enhancements for this Winter'16 release. All currently known and resolved issues can be viewed in the Host Analytics Knowledge Base. (Access requires user authentication.)
New Features and Enhancements
Process Reporting Area
The processing of scenarios and dimensions for configured reporting areas is now available via the Process Reporting Area page. (Previously this functionality was named Process Cube & Dimension.) Always perform full processing of the cube and associated dimensions whenever you have significant metadata changes (e.g., reorganization, company merger, etc.) or large data loads (e.g., new history year, more detailed data, etc.).
Dynamic Dimension Security
A tool has been provided with this release which significantly improves system performance — particularly in regards to the running of reports — when dynamic dimension security is configured.
This tool enables dimension security for existing or new applications.
Contact Host Analytics Support for more information.
Application Notes
If dimension security is turned on, but user access is not provided for the respective dimensions, the following message will appear across all the screens where the dimension tree is exposed in the application when member selection is made on any dimension:
"You are not authorized to access the Reporting Area.
Contact your System Administrator.”
If access is provided to the user on the main hierarchy, access to the corresponding leaf members in the alternate hierarchy is automatic if dimension security is turned on. Alternate hierarchies have automatic permissions if copy budget entity security is turned on for both [new] and Role 2005 [old].
If access is provided to the user on a member within the main hierarchy, access is automatic to view the calculated members that are defined using the member on which the access is turned on in the dimension tree. However, the data calculation is displayed in the report for calculated members only if the user has access to all the members that are used in the calculated member rule. If the user does not have access to at least one member applied on the rule, the report is run successfully and an empty line is returned for the calculated line. This behavior is applicable only if dimension security is turned on.
If all attributes are selected, it applies only to those dimensions for which attributes are mapped and ignores the ones which are not mapped.
Hierarchy Management UI Enhacement
The Hierarchy Management UI has been enhanced for Budget Hierarchies. Navigation is faster and supports larger number of members. You can now navigate through the hierarchy:
Using the tree structure in the left pane;
Searching for the member in search mode;
Clicking the "bread crumb" links at the top of the page.
Additional features include show/hide, search, locking, preview, save/save & publish, usage reports, and adding a new member.
New Options in Add User Screen
Two new options have been added to the Maintenance > UserManagement > Add User screen: Disable User Login and Disable Password Expiry Check. Typically these settings are selected for user accounts which are created to perform back-end tasks such as DLR loads, Cloud Scheduler jobs, etc.
Disable User Login — Login to user account will not be allowed from main browser window.
Disable Password Expiry Check — Normal password expiry policy is not applicable for this user.
Export Data .xlsx Support
Export data option now supports exporting data in Excel .xslx file format. By default, the existing configurations will continue to have .xls format and you can change this setting as required.

Export Data, .xlsx Format
.xlsx File Support for DLRs
.xlsx file load types are now supported for DLRs. Because the .xlsx files do not store regional settings in the file definition, these settings must defined for the user account via Maintenance > My Settings > General.
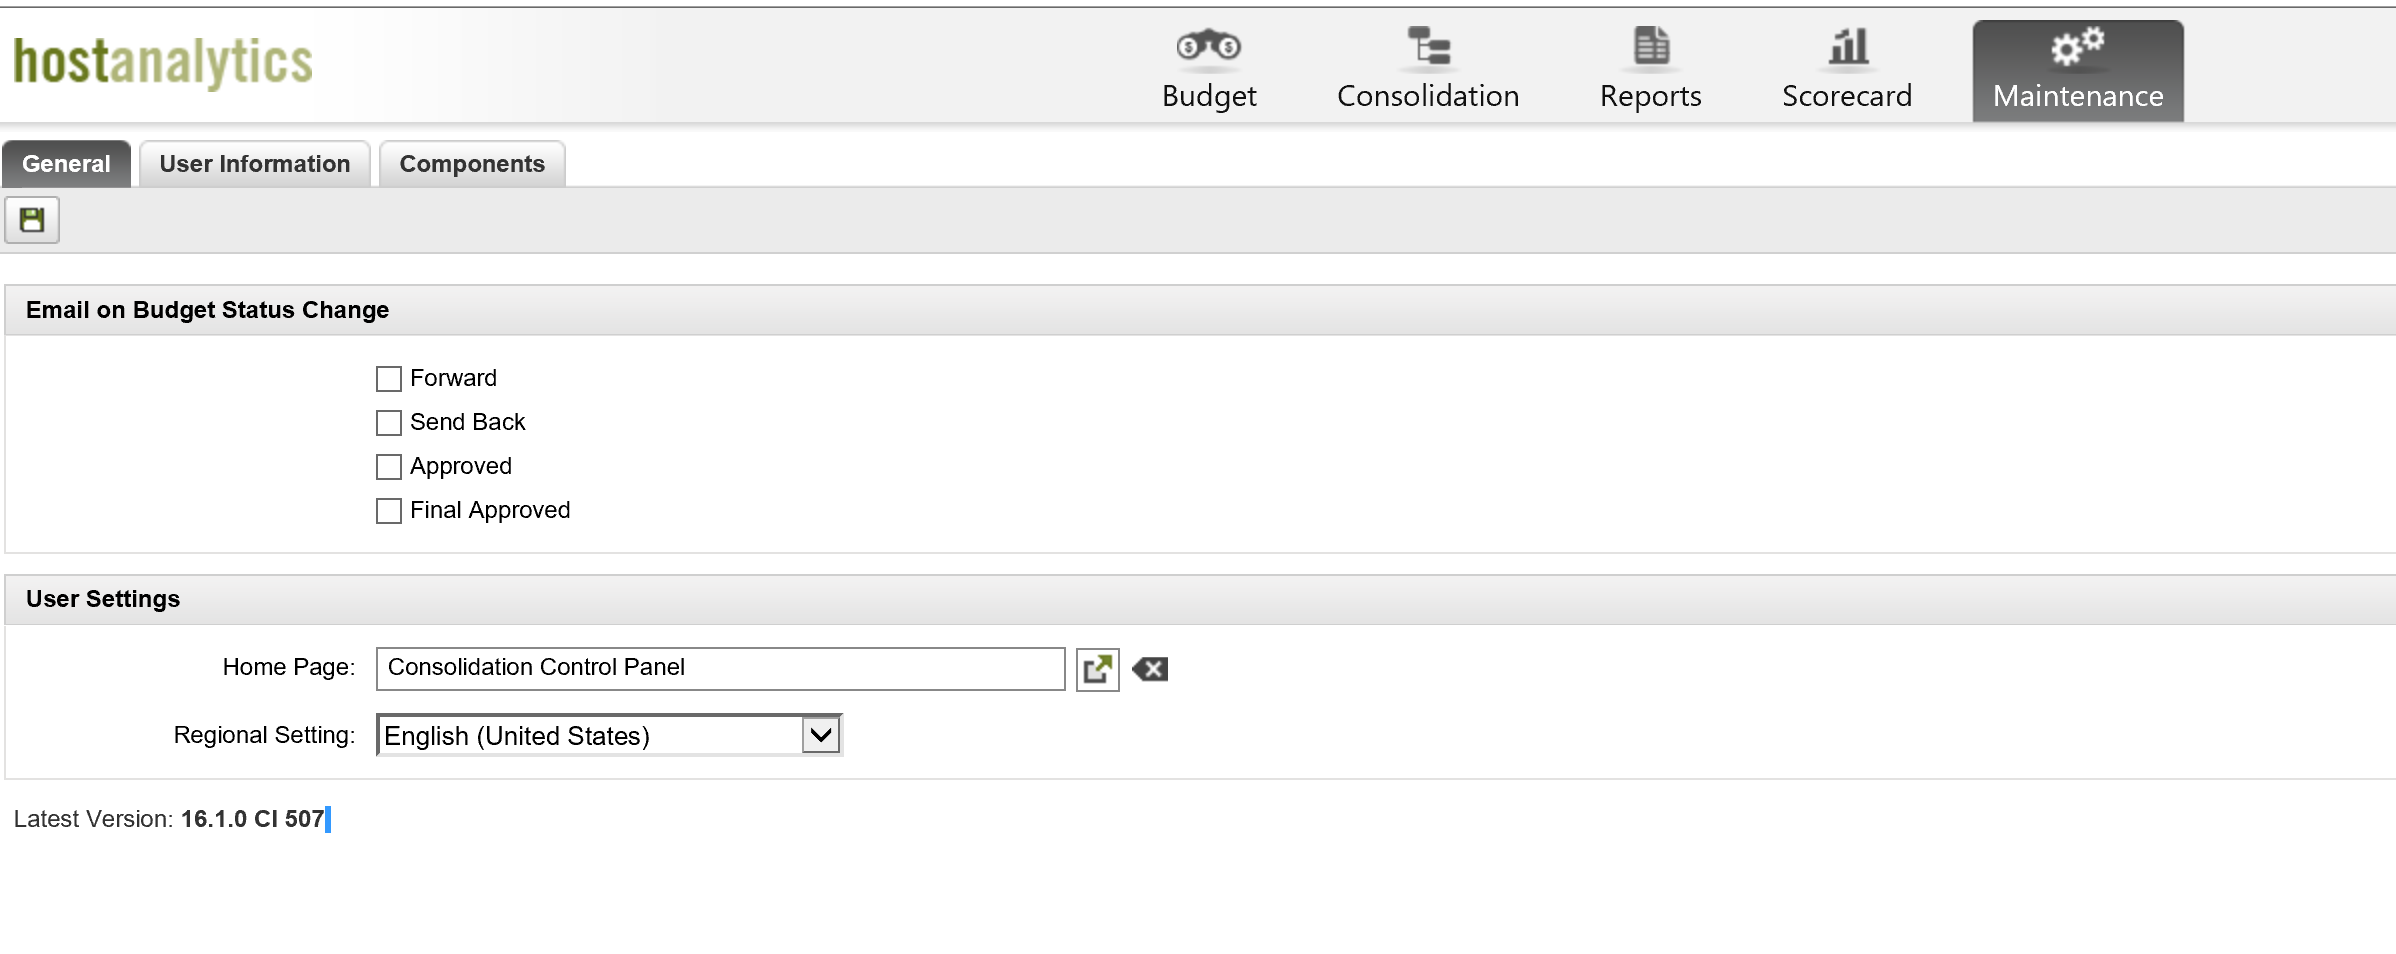
Regional Setting for .xlsx File
The date and decimal formatting of the data within DLRs are read based on the regional settings of the user. By default this setting is set to English (United States).
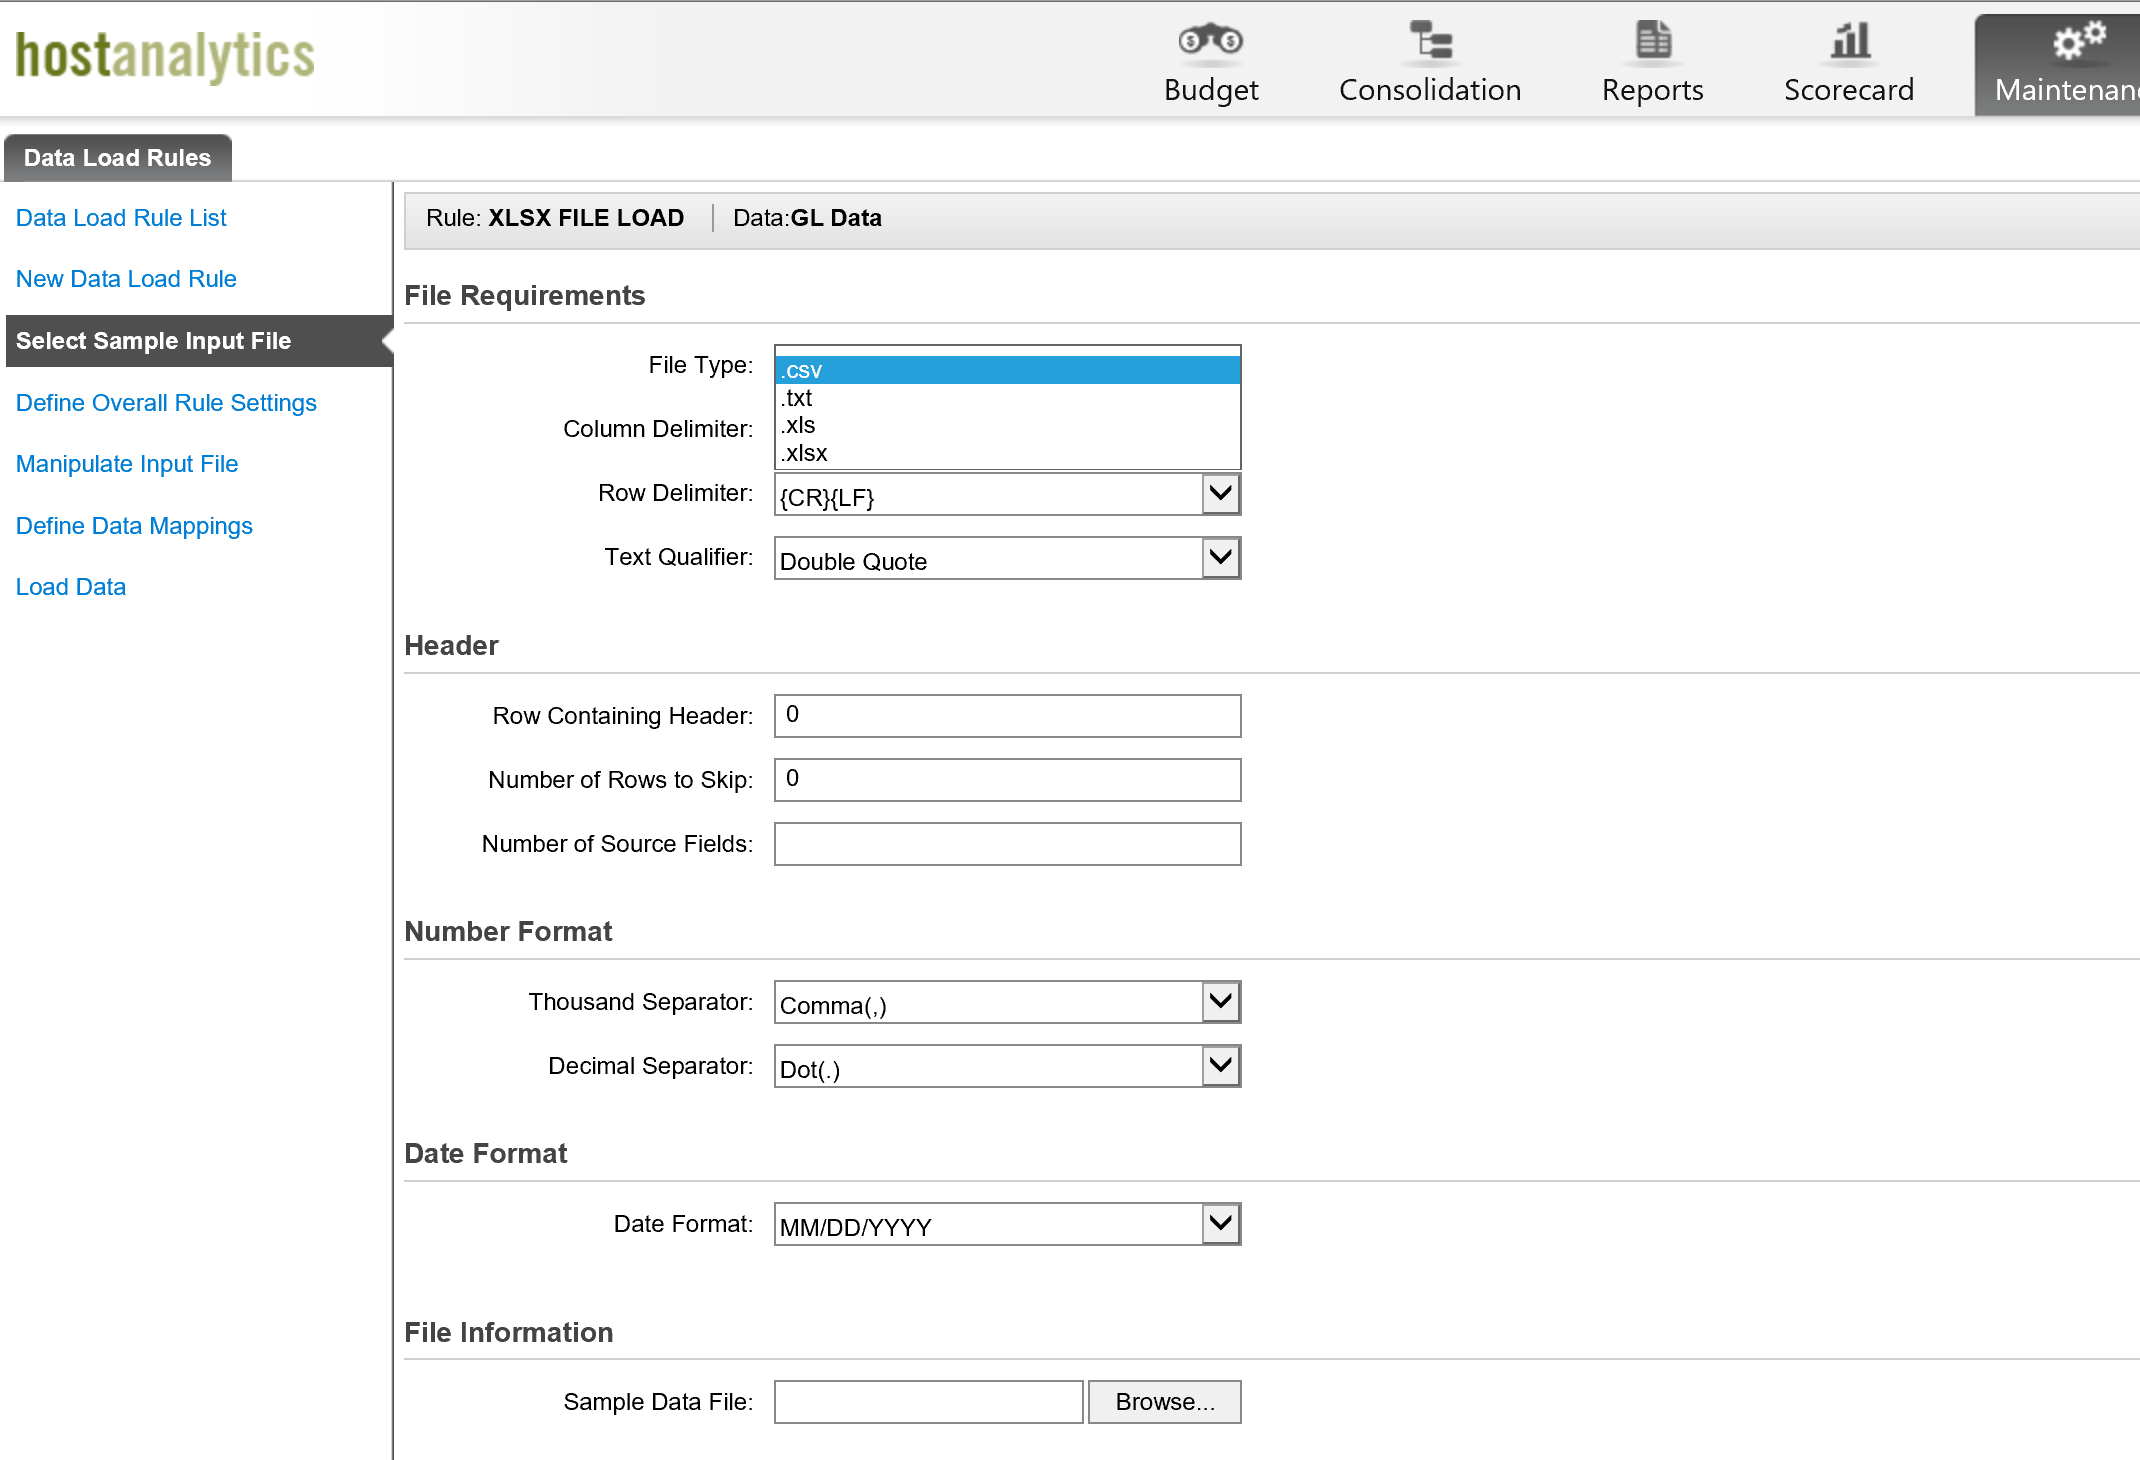
DLR .xlsx File Selection
Audit Log Archiving
The option the archive the audit log is now available. You can archive previous audit log records, and keep the current log for three to four months. To launch the Application Audit Details screen, from which you can configure audit log archiving, click Maintenance > ApplicationAudit > View Audit Log.
Translation Lines Enhancement
The Translation Lines screen has been enhanced with options to insert data, replace existing data, etc. To access the translation lines screen for a given translation code source/target, click Maintenance > Data Integration > Translations Setup, then click Translation Lines. Insert or replace data as required.

Translation Lines Screen
Customer Community Access - Multiple Environments
You can access the Customer Community portal from within the application (via the Community link under User options), directly navigating to the Community URL, or via links in emails, and then authenticating your access using your application credentials.
Previously, issues were encountered if the URL was not https://cpm.hostanalytics.com. Now, you will be directed to a page where you can select the URL you are using for your Host application access.
For example, users on https://EPM01.hostanalytics.com or https://traininghostanalytics.com can choose the specific URL to authenticate their host credentials.
Copy/Paste type DLRs
The removal date for the conversion of Copy/Paste type DLRs to File Load type DLRs has been extended. It is highly recommended that you convert existing DLRs as soon as possible.
Additional API Operators
The APIs in back end operation now support the operators Not In and In for filtering of segment members. This enhances the way in which APIs can be used to place additional conditions in the importing or extraction of data.
Cube Process Enhancement
Cube process is now executed for enhanced load balancing and performance. This allows the user’s machine to transparently perform other tasks — report queries, simulations, consolidations, etc. — while the cube process is running, with no significant reduction in performance. An email message is sent to the user once the cube process is complete.
Sales Calculations and Sales Data Transfer Enhancement
Sales calculations and the sales data transfer processes — e.g., task scheduling, queuing — are now executed for enhanced reliability and stability. Schedule information is available via the Job Manager.
Business Analytics, ExportData, HR Indexing Ehanacement
Business Analytics (e.g., create space, update space, folder creation, etc.), Export Data, and HR indexing are now executed for enhanced reliability and stability. Schedule information is available via the Job Manager.
Column Configuration for Drill-Through Reports
The order listing of columns (i.e., attributes) in a drill-through dynamic report can be configured via the Maintenance > Data Integration > Transaction Details screen.
To move an attribute, highlight its row and then use the up and down arrows to move it to the position where you want it to appear. In Figures 1 and 2, below, Department is moved from first to second position. It then appears as the second column in the drill-through dynamic report, as shown in Figure 3.
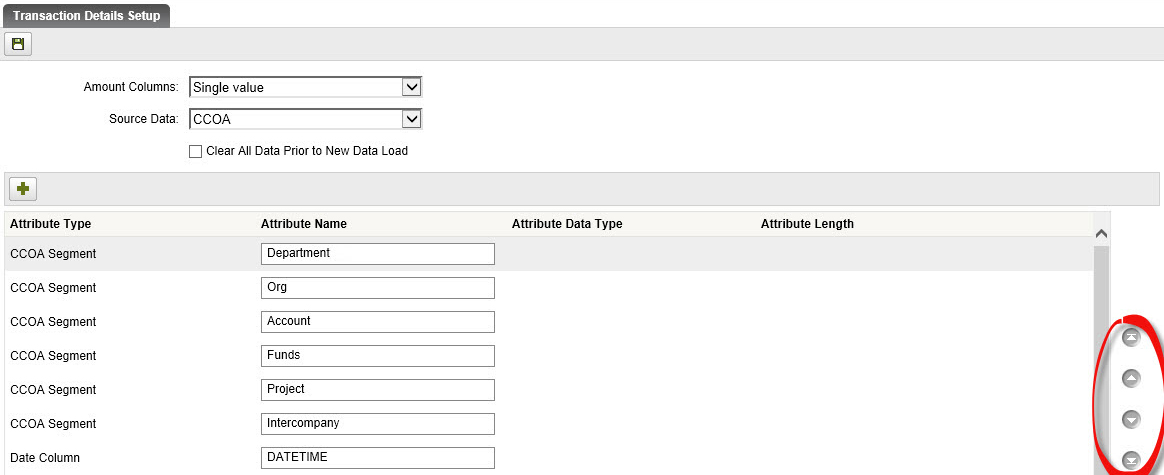
Figure 2. Transaction Details Setup, with Department Attribute in First Position
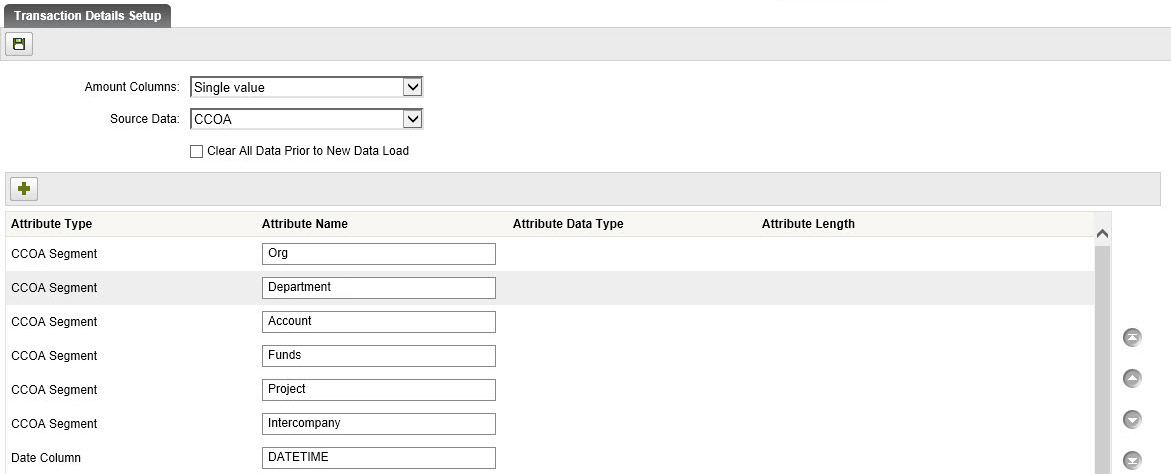
Figure 1. Transaction Details Setup, with Department Attribute Moved to Second Position
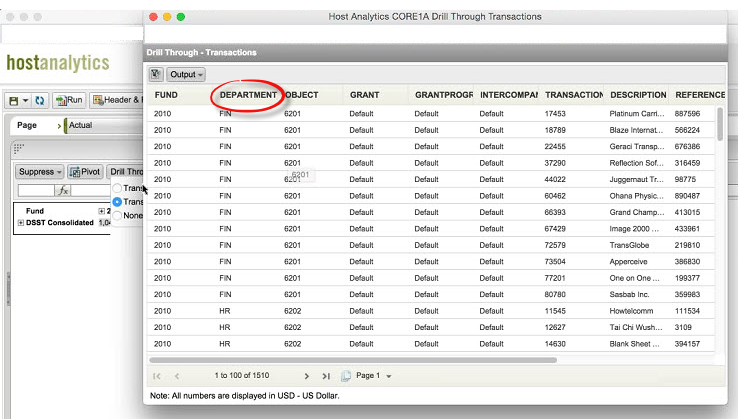
Figure 3. Department in Second Position in Drill-Through Transaction
Non-U.S. Local Support for New Cross Browser Template Grid
The new cross browser template grid has been enhanced to support the non-U.S. local numbering formats. Tests have been concluded for U.S., Japanese, Simplified Chinese, and German cultures.
Budget Entity Approval Workflow E-mail Enhancement
The budget entity approval workflow e-mail has been updated to the new standard Host Analytics e-mail format. The new e-mail notification now includes the plan's Scenario information on the approval notification.
New Employee Load APIs
The following new employee load APIs are now available to support loading multiple employee positions to budget, forecast, or default scenarios:
Load Employees — Load multiple employee positions through the employee data load. Can also load notes for each employee position, up to 4,000 characters;
Delete Employees — Delete employee positions for scenario, budget entities, and employees;
Get Employees — Retrieve employee positions for scenario, budget entities, and employees.
Each API requires a login name LoginName, password password, and tenant code TenantCode as parameters for a valid Host application user. An UnAuthorized exception appears for invalid users.
Airlift XL Login Application URL
Airlift XL now uses the application URL for login.
Previously, if you tried to login with the API URL in the Horizon URL entry field (e.g., https://sandbox.hostanalytics.com or https://cpm.hostanalytics.com), an error message would appear
Now, the Horizon URL entry field has been changed to Application URL, and you can enter the application URL instead of the API URL.
The AirliftXL Build can be downloaded from the Support portal.
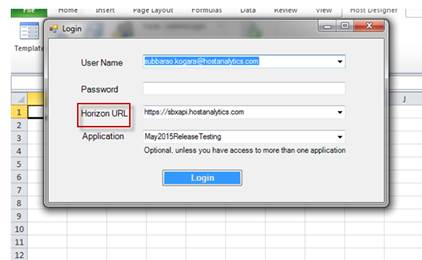
Previous Airlift XL Login Screen
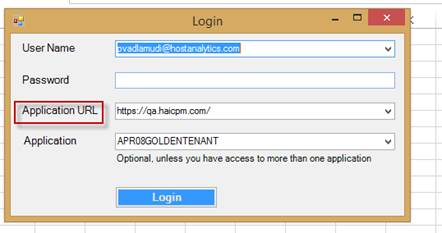
New Airlift XL Login Screen
Dynamic Report UI Enhancements
The following updates have been made to the dynamic report screens illustrated below.
Remove Dimenion
Click remove icon [X] to remove dimension from the layout area.
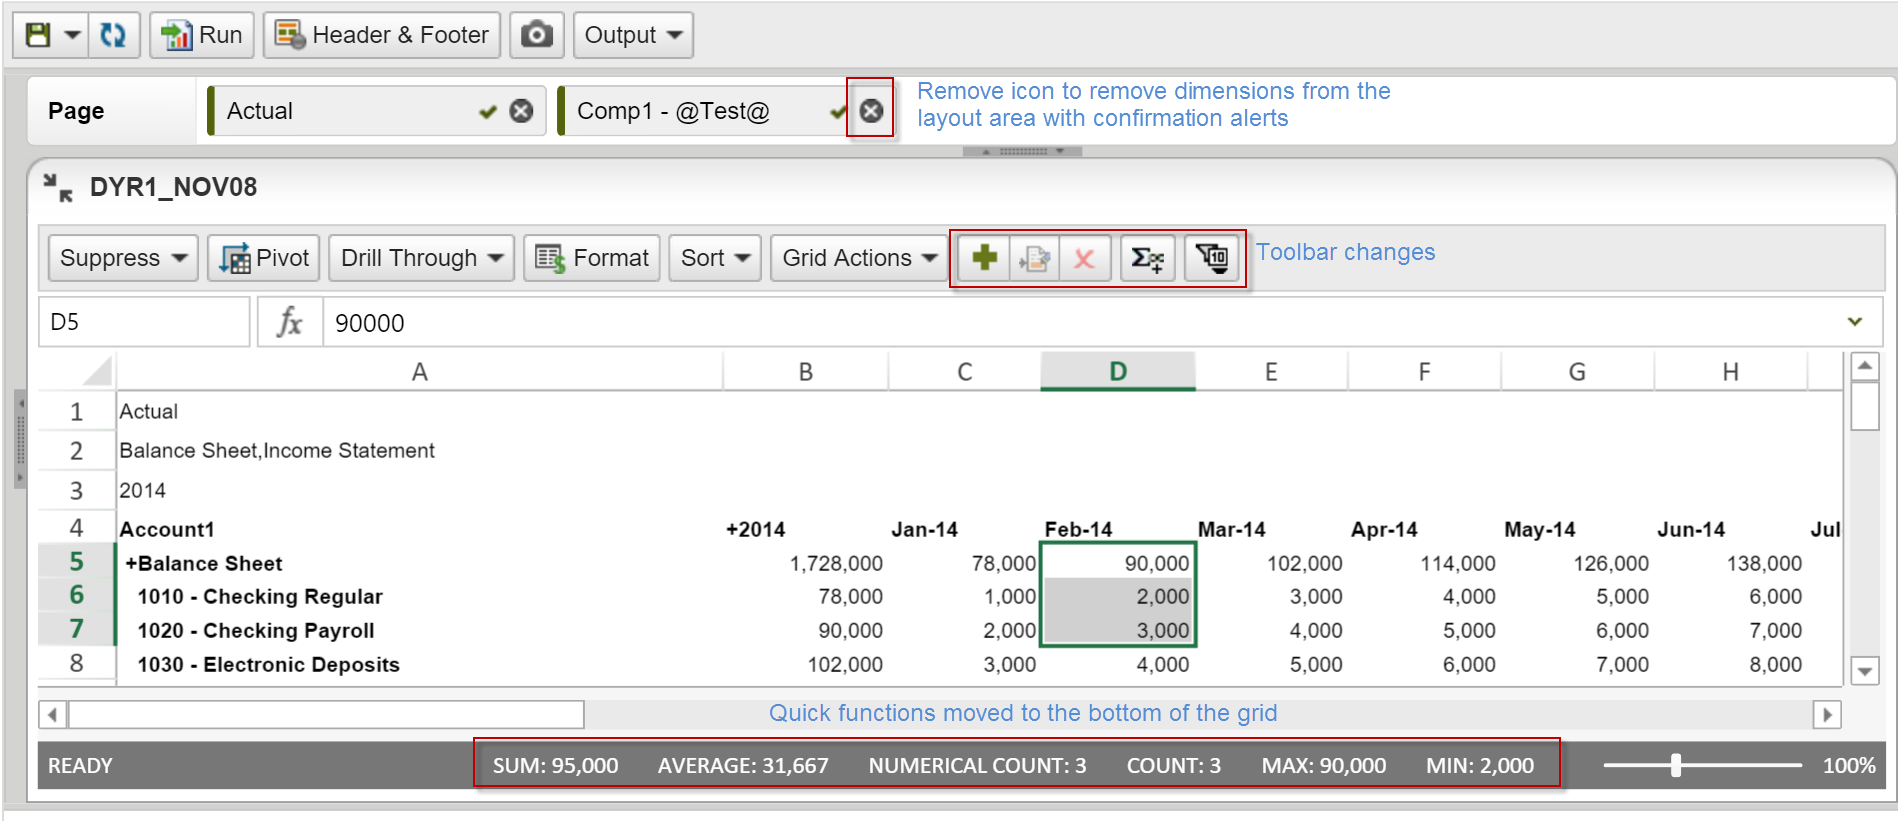
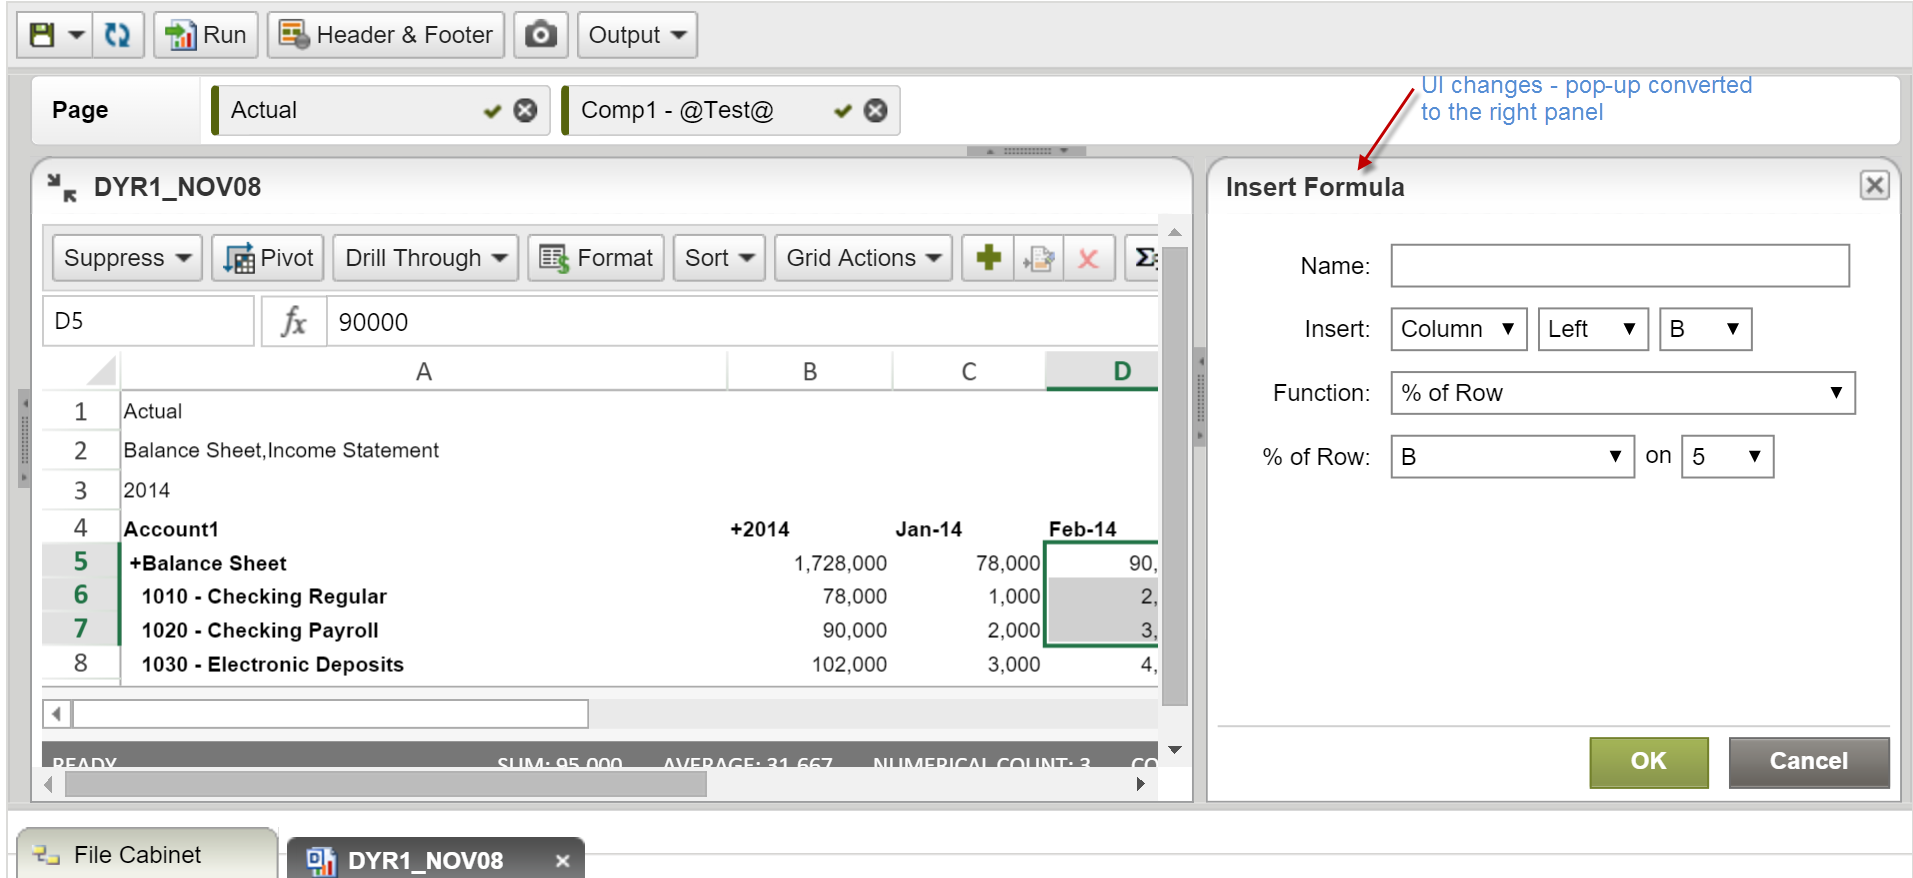
Insert Formula
Click formula icon to launch (see toolbar changes, above). Use to add formula to selected cell.
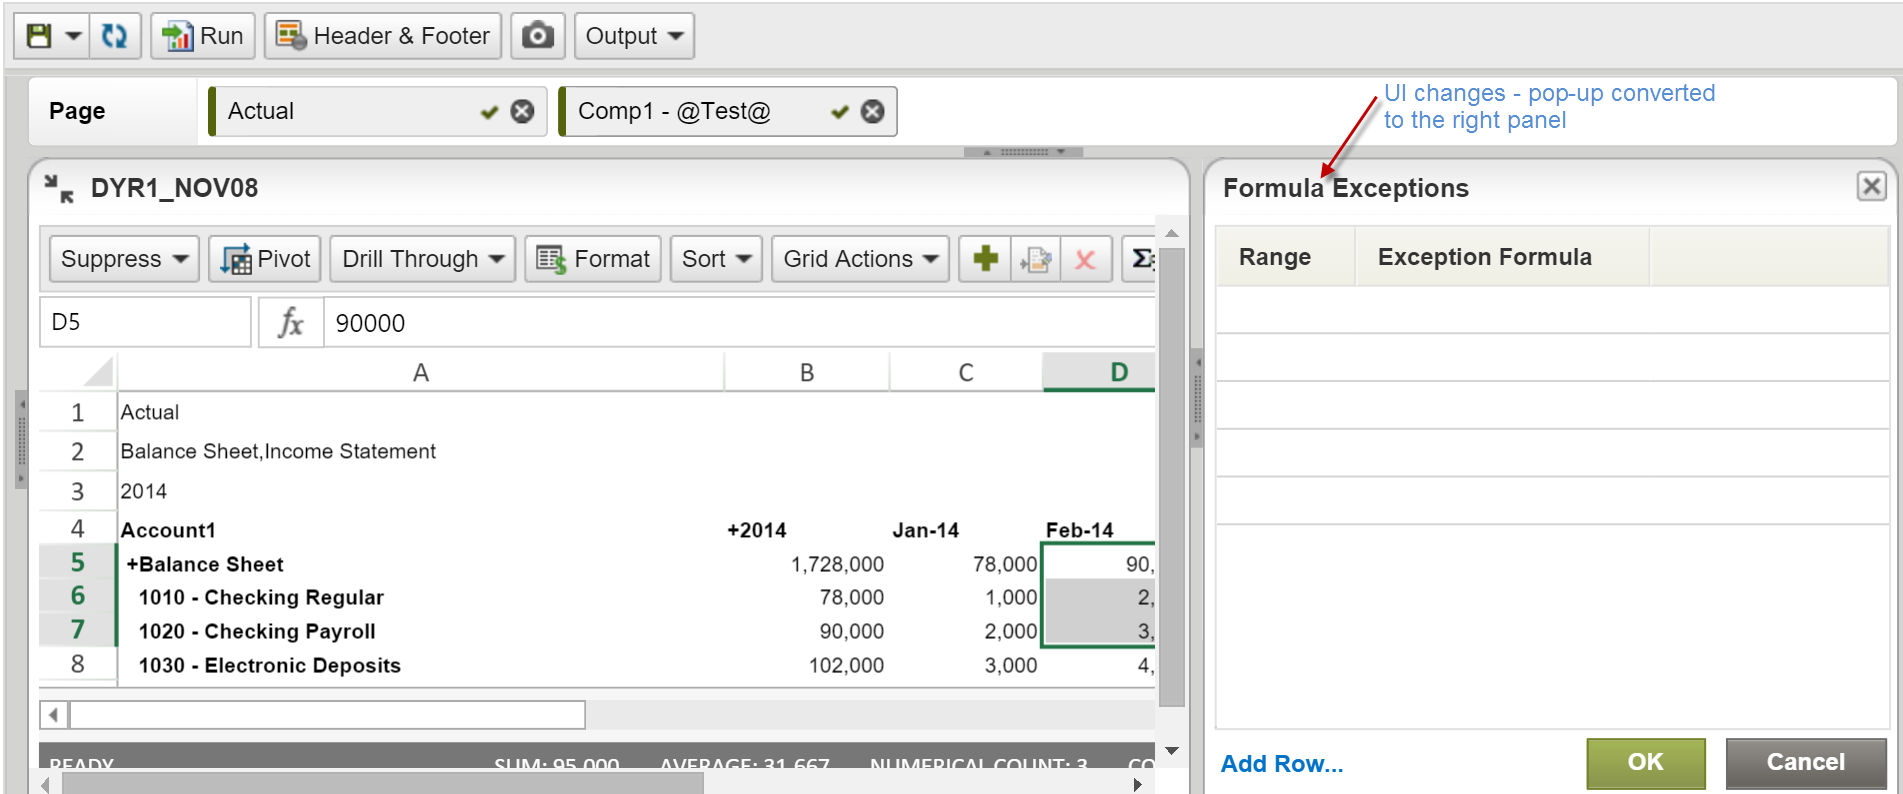
Formula Exceptions
Click formula exceptions icon to launch (see toolbar changes, above).
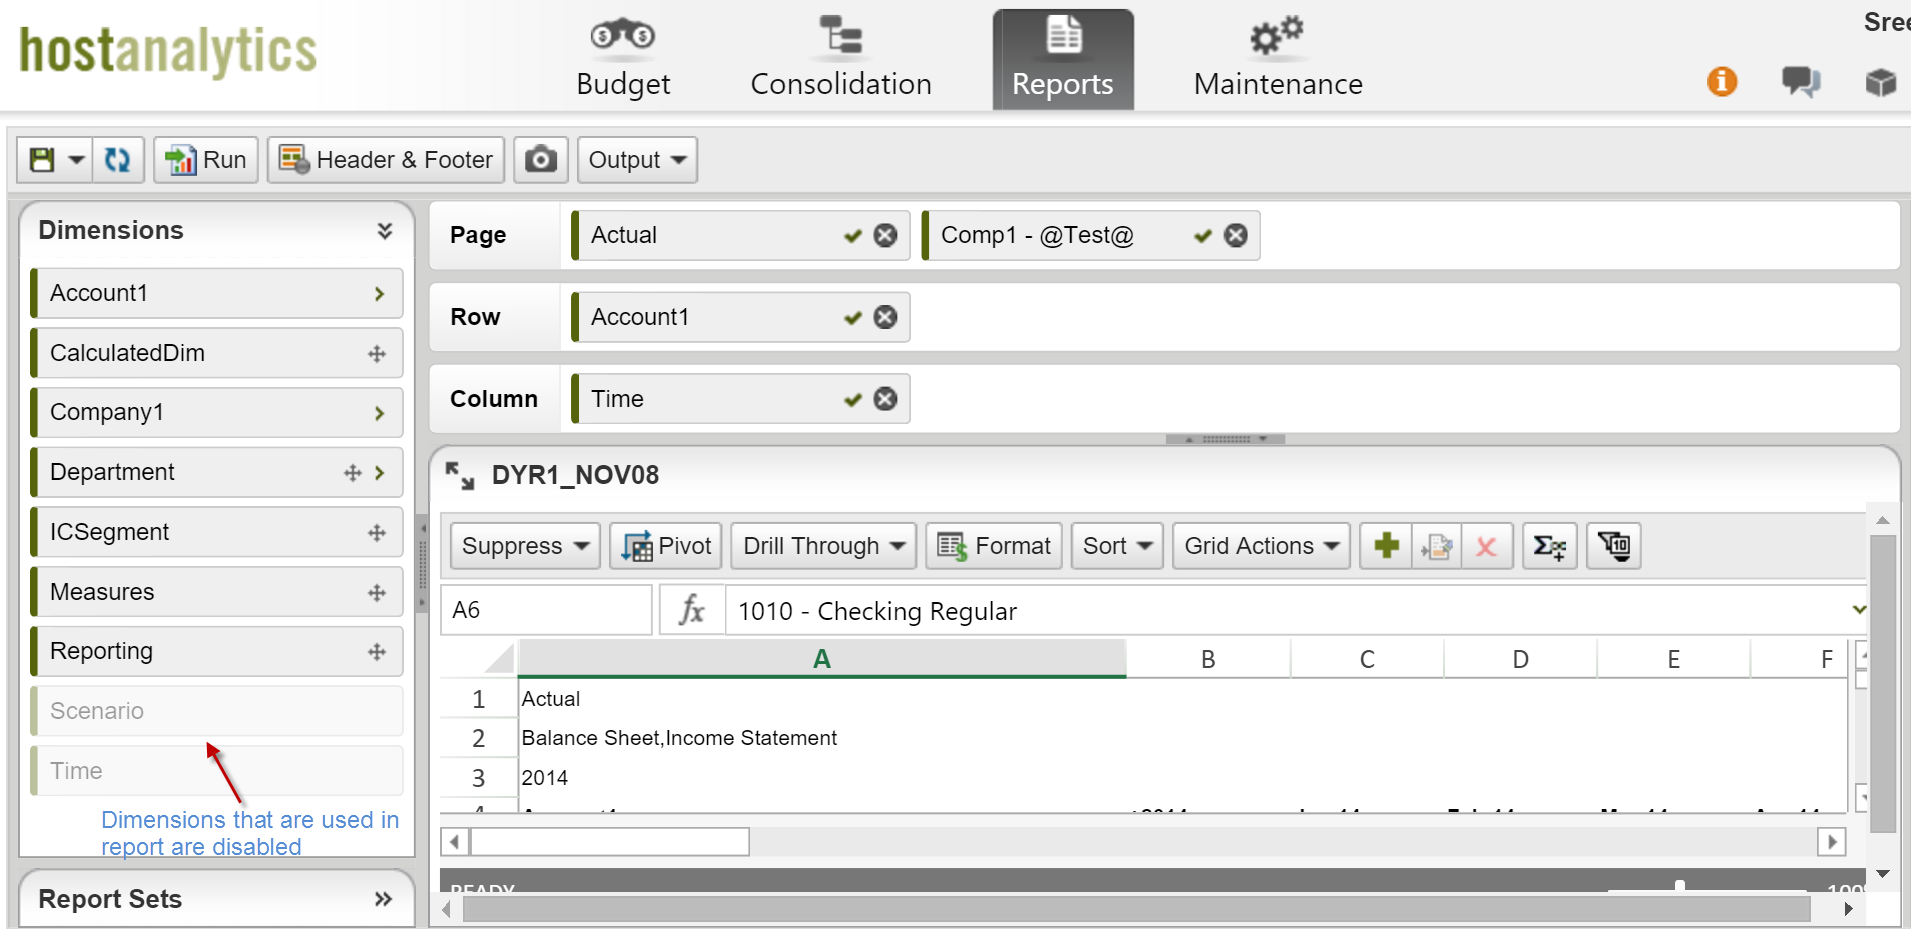
Disabled Dimensions in Use
Dimensions currently used in the report are disabled (grayed out).
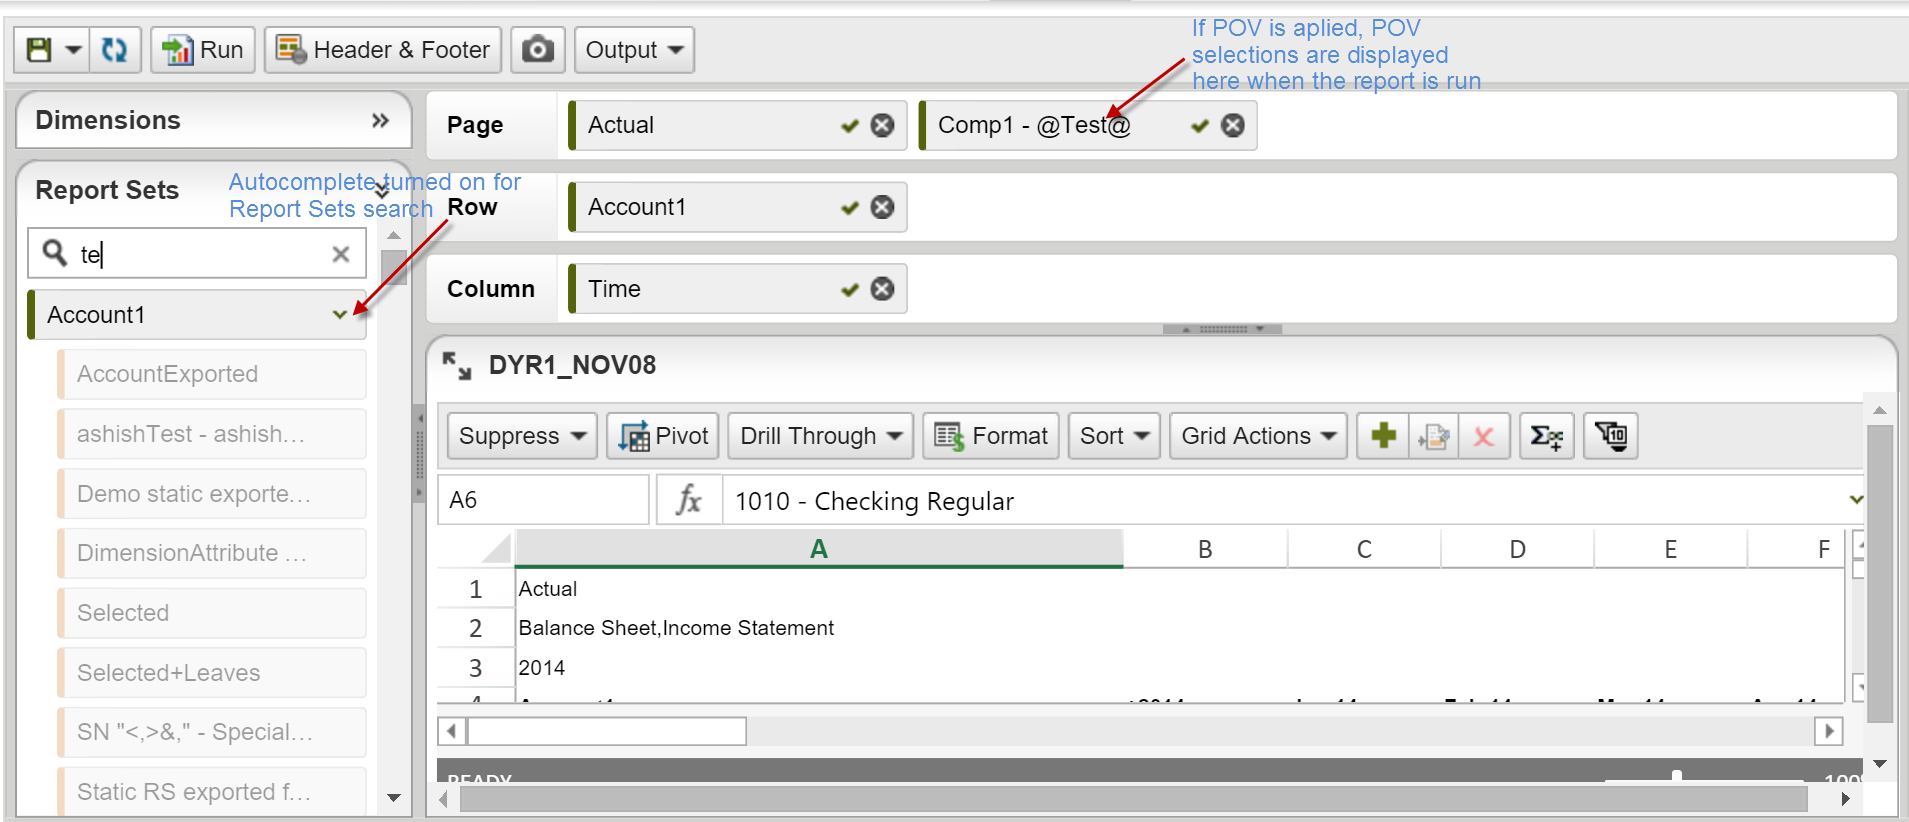
Report Sets
Auto complete (i.e., search suggestion) is turned on for Reports Set search.
POV selections are displayed in the Page when the report is run, if POV is applied
Notifications and Job Manager Enhancement
Notifications
Every month on the 3rd Friday, during the maintenance upgrade, the application automatically deletes history of notifications and archives/deletes Job Manager records/rows. During this process, all In-App Notifications older than 30 days are permanently deleted from the application. Maintenance, Cloud Scheduler, Job Manager history older than 90 days is archived and not visible in the Job Manager screen. Job Manager history from the archived tables is deleted permanently after an additional 90 days.
Notifications displayed on the Notifications page (see image below) that are older than 30 days will be automatically deleted and will not be maintained in Host Analytics. If you’d like to retain downloadable files from notifications for Report Books, Report Collections, and Financial Package Publisher, please save the files to your computer.
To access Notifications, click the Notifications button in the upper right-hand corner of the application.
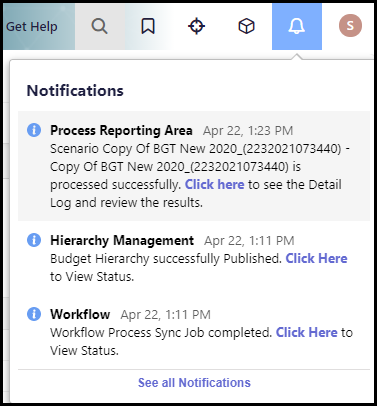
Job Manager
To access Job Manager, select Maintenance, Cloud Scheduler, and click the Job Manager tab.
All Job Manager Processes that are older than 90 days will be automatically deleted. Host Analytics will not retain history logs. If you’d like to retain these logs, select Output, Save As Excel to save Job Manager history information to an Excel spreadsheet on your computer.

Consolidation Process Integration with Cloud Scheduler
Consolidation is now integrated with Cloud Scheduler so that you can schedule Report Collections to run and manage and track the status for individual schedules. Access Cloud Scheduler by navigating to Maintenance > Administration > Cloud Scheduler. When you add a Process Flow and select Tasks for that Process Flow, you can now select the Consolidation Task Type (shown below).
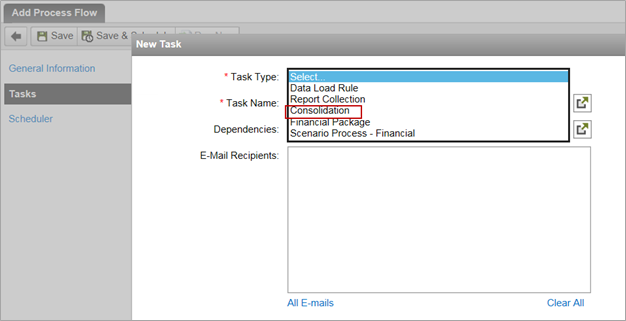
Once you select the Financial Publisher Task Type, the Scenario, Company and Period fields are enabled.
Scenario – Select the scenario you want to schedule to run the Consolidation process for.
Company – Select the company you want to schedule to run the Consolidation process for.
Period–:
Current – Run Consolidation for the current budget period
Previous
Current Financial Year
Custom - Select a Custom Period to select From and To dates
You must have read-only permission at the very least to add Consolidation to a Process Flow. A single Consolidation can be added to multiple Process Flows.
When a Consolidation is run as a task in a Process Flow, the following takes place:
If the Consolidation is executed successfully, users are notified via email and in application notifications.
E-mails are sent to users specified in the E-mail Recipients field.
Security is based on the configuration done for Consolidation.
Status is tracked through Job Manager.
Access Job Manager by clicking the Job Manager tab. Select a process flow and click the Detail Log button to view detailed information for a process flow. The status field reflects the status of the Consolidation in the process flow. Each status is described in the table below.
Running | The task execution has started. |
Completed with error(s) | One or more (but not all) of the sub-tasks (i.e. Validation checks, Partition Processing) in the Consolidation failed. |
Success | Execution of all Consolidation sub-tasks was successful. |
Failed | All sub-tasks (i.e. Validation checks, Partition Processing) under the Report Collection failed. |
Financial Package Publisher Integration with Cloud Scheduler
Financial Package Publisher is now integrated with Cloud Scheduler so that you can schedule financial packages to run, and manage and track the status for individual schedules. Access Cloud Scheduler by navigating to Maintenance, Administration, Cloud Scheduler. When you add a Process Flow and select Tasks for that Process Flow, you can now select the Financial Package Type (shown below).
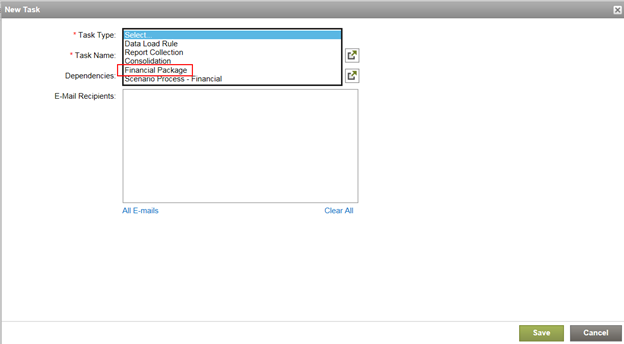
Once you select the Financial Publisher Task Type, select the Financial Package based on Name from the File Cabinet.
Dependencies is an optional field. Select tasks which must be executed in sequence with the task you are creating. Dependency means that the new task cannot be started until the dependent tasks are successfully completed. A dependent task is executed only if the task in which it is dependent upon is successfully completed. If the task in which it is dependent upon fails, the dependent task will not execute. All tasks without dependencies are executed in parallel.
You must have read-only permission at the very least to add a Financial Package to a Process Flow. A single Financial Package can be added to multiple Process Flows.
When a Financial Package is run as a task in a Process Flow, the following takes place:
If the Financial Package is executed successfully, users are notified via email and in application notifications.
E-mails are sent to users specified in the E-mail Recipients field.
Security is based on the Report Access and Dimension security.
Status is tracked through Job Manager.
Access Job Manager by clicking the Job Manager tab. Select a process flow and click the Detail Log button to view detailed information for a process flow. The status field reflects the status of the Financial Package in the process flow. Each status is described in the table below.
Running | The task execution has started. |
Completed with error(s) | One or more (but not all) of the Financial Package sections failed. |
Success | Success Execution of all Financial Package sections was successful. |
Failed | All sections failed. |
Support Update
Microsoft support for Office 2003 ended as of 4/8/2014. Therefore, as of the Winter ’16 release (February 2016), Host Analytics will no longer support the export of Dynamic Reports and Report Books to Excel 97-2003 in .xls format. Please continue to export both Dynamic Reports and Report Books in .xlsx format.
Also, .xls file type has replaced with .xlsx for Snapshot in File Cabinet, Scorecard, Benchmark, Report Sets, Unified Hierarchy Management, Budget data exports, Data Load Rules, and Translation Lines.
Process Flow Enhancement
The number of process flows per application has been increased from twenty to 50.
Scenario Add/Edit UI Improvement
Scenario Add/Edit screen UI has been improved for the improved user experience with a clean usable organization of the various setup aspects of the scenario.
Scenario information has been updated with the three sections for the General Information, Data Seeding and the Compare Scenarios configuration as shown below.
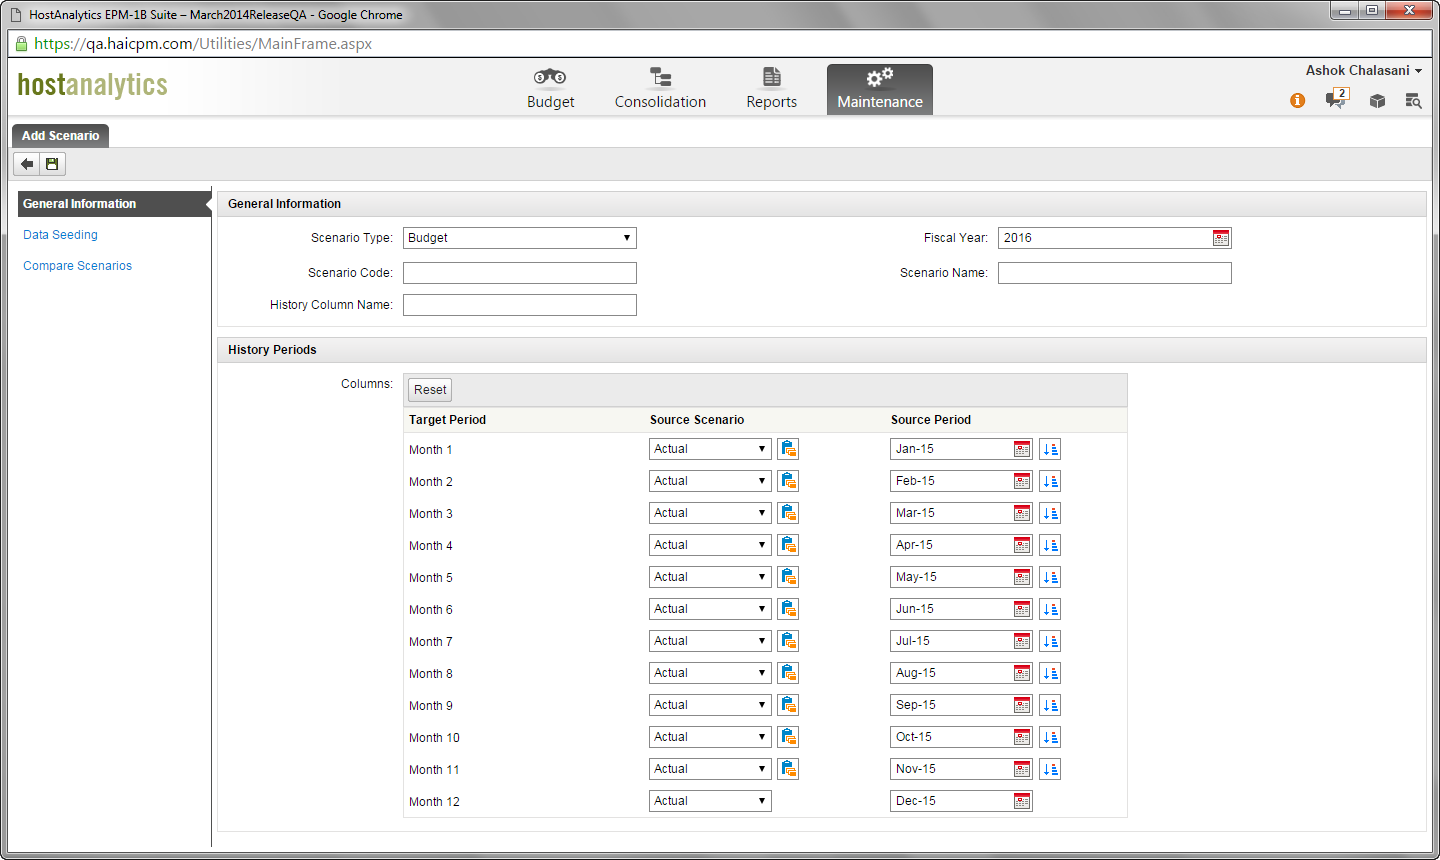
General Information
This section consolidate the general configuration of the scenario such as type, name and the history periods of the scenario.
This section usually address most of the scenario creation requirement with few data input fields. Depending upon the scenario type selected, options will appear with all the defaults pre-selected.
For History Periods section, now we have a new ‘Reset’ option to reset the selections.
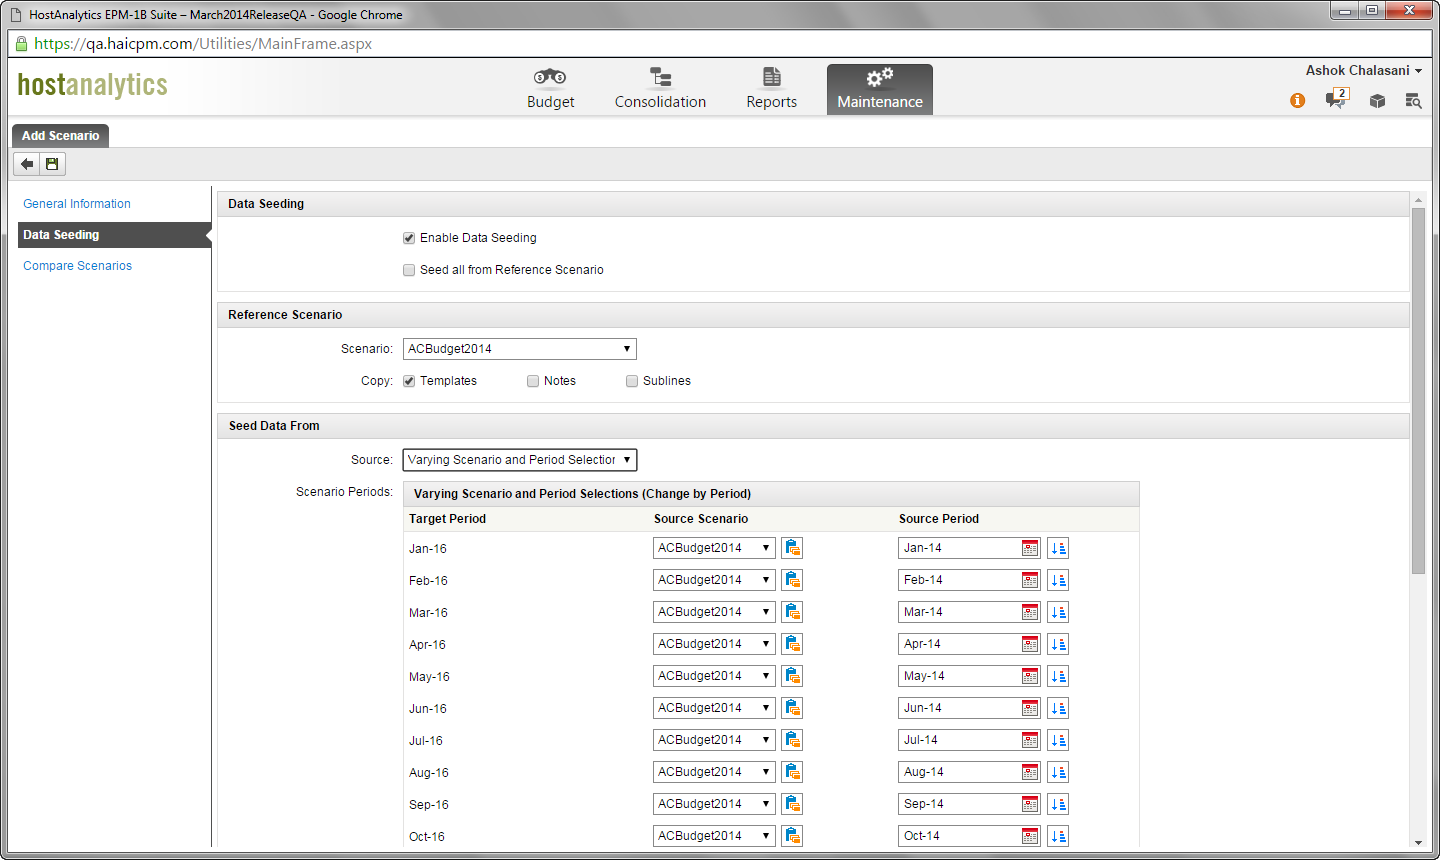
Following options are introduced to help address numerous clicks required to set the individual period and scenarios selections with History setup, and the Seeding configurations. These options will incredibly help the user to setup a scenario much faster.
Copy Scenario selection to the rest of the periods (![]() )
)
This copies the current selection to the remaining periods. This selection to copy icon appears for all the periods except the last period.
For example, let’s say that all periods have the Actual scenario specified, but you want the source scenario to be Budget 2015. Select Budget 2015 in period 1 and click the button to copy Budget 2015 to all source scenario periods as shown below.
Before button is clicked:

After button is clicked:

Auto increment the current selection to the rest of the periods (![]() )
)
This will auto populate the remaining periods incrementally from the current period selection.
For example, in the image below, the same period is selected as the source period for periods 1, 2 and 3. Let’s say you want the periods to increment steadily from period to period. Click this button to perform the incremental period adjustment automatically as shown in the image below.
Before Increment button selected:

After Increment button selected (starting with period 2):

By default, History Period selections show data from the Actual scenario's prior fiscal year.
Reset: A new option. Click Reset to reset all History Periods selections to display data from the Actual scenario’s prior fiscal year.
Data Seeding
This section consolidates the seeding functionality.
‘Enable Data Seeding’, check box enables the seeding functionality.
Upon this selection options for the ‘All’ seeding, and custom seeding options available.
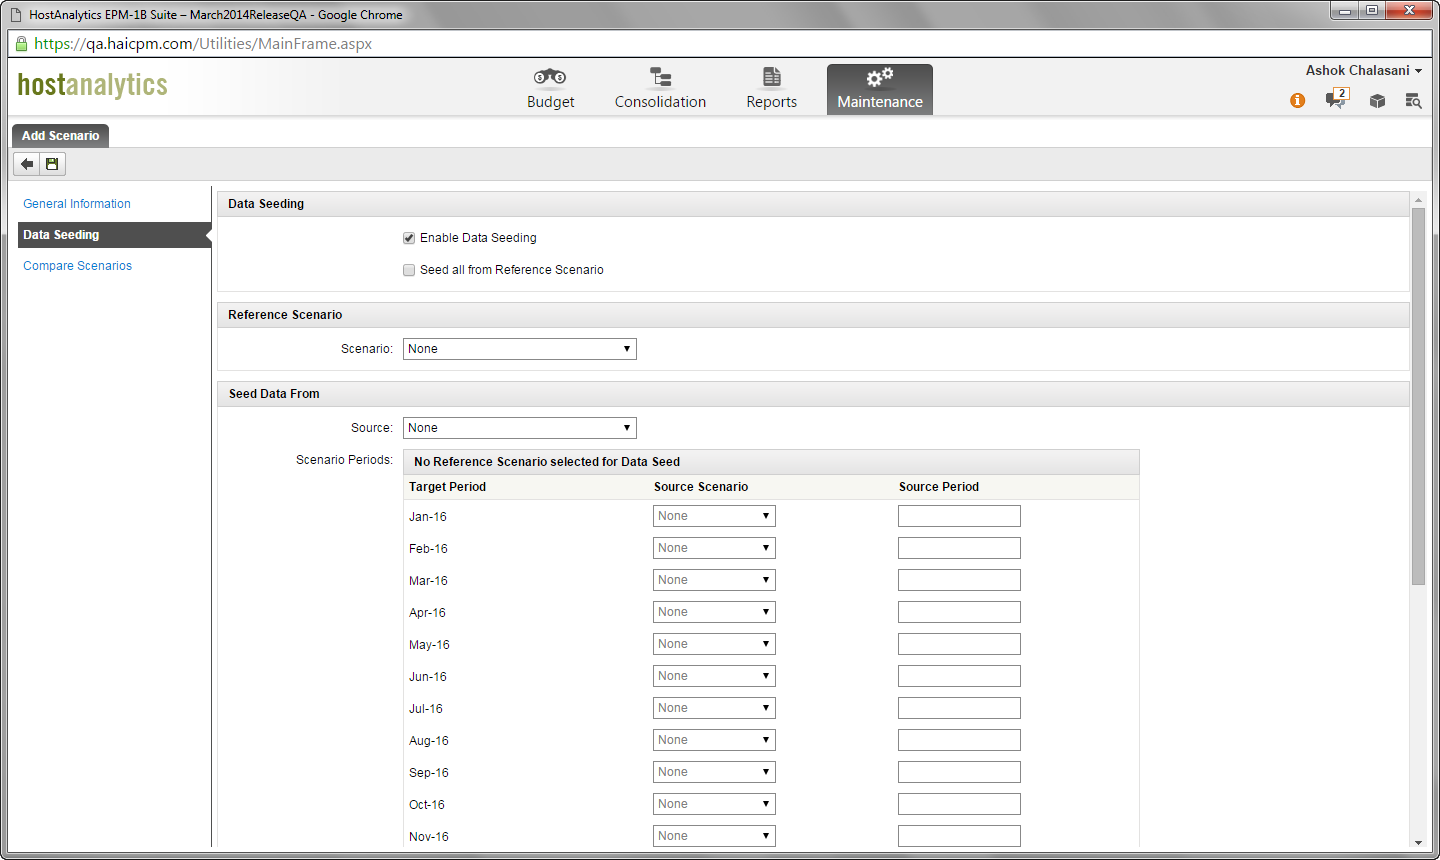
Seed All from Reference Scenario: This will seed all the data from the reference scenario selected. This is an ‘ALL’ seed. When this check box is not selected, user has option to custom seed the scenario using Data seed from Reference scenario or Change by Period options.
Custom Seeding: When Seed All from Reference Scenario check box is not selected (Default), user has the following custom seeding options to seed the using the reference scenario or using the change by period data seed selections as below.
Copy templates, notes and sublines from reference scenario without any data seed
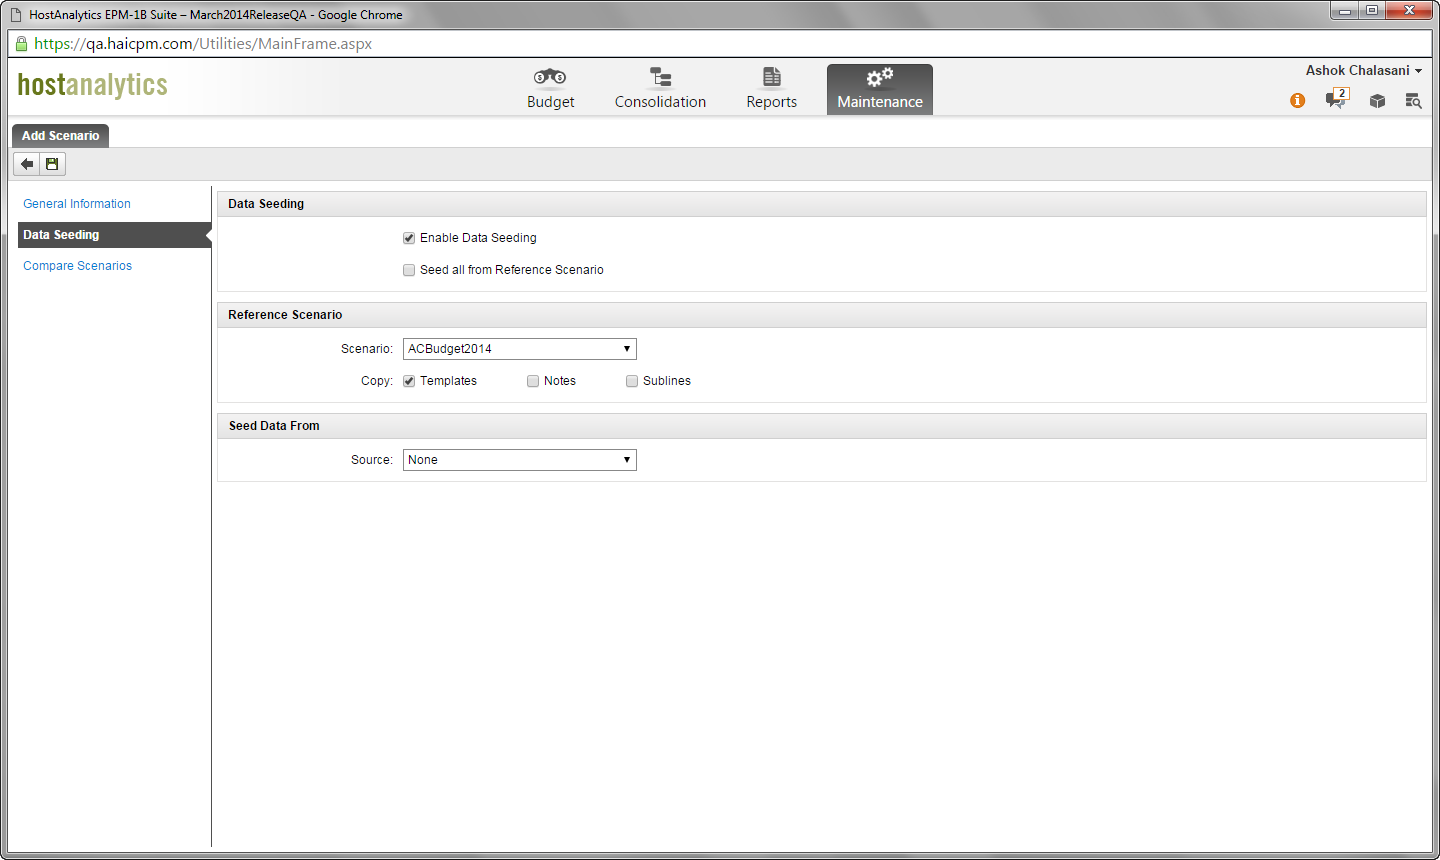
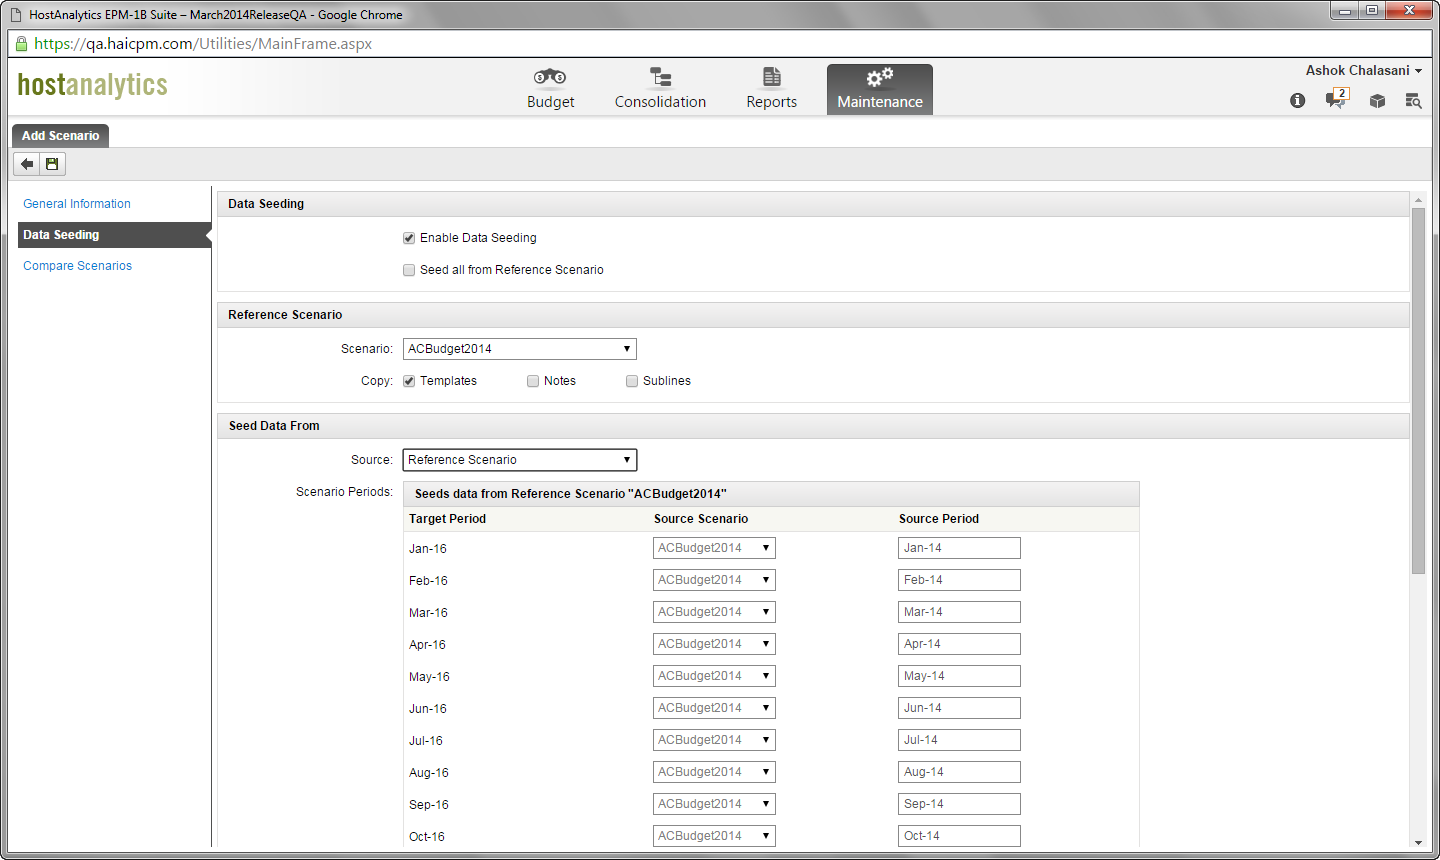
Copy Templates, Sublines and notes from the reference scenario along with data from the selected reference scenario.
Copy Templates, notes and sublines from reference scenario but seed data from ‘Change by Period’ with multiple scenario selections.
When the reference scenario selected is a forecast scenario, ‘Copy Actual data from Closed Periods’ configuration appears for the data seed selection.
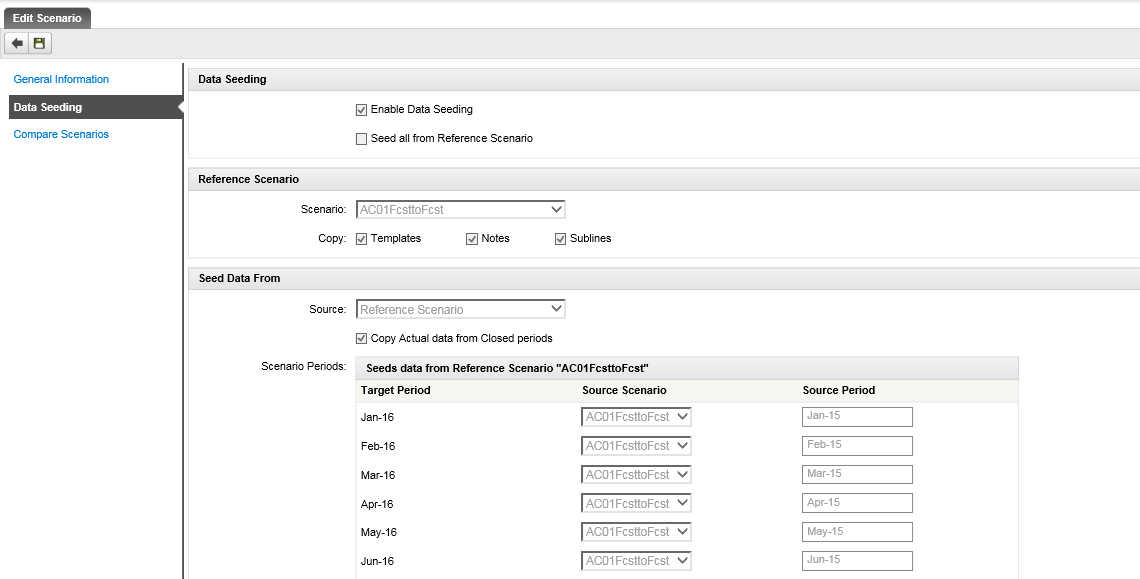
Compare Scenarios
Compare Scenarios functionality is available when adding a Forecast or Budget scenario. When this check box is selected, scenario selections for the compare scenario options will be displayed. No. of Compare Scenarios options will be enabled based on the configuration setup to enable compare scenarios.
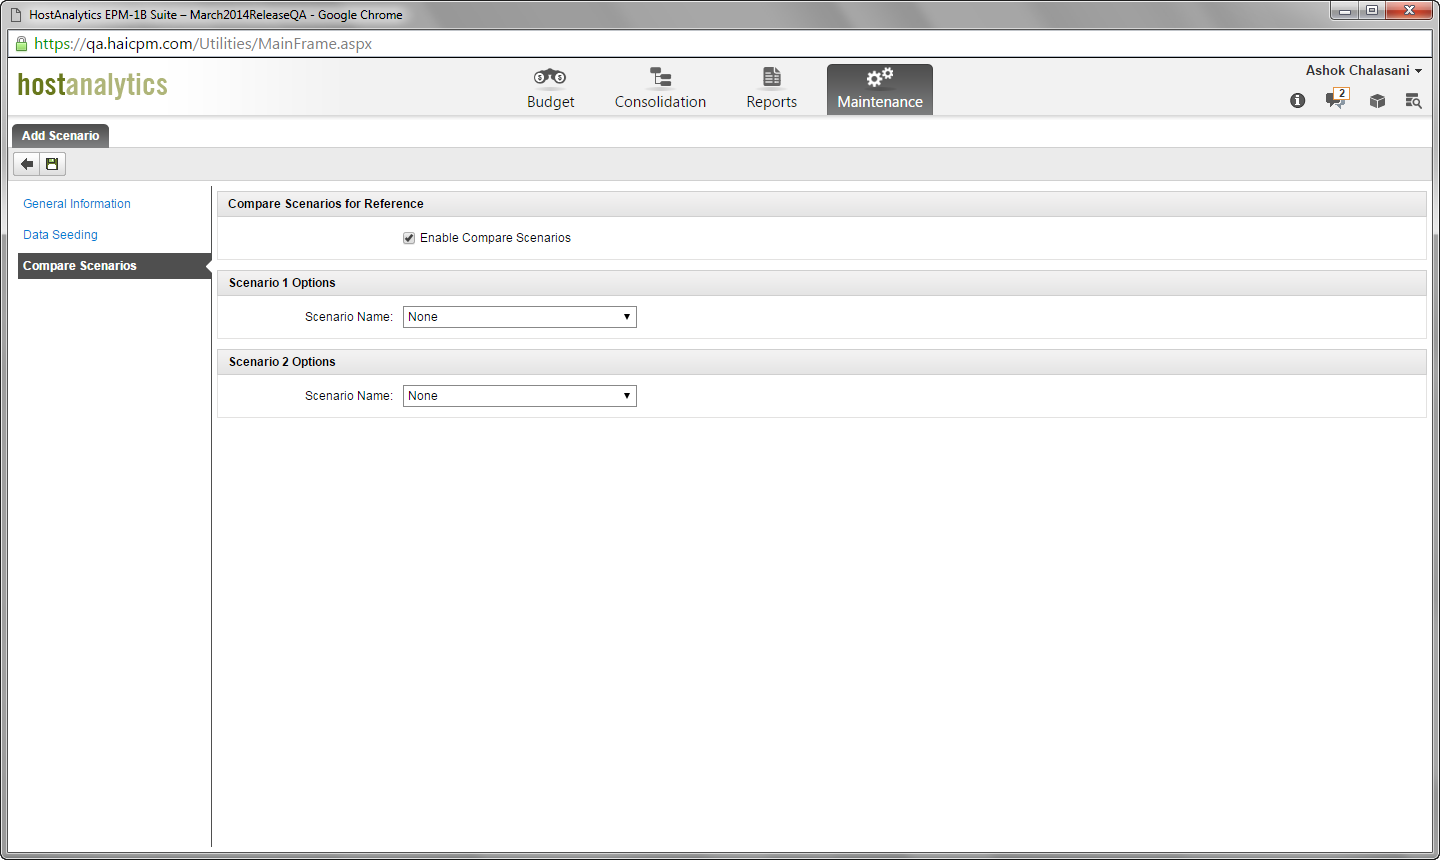
Fields available on the Compare Scenario page based on Scenario referenced to compare.
| Scenario Referenced to Compare | Fields Available and Description |
|---|---|
Budget |
|
Actual |
|
Preloaded |
|
Top Down |
|


