Set up a Reviewer User with Access to Specific Models, Views, Reports, and Dimension Members
- 1 Minute to read
- Print
- DarkLight
- PDF
Set up a Reviewer User with Access to Specific Models, Views, Reports, and Dimension Members
- 1 Minute to read
- Print
- DarkLight
- PDF
Article summary
Did you find this summary helpful?
Thank you for your feedback
In Practice: Add a Reviewer User
Select the Manage task and the User Management subtask.
Enter the Reviewer user’s email address in the Username field.
Select Reviewer in the Role field.
Enter the first and last name of the Reviewer user in the Name field.
Enter a temporary password for the Reviewer user in the Password field. Make sure you let the user know what the temporary password is. The Reviewer user can change it at a later time.
Select a User Type: Business or External. For information on these types, see User Types. If you are a Business user, you can add only Business users. You cannot add an External user.
Click Save.
In Practice: Set up a Group for Reviewer Users
Select the Manager task and the Group subtask.
Enter a group name in the Group field.
Click Save.
In Practice: Map the Added Reviewer User to the New Group
Now that you added the Reviewer user on the User page and created a group for the user on the Group page, you must map the added Reviewer user to the group. Complete the following steps:
Select the Manage task and the User Group subtask.
Enter the Reviewer user’s email address in the Username field.
Select or enter the group name defined on the Group page.
Click Save.
Next, assign user group access to models, reports and views.
In Practice: Assign Dimension Security to a Reviewer User
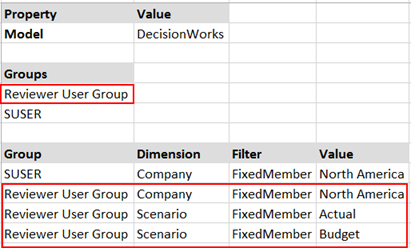
In the example, access to multiple dimensions will be given to a Reviewer user. In this case, the Reviewer user will have access to the Company - North America dimension member, the Actual scenario, and the Budget scenario.
Select the Manage task and the Model Administration, Model Permissions subtask.
Enter the user group the Reviewer use has access to in the Groups field (see image below).
Enter the group you entered in the Groups field under Group.
For Dimension, select Company.
Select FixedMember for Filter and enter North America as the member you want the Reviewer user to have access to.
Perform steps 3 – 5 for the Scenario dimension. For Value, enter Actual and Budget as shown below).
Click Save.
Note:
The same steps can be taken to assign dimension security to a Contributor user.
Was this article helpful?