Static Report Set Summary
- 9 Minutes to read
- Print
- DarkLight
- PDF
Static Report Set Summary
- 9 Minutes to read
- Print
- DarkLight
- PDF
Article summary
Did you find this summary helpful?
Thank you for your feedback
Overview
You can create a Static Report by defining each Report Set line item individually. Static Report Sets often have header lines, Excel lines, reference account lines, and row title lines.
Field Description
You can perform the following actions on the Static Report Set page:
Reload - Click the Refresh icon to reload the report.
Save - Click the Save icon to save the report.
Save As - Click the Save As icon to save to change the name of the report or make a duplicate.
Add Rows - Enter the number of rows in the field that you want to add and click the Add Rows icon to add rows to the grid.
Remove Rows - Enter the number of rows in the field that you want to delete and click the Remove Rows icon.
Move Row Up - Click the Move Row Up icon to move the rows within the grid.
Move Row Down - Click the Move Row Down icon to move the rows within the grid.
Copy - Click the Copy icon to copy existing rows.
Paste - Click the Paste icon to paste the selected rows.
Format Painter - Click the Format Painter icon to copy the format of a cell and paste the format to other cells. The text and data format is copied from the source cell to the target cell.
Note:The Format Painter icon is disabled when you select multiple cells.You can copy the format and paste to all cells, Report Set lines including row, column headers, merged lines, excel formulas. The data format can be copied and pasted to the Report Set line only. The format is retained when you Save, Run, Refresh, Save As, Copy, and export a Report Set.
Format - Click the Format icon to open a pane where you can format the lines and data in the grid, as well as add conditions such as, equal to, not equal to, and so on.
More- Click the More icon to add lines and rules and perform the following grid actions:
Add Lines & Rules
Single Dimension - Select this to add multiple lines and rules at once from a single dimension. You can select the required dimension member from the Add Lines & Rules window as displayed in the image below. Using a single dimension, you can bulk upload Report Set lines from a dimension in a Report Set.
Grid Actions
Gridlines On/Off - Select this to show or hide gridlines.
Freeze On/Off - Select this to turn freeze on or off.
Show/Hide Row Header - Select this to show or hide the row header. This option is available only for Modern Static Report Set.
Show/Hide Column Header - Select this to show or hide the column header. This option is available only for Modern Static Report Set.
Show/Hide Formula Bar - Select this to show or hide the formula bar. This option is available only for Modern Static Report Set.
Show Excel only Formula / Show All Formulas - Select this to display only excel formula or all formulas. This option is available only for Modern Static Report Set.
Output
Print - Select this to print the Report Set.
Print Setup - Select this to apply print settings based on your requirement.
Export to Excel - Select this to export the Report Set to excel.
Show/Hide/Re-arrange Columns
Select the Show/Hide/Re-arrange Columns icon to show, hide, and re-arrange the columns based on your requirements. You can drag and drop a column to reorder in the Show/Hide/Re-arrange Columns drop-down list. The column settings are retained when you access the Report Set next time and export a Report Set to excel.
Note:
You cannot rearrange the first four columns in the grid.
Enable Modern Features
Select this toggle button to convert the Classic Report Set to Modern, and all the features will be displayed in the Report Set.
Note:
You cannot revert to Classic features once you enable the Modern features. These features will be applied to Dynamic Reports created using the Report Set where Modern Features are enabled.
Format
You can format the lines and data in the grid, as well as add conditions such as, equal to, not equal to, and so on.
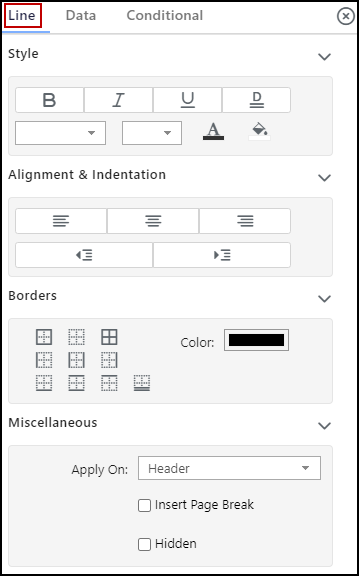
Line
Style - Apply bold, italic, underline or double underline. Select a font, font size, font color, and background color.
Alignment & Indentation - Select to align right, center, or left. Select right or left indent.
Borders - Select border options and border color.
Miscellaneous- Apply the following line settings to the Report Set:
Header
Data
Header and data
Separate Header & data
When you run a Dynamic Report with the Report Set, the formatting is retained.
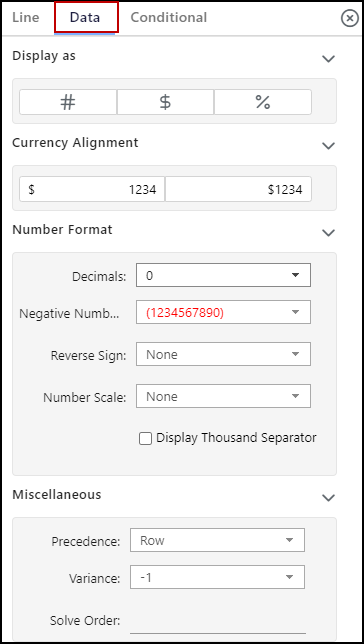
Data
Display As - Display data in a number, percent, or currency format.
Currency Alignment - Select to display a space between the currency symbol and data or no space.
Number Format
Decimal- Select the number of decimals you want displayed.
Negative Numbers- Select how you want negative numbers displayed.
Reverse Sign- Select any of the following to change the value of the data:
Reverse Sign - Changes the value to positive or negative based on the actual sign.
Negative to Positive - Changes negative values to positive values.
Positive to Negative - Changes positive values to negative values.
None - Retains the value without changing its sign. This is the default value.
You can also change the value navigate using the Reverse Sign column available in the grid. If you select an option from the Reverse Sign column, the same option is displayed as selected in the Reverse Sign drop-down list.
Number Scale - Select how you want the number scale displayed.
Display the thousand separator - Select to display the thousand separator, For example, 5,888 or not 5888.
Miscellaneous
Precedence - Select row or column.
Variance - Select the required value from the drop-down list.
Solve Order - Enter the solve order value.
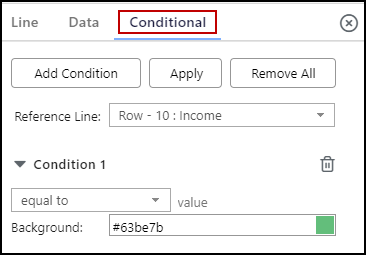
Conditional
Add Condition - Click to add conditional formatting to the Report Set.
Reference Line - Select the reference line in the Report Set from the drop-down list or select a row in the Report Set.
Condition 1 - Displays once you select the reference line and click Add
Condition - Select a condition from the drop-down list that you want to apply. For example, if the row is greater than zero then it will appear in green.
Apply - Select this if you want to apply the condition to the Report Set row.
Remove All - Select this to remove all conditions from Report Set.
Grid Actions
You can perform the following actions:
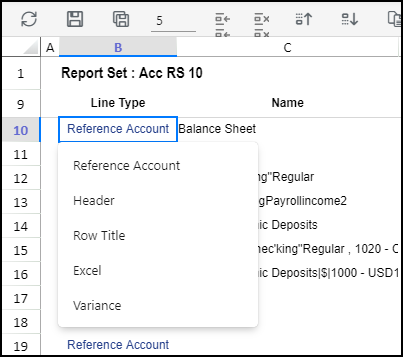
Change Line Type
Select the required cell under the Line Type column in the grid and the following options available
Reference Account
Header
Row Title
Excel
Variance
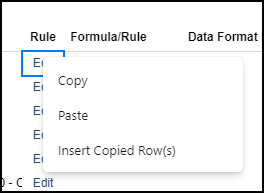
Copy
Select this to copy the selected cell.
Paste
Select this to paste the copied cell.
Insert Copied Rows
Select this to insert copied rows.
Add / Edit Rule
Clicking Add or Edit in the Rule column to open the Add Rule or Edit Rule window. Select the Single, Multiple or Advanced tab based on your requirement. You can add single or multiple members from the selected dimension, as well as the actual rule itself.
The selected options in a Report Set are dynamically applied at Dynamic Report run time instead of adding members to Report Set lines one time at the setup. This ensures that any new members added in the hierarchy are pulled dynamically without making any changes to Report Set definitions. This is applicable to Main, Alternate, Attribute, and Attribute Hierarchies, Substitution (Standard and Derived) Variables when used within the Single Dimension rule in a Report Set.
Single Tab
Select this to add a single dimension to the Report Set. The following fields are available only on the Single tab:
Suppress Indents
Select this check box to remove indents from the output for the selected member(s), children, all children, the selected member(s) plus the children, the selected member(s) plus all children, leaves, the selected member(s) plus leaves, or the selected member(s) plus the parents.
Options
The drop-down list is enabled only when a single rollup member is selected in the rule. The following options are available in the drop-down list:
Selected - Members in the tree, as selected by the user. This is the default value.
Children - Immediate children of members, as selected by the user
Selected + Children - Selected members, and their immediate children
Selected + All Children - Selected members, and all levels of children under them
Leaves - Leaf members at all levels under the selected members
Selected + Leaves - Selected members, and their leaf members, at all levels.
Selected + Parents - Selected members, and their immediate parents.
- The following option are available only for the Time dimension:
Year
Quarter
Month
Trailing
Total - Trailing
Note:The Options drop-down list is enabled only when you select a single dimension in the rule and single rollup member within the single dimension rule.Display Parents Last
Select this check box to display the parent member at the bottom of the hierarchy. This check box is available for the Selected + Children, Selected + All Children, Selected + Leaves, and Selected + Parents options. If the check box is selected, the parent member will be displayed at the bottom of the hierarchy.
Limitations
When you copy and paste a rule line using the keyboard, the selected Options is not retained. If you edit the rule, the Edit Rule window opens in the Advanced tab.
When you define the Excel formula on a rule, the member is displayed in Dynamic Reports only when you select Selected + Children, Selected + All Children, Selected + Leaves and Selected + Parents from the Options drop-down list.
When you add a conditional format on a line with reference to another line, the Report Set rule with the following Optionsis not supported:
Children
All Children
Leaves
Year
Quarter
Month
Trailing
Total - Trailing
Multiple Tab
Select this to add multiple dimensions to the Report Set. You can add a report set line as a combination of members from multiple dimensions.
In a multiple dimension Report Set line, the dimension on which the Report Set is being created is mandatory.
Advanced Tab
The Advanced tab allows you to select Members and Functions for a particular scenario, and then build a rule for them by dragging them to the Rule Builder pane.
Types of Static Report Sets
There are two versions of Report Sets:
Classic
Modern
You can save a Classic Report Set as Modern by using the Enable Modern Feature toggle button on the toolbar. The Version column in the File Cabinet page differentiates between Classic and Modern Report Sets.
You can add, edit, save, save as, and copy Classic Static Report Sets from a Modern browser. An existing Classic Static Report Set can be modified and saved from a Modern browser, and the audit log is updated accordingly. Freeze On/Off, Grid Headers On/Off, and other toolbar options are saved and applied for a Classic Report Set when accessed from modern browsers.
All toolbar options are available when a Classic Static Report Set is accessed from a modern browser, as per user security and report access settings.
Difference between Modern and Classic Report Set
All Classic Report Sets work in modern browsers. The Version column differentiates between classic and modern report sets.

The key difference between Modern and Classic Report Set is displayed in the table below.
| Fields | Modern Report Set | Classic Report Set |
|---|---|---|
Font Name | Available under Format > Line > Style | Not available |
Font Size | Available under Format > Line | Not available |
Color | Available under Format > Line > Border | Not available |
Outside Borders Left Border Right Border Double Bottom Border | Available under Format > Line > Border | Not available |
Apply On drop-down list | Available under Format > Line > Miscellaneous | Not available |
Absolute check box | Not available | Available under Format > Data > Display As |
Currency Alignment | Available under Format > Data | Not available |
Negative Number drop-down list | Available under Format > Number Format | Not available |
Absolute for Number Scale check box | Not available | Available under Format > Number Format |
Display Thousand Separator check box | Available under Format > Number Format | Not available |
Precedence | Available under Format > Number Format | Not available |
Was this article helpful?