The ESM Canvas option in Dynamic Planning
- 6 Minutes to read
- Print
- DarkLight
- PDF
The ESM Canvas option in Dynamic Planning
- 6 Minutes to read
- Print
- DarkLight
- PDF
Article summary
Did you find this summary helpful?
Thank you for your feedback
Overview
The ESM Canvas allows users to perform various actions, such as listing canvases, modifying data, and saving changes according to their access permissions. The ESM Canvas offers the following key features:
- Data Saving and Formatting: The user can store and structure data in a way that facilitates deployment.
- Shared Access: Formatted data can be shared with multiple users, granting them different access levels, such as Contributor and Reviewer.
Additional features of the ESM Canvas include:
- Filter Option: Users can utilize a filter to narrow down and sort the displayed content.
- Add New Canvas: Users can create a new canvas within the platform.
- Search Functionality: Users can quickly search for specific canvases using the Ctrl+F shortcut.
The ESM Canvas landing page caters to three types of users based on their login credentials:
- Design Users (Admin users)
- Input Users (End users)
- Design + Input Access (Admin + End users)
Design Users (Admin Users)
Design users are responsible for creating the canvas. The landing page for Design users includes the following sections:
- Canvas Name: Displays the canvas name in black text without hyperlinking.
- Description: Shows the descriptions for each canvas, with text wrapping if it exceeds the column width.
- CanvasAction: Provides options for Design, Duplicate, and Delete.
Input Users (End Users)
Input users are restricted to viewing only the canvases that have been specifically deployed for them. If users have been added to the deploy page but haven't deployed a canvas, they will not be able to see that canvas listed on the listing page. The landing page for Input Users incorporates the following features:
- Canvases are hyperlinked and can be opened in a new tab.
- The landing page includes two columns: Canvas Name and Description.
- Filter option is available.
- Ability to use Ctrl+F and search for a specific canvas.
Note:
The Input user can edit the deployed canvas and save the changes.
Design + Input Access (Admin + End Users)
For users with both design and input access, the landing page distinguishes between deployed and undeployed canvases. Deployed canvases are displayed in blue with hyperlinks. Users with design and input access can perform various actions on deployed canvases, including inputting data, designing the canvas, duplicating it, and deleting it.
Undeployed canvases, on the other hand, are shown in black. Users with design and input access can still perform actions on undeployed canvases, such as designing, duplicating, and deleting them.
.png)
Note:
The landing page includes pagination, displaying 100 canvases per page. A scroll bar allows users to navigate through the list, and they can use Ctrl+F to search for specific canvases on the selected page.
Prerequisites
- Contact the Planful Support team to enable the ESM Canvas flag, to access the ESM Canvas.
- The ESM Canvas is only accessible to the Super Admin. To provide the Super Admin access, follow these steps:
- Navigate to Maintenance > Overview.
.png)
- Click User & Role Management.
.png)
- Under the User section, select the required user.
.png)
- Click Navigation Role and select Super Admin role.
.png)
- Click Navigation Access.
- Expand the Dynamic Planning option, and select the ESM Canvas checkbox.
- Under ESM Canvas, you have two types of permission; select the required permission:
- Design: This permission allows users to design the canvas. Once the design is complete, the same user can define access for other users by granting them Input access.
- Input: This permission allows users to view the assigned canvas and provide their input as needed.
.png)
Note:
- Once users are granted Design, Input, or both access, the ESM Canvas option will be displayed in the left navigation panel under Dynamic Planning.
- Users with Input access will only be able to view the canvases deployed explicitly to them.
Login Page
To access the ESM Canvas, you need to log in to the Planful application.
In Practice: To log in to the Planful application
- Open the Planful application, and enter the below details:
- Username
- Password
- Click Login.
- Select Your Application, and click Launch.
.png)
ESM Canvas Landing Page
In Practice: To access the ESM Canvas
- Navigate to Home > Dynamic Planning > ESM Canvas.
.png)
- My Canvasespage appears. The following options are available:
- Canvas Name
- Description
- Canvas ActionsNote:The landing page view may vary based on the user's permissions when logging in.
- Canvas Action includes the following features:
- Design: This option enables admins to edit the canvas. Clicking on this option will direct the admin to the design tab for making modifications.
- Input: This option takes users to the end-user view of the canvas and provides them access to give any input if required.
- Duplicate: This feature duplicates the selected template and presents a pop-up window to update the name of the duplicated template.
- Delete: Admins can delete the template.Note:
- The Canvas Actions feature will only be visible to users with design access.
- Optionally, you can click the fullscreen icon to expand the view and see the My Canvases page in fullscreen mode.
.png)
- Click the Filter icon to filter out the canvas by Canvas Name or Description.

Creating a New Canvas
In Practice: To create a new Canvas
- Click + New Canvas.
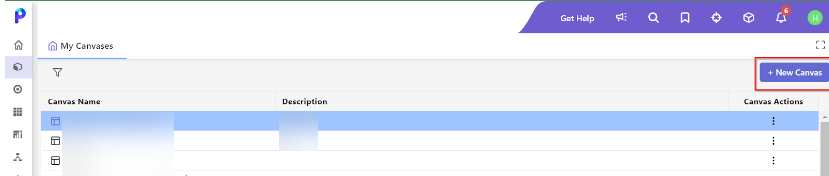 Note:Design access is mandatory to access the + New Canvas tab.
 - On the Define window, enter Canvas Name and Canvas Description.
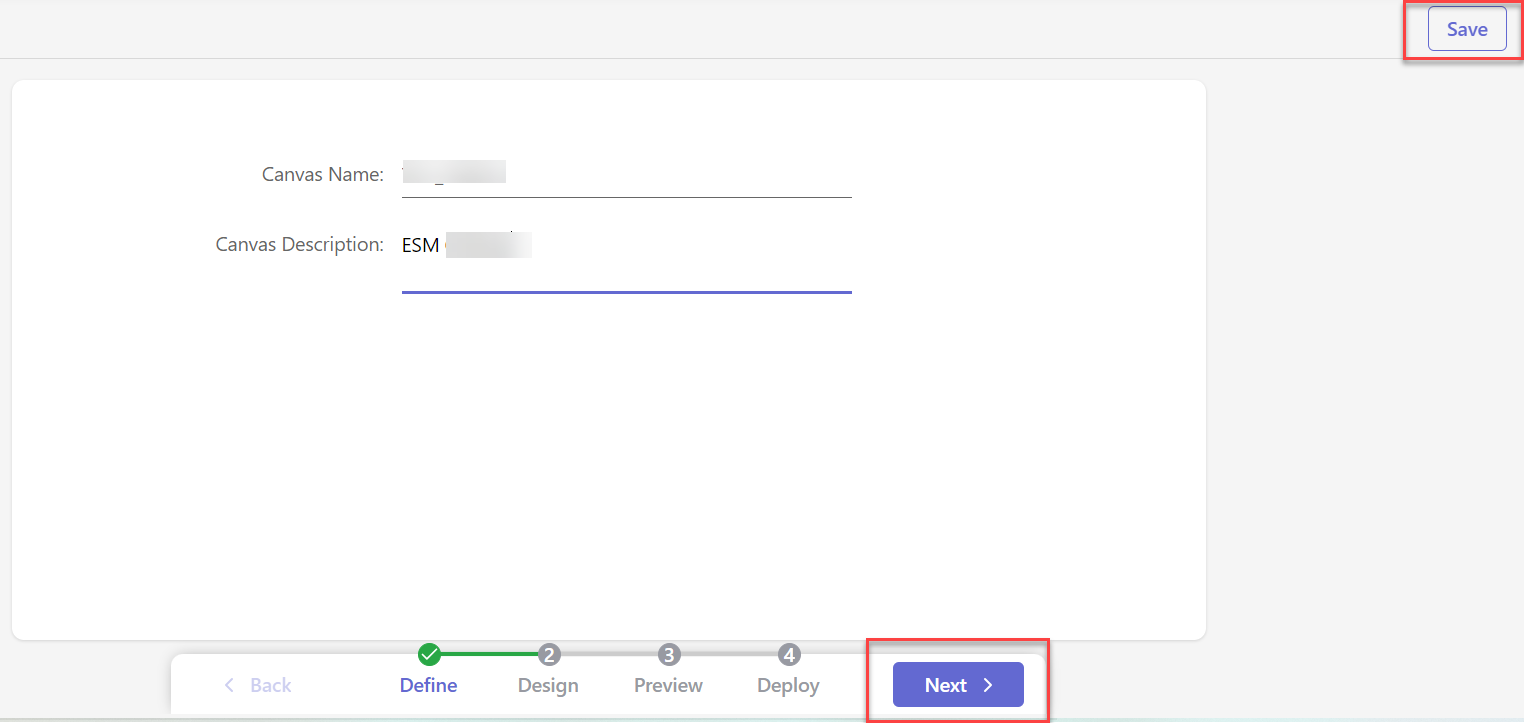 Notes:If both the Canvas Name and Description are valid, the user with Design access will be allowed to proceed to the Design step.
- When adding a Canvas Name, the following criteria are mandatory:
- The Canvas Name field must be filled, as it is mandatory.
- Duplicate names are not allowed.
- The Canvas Name can have a maximum length of 128 characters.
- AlphaNumeric names are allowed in the Canvas Name field.
- Special characters are permitted in the Canvas Name field.
- Internationalization is supported, allowing for multilingual inputs in the Canvas Name field.
- The Description for the canvas is optional and can have the following characteristics:
- The Description field allows a maximum length of 512 characters.
- AlphaNumeric content is permitted in the Description field.
- Special characters are also allowed in the Description field.
- The Description field supports internationalization, enabling the use of different languages and character sets.
- When adding a Canvas Name, the following criteria are mandatory:
- Click Next or Save. Note:The Save option saves added information, while the Next option helps users move to further steps.
- On the Design tab, Select Model from the dropdown list.
.png)
- Upon selection, all the dimensions associated with the selected model appear.
.png) Notes:
Notes:- By default, the first model in the list will be selected.
- All Fields are added by default in the column section.
- Only the models already defined in SpotlightXL will be listed here.
- You can select the Page option for the model to select the map from the available list.
.png)
- Once the map is selected, the corresponding dimensions will be listed, and the user can drag and drop them to the page section. Note:
When adding a page section, at least one dimension must be dragged and dropped into it, and only four-page dimensions are supported. Once a dimension is added, selecting at least one unique member within that dimension is mandatory.
- You have the following OLAP options available to select a member for the added dimension:
.png)
- Selected: Only the parent member is selected.
- Children: Select only the children of the selected member.
- All Children: Select all descendants of the selected member.
- Select + Children: Include the selected member and only its children.
- Select + All Children: Include the selected member and all its descendants.
- Leaves: Display all descendants of the selected member that have no children.
- Select + Leaves: Include the selected member and its leaf descendants.
.png) Note:Selecting one member for each dimension is mandatory.
Note:Selecting one member for each dimension is mandatory.
- Click Save to save the template.
- Click Next to save the template and go to the Preview page.
.png)
- On the Preview page, you can validate the added columns. Note:Once the Design and Define steps have been fully validated, they will be marked with a green tick.
- Enter relevant data into the Select Layout Filter field to view specific data.
.png)
- Click Save Canvas.
- Click Next.
.png)
- You can add the Contributors and Reviewers on the Deploy page. Note:The following limitations for each user:
Contributors: Users can input, view, analyze, update, and collaborate.
Reviewers: Users can view, analyze, and collaborate. - Click Deploy. Note:Once the canvas is deployed, it will automatically display in blue color and appear in the My Canvas list.
.png)
Was this article helpful?