Attributes & Attribute Hierarchies
  • 7 Minutes to read
  • Dark
    Light
  • PDF

Attributes & Attribute Hierarchies

  • Dark
    Light
  • PDF

Article Summary

Adding an Attribute Hierarchy

Attribute hierarchies are created for reporting purposes and provide a way to summarize members. An Attribute Hierarchy can be used as an alternative common chart of accounts hierarchy. You can also create report sets for Dynamic Reports based on an Attribute hierarchy.

To add an attribute hierarchy to a dimension, follow these steps:

  1. Navigate to Maintenance > Hierarchy > Hierarchy Management.
  2. In the Hierarchy Selection section, select Finance Hierarchies from the Type drop-down list, and select a Dimension.
  3. Click Setup.
  4. On the Financial Hierarchies Setup page, click Add.
  5. Select the Hierarchy Type as Attribute Hierarchy from the drop-down menu. 
  6. Enter the Name and Description.
  7. For Type, there are two types of attribute hierarchies you can define: Rollup based on Attributes and Rollup created manually
    1. Select Rollup based on Attributes to automatically roll up all levels of your hierarchy based on defined attributes.
    2. Select Rollup created manually to define how you want the leaf level members to roll up within the hierarchy. For example, you might want your company's subsidiaries to roll up based on the state they operate in versus a company account they are naturally associated with.
  8. When you select Rollup created manually, the Leaf Level field appears. Select the leaf level roll-up member. For example, if you have an attribute hierarchy associated with a Product dimension and want the hierarchy to roll up to an AllProdManRollup, the leave level member might be ProductManager. For example:
    1. Level 1 Rollup = AllProdManRollup
    2. Level 2 Parent = Regions
    3. Level 3 Leaf = ProductManager
  9. In the  Levels field, enter the number of levels you want the hierarchy to have and press Enter on your keyboard or click the add level button.
  10. The highest level (or root) of a hierarchy is the hierarchy name. Provide level names for the levels you specify. In this case, you would enter Regions for the parent level and ProductManager for the leaf level. The Level Name list box is populated with attributes defined on the Attribute page.
  11. Click Save.
Note:
You can edit an attribute hierarchy ONLY if Used in Reporting is No.

Defining Attributes

Before creating an Attribute Hierarchy, you'll define attributes. Attributes are used to report and aggregate dimension data based on traits. For example, a Department dimension is associated with the division attribute dimension. Members of the division attribute dimension are categorized based on profits.

The attributes defined here are used in the Budget Entity Definition and reports.

User-defined attributes are optional. For Financial Segments, you can have up to 25 (10 by default) attributes per dimension(based on your application configuration), which means that you will have 200 attributes (25 per dimension) across 8 dimensions. For Sales, you can have up to 10 attributes per dimension.

Attributes are created on the Add Attributes page under the More option on the Financial Hierarchies Setup page.

On the Attribute Setup page, there are several icons in the ribbon, each of which is explained below.

  • Add - Add a new attribute.
  • Edit - Edit an existing attribute. You can edit an attribute ONLY if Used in Reporting is No.
  • Delete - Delete an existing attribute 
  • Move Up / Move Down - Position attributes on the page.
  • Save Display Order - Saves the position of the attributes on the page.
  • Attribute Member(s) - Click to access the Attribute Members List page. View, delete, and export attribute members (of attributes that have an attribute type of "Text"). Click Output to export the Attribute Members List to Excel for printing, viewing, or reporting purposes.

To add a new attribute:

  1. Navigate to Maintenance > Hierarchy > Hierarchy Management.
  2. Select the Finance Hierarchy and the Dimension you want to add the attribute to.
  3. Click Setup.
  4. Select the hierarchy on the Financial Hierarchy Setup page.
  5. Click the More option and select Attribute Setup.
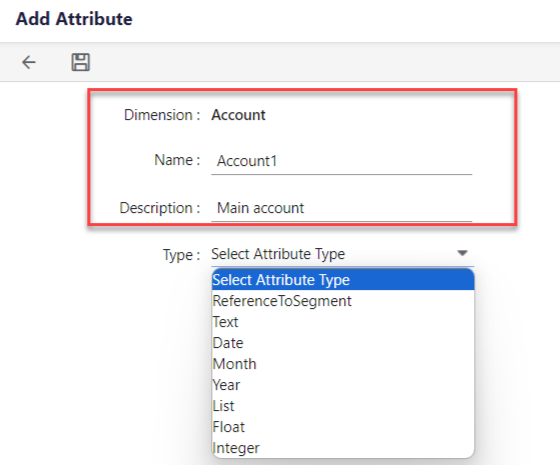
  6. Select a Dimension to which you want to add the Attribute (such as Account.)
  7. Click the Add button to add a new Attribute
  8. Enter a Name and Description.
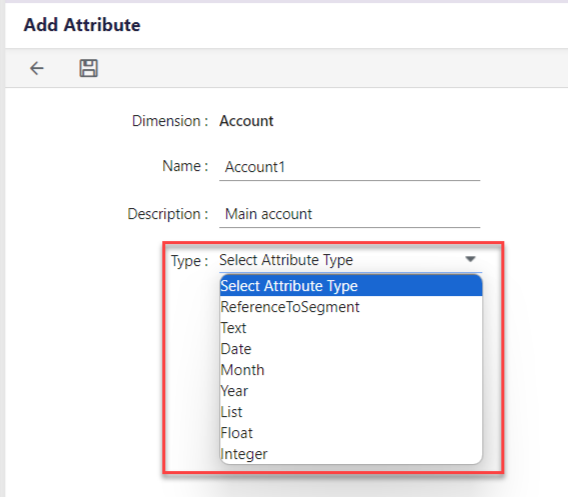
  9. Select the attribute Type:
    1. Reference to Segment: Links the attribute to another dimension. For instance, utilizing leaf members from a country hierarchy as attribute values for another dimension like Customer.
    2. Text: For alphanumeric values that differ between hierarchy members, like City names or Contact Numbers.
    3. Date: When the attribute's value is a date (e.g., Date of Incorporation).
    4. Month/Year: For associating months/years with attributes (e.g., Subscription Renewal Month or Year of Introduction).
    5. List: Specifies allowed values for an attribute, useful for categorizing items within a dimension (e.g., different types of routers under the Product dimension).
    6. Float/Integer: For numerical data (Float for decimal values and Integer for whole numbers) like pricing (MRP) or shelf life.
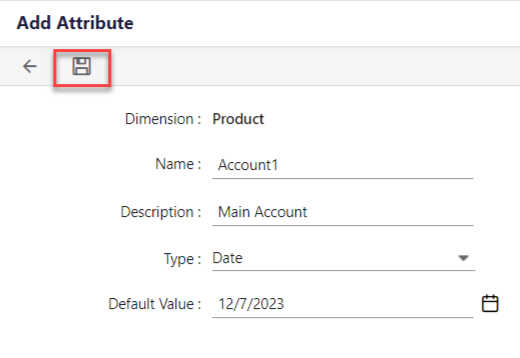
  10. Based on the selected type, fill in the relevant details for Default Value:
    1. For instance, for Reference to Segment, like using leaf members from a country hierarchy under the Customer dimension for Country.
    2. For Text, such as City names or Contact Numbers.
    3. For Date, Month, Year, List, Float, or Integer, enter respective values as applicable.
  11. Click Save.

Setting Up An Attribute Used in Reporting and Enabling Drill Down to Dimension Member

On the Attributes list page (shown below) two options are not set up when you add the attribute to the hierarchy; Used in Reporting and Drill down to Dimension member.

Used in Reporting - Yes is displayed when the attribute is mapped to a dimension.

In Practice

To map an attribute to a dimension, complete the steps below.

  1. Navigate to Maintenance > Reports > Cube Settings.
  2. On the Attribute Settings tab, click the Add icon to add an attribute.
  3. The Select Attributes window appears, for the selected area (Financial, Workforce, or Sales).
  4. Select the attribute in the hierarchy (organized by dimension) and click Add Selected.
  5. Under Type select Basic or Property.
    Notes:
    • Select Basic as selecting Property does not allow you to select the Include Rollup Members checkbox. 
    • When you select the Include Rollup Members checkbox, it includes leaf-level members with the mapped attribute and allows you to drill down.
  6. Select the Include Rollup Members checkbox.
  7. Click Save.
  8. Now, navigate to Maintenance > Hierarchy > Hierarchy Management.
  9. Select the Project Finance Hierarchy and the dimension where the attribute has been mapped.
  10. Click Setup and select the hierarchy.
  11. Click More and select Attribute Setup.
  12. The Used in Reporting and Drill down to Dimension member setting is displayed.
Note:
Drill down to Dimension member - Yes is displayed if the Include Rollup Members checkbox is selected on the Attribute Settings page.

The Reporting Cube must be processed when changes are made to a hierarchy so that changes are reflected in reports.
To process the Reporting Cube:

  1. Navigate to Maintenance > Reports > Process Reporting Area.
  2. Click the Dimensions tab.
  3. Select the Reporting Area.
  4. Select the checkbox next to dimensions.
  5. Change the Process Type to FullProcess.
  6. Click Process Now.

The changes will now be reflected in reports.

Making an Attribute Available for Dynamic Reporting

Ensure the Used in Reporting selection is set to Yes.

For information on how to do so: see Setting Up An Attribute Used in Reporting and Enabling Drill Down to Dimension Member

  1. Create the Attribute on a dimension (in this case Account)
  2. Navigate to Reports and Add a Dynamic Report.
  3. Under the Account dimension, the Attributes are listed and available for selection.

  4. Drag the attribute to the report axis. Complete the report and run.

Reflecting New Attribute Levels in Reports

When you add a new attribute level in the attribute hierarchy, you may not see the data reflected in reports if those reports were mapped to attributes before the addition to the attribute hierarchy. Complete the following to ensure all data is reflected in reports:

  1. Remove the references of the Attribute Hierarchy from the Dynamic Reports and Report Sets where it is being used.
  2. Unmap the attribute hierarchy from Reporting via the Attribute Settings screen.
  3. Re-map the attribute hierarchy from Reporting via the Attribute Settings screen.
  4. Process the Account dimension.
  5. Use the reference in the same Dynamic Reports and create a new report set based on the Attribute Hierarchy.

Mapping and Unmapping Workforce Planning Default Measures for Reporting Purposes

All default measures are enabled for selection on the Attribute Settings page so that you can map and unmap them to and from the reporting area. If you do not want to include annual salary or bonus, for example, in a Dynamic Report, you can hide them from the Measure dimension.

In Practice: Map Workforce Planning Default Measures from Attribute Settings

  1. Navigate to Maintenance > Reports > Cube Settings.
  2. On the Attribute Settings tabSelect Workforce Attributes from the drop-down menu.
  3. Click the Add icon to select measures to map.
  4. Click Add Selected.
    Note:
    You must map the Amount in CC (Common Currency), Headcount, and any one of the measures from the Position and Employee dimensions to take advantage of Workforce Reporting.
  5. Click Save.

Unmapping Measures

Not all measures can be unmapped. You will receive an informational message for measures that cannot be unmapped. Workforce Reporting measures (Amount in CC, Headcount and any one of the measures each from the Position and Employee dimensions) are required to be mapped.

To Unmap Measures:

  1. Click the checkbox next to the measure you want to unmap.
  2. Click the Unmap Measures button shown below.

Adding Another Level to Your Attribute Hierarchy

Adding or deleting a level within an existing attribute hierarchy is not possible if the attribute hierarchy has members.

  1. If the attribute hierarchy does not have members, navigate to Maintenance > Hierarchy > Hierarchy Management.
  2. Select the Type and for Hierarchy select the hierarchy under Attribute Hierarchies as shown below.
  3. Click Setup.
  4. Select the attribute hierarchy on the Finance Hierarchies Setup screen and click Edit.
  5. Add another level by clicking the Add button.

Was this article helpful?