Overview of Reports Available for Consolidation
| Report | Available for | Description |
| CTA Detailed Report | CTA accounts | For the accounts selected in the CTA set, this report provides the difference between the local currency balances converted using the currency type specified against the account versus the currency type specified in the CTA set definition. |
| Journal Entry Report | Standard Journals, Recurring Journals, Dynamic Journals | View journal entry details for a selected time period and print the output or download and save it as an Excel file for offline analysis. |
| Exchange Rates | Standard, Recurring, Dynamic, Non Controlling Interest, Validations, Reclassifications, Consolidation Process, Eliminations | View currency exchange rates for the application. |
| Audit Log | Standard, Recurring, Dynamic, Non Controlling Interest, Eliminations, Reclassifications, Consolidation Process, Validations | Provides information that can be very useful to administrative users. Administrative users may monitor all actions taken by regular users. If there are any discrepancies, administrative users can view the regular users that were logged on when the discrepancy occurred as well as the actions each user took associated with the module or piece of functionality in question. |
| Elimination Report | Eliminations | Elimination reports allow you to view the Elimination Entries results posted during the Elimination Process. Run deployed Elimination reports for a selected time period, Elimination Set, and list of accounts. |
| Variance Report | Eliminations | Run deployed Elimination Variance reports for a selected time period, Elimination Set, and list of accounts. An Elimination Variance report is a standard report that must be deployed from the Standard Reports page. |
| Natural Account Balance | Standard, Recurring, Dynamic, Eliminations, Non Controlling Interest, Reclassifications, Consolidation Process, Validations | Natural accounts contain transaction-level data. These accounts are used for revenues, expenses, assets, liabilities, and equity-type accounts. |
| Validation Status Report | Validations | Review the status of each processed Validation. The Remarks column provides you with additional information on the status of the Validation. Validations that result in a zero with an asterisk (0*), indicate that there was no data in the LHS or RHS and the system assumed it was a zero. Export the report to Excel by clicking the button highlighted in orange.
|
| Consolidation Status | Consolidation Process | The Consolidation Status report is an opt in feature used to view the status of the Consolidation Process for a given intersection (entity, scenario, period) within a close cycle. The Consolidation Status report offers several benefits, such as providing the necessary information to complete the close process in a timely manner. Further, consolidators can view the status by entity and the time period for which they are responsible. |
CTA Set and CTA Detailed Report
Accounting principles mandate that when translating financial statements to a reporting currency, the closing rate for all Balance Sheet accounts is used, as well as the weighted average rate for Profit and Loss Accounts, and historical rates for Historical Accounts and Retained Earnings. After translating using these principles, if the books do not balance, then a plug account can be posted to a balancing account called Cumulative Translation Adjustment (CTA) to balance the books.
The balance posted to the CTA account is also known as unrealized gains or losses due to currency fluctuations. The balance posted to the CTA account is an accumulation of the FX gains\losses generated by multiple accounts in the natural hierarchy.
In Planful, a plug account must be specified for posting the unrealized gains or losses during Consolidation Setup. Consolidation Setup, is also where you specify the rollup accounts for Total Assets, Total Liabilities, and Total Equity. For converted currencies such as; common currency, interim currency, and reporting currencies, the system calculates Total Assets - (Total Liabilities + Total Equity). If the results of the calculation do not equal zero (unbalanced books), the difference is posted to the CTA plug account to balance the books. Using this method, Planful doesn’t provide the account details for the balance posted to the CTA account. You can overcome this using the functionality called CTA Sets.
In Practice
Navigate to Maintenance > Multi-Currency > CTA Sets.
Click Add.

Enter a Title and Description.

Specify a Base Rate. Typically this base rate has to be the closing rate of the period such as the EOM- End of the Month Rate.
Click Add Accounts and select the accounts that contribute to the CTA balance. Typically these are historical accounts such as Common Stock, Retained Earnings, and PPE accounts.
Under Target CTA Setup, specify the segment combination of the CTA account. This might be the same CTA account specified in the Consolidation Setup.
Save the CTA Set. Create as many sets as required.
Navigate to Maintenance > Hierarchy Management. Select the Dimension as Reporting and click Show.
Create a new Reporting Currency. To learn how to create Reporting Currency, click here.
Select a leaf level member of the Reporting Currency in Hierarchy Management. The Properties pane appears. Under Segment Properties, select Account Based for Calculation Type. Select other properties as required.
Select Overwrite default CTA.
Under CTA Sets, select the sets created earlier. Click OK and then click Save.

Run the Consolidation Process for the Reporting Currency.
Navigate to Maintenance > Report Administration > Standard Reports and Run the CTA Detailed Report (which must be deployed by an Admin user).
.png?sv=2022-11-02&spr=https&st=2026-02-01T23%3A02%3A58Z&se=2026-02-01T23%3A23%3A58Z&sr=c&sp=r&sig=JwaZU3kJ8ZgNbnm2EGVPraGU2TOchSxu4fS1T23XcD4%3D)
Select a Scenario, Period, Account, Company, Reporting, CTA Set(s), and Run the report.

For the accounts selected in the CTA set, the report provides the difference between the local currency balances converted using the currency type specified against the account versus the currency type specified in the CTA set definition.
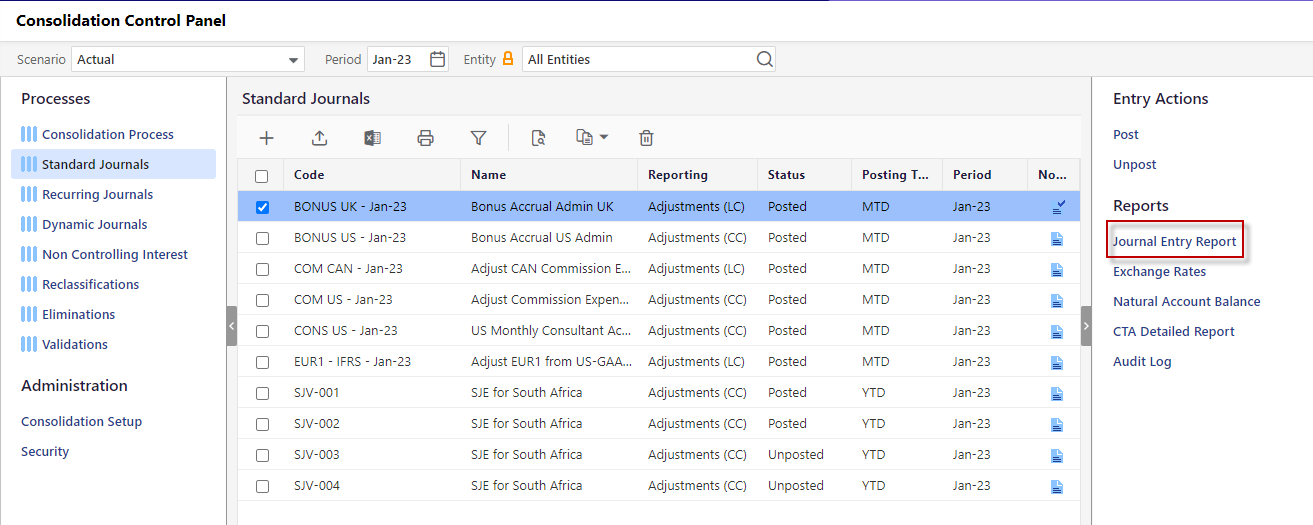
Journal Entry Report
The Journal Entry Report provides a glance at journal entries for a specific status. Use this report to query journal entries from the point they are created, to approved. This report is available only for Standard Journals, Recurring Journals, and Dynamic Journals.
To run and view the Journal Entry report :
In the Consolidation Control Panel, under Processes, select a process. The grid for the process you have selected appears.
Under Reports, click Journal Entry Report. The Journal Entry Report dialog appears.

Select the Scenario.
Select the Period by selecting a date range using the calendar icon.
Select the Journal Types. Available values are Standard Journals, Dynamic Journals, and All Journal Types.
Select the Status for journal entries. Available values are All (Status), In Process, Pending Review, Approved, Posted, Unposted, and Rejected.
Select Journal from the dropdown.
Select the Display for journal entries in report results by Code, Name, or Label. Selecting Label displays the code and name for journal entries.
Select the Sort Order, available options are By Period, By Status, and By Period & Status.
Click Apply & Open. The report details appear at the bottom, within the Journal Entry Report dialog.

Activity Log Report
The Activity Log report contains data that can be used to review the activity associated with a given Validation. For example, for a selected period-Validation combination, you could review the number of times the Validation was run and the status of each run. This report is available for the Validations Process only.
To run and view the Activity Log report :
In the Consolidation Control Panel, under Processes, click Validations. The Validations grid appears.
Under Reports, click Activity Log. The Activity Log dialog appears.
Select the Validation.
Select the Period by clicking the calendar icon.
Click GO. The report details appear at the bottom, within the Activity Log dialog.
Variance Report
The Variance report is a standard report that your administrator must deploy. You can run a Variance Report by selecting a scenario, time period, Elimination, and Elimination accounts in various combinations. This report is available for the Eliminations Process only.
To run and view the Variance report :
In the Consolidation Control Panel, under Processes, click Eliminations. The Eliminations grid appears.
Under Reports, click Variance Report. The Variance Report dialog appears.

Select the Scenario.

Select the Fiscal Year.
Select the Month.
Select the Elimination Set.
Select the elimination Accounts.
Note:The Show/Hide option is a toggle to display or hide fields.Click Run. The report results are displayed within the Variance Report dialog.

Elimination Report
Run the Elimination report to view the results of Elimination Entries that were posted during the Elimination Process. You can view the Elimination Report by selecting time period, Elimination, and Elimination accounts in various combinations. This report is available for elimination process only.
To run and view the Elimination report :
In the Consolidation Control Panel, under Processes, click Eliminations. The Eliminations grid appears.
Under Reports, click Elimination Report. The Elimination Report dialog appears.
The Scenario field for eliminations is read-only.
Select the Month by selecting a month and fiscal year using the calendar icon.
Select Elimination from the drop-down.
Select the elimination Account.
Click Go. The report details appear within the Elimination Report dialog.

Exchange Rates Report
The Exchange Rates report provides information on currency exchange rates used in the application. This report is available for all processes.
To run and view the Exchanges Rates report :
In the Consolidation Control Panel, click a process, then Reports, and then click Exchange Rates. The Exchange Rates page appears.
Select a Scenario.
Select the Year.
Select the Currency.
The report displays data based on the selection.

Natural Account Balance Report
The Natural Account Balance report contains transaction-level data. This report checks the natural balance as defined by you (debit/credit account property in segment hierarchies) and determines if the current period’s balance is different from the natural balance. If there is a difference, an email notification is sent to users to take appropriate action. This report is available for all processes.
Examples of Natural Account Balances for accounts include:
Income – Credit balance
Expense – Debit balance
Assets – Debit balance
Liabilities – Credit balance
Equity – Credit balance
To run and view the Natural Account Balance report :
In the Consolidation Control Panel, under Processes, select the process. The grid for the process you selected appears.
Under Reports, click Natural Account Balance Report, and The Natural Account Balance Report dialog appears.
Select the Scenario.
Select the Fiscal Year.
Select the Entity.
Select the Fiscal Month.
Select the Currency. Available values are Local and Common.
Note:The Show/Hide option is a toggle to display or hide fields.Click Run. The report details appear within the Natural Account Balance Report dialog.

Validation Status Report
The Validation Status Report provides the status of processed Validations. This report provides a list of successful and failed Validations. Access this report from the Validations Process.
To run and view the Validation Status report :
In the Consolidation Control Panel, under Processes, click Validations. The Validations grid appears.
Under Reports, click Validation Status Report.

The Scenario field is read-only and indicates the scenario associated with the Validations.
Select the Entity.
Select the Validation.
Select the Period by clicking the calendar icon.

Click GO. The report details display within the Validation Status Report dialog.

Consolidation Status Report
The Consolidation Status report is an opt-in feature to view the status of the Consolidation Process for a given intersection (entity, scenario, period) within a close cycle. The Consolidation Status report offers several benefits, such as providing the necessary information to complete the close process in a timely manner. Further, consolidators can view the status by entity and time period they are responsible for. This report is available for the Consolidation Process only.
Once the necessary General Ledger data is loaded, journal entry processing, and consolidation activities are completed, the behind-the-scenes log stores each action with a date and time stamp. For example, if you run the Consolidation Process, the application logs the activity and time, along with the consolidated action. All this information is available in the Consolidation Status report.
If you modify data in a previous or current period, the consolidation status for all subsequent periods will be affected, as year-to-date amounts. For example, if you modify data for July 2022, the Consolidation Status report will change for August 2022 and September 2022 as well.
Perform the below steps to run and view the Consolidation Status Report:
In the Consolidation Control Panel, under Processes, click Consolidation Process.
Under Reports, click Consolidation Status. The Consolidation Status dialog appears.
The Scenario is a read-only field that indicates the scenario associated with the Consolidation Process.
.png?sv=2022-11-02&spr=https&st=2026-02-01T23%3A02%3A58Z&se=2026-02-01T23%3A23%3A58Z&sr=c&sp=r&sig=JwaZU3kJ8ZgNbnm2EGVPraGU2TOchSxu4fS1T23XcD4%3D)
Select the Period by clicking the calendar icon.
Select the Entity.
Click GO. The report details with the Overview tab selected is displayed within the Consolidation Status dialog.

Interpret the Consolidation Status Report Results
Consolidations Status report results are spread across four different tabs —Overview, Consolidation Detailed, Standard Journals, and Validations. This section helps you understand the information on each tab. Note that all children of a parent entity display the same status as the parent.
Overview
The Overview tab provides information on the consolidation status, data load, Standard Journals, locked, and Validations. The consolidation statuses are "Consolidation successful", " Not Started", "Consolidation required", "Consolidation was never performed", "Consolidation Process was performed", "Data has changed since the last Consolidation Process", and so on. You can drill down into unprocessed consolidations for more information.
Consolidated Detailed
The Consolidated Detailed tab provides information on the location of the modified data, the modifications itself (add, edit, etc.), the user who modified the data, and so on. For more information on modifications, click an individual process to open the pop-up message containing the most recent five modifications.
Click the more... link to download an Excel report containing the modifications across all processes for the entity. When clicking the more... link at roll-up level, the Excel report provides information on modifications to all processes for all entities under the roll-up..png?sv=2022-11-02&spr=https&st=2026-02-01T23%3A02%3A58Z&se=2026-02-01T23%3A23%3A58Z&sr=c&sp=r&sig=JwaZU3kJ8ZgNbnm2EGVPraGU2TOchSxu4fS1T23XcD4%3D)
Standard Journals
The Standard Journals tab provides information on the unprocessed Standard Journals. The indicators used for the Overview and Consolidation Detailed tabs are the same. You can also drill down into unprocessed Standard Journals and export them to an Excel sheet.
Validations
The Validations tab provides information on unprocessed and failed Validations. The indicators used for the Overview and Consolidation Detailed tabs provide the same purpose on the Validations tab as well. You can also drill down into unprocessed Validations and export them to an Excel sheet.
Report Behaviour
The following is a sample Consolidation Status report that describes the behavior of each status for various processes.


