Integration Services
- 5 Minutes to read
- Print
- DarkLight
- PDF
Integration Services
- 5 Minutes to read
- Print
- DarkLight
- PDF
Article Summary
Share feedback
Thanks for sharing your feedback!
Introduction
The Data Integration Services feature allows you to manage the Integration Process with Boomi from within the Planful application. Execute an Integration Process on-demand from Planful without needing to intricately understand Boomi, and, without the help of an IT professional.
Use the Integration Service to execute a custom Integration Process to load metadata, summary data, transactions data and operational data to Planful. This feature provides complete visibility into the type of data source and the data that is being loaded to the application and has full auditing capabilities as well as detailed status of each integration process.
First, you will need to configure the Integration Service on the Configuration Tasks - Cloud Services page and then you’ll configure the process for execution on the Integration Service page under Data Integration (DLR). Admins are required to provide navigation access to users who will need to access the Integration Service page. The steps below walk you through the setup and execution. There are three tasks you will need to perform, which are:
Completing the Integration Services Configuration Task
Setup the parameters for the integration as well as authentication information.
In Practice
Navigate to Maintenance > Admin > Configuration Tasks.
Open the Data Integration Configuration - Cloud Services task.
On the Cloud Services page, click the Integration Service task.
Enter the Account ID provided by Boomi.
Planful supports HTTP (RESTful) APIs that publish data in JSON format. Enter the request in the Rest API URL field.
Enter the username and password to authenticate the Rest API URL call.
Click Submit. The welcome screen appears.
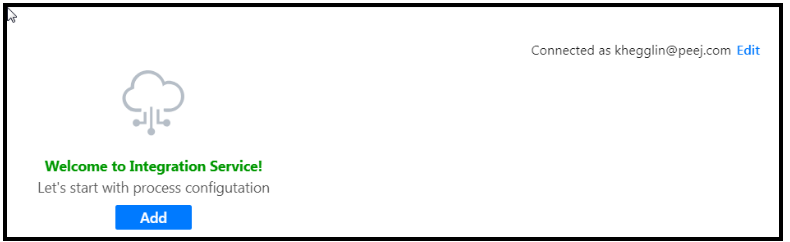
Click Add . The Configure Process screen appears.

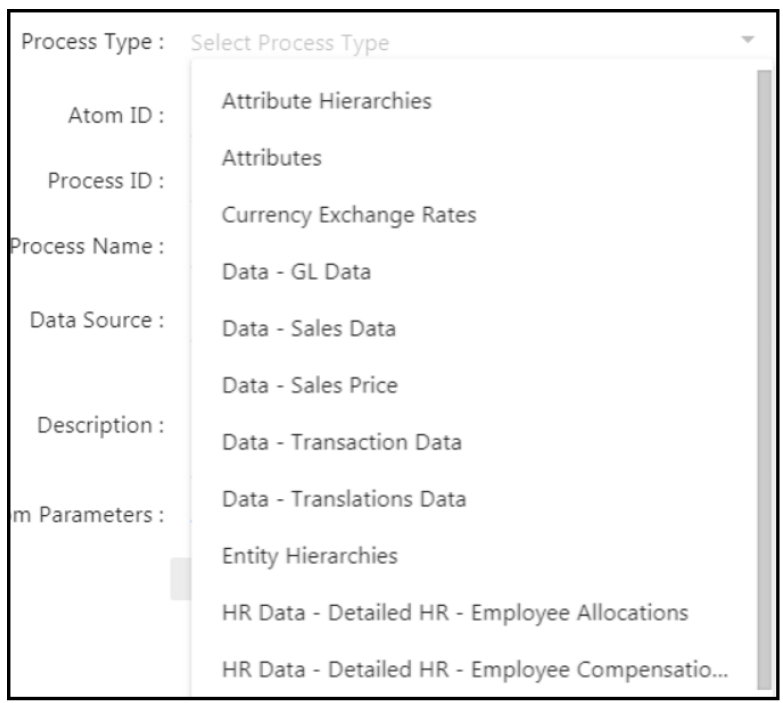
The Rest API URL is populated based on the URL you already entered during step 5. For Process Type , select the type of data you are loading. See examples in the screen below. For this example, Data - GL Data is selected.
Enter an Atom ID provided by Boomi. The Atom contains all the components required to execute your processes from end to end, including connectors, transformation rules, decision handling, and processing logic. This ID is provided by Boomi.
Enter an ID or your choice to identify the process.
Enter a name of your choice to identify the process.
Select the source vender, Boomi, (where your data is stored) for the Data Source field.
Here is an example using SFTP:
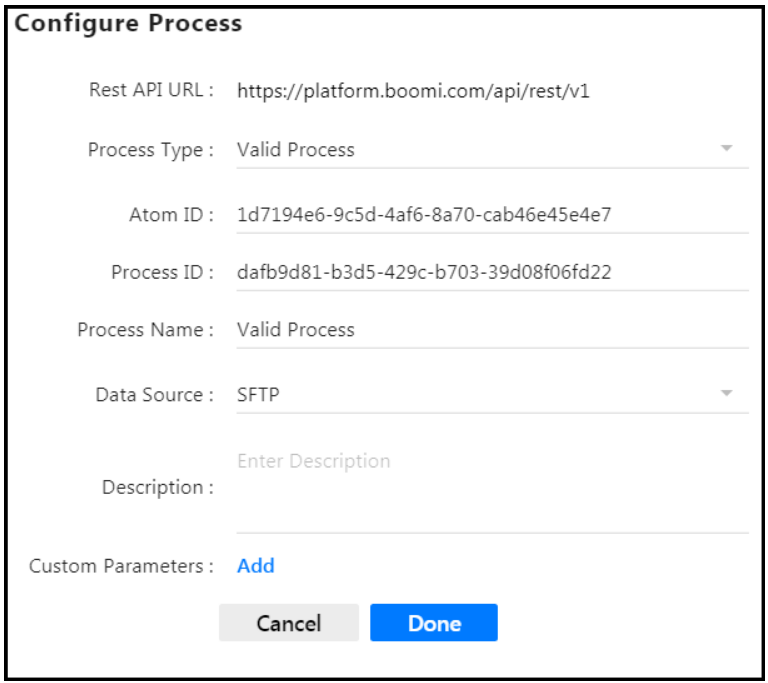
Enter a description of the process and click the Add button (optional) to launch the Custom Parameters page where you can set additional parameters. You might want to set additional parameters when you want to load data from different subsidiaries, for example, and need to identify each (Subsidiary A or B). Enter a name for the custom parameter and provide a label. Note that these two fields can be the same.
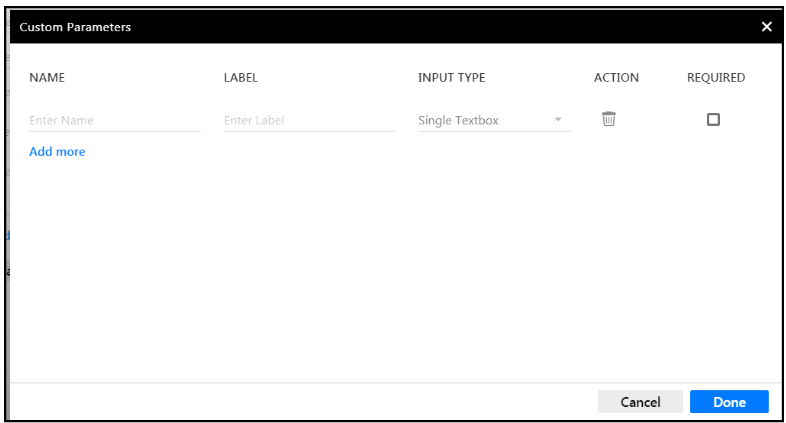
For Input Type , select to present the user with a textbox or a dropdown list box. If you select Dropdown , you will be prompted to enter selectable options. Select the Required checkbox as shown below. By selecting Required , users executing the process will be required to provide an input value for the parameter.
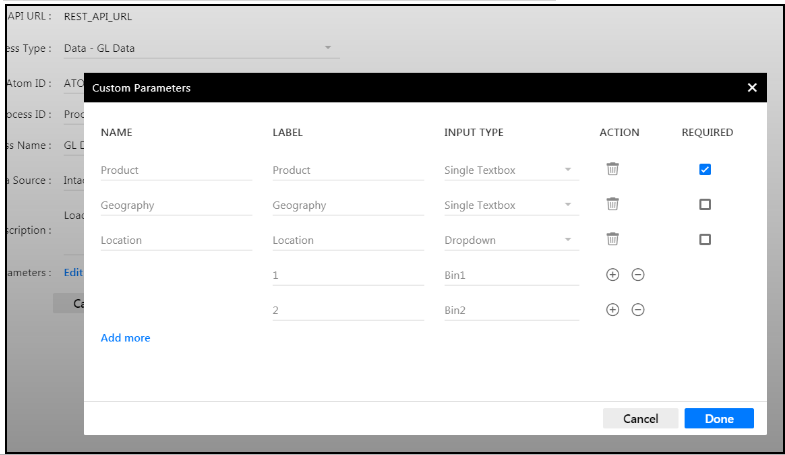
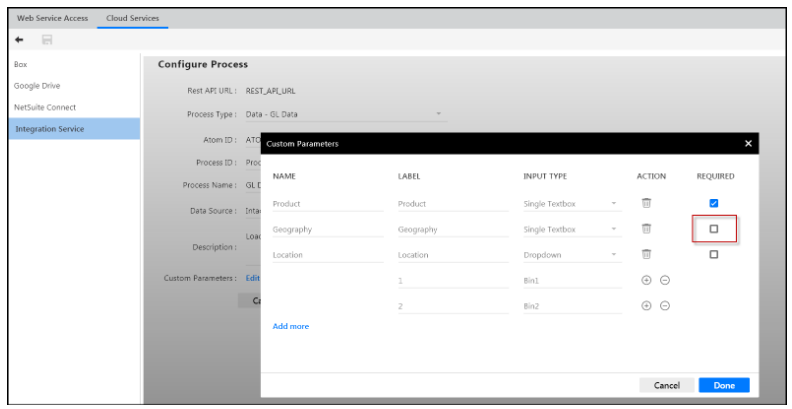
DO NOT select the Required checkbox as shown below. When you do not select Required, users have the option of completing the parameter when executing the process.
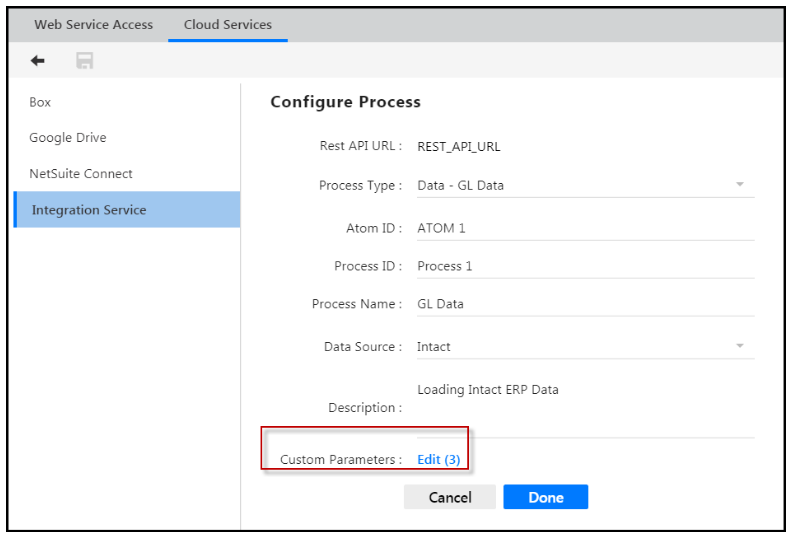
Click Add more to add additional custom parameters or click Done . Once complete, the number of parameters added (required or not) will display on the Configure Process page - Custom Parameters field as shown in the image below.


Working with Custom Parameters for Integration Service Processes
Once admin users have set up custom parameters (optional or required or both), users should follow the steps below to execute an Integration Services process.
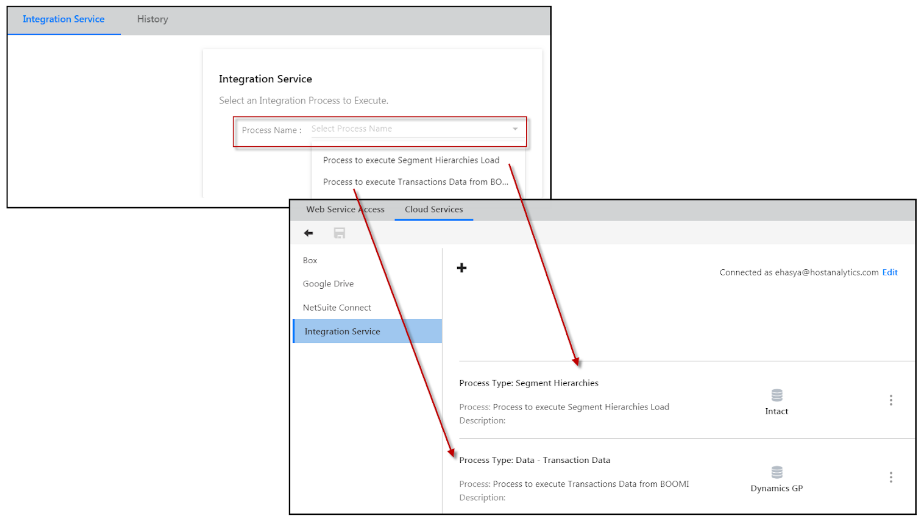
In this example, the Process to execute Segment Hierarchies Load is created as an Integration Service process as shown below. And, two custom parameters are defined; one being required and the other is optional (see second image below).


In Practice
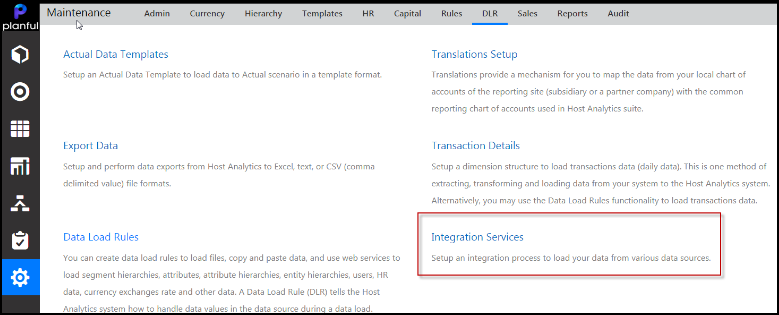
Navigate to Maintenance > DLR > Integration Services.
The Integration Service page is displayed. Select a process by name. Notice that the names in the Process Name list-box are populated from the processes defined on the Integration Process page.

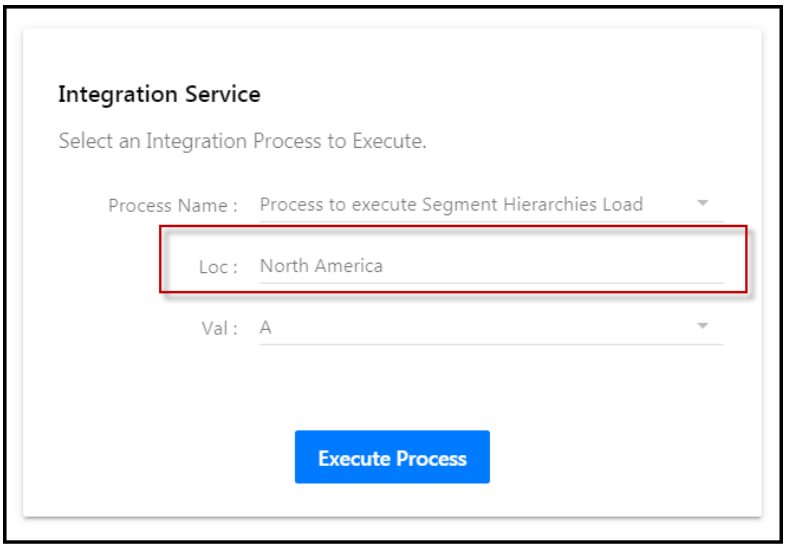
In this example, the Process to execute Segment Hierarchies Load is selected. Notice that the Loc (location) field is required, but the Val (value) field is optional. Required parameters are mandatory and the Integration Process will not execute without the parameter completed. Optional parameters are not required and it is up to the user as to whether the optional parameters are completed. If you execute the process without entering a value for the Loc field, the system will prevent it. The second image below shows the message that appears when a required field is not completed.
Complete the required fields (as shown in the 3rd image below) and click Execute Process.


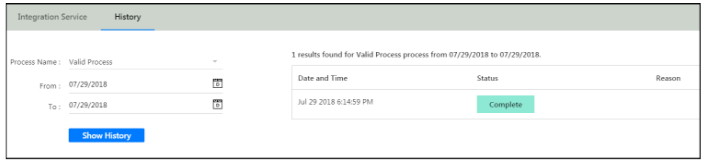
You can view all processes by clicking the History tab, selecting a process name and the dates for which it was executed.


Providing Navigation Access to the Integration Services Application Page
Provide a user with access to the Integration Services application page where the user can set up processes for execution (to load data).
In Practice
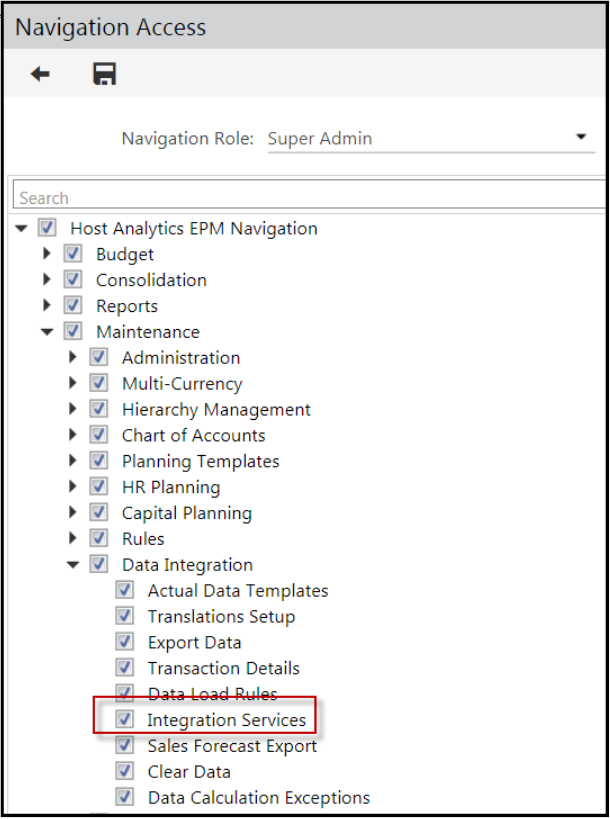
Access the Navigation Access page by navigating to Maintenance > Admin > User Management.
Click the Navigation Role tab and select the Navigation Access button to launch the Navigation Access page for a selected navigation role.
Select the Integration Services checkbox and click Save.

Adding an Integration Service Process
Define the data type you want to load and select the vendor you want to load data from.
In Practice
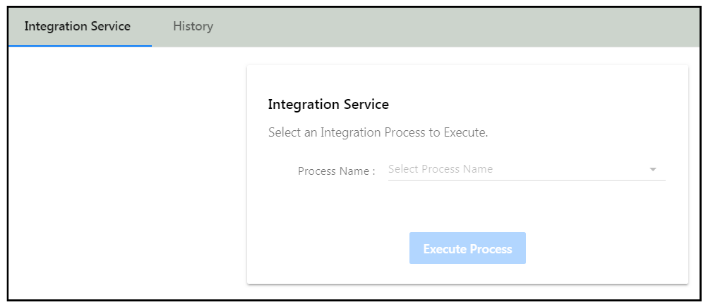
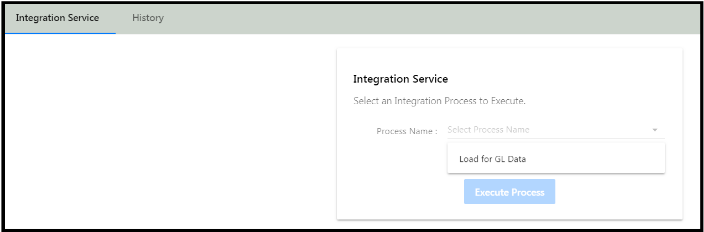
Access Integration Services by navigating to Maintenance > DLR > Integration Services.
The Integration Service screen appears. Select a process to execute.
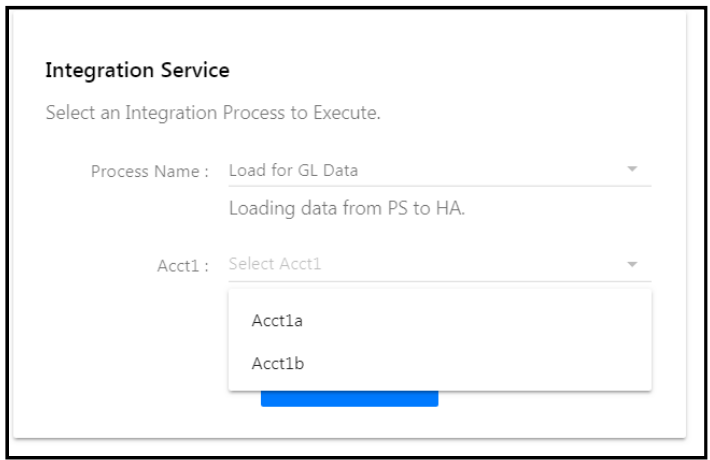
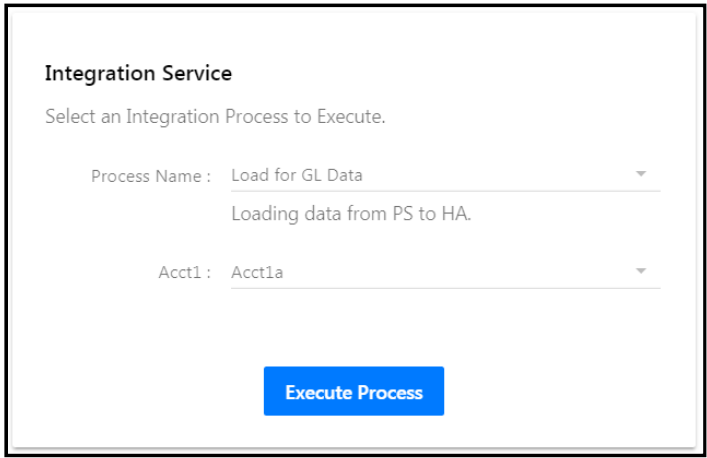
The Process Name list-box is populated based on the processes set up on the Configuration Tasks - Cloud Services page. In this case the process configured is called Load for GL Data. Select it.
Because a dropdown was configured for this process, select to load data for subsidiary A or B.
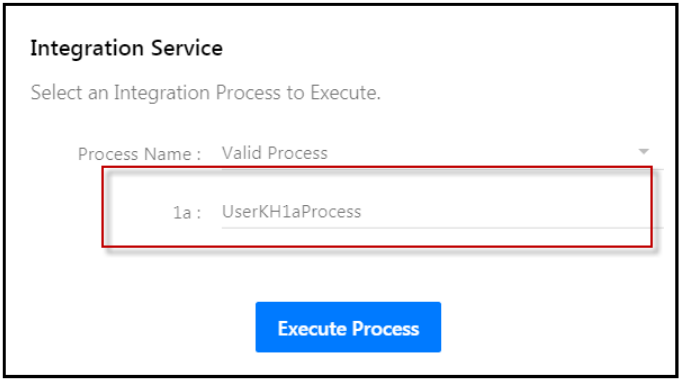
Here is an example where a textbox was selected and named “1a”. The user executing the process might want to enter details in the textbox as shown below.
Click Execute Process to load the data.
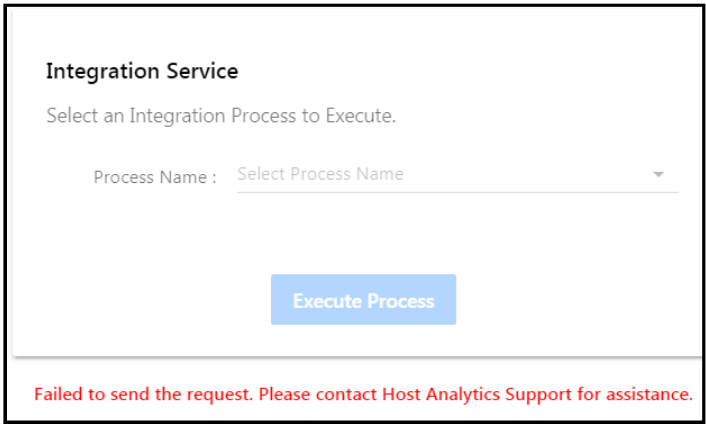
If the process fails, the following message appears:
If the process is a success, the following message appears:
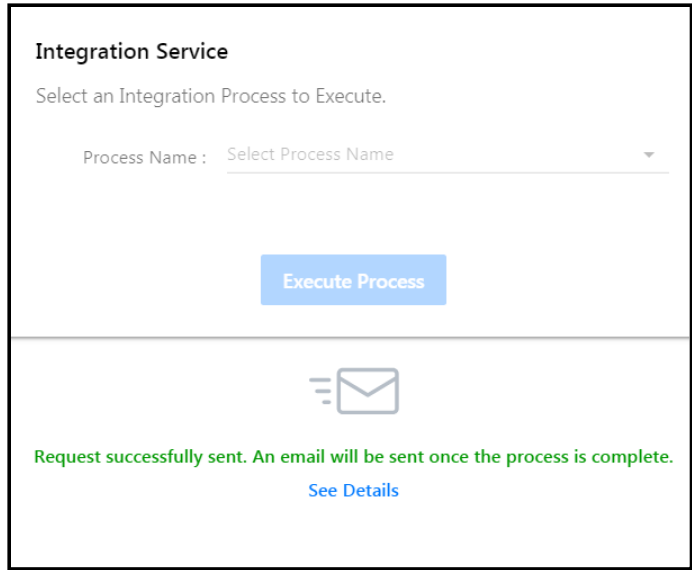
Click See Details or select the History tab and the page below appears.


Editing, Deleting and Copying Integration Service Processes
You can copy, edit or delete the configured processes (in additional to adding new processes). You can also select to add another configured process. If you copy a process, you can then edit it as needed.
In Practice: How to Copy an Integration Service Process
Navigate to Maintenance > Admin > Configuration Tasks.
On the Configuration Task page (under Data Integration Configuration), click Cloud Services.
On the Cloud Services page, select Integration Service.
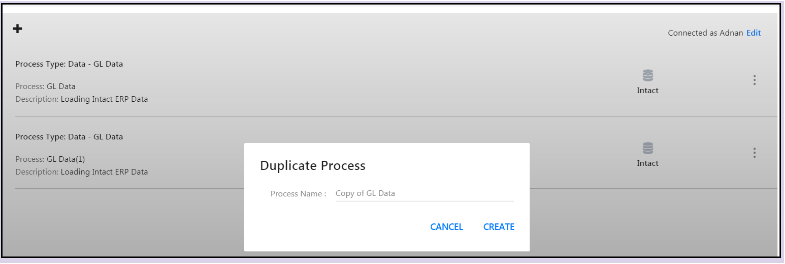
Integration Service process are shown (an example is provided below). Select the three vertical dots for a process and select Duplicate.
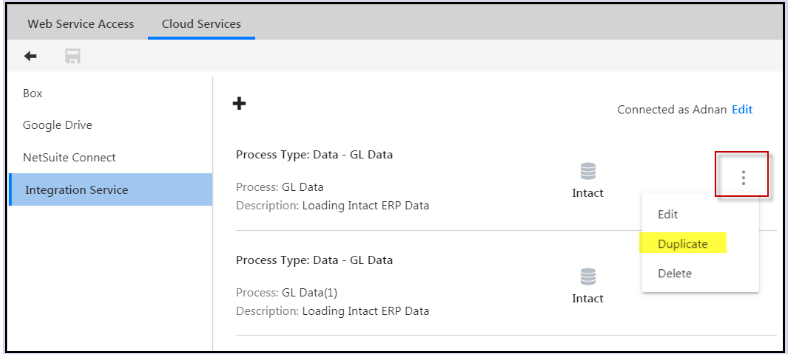
The Duplicate Process screen appears. The name of the process is the same name of the selected process you are copying, but it is preceded with “Copy of ”. You can keep this name or rename the process. Then, click Save.


Was this article helpful?