Modeling Model Manager, Global Model Actions with the More Menu
- 10 Minutes to read
- Print
- DarkLight
- PDF
Modeling Model Manager, Global Model Actions with the More Menu
- 10 Minutes to read
- Print
- DarkLight
- PDF
Article Summary
Share feedback
Thanks for sharing your feedback!
Overview
The More menu is primarily for Power and Contributor. Reviewers only have one option on the More menu: Model Artifacts.
 Click the 3-dot icon from the Grid or List layouts to open the More menu.
More menu for a Generated Model | More menu for an Ungenerated Model | More menu for an External Source Model |
** Not available for Reviewer users |
** Not available for Reviewer users |
** Not available for Reviewer users |
Adding a Map
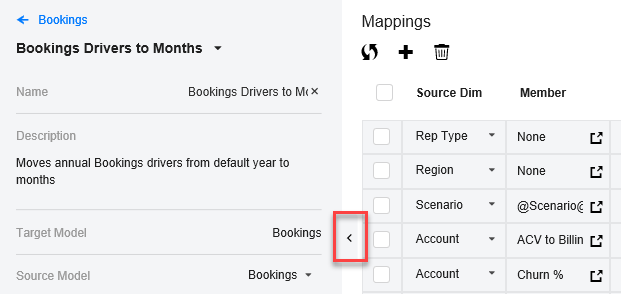
When you select Add, Map, the Mappings screen appears.
The left pane of the screen lets you specify the following basic information about the map:
Map name (required)
Map description
Target model (required)
Source model (required)
Map type (Data, Metadata, or Both) (required)
Transfer type (All data, or Leaf data) (required)
Write Back ID (used only when data is flowing back to the original data source)
Access Token (used only when automating data integration with APIs)

The right pane of the screen is where you specify the mapping details:
Source Dimension
Member (Source Value)
Filter (Source Filter)
Target Dimension
Member (Target Value)
Filter (Target Filter)
Match Criteria
Use the drop-down arrows to select different options.
Use the open icon to view the Member Selection box.
To delete a row, click the checkbox next to the row and click the trashcan icon.
To discard your changes, click the Refresh icon.
To add a new row, click the + icon.
Note:You can expand the Mappings pane by clicking the left arrow between the two panes. It looks slightly different depending on your browser.


When done with your changes, click Save.

For details about using maps to load data from Planful Structured Planning, Consolidation, or Reporting applications, see Setting up the Target/Master Model using a Map.
Clearing a Model
For multidimensional models, when you select Clear Model, all data in the model is deleted, and the model moves from a Generated state to an Ungenerated state. Dimensions and other artifacts are retained. An ungenerated model can be modified or deleted.
When you are in the process of designing and testing a new model, you will likely Clear Model and Generate Model frequently. However, once a model is in production, these actions will be used rarely.
When the model is cleared, you see the Ungenerated icon (incomplete circle) next to the model name.

For external source models, when you select Clear Model, all data in the model is deleted. All field definitions, expressions, and formulas are retained.
When you are in the process of designing and testing an External Source Model, you will likely Clear Model and run Data Loads frequently.
Deleting a Model
For multidimensional models, when you select Delete Model, the entire model is deleted, including all data, dimensions, formulas, calculations, maps, and reports, and other artifacts. You cannot delete a generated model. You can only delete ungenerated models. To delete a generated model, select Clear Model to return the model to a state of ungenerated and then select Delete Model.
For external source models, you select Delete Model, the entire model is deleted, including all data, fields, formulas, calculations, maps, views, reports, and other artifacts.
This action is permanent and cannot be undone. Considering making a backup of the model before you delete it. Select Model Backup from the More menu.
Generating a Model
When you select Generate Model, the model moves from an Ungenerated state to a Generated state, which completes the setup of the model.
If the Model is a Master model, the model is populated with data using the Map that indicates that Data should be included, either by selecting Data or Both in the map Type setting.

If the Model is an Analytic model, the model is not populated with any data but is ready for data input.
Once generated, you cannot edit the model structure unless you clear the model first. Generated models are available for analyzing and reporting. Ungenerated models are not available for analyzing or reporting.
Ungenerated - for designing or editing a model.
Generated - the model is ready for consumption by users (Analyze, Report).
Locking a Model
When you select Lock Model, the model is blocked from modification or clearing. Only Analytic and Master models can be locked. Models must be in a Generated state to be locked. Ungenerated models cannot be locked.
While locking a model ensures data integrity and prevents clearing the data, it also means that data changes cannot be saved or updated from Views, Reports, Data Load, API Library, Calculation, and Maps.
Use Lock Model to freeze the data in the model. This is helpful prior to making backups or preparing to perform other maintenance or changes to the model.
When the model is locked, you see the Locked icon next to the model name.

Functionality that can be Used on Locked Models:
Append Dimension Member
Set Display Label
Set Dimension Based Properties
Attribute
Set Attribute Mapping
Lock Effects on Calculations
When a calculation runs, it checks whether the model is locked or not before executing each line item. If the model is locked and the calculation has a step that modifies data, the calculation is terminated and you are notified.
Saving Report Data to Locked Models
If a report is associated with a locked model and the Enable Save property is set to All Models, users cannot save data from that report.
If a report is associated with multiple models, one of the models is locked, and Enable Save is set to All Models, users cannot save data from that report.
If a report is associated with a locked model, Enable Save is set to Calculation Model and Calculation on Save is based on the model that is locked as shown below, users cannot save data from that report.
- If a report is associated with multiple models (some that are) locked, Enable Save is set to Calculation Model, and Calculation on Save is not based on the model that is locked, users can save data from that report to the model that is not locked.
Saving View Data to Locked Models
- If Enable Save is set to Yes in a View on a model that is locked, users cannot save data from that view.
Unlocking a Model
When you select Unlock Model, the model is returned to normal status, available for updates to data. Only locked models can be unlocked.
Running a Model Backup
The Model Backup menu item is available only to Power users and can be found on the More menu of the models listed in Model Manager.
If the model is in an Ungenerated state, you can backup the model but there are no other choices available because there is no data in the model.
If the model is in a Generated state, either Locked or Unlocked, you have three choices for your Model Backup:
Backup Without Data
Backup with Leaf Level Data only (this option is recommended; it is helpful when moving large models across environments)
Backup with All Data

After you select Model Backup (and select a data option), the model is immediately backed up as a .ZIP file. Some browsers may ask you if you wish to open or save the .ZIP file. Otherwise the resulting .ZIP file is stored in the Downloads folder associated with your browser.

The maximum size of a model backup and/or restore is defaulted to 200 MB.
Note:
If required, contact Planful Support to increase this default. The limit is 500 MB.
As a best practice, use Leaf Level for Data when exporting big models, and do not exceed the limit of 500 MB.
The following items are not backed up currently with this functionality:
Model Permissions – these would need to be recreated in the target application. The default behavior is that the Power users in the target application will have access to the newly added model, but no other users will be able to access.
Users, Groups, User Groups are not backed up as they are application specific, not model specific.
Additional Data Sources – data sources other than Planful Structured Planning, Consolidation, or Reporting applications that are not backed up currently.
Note:
If you are backing up a Master model that is connected to HACPM_Financial, you might be able to restore it as a Direct Access to PCR model. See Converting a Master Model into a Direct Access to PCR Model.
Running a Model Restore
Model Restore functionality is available on the ribbon of Model Manager in Spotlight.
Only users with Power privilege can see this icon on the ribbon and run Model Restore.

In Practice
Click the Model Restore icon. A panel appears on the right side of the window. You need to find the model backup file that was saved previously and that you want to restore from. The model backup file is a .ZIP file.
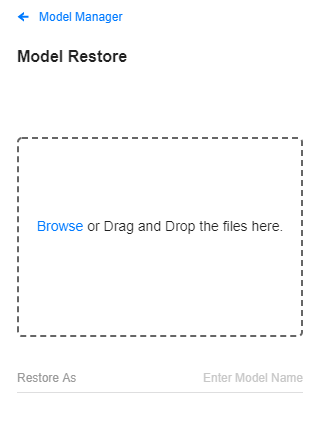
Click Browse to open a file section box. Or drag and drop the .ZIP file into the Model Restore panel. The .ZIP file then appears in the dotted line box.
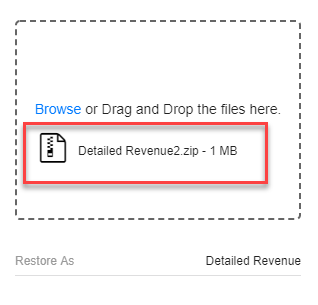
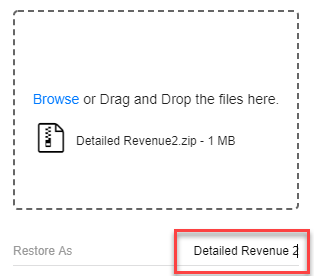
By default, the model will be restored with its original name. If you want to restore the file with a different name, click on the model name next to "Restore As" and change it.
Scroll down, if necessary, and click Restore.

The .ZIP file is processed and, if successful, you see a notification.

The restored model then appears as one of the models in the Grid or List layout in Model Manager.


Note:
If you are restoring a Master model that is connected to HACPM_Financial, you might be able to restore it as a Direct Access to PCR model. See Converting a Master Model into a Direct Access to PCR Model.
Viewing Model Activity
When you select Model Activity, you see the Model Activity Browser. This browser displays the status of activities performed using the Model Manager. Previously, information like this was limited only to Power users, but Contributors also have access to this browser. Power users also have a more comprehensive way in SpotlightXL to view actions on models using Manage, Model Administration, Audit Log.
Model Activity provides an ongoing log of activities happening on each model. For example, if someone edits a dimension, it is logged. If someone runs a calculation, it is logged.

Power and Contributor can view model activity by user, component, action, date, and success or failure.
Username : select the username whose activity you want to view.
Component : optionally select the area of functionality in Modeling that you want to view, such as Calculation or User Login.
Action : optionally select the type of action that you want to view, such as Save, Run, or Breakback.
Date Range : defaults to today; optionally select a different date range.
Status: default to show both Successful and Failed activities; optionally uncheck either Success or Failure.
After making your selections, click View Logs.
Activity Panel:
The right side of the Model Activity Browser contains information about the actions performed by users.
Username: who performed the activity
Component: what area of Model Manager was used
Action: type of operation performed
Name: the name of the Component used, if applicable
Status: Success or Failure
Details: any messages generated by the activity
Date: the date and time the activity was performed
Working with Model Artifacts
When you click Model Artifacts, you see the Model Artifacts Browser.
You can also open the Model Artifacts Browser by clicking on a calculation, formula, scope, or map in a Model Box.

The Model Artifacts Browser is a dynamic viewer window that displays the following artifacts, if they exist, for the selected model:
Attributes: see Using the Dimension Attribute Browser
Dimensions: see Using the Dimension Browser
Maps: see Creating, Editing, and Filtering Maps
Calculations: Running and Filtering Calculations
Formulas: see Filtering Formulas
Scopes: see Filtering Scopes
Views: see Running and Filtering Views
Reports: see Running and Filtering Reports
Fields (for External Source Models): see Filtering External Source Model Fields
Formulas (for External Source Models): Creating, Editing, and Filtering External Source Model Formulas
Maps (for External Source Models): see Filtering External Source Maps
The right side of the Model Artifacts Browser contains details of the artifact selected.
Icons are available to perform actions on the artifact, such as Refresh, Filter, and Run.

For more information, see Using Model Artifacts.
Viewing Model Statistics
When you click Model Statistics, you see the Model Statistics Browser. These statistics have previously been available only to Power users (with Manage, Application Administration, Application Statistics). Now Contributors can view them also.
Everything in this browser is read-only. You can click the column headings to sort them in different ways.

Statistics:
Model Size in megabytes; the model is stored in the cloud.
# of Dimensions; the dimensions are listed in the panel to the right.
# of Attributes; you can view the attributes in the Model Artifacts Browser.
# of Key Members; the member counts of each key dimension multiplied together. This is also known as the Key Block Size.
# of Value Members; the member counts of each value dimension multiplied together. This is also known as the Value Block Size.
# of Records; the number of data records in the model.
Dimension Panel:
The right side of the Model Statistics Browser contains information about the dimensions. You can click on a column heading to sort the dimensions in the order of that column, ascending or descending.
Dimension Name: listed in the order they were created
Dimension Type: Key or Value; Key corresponds to dimensions that will most likely change over time (such as Customer and Account), whereas Value corresponds to dimensions that do not change often (such as Scenario or Year).
Member Count: number of members in that dimension
Hierarchy Levels: number of levels of parents and children
Was this article helpful?