1.8 Modeling Release Notes, August
- 16 Minutes to read
- Print
- DarkLight
- PDF
1.8 Modeling Release Notes, August
- 16 Minutes to read
- Print
- DarkLight
- PDF
Article summary
Did you find this summary helpful?
Thank you for your feedback
This document describes all the features and enhancements with this release of Spotlight/SpotlightXL, as well as any known or resolved issues.
Features and Enhancements
Organizing Calculation Processes in Folders
Description Field for Calculations
User Group Permissions for Calculations
Support for Variables in Views and Reports
Attributes
Attributes are characteristics associated with dimensions and are most commonly used to create alternative roll-ups for analysis and reporting.
Suppose in a Budget model, you have Customer, Company, Product dimensions defined. For a dimension called Product, you can configure attributes like size or color. These attributes provide additional flexibility to look into your data from a different perspective.
Attributes can be used in view and reports for reporting and analysis.
Note:
Attributes are enabled by default for all applications.
Providing Access to the Attribute Page
Setting Up Attributes
Admin and Designer roles can set up attributes. Reviewers can use attributes that are set up, but must first be provided access.
There are two ways to set up attributes:
Importing Attributes and Attribute Hierarchies from the Core Application
When importing attributes and attribute hierarchies from Core applications, you must define a map in SpotlightXL to transfer the data from Core applications.
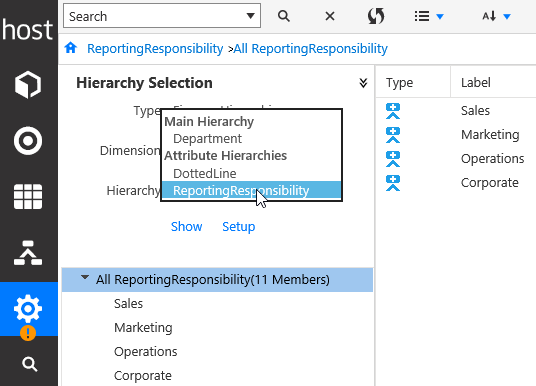
In this example the VP_Resp attribute defined on the Department dimension in the Core application and the ReportingResponsibility attribute hierarchy defined on the Department dimension are mapped as attributes in the Modeling SpotlightXL application.
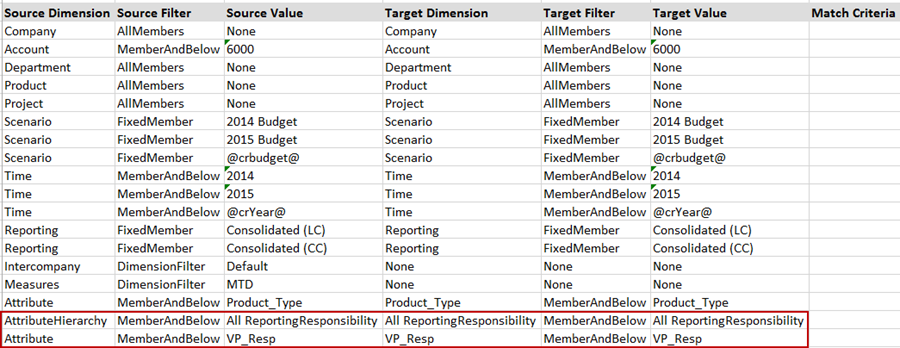
Attributes as Defined in the Core application for this example is shown below.
- Access the Model Map page.
- For Source Dimension select Attribute.
- For Source Filter, all members below VP_Resp including VP_Resp will be transfered to Modeling from Core applications.
- For Source Value, the VP_Resp attribute (which is the root level member of the AllReportingResponsbility attribute hierarchy as defined in Core applications) is selected as it is the attribute in Core applications that will be transfered to Modeling.
- Select the Target Dimension, which is VP_Resp. You must always include the dimension when mapping an attribute from Core applications. In this case the dimension is Department, which is included in the map shown below. Another example might be if you want to map the Color attribute defined on the Product dimension in Core applications. In this case, your map must include both the Product dimension and the Attribute color.
- The Target Filter, like the Source Filter is MemberAndBelow so that all members below VP_Resp (including VP_Resp) will be populated in Modeling.
Note:
MemberAndBelow is the only source filter that is currently supported for creating and moving the attributes from Core applications to Modeling.
- Lastly, the Target Value is the attribute named VP_Resp.
- Similar mapping is done for the attribute hierarchy named ReportingResponsiblity as shown below.
- Also the attribute that you are mapping from core application should have mapping defined to the leaf members of the base dimension in the core application
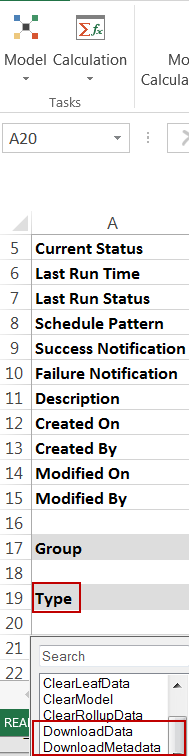
Attributes mapped will be created in Modeling once the model is refreshed. To refresh the model, run the calculation by accessing the Model Calculation page. Ensure the DownloadData and DownloadMetadata types (shown below) are selected.
Note:
You can also Access the Manage, Application Administration, Metadata Download page and click Run to refresh metadata.
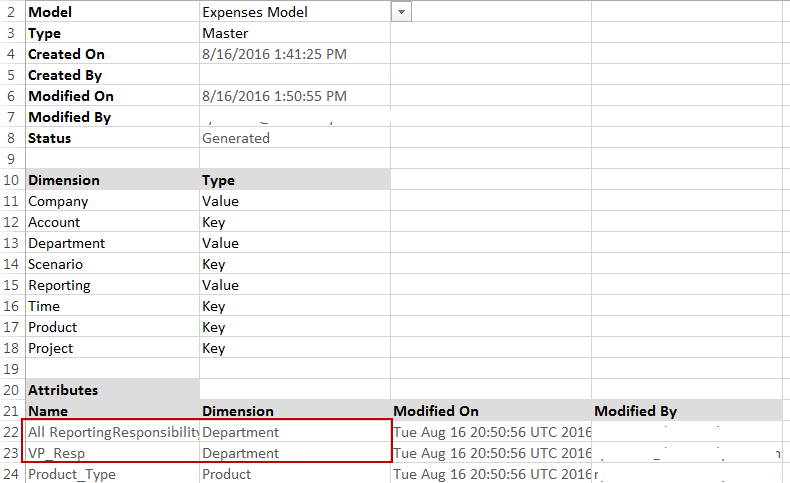
- Once the model is refreshed, access the Model Setup page to verify the attributes were created for the model and associated dimension. An example is shown below.
Note:
You cannot move attributes between models (for example, from the Master model to an Analytic model). However, you can create attributes manually in any model (both Master and Analytic).
If you want to make changes to an attribute in Modeling that is sourced from Core applications, make the change in Core applications and then refresh the model to reflect the same changes in Modeling.
Creating Attributes within Modeling
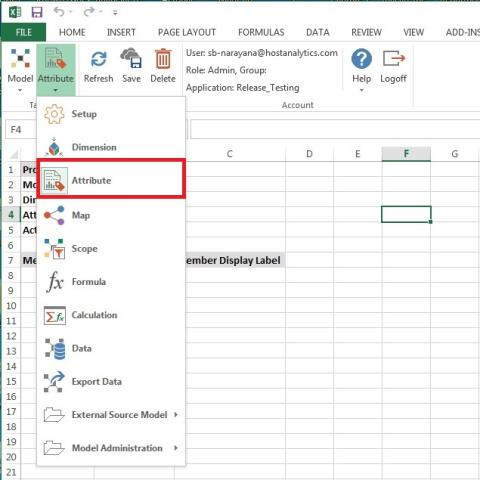
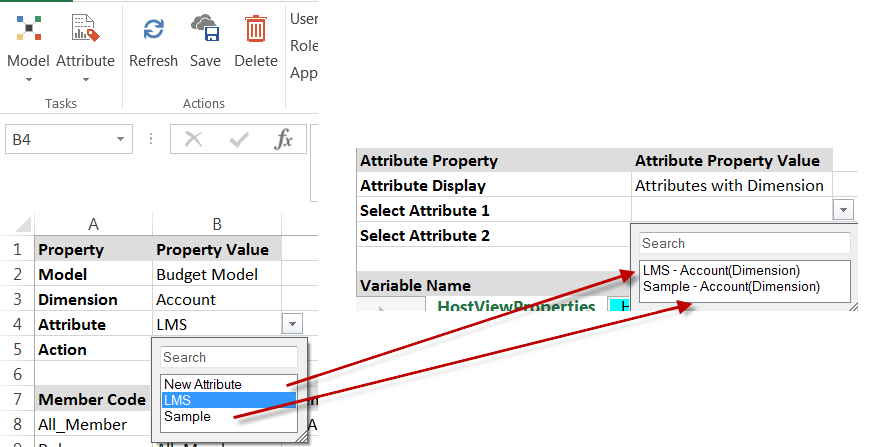
Navigate to Model, Attribute. The Attribute page displays attributes associated with a selected Model and Dimension. It also provides functionality to create new attributes for a specified Model and Dimension as well as update attributes already associated with a Model and Dimension.
The image below displays the Budget Model, Account Dimension, and the associated Sample Attribute.
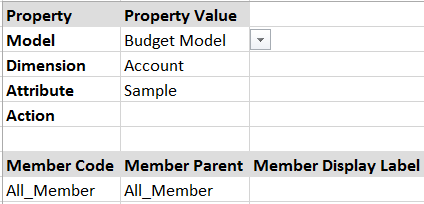
Model—Name of model to which the attribute will be or is associated
Dimension—Name of the dimension to which the attribute will be or is associated
Attribute—Name of the attribute associated with model. By default, New Attribute is displayed
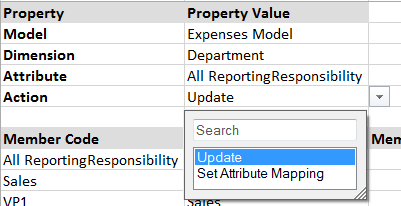
Action— There are two actions available based on the stage of the attribute.
Select the Update action to update attribute data associated with a Model and Dimension with the latest changes (see Updating an Attribute).
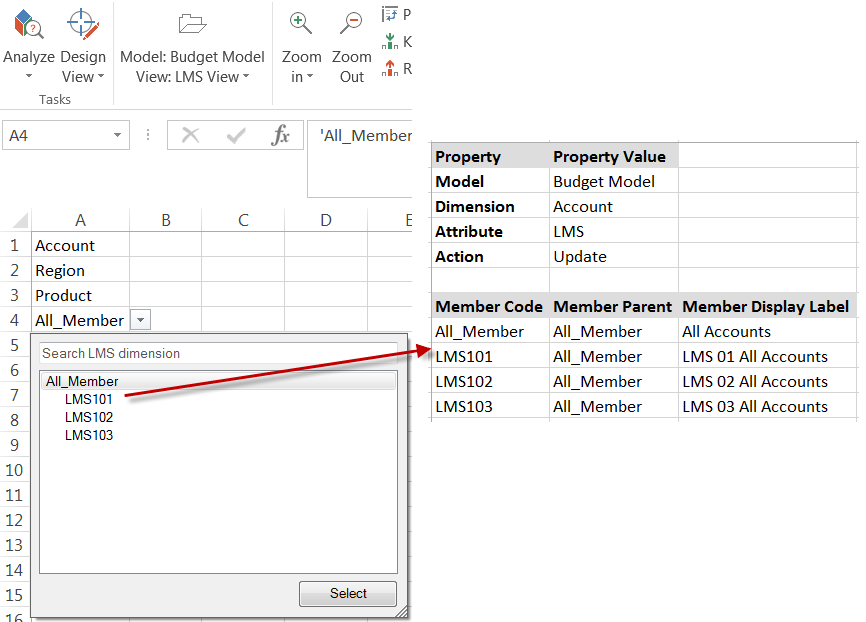
Once the attribute is set up to map the attribute members to leaf dimension members, select Set Attribute Mapping so that all leaf members of the selected dimension will be displayed. You can type the attribute members in the attribute member code column or you can select from the drop down and then save the attribute.
Page Contents Displayed When Update is Selected
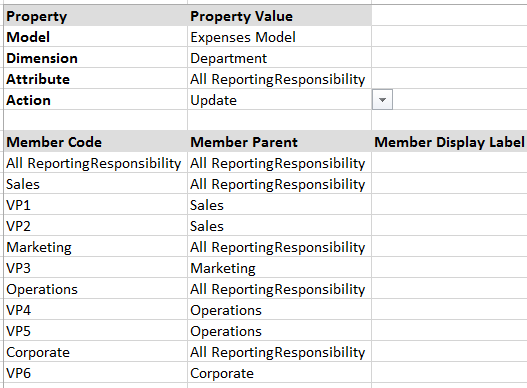
Member Code - A unique identifier for the dimension member.
Member Parent - The name of the parent member in the dimension hierarchy that the member rolls up to. For example, the Time dimension Parent Member might be a and the Rollup Member might be Q1a.
Member Display Label - Allows you to customize the display label. For example, if the Member Code is Jan-15 and you want to display the full name of the month, enter January-15 in the Member Display Label field.
Page Contents Displayed When Set Attribute Mapping is Selected
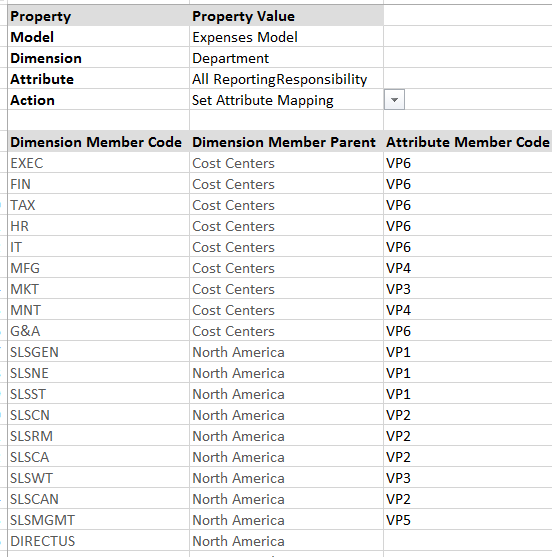
Dimension Member Code - Dimension code for all leaf members of the selected dimension is displayed.
Dimension Member Parent - Parent member for all leaf members of the selected dimension is displayed.
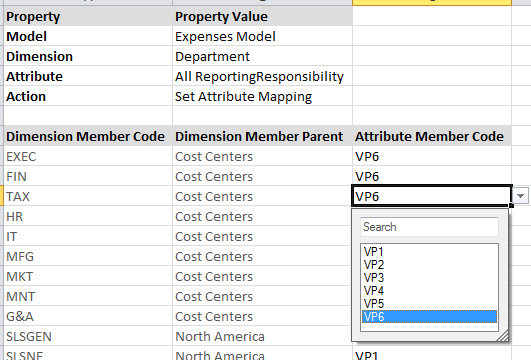
Attribute Member Code - Enter the attribute members here or select from the drop-down as shown below.
Complete the following steps to create a new attribute on a dimension:
- Navigate to ModelDimension.
- Select the Model you want a new attribute associated with.
- Select the Dimension you want a new attribute associated.
- Enter the name of the new attribute in the New Attribute field.
- In Member Code area, add new members. Adding attribute members is similar to adding dimension members. You can define the attribute with one root member or have multiple levels. You can also provide display label details for all the members of the attribute.
- Map dimension members to attributes members using the Set Attribute Mapping action.
- Save.
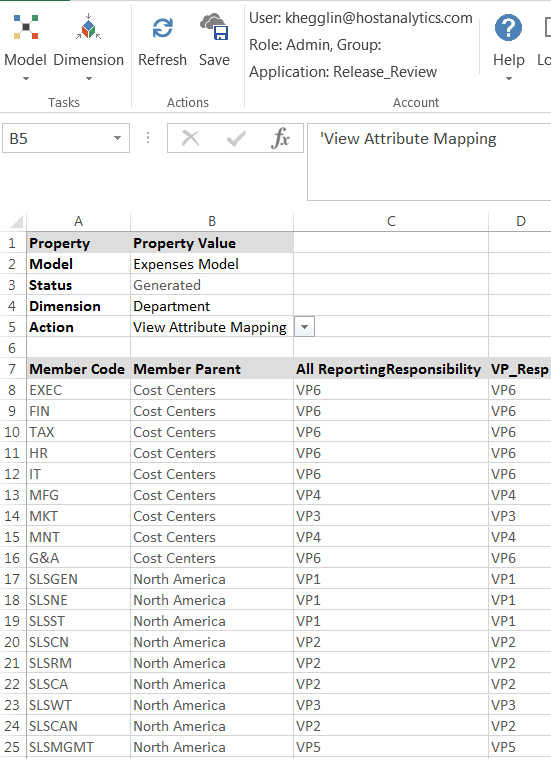
- View attribute mapping details by accessing the Model Dimension page as shown below. Make sure you select the View Attribute Mapping action on this page
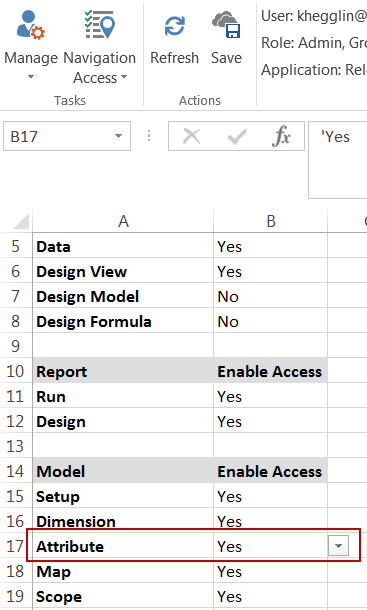
Providing Access to the Attribute Page
Admin users can disable access to the attributes setup for Designer users from the Navigation Access screen as shown below.
Deleting Attributes
You can delete attributes as long as they are first deleted from any Views or Reports in which they are being used.
Using Attributes in Views
Complete the following steps to use attributes in views:
- Navigate to Analyze, Data.
- Select the model/view for which you created the attributes.
- Select the Design View subtask.
- Click the Properties action.
- In the Attributes section of the page(shown below), select the attribute properties for the selected view.
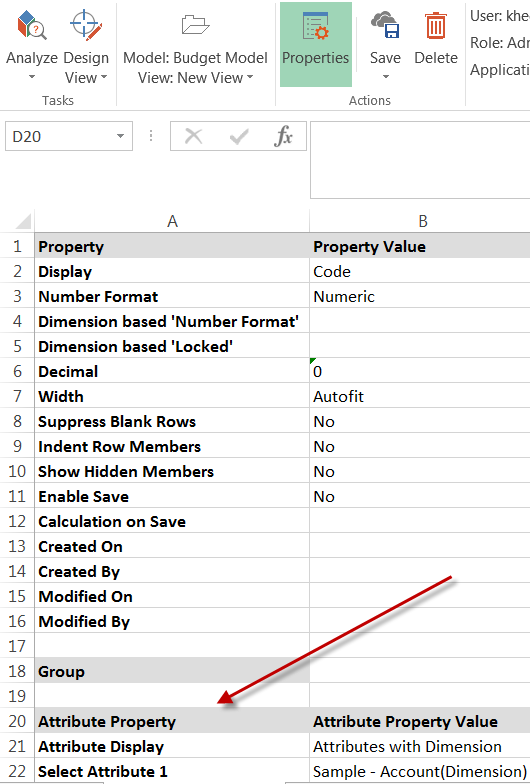
- For Attribute Display, select from one of the following options:
Attributes with Dimension - Displays the attribute and the associated dimension
Attributes without Dimension - Displays the attribute only
- Select the attributes you want to use for the view. Attributes are displayed for selection in the Select Attribute1, Select Attribute2 fields. Note that a maximum of 2 attributes is allowed for selection in a View. The image below shows how the attributes created on the Attribute page are populated and available in the Attributes list box on the Properties page. Select
- Save the view.
Note:
Note that when you are using attributes in a View, Design View mode will not display data. Data will only be displayed during run mode.
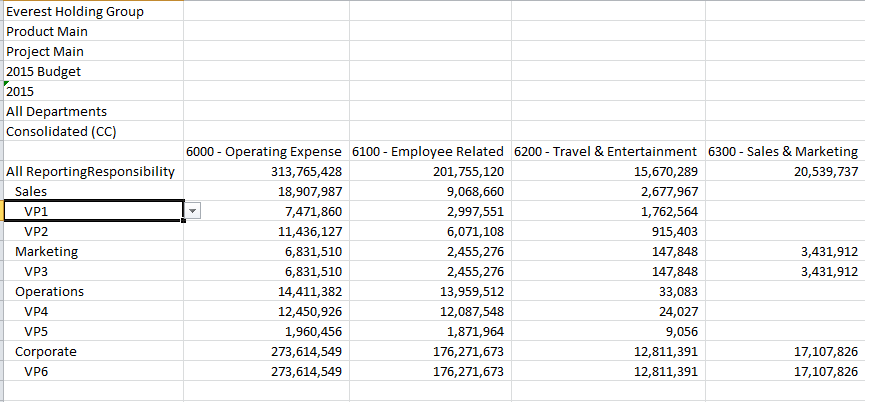
- Navigate to Analyze, Data to run the view. The attributes defined are displayed in a way similar to page level POV as shown below.
Using Attributes in Reports
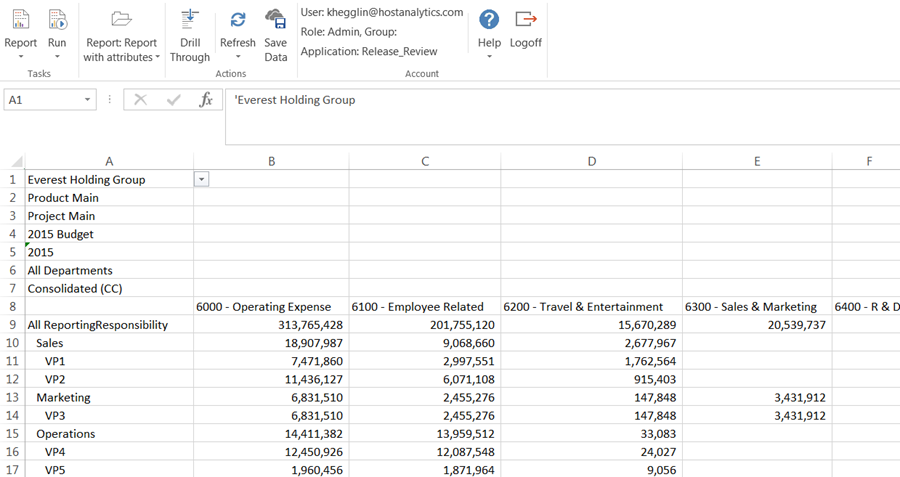
You can use attributes in reports as you would dimensions. A report with attributes is shown below.
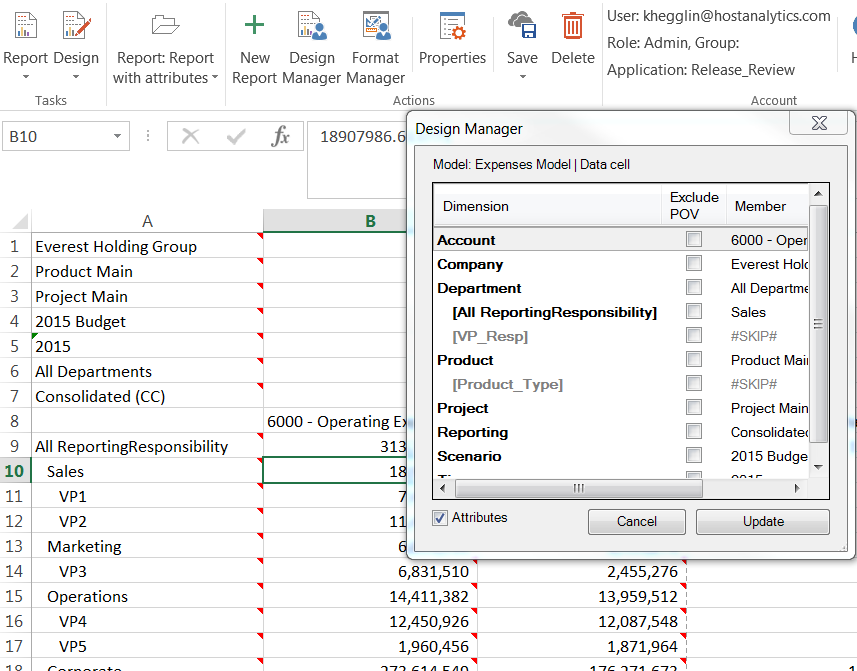
To use attributes in your reports, provide required mappings for each cell in the report by accessing the Design subtask and the Design Manager action (shown below).
If you create a report from a View that has attributes, you can use the Design subtask or the Capture data option. Both options will capture attribute mappings defined in the view and carry the mappings into the report.
If you create the data intersection in an existing report or in a new report, Design Manager will display the attributes in the selected model if you select the Attributes checkbox at the bottom of the Design Manager screen.
Make attribute member selections as you would dimension members. You can select up to two attributes per report.
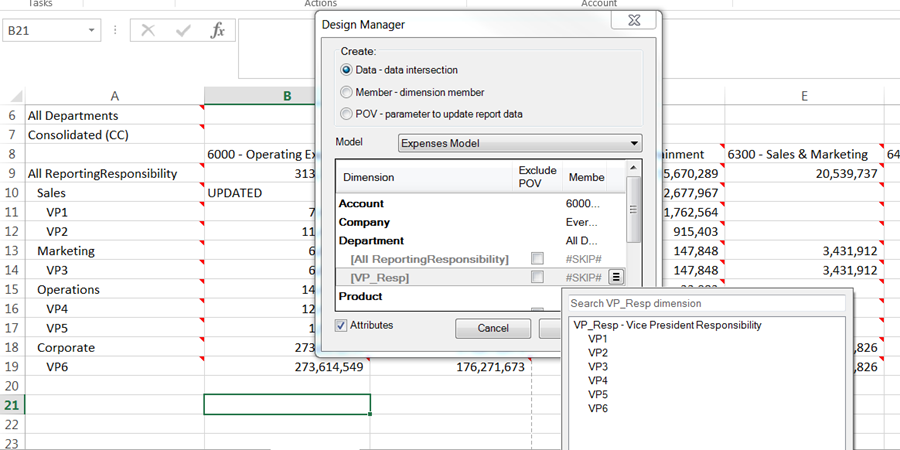
Using POV in Reports with Attributes
When creating the dimension member or POV member in an existing report or in a new report, Design Manager will display the attributes of the selected model in the Dimension drop down if you select the Attributes checkbox at the bottom of the Design Manager screen as shown below.
Limitations
Maximum of 5 attributes per Dimension is allowed
Maximum of 2 attributes in a View is allowed
Maximum of 2 attributes per Model in a Report is allowed
Attribute name must be unique
Attribute name cannot match any dimension name for the model
Attribute name cannot contain "." (dot) character.
Use of special characters in the attribute name is not recommended
"New Attribute" is a reserved keyword and cannot be used as an attribute name
Drill through functionality in Views and Report is not support if attributes are enabled
Cascaded report is not support with attributes
Data cannot be saved from the View / Report if attributes are being used in that View / Report
When you are using attributes in a View, data will not displayed in design mode i.e. Analyze > Design View. Data will only be displayed only during the run model i.e. Analyze > Data
Dimension security is currently not supported if you are using attributes in a View / Report.
Organizing Calculation Processes in Folders
The Folder structure functionality is available in SpotlightXL, which allows you to organize your Calculation processes based on the models from which they were created. Additionally, you can add calculations to your Favorites folder by right-clicking on the Calculation and selecting Add to Favorites. In the example below, the Balance Sheet and Model Refresh calculations are organized in the Balance Sheet folder.
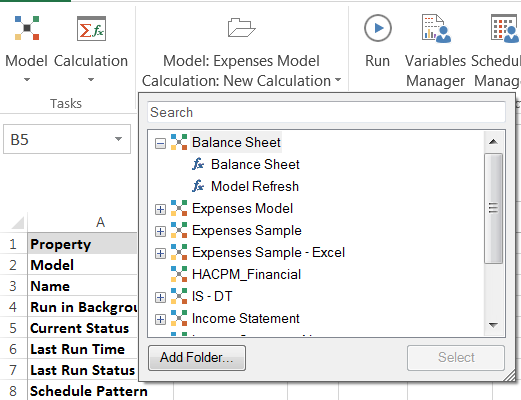
Use the Search functionality at the top of the screen to search for Calculations, then use the up and down arrows to scroll through the results.
Favorites and Recent folders are user specific. The Recent folder displays 10 recently accessed Calculation Processes by user across all Models. The Favorites folder displays 10 Calculation Processes. If you add more than 10 items, the most recent 10 are displayed.
You can add folders, delete and rename folders as well as move Calculations from folder to folder by dragging and dropping.
Note:
Folders are not based on security role (Admin, Designer, Reviewer), so any user role can add, edit, rename, or delete a folder, or move any calculations they have access to from folder to folder.
Adding, Deleting, and Renaming Folders
To add a folder:
Select a model and click Add Folder.
Enter a folder name and click OK.
To delete a folder:
Select the folder.
Make sure there are no calculations in the folder as you cannot delete a folder that contains calculations.
Right click and select Delete.
To rename a folder:
Select the folder.
Right-click and select Rename.
Enter the new name of the folder then click OK.
Description Field for Calculations
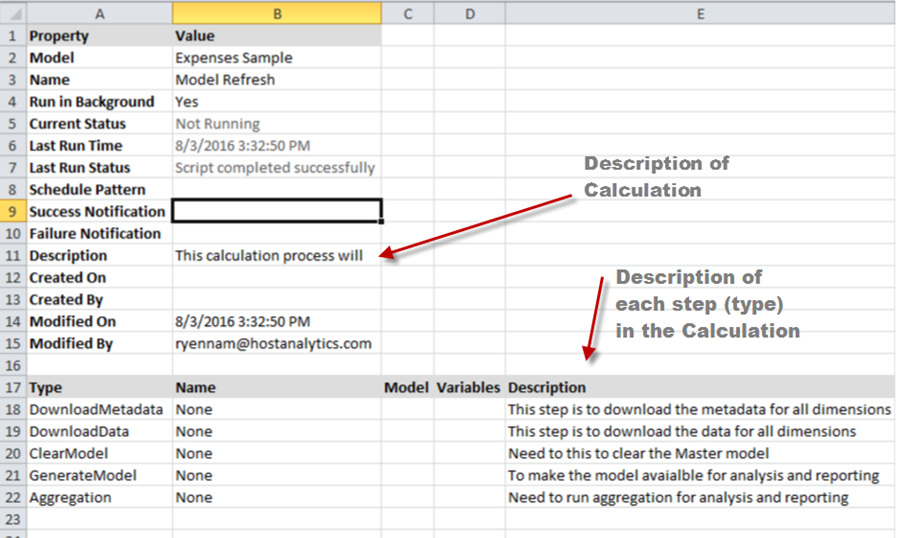
Descriptions for the Calculations are now added at the calculation level and also at the step level. You can use the new Description field to provide detailed information about the Calculation and also for each step within the Calculation.
Access the Model task and the Calculation subtask. Notice the new Description fields shown below.
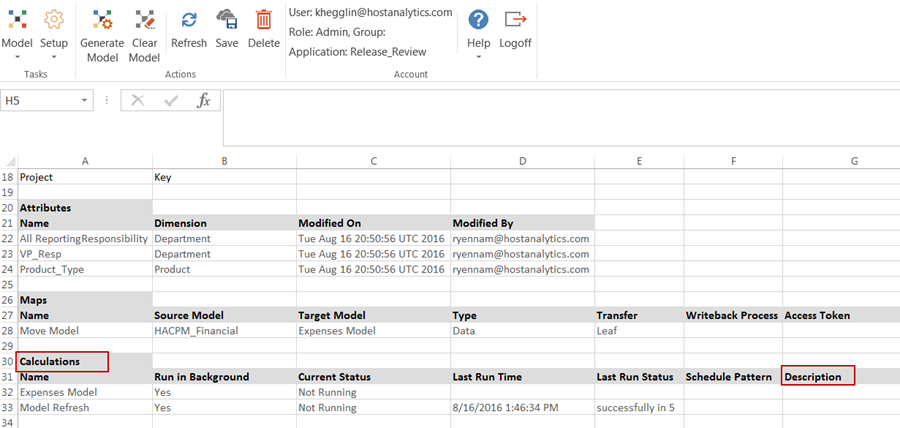
The Model Setup page will now display description for each Calculation as shown below.
Note:
The Calculation Description field is limited to 5,000 characters and for each step within the Calculation you can enter up to 1,000 characters. If the limit is exceeded, the application will truncate the text. The Variables column width in the Calculation is currently set to auto fit. If you are using multiple variables in a step, the Description field will not be visible unless you scroll to the right of the screen. This will be addressed in a future release.
User Group Permissions for Calculations
Previously, Designer users could access a Calculation if they had access to the corresponding Model. Now, Admins can set (allow or restrict) access to a Calculation for Designer roles based on user group.
To provide Calculation access to Designers:
- Navigate to Manage, Application Administration, Application Settings.
- Scroll down to the Calculations heading as shown below.
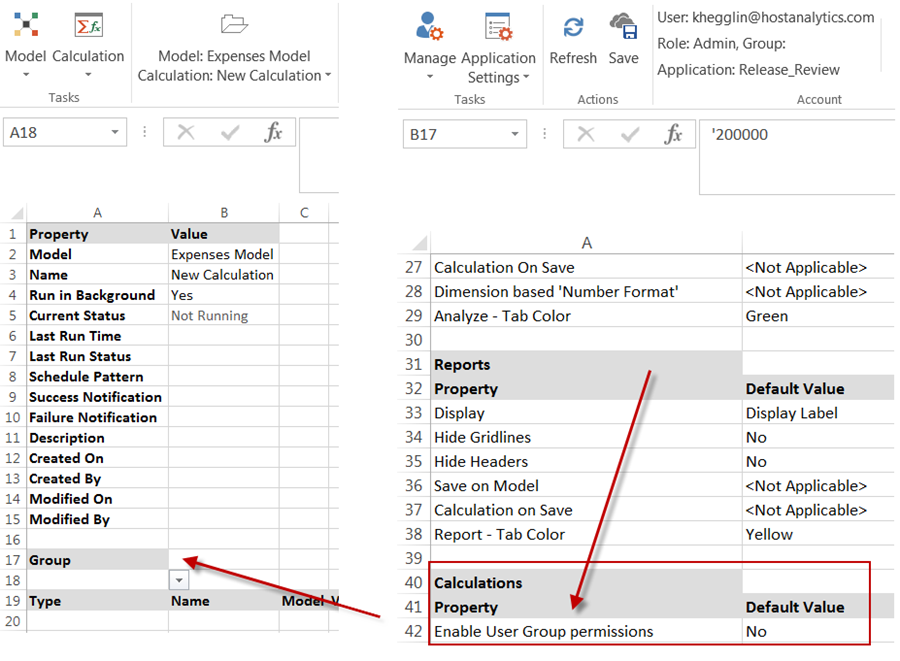
- Set the Enable User Group Permissions property to Yes.
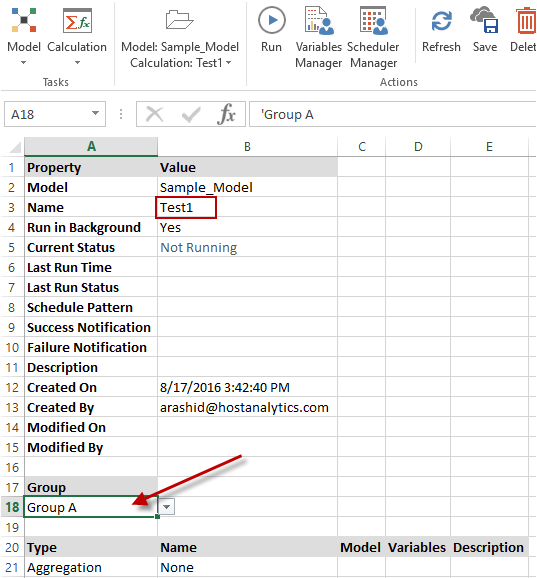
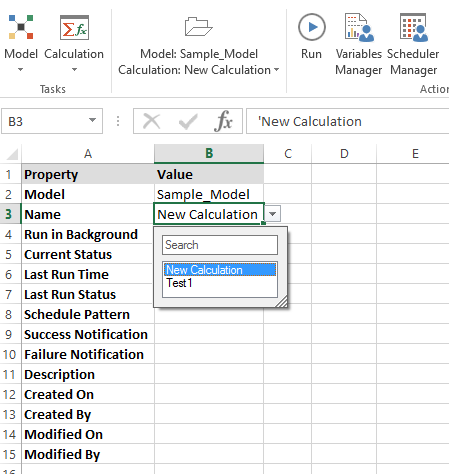
Admins can assign Groups to the Calculation. Only Designers belonging to the assigned Groups will be able to access, modify and run the Calculation. For example, an Administrator assigned the Test1 Calculation to Designers of Group A as shown below.
Now, notice that Group A is not assigned to the Test2 Calculation.

When a Designer logs into the application and accesses the Calculation page, only Test1 is available as shown below.
Support for Variables in Views and Reports
With this release Variables can be assigned to Views and Reports, which will be used during the execution by the Calculation and will make them more dynamic. For example, let's say you create a map, formula, and scope that have a variable called @CrBudget@ defined. Then, you create a Calculation that uses these artifacts (the map, formula, scope) and the variable called @CrBudget@. When you save data from a View or Report where the @CrBudget@ variable is used, the application passes the selected scenario for execution to the Calculation.
When Variables are used in Views and Reports, for example @CurScenario@, the current scenario is passed to the Calculation. For example, let's say you want to save data for several scenarios, prior to this release you would have had to access the Calculation and change the value for the scenario manually. Now, use a variable and pass the variable automatically from a View or Report without accessing the Calculation and manually changing it.
Note:
The dimension on which the variables are defined should always be on the Page / Filter / POV.
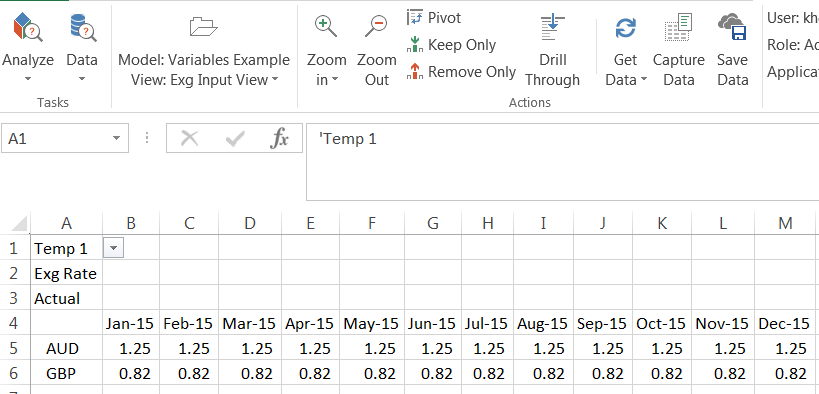
Example: In this example the @CurScenario@ variable is defined. When data input is performed in the view on the Analyze Data page, the Calculation runs automatically no matter what scenario is selected (Actual or Budget).
The model and view shown below, called Variables Example - Exg Input View, is used to input exchange rate information for local currency for the Actual and Budget scenario. The system calculates the common currency data based on exhange rate and local currency. So, the input is exchange rate and local currency and the output is common currency. Notice that the exchange rate information for the Actual scenario is shown below.
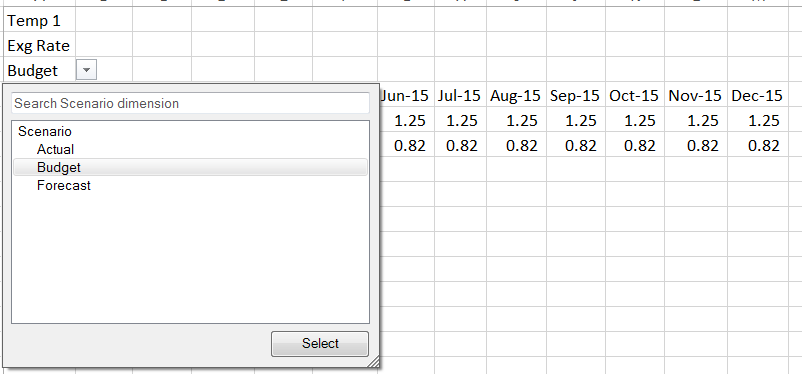
Select the Budget scenario and exchange rate information for that scenario is displayed.
Now, the Data Input View is displayed to perform data input for the Actual scenario as shown below.
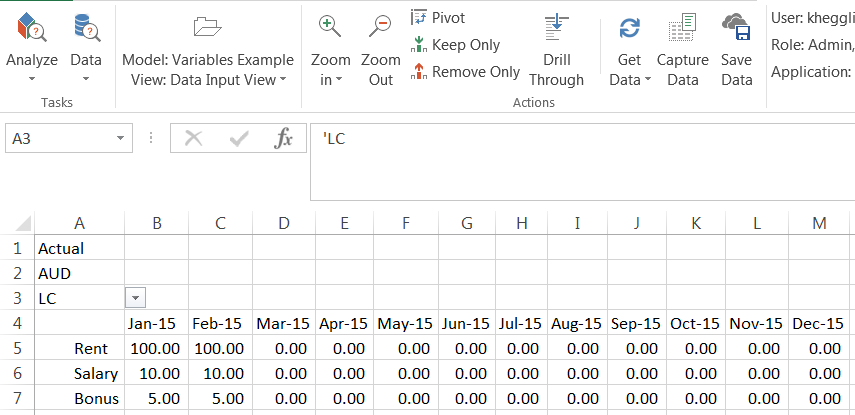
As you input data in this View the Calculation is running in the background to automatically calculate the common currency.
When the validation view, called CC Date, is accessed the common currency data is available for the Actual scenario as shown below.
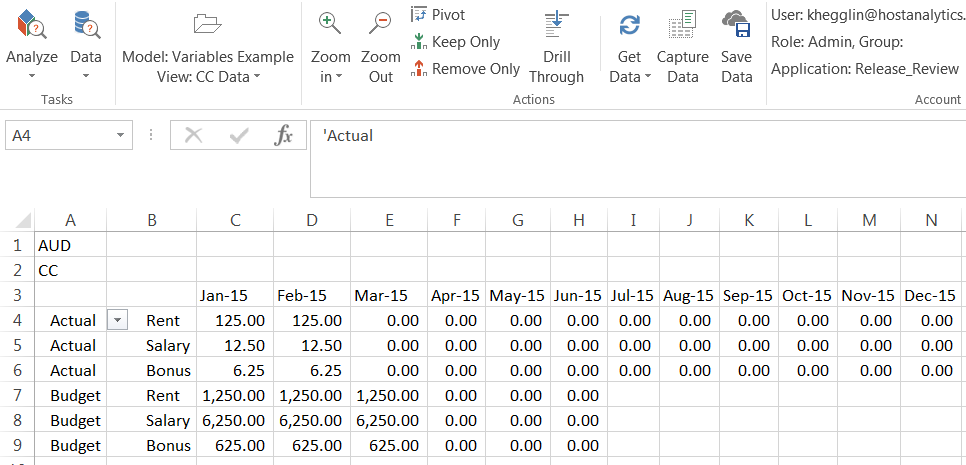
Now, you can select the Budget scenario and input data. As you input data, the Calculation will automatically calculate the Common Currency for the Budget scenario as well. This is because the @CurScenario@ variable is used so the Calculation will execute automatically for whichever scenario is selected as the current scenario.
To assign variables to views:
- Access the Design View page.
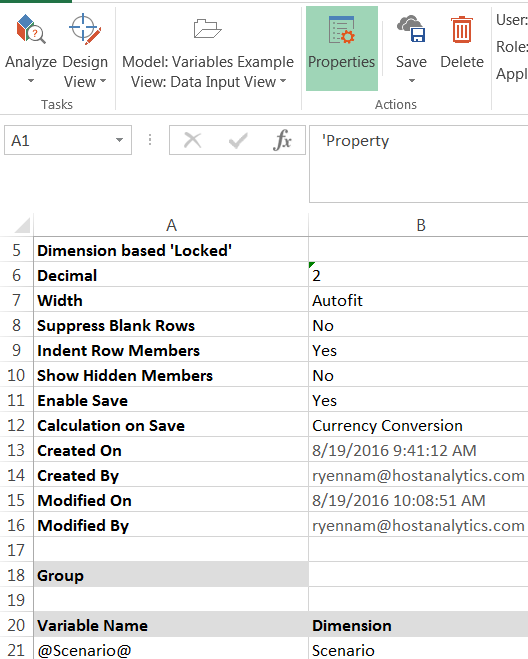
- Select the Properties action. The Variable Name and Dimension fields are displayed.
- Enter variable name and select the associated dimension that is defined in the map, formula, and scope. In the example below, the @Scenario@ variable is entered and the Scenario dimension.
Prerequisite:
You must have the variable defined in your formula (accessed by navigating to the Model Formula page). You must use the same variable in your Calculation.
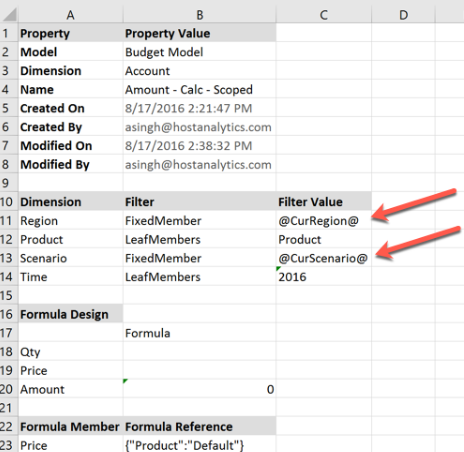
In the example below, the Filter Value on the Model Formula page contains variables for Region and Scenario dimensions.
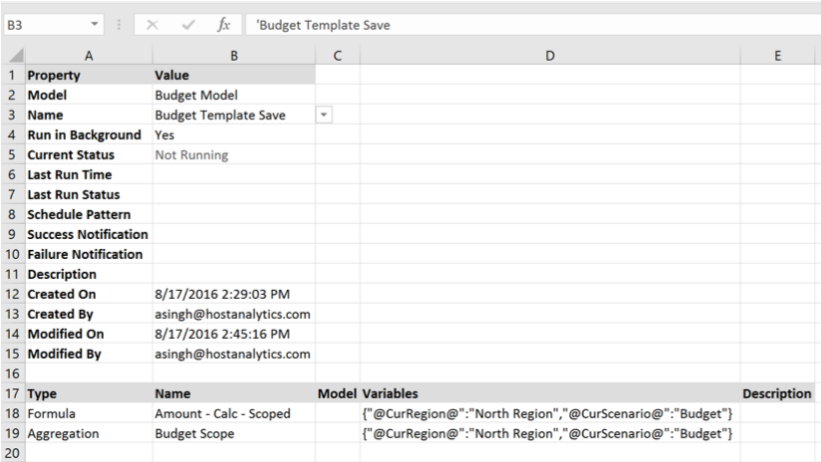
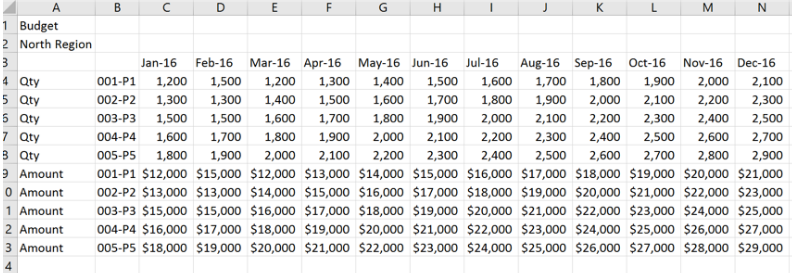
On the Model Calculation page, there are variables defined for the Formula and Aggregation steps. Budget is specified for the @CurScenario@ variable and North Region is specified for the @CurRegion@ scenario.
When the Budget Model and View is accessed via the Analyze Data page, you can enter the @CurRegion@ and @CurScenario@ variables in the Properties page for the View. In the image below, these variables have been entered in the Properties page and the dimension members selected. Notice that the North Region and the Budget variables are displayed on the page axis.
Note:
The Variable name defined in the map, formula, and scope must match the variable name in View property or else the Calculation will ignore that variable and execute the Calculation with default selections.
Model Setup Page Enhancement for Variables
The Model Setup page now displays all variables used in Maps/Formulas/Scopes.

Alert Message for Blank Rows
In prior releases, whenever blank lines were inserted within a Map, Scope, Dimension, and Calculation worksheet, the application ignored data after the blank lines. Now, when blank lines are detected within a worksheet and you attempt to save, an alert message is displayed as shown below.
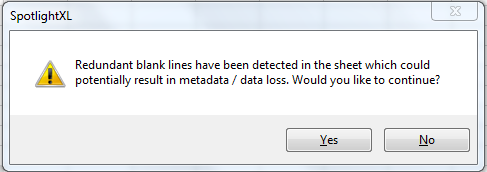
Click No so that changes are not saved to the database and to return to the worksheet and correct the issue.
Other Enhancements
Drill through for the HACPM_Financial model is now based on the dimension security defined on the target Master / Analytic model.
Pagination option for drill-through in reports/view(s) in Spotlight.
Auto refresh on POV changes was introduced to Spotlight XL. In this release, we are implementing auto refresh for POV changes for Spotlight.
The Audit log is now available for the following areas of the application:
View, Report
Attribute, Map, Scope, Calculation, Data
Export Data, Substitution Variable, External Source Model, EDS Map, EDS Data
Manage Task: User, Group, User Group, Navigation Access, Process Management, Manage Access Token, Access Token
Known and Resolved Issues
Known Issues
| Issue ID | Task | Description |
|---|---|---|
1409 | Design Manager (SpotlightXL) | Deselecting and reselecting the 'Attributes' checkbox in Design Manager removes the Attribute members. |
1406 | Design Report (SpotlightXL) | Excel a Chart Problems. |
1387 | Model External Data (SpotlightXL) | Designer cannot generate external data source model. |
1322 | Report Design (SpotlightXL) | Unable to cascade with substitution variables. |
1301 | Model Calculation (SpotlightXL) | No line breaks to calculation description, variables and step description in Calculation screen. |
1297 | Design View, Report Design (SpotlightXL) | Drill Through is not supported for Views/Reports containing Attributes. |
1277 | Design View | Permissions for View: Group setting not retained for New View. |
1273 | Report (Spotlight XL) | Cascade Report has inconsistencies with Filters. |
1144 | Report (Spotlight XL) | Freeze Panes location should not be outside of the sheet viewable range. |
1137 | Report (Spotlight XL) | Using Freeze Panes in a SpotlightXL Report causes the scroll bars to disappear or disabled. |
765 | Report Design (Both) | Exclude POV does not work properly when run for a cascaded report. |
733 | Report Design (Both) | Report Design POV Default Filter Value is always set to Code. |
741 | Report Design (Both) | Drill through value is always code (versus label). |
687 | Report Run/Design(Spotlight XL) | The Refresh All Open Reports option does not work as designed in all cases. |
477 | Report Design (Both) | Cell scaling and lock is not functioning as designed for Cascaded reports. |
417 | Report Design(Spotlight XL) | Excel Accounting Number Format functionality can be applied to a report while in Report Design. Right not this functionality is not working properly. |
405 | Report Design(Spotlight XL) | In Report Design, specify a dimension to be cascaded. Copy and paste the cascaded member/block in the same column. Select Save and Run The following is displayed 'Cannot find variable '@Cascade' in model...'. Select Refresh and the following is displayed 'Object reference not set to an instance of an object'. Important! The cascaded member must be defined in the same line or above the cascaded block, otherwise the report will not run. |
Resolved Issues
| Issue ID | Task | Description |
|---|---|---|
1281 | Analyze Data Design View | Reviewer cannot save view, which runs calculation that clears all, leaf or rollup data with scope. |
1396 | Model Formula | Formula deletes formula with same name in another model. |
Was this article helpful?