1.8.2 Modeling Release Notes, October
- 9 Minutes to read
- Print
- DarkLight
- PDF
1.8.2 Modeling Release Notes, October
- 9 Minutes to read
- Print
- DarkLight
- PDF
Article summary
Did you find this summary helpful?
Thank you for your feedback
This document describes all the features and enhancements with this release of Spotlight/SpotlightXL, as well as any known or resolved issues.
Features and Enhancements
| Features |
|---|
Dimension-Based Lock Report Lock Property at Application Level |
Dimension-Based Lock Report Lock Property at Application Level
Application level dimension based locking was released for Views. This release, admin users can also lock dimension members for reports at the application level.
To enable locked dimension members in reports at the application level:
Select the Manage task and the Application Administration, Application Settings subtask.
Under the Reports Property called Dimension Based 'Locked', select Application Level (shown below).
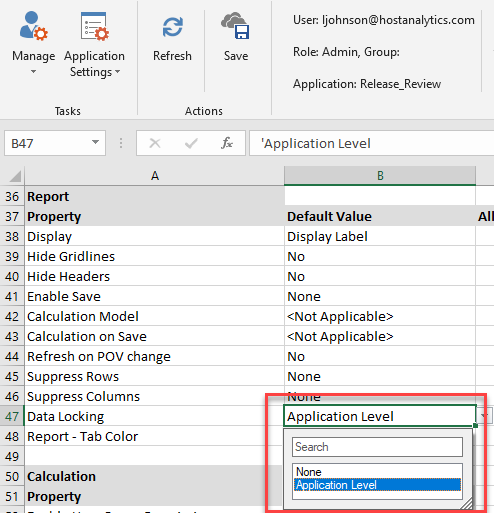
Selecting Application Level applies dimension based locking to all Reports and related Models in the Modeling application.
For Dimension based Locked property, select from the following 2 values:
Application Level – Globally lock dimension members for all reports at the application level.
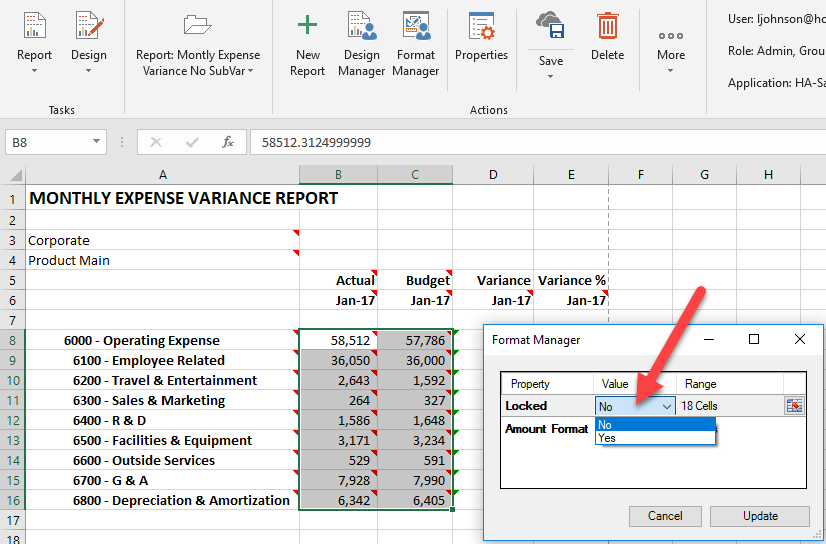
None – Lock at the individual cell level within Report Design using Format Manager as shown below.
Additional Functionality for Locking Data
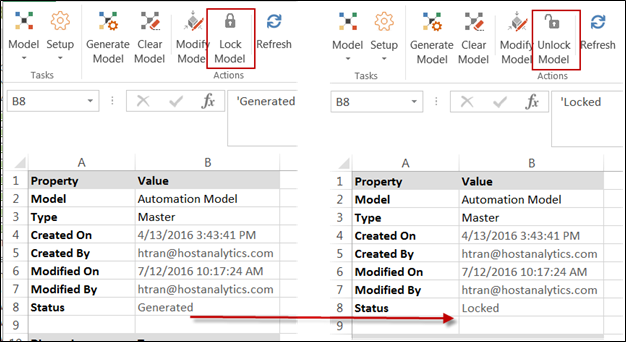
With this release, you can lock a model to prevent modification or clearing. Analytic and Master models only can be locked. Models must be in a Generated state to be locked. Not Generated models can’t be locked.
To lock a model:
Access the Model task and the Setup subtask.
Select a Generated model.
Click the Lock Model action (which is only enabled when a Generated model is selected). Notice the Status of the model changes from Generated to Locked as shown below. Also notice that the Lock Model icon changes to Unlock Model.
While locking a model ensures data integrity and prevents clearing the data, it also means that all data may not be saved/updated (see Saving Report Data to Locked Models and Saving View Data to Locked Models) from Views, Reports, Data Load, API Library, Calculation, and so on.
See: Saving Report Data to Locked Models and Saving View Data to Locked Models
Saving Report Data to Locked Models
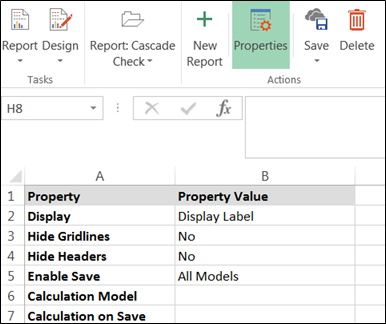
If a report is associated with a locked model and the Enable Save property is set to All Models as shown below, users cannot save data from that report.
If a report is associated with multiple models, one of the models is locked, and Enable Save is set to All Models, users cannot save data from that report.
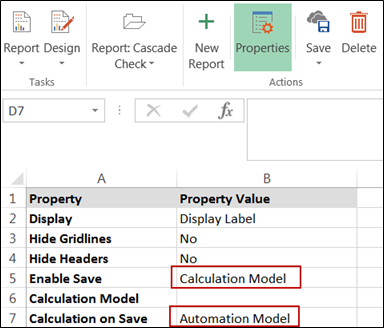
If a report is associated with a model that is locked, Enable Save is set to Calculation Model and Calculation on Save is based on the model that is locked as shown below, users cannot save data from that report.
If a report is associated with multiple models (some that are) locked, Enable Save is set to Calculation Model, and Calculation on Save is not based on the model that is locked, users can save data from that report to the models that are not locked.
Saving View Data to Locked Models
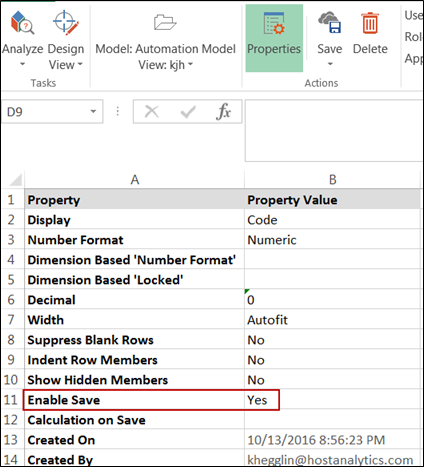
If Enable Save is set to Yes in a View on a model that is locked as shown below, users cannot save data from that view.
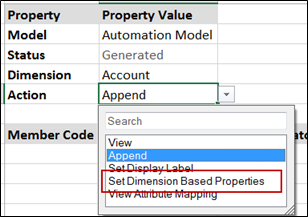
Functionality that can be used on locked models includes:
Append
Set Display Label
Set Dimension Based Properties
Attribute
Set Attribute Mapping
To unlock a model:
Access the Model task and the Setup subtask.
Select a Locked model.
Click the Unlock Model action.
Locking and Unlocking Models Using a Calculation
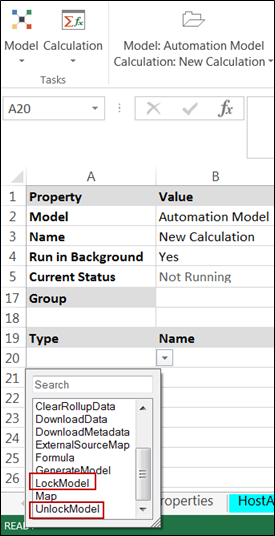
Another way to lock or unlock a model is to select the LockModel or UnlockModel type as a line item in a Calculation. Performing the lock or unlock in a calculation saves time as it automates the process. For example, you might want to unlock a locked model, generate a formula, run aggregation, and then lock the model once again. If this is the case, your Calculation might look like the following:
To lock/unlock a model using a Calculation:
Access the Model task and the Calculation subtask.
Select the model you want to lock or unlock.
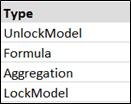
In the Type list-box select the LockModel or UnlockModel type as shown below.
Note:
When the Calculation runs, it checks whether the model is locked or not before executing each line item/step. If the model is locked, the calculation will be terminated and you will be notified.
Appending Metadata
We’ve added a type to Calculation called AppendMetadata, which allows you to add new members to an existing dimension. Until this release, appending metadata was only available from the user interface (Model, Dimension, Append actions).
Tip!
If you are refreshing data in a model and the source model has metadata changes (i.e. added a new product, department, project etc.) then AppendMetadata will be very helpful.
Appending metadata differs from a full or partial Model Refresh. For example, let’s say you are loading data from Host Analytics Core and you want to refresh that data on a monthly basis. There is no need to clear and recreate the entire model, which is what a full refresh would do. If you perform a partial refresh, only the mapping of type Data is performed meaning that new a dimension member (like a new Department) is not mapped so the Calculation will fail due to the new member.
This feature also differs from the Append action you can select for a dimension because selecting Append allows you to enter new dimension members directly into Modeling, but does not load them from another source like Host Analytics core.
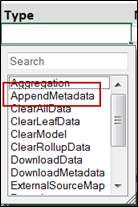
To use the Append Metadata type in a Calculation:
Access the Model task and the Calculation subtask.
Select the model in which you want to append metadata.
Under Type, select AppendMetadata as shown below.
An example of typical full refresh Calculation steps are shown below. Notice the full refresh clears the model and generates it again while the partial refresh appends the metadata.

An example of typical partial refresh Calculation steps are shown below.

Note:
The AppendMetadata type will only append new members (both leaf and rollup) to the target model.
Tip!
If you are mapping attributes from the core application then the attribute will be completely refreshed. In other words, all changes in the attribute including the mappings to the dimension members will be refreshed in the target model.
Modification of Dimension Type
Key and Analytic dimension types can now be modified. For example, if you originally assigned a Project dimension as a Key dimension, you can now change it to a Value type dimension. Similarly, if you assign a Project dimension as a Value type, you can now change it to Key.
Note:
Changing the dimension type cannot be performed on Generated or Locked models. The model must have a status of Not Generated.
To change a dimension from a Key to a Value or vice versa follow the steps below.
Access the Model Setup page.
Select the Model and click the Modify Model action.
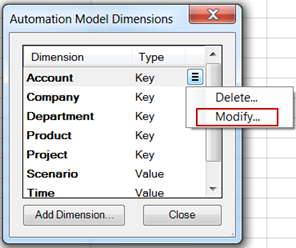
Select the dimension you want to modify and click Modify as shown below.
- On the Modify Dimension dialog page, select the Type from the list-box as shown below.
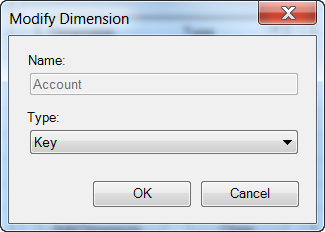
- Click OK and Close the dimension dialog page.
Other Enhancements
Query optimization in Views if ‘Suppress Blank Rows’ property is set to ‘Yes’. With this release we have optimized the query processing. This will be helpful for users with multiple dimensions on rows where all of them are of type ‘Key’ zooming to the leaf level.
Set View Properties has been renamed to Set Dimension Based Properties on the Model Dimension page in the Action list-box shown below.
Calculation Script and Calculation Process has been renamed to Calculation.
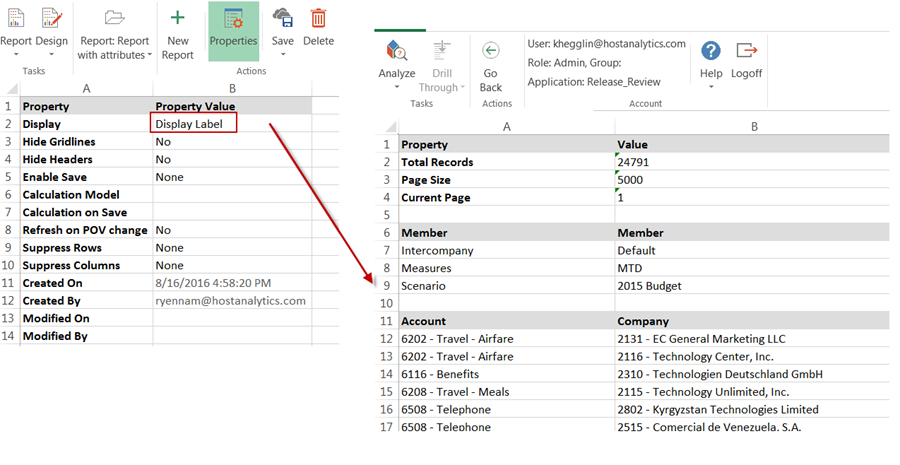
Drill Through report displayed the dimension member codes. With this release it will display either code or display label based on the display property of the view / report. Also, the display label will be based on the source model (i.e. HACPM) model. In the image below, Display Label is selected for Display on the Report Properties page so Display Label is displayed when Drill Through is performed on that same report.
_Attribute_Default is the default member that will be added to the attribute. If a leaf dimension member is not mapped to any attribute members then all those leaf dimension members will be mapped to this default member.
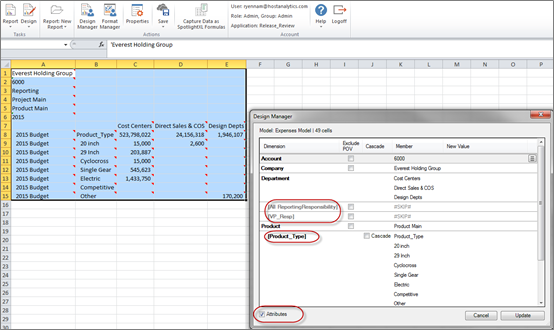
The Attributes check box (shown below) in the Design Manager will not remove the attribute member mappings. Checking this will show the attributes that are available in the selected model and unchecking this will hide the attributes from the Design Manager.
Known and Resolved Issues
Known Issues
| Issue ID | Task | Description |
|---|---|---|
1596 | Model Setup | The display order of the added Dimension members are not correct after running AppendMetadata. |
1595 | Model Setup | Duplicate Member Code found when running AppendMetadata after adding a new Dimension in Target. |
1578 | Model Setup | The Modify Model Dimension Error message is unclear. |
1527 | Model Attributes | The corresponding attributes in a map are deleted when the base dimension is deleted. |
1496 | SpotlightXL | When you logoff and are in edit mode, the Excel workbook freezes. |
1492 | Model Setup | Using special characters for the model name results in errors. |
1464 | Report (SpotlightXL) | When suppress rows/columns is enabled, If Dimension Members and Data Intersection are available in same column/row in a report then dimension members will be suppressed along with data intersections |
1457 | Design Report (SpotlightXL) | In some cases Suppress blank rows/columns is not working as expected when Groups are expanded in the report |
1455 | Report (Spotlight) | Suppress blank rows/columns is not supported in Spotlight (i.e. Web Interface). |
1454 | Design Report (SpotlightXL) | In some cases Suppress blank rows/columns is not working as expected if groups and freeze panes are enabled in the report |
1443 | Model Setup (SpotlightXL) | System throws an error if user selects ‘Modify Model’ for a New Model. |
1406 | Design Report (SpotlightXL) | Excel a Chart Problems. |
1387 | Model External Data (SpotlightXL) | Designer cannot generate external data source model. |
1322 | Report Design (SpotlightXL) | Unable to cascade with substitution variables. |
1321 | Report (Spotlight XL) | Substitution variables are not working as expected in Cascade Report. |
1277 | Design View | Permissions for View: Group setting not retained for New View. |
1273 | Report (Spotlight XL) | Cascade Report has inconsistencies with Filters. |
1144 | Report (Spotlight XL) | Freeze Panes location should not be outside of the sheet viewable range. |
1137 | Report (Spotlight XL) | Using Freeze Panes in a SpotlightXL Report causes the scroll bars to disappear or disabled. |
765 | Report Design (Both) | Exclude POV does not work properly when run for a cascaded report. |
733 | Report Design (Both) | Report Design POV Default Filter Value is always set to Code. |
687 | Report Run/Design(Spotlight XL) | The Refresh All Open Reports option does not work as designed in all cases. |
477 | Report Design (Both) | Cell scaling and lock is not functioning as designed for Cascaded reports. |
405 | Report Design(Spotlight XL) | In Report Design, specify a dimension to be cascaded. Copy and paste the cascaded member/block in the same column. Select Save and Run The following is displayed 'Cannot find variable '@Cascade' in model...'. Select Refresh and the following is displayed 'Object reference not set to an instance of an object'. Important! The cascaded member must be defined in the same line or above the cascaded block, otherwise the report will not run. |
Resolved Issues
1541 | Report (SpotlightXL) | Application results in an error when a chart is added to the worksheet. |
1483 | Report (SpotlightXL) | Report does not save the chart when groups are enabled. |
Was this article helpful?