1.9.2 Modeling Release Notes, January
- 7 Minutes to read
- Print
- DarkLight
- PDF
1.9.2 Modeling Release Notes, January
- 7 Minutes to read
- Print
- DarkLight
- PDF
Article summary
Did you find this summary helpful?
Thank you for your feedback
New Features and Enhancements
Attributes Display Enhancement
Displaying the Default Display Label
Saving Data on Attributes for Views and Reports
Hierarchy Management
We have enhanced the dimension hierarchy screen to allow users to update the dimension hierarchy without clearing the model. Users can add new rollup members, move or change rollup members and also add new leaf members.
Data stored against rollup members will be deleted when the user updates the hierarchy however leaf level members (Level 0) data available in the model will be retained as is and users need to re-calculate and re-aggregate the model after updating the dimension hierarchy to make the model available for analysis and reporting
To modify your hierarchy on a model which already has data in it, you must first lock the associated model to prevent modifications and data inputs to the model while the hierarchy is being changed.
The steps to lock the model and modify the hierarchy follow:
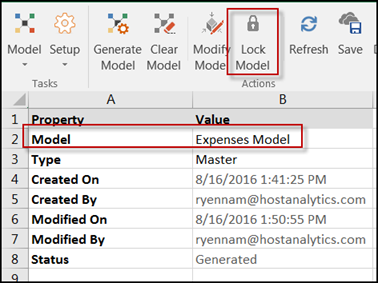
Select the Model task and the Setup subtask.
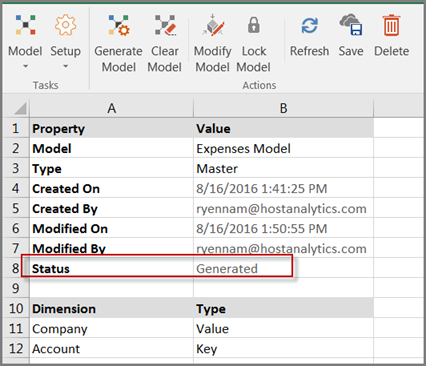
Select the model and click the Lock Model action as shown below. Notice that the status changed from Generated to Locked.
Example of locked and unlocked model:
Note:
If you do not lock the model, you will not be able to make changes to the hierarchy on a model which has data.
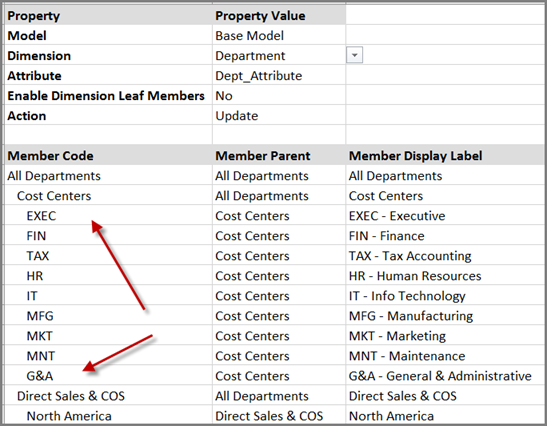
Select the Model task and the Dimension subtask. Notice the model has a status of Locked and the Action is Update.
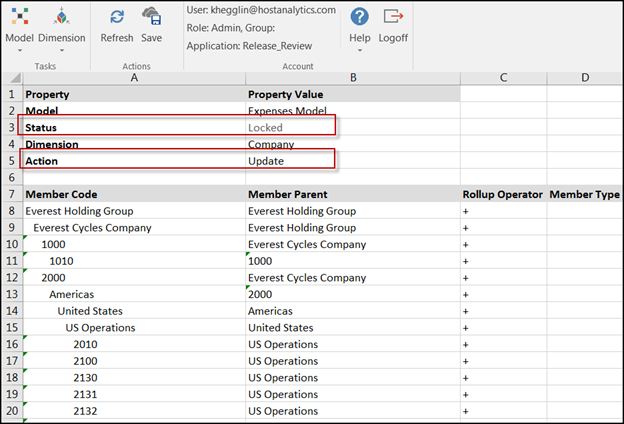
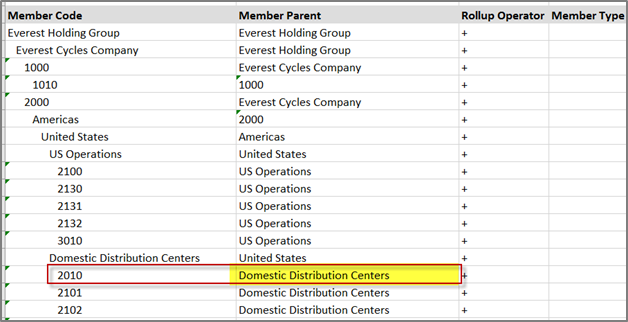
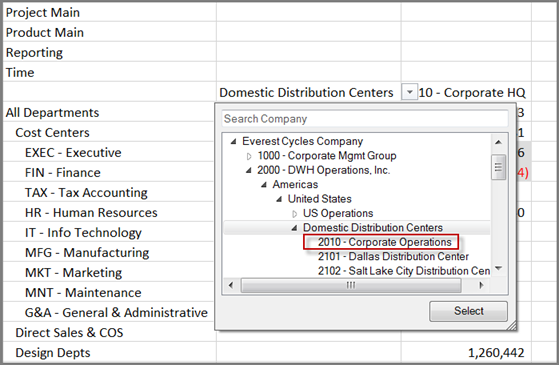
Add and move rollup members. Delete is not currently supported. In this example, the 2010 member is moved from US Operations to Domestic Distribution Centers.
Tip:
to move a member to another parent, use cut and paste and change the Member Parent.
Prior to move:
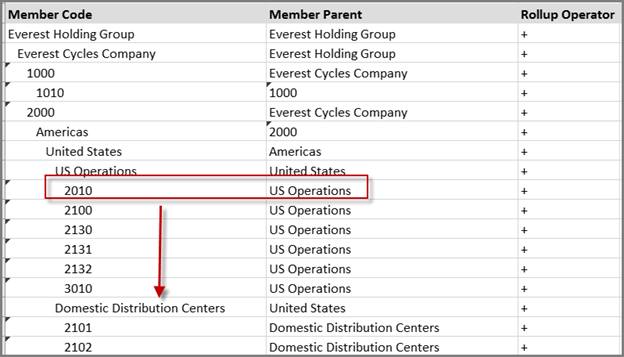
After member has been moved:
Important!
When moving hierarchical members from one parent to another, make sure you update the Member Parent. In the image above, the 2010 member had a US Operations parent. Since it was moved under the Domestic Distribution Centers parent, the Member Parent name was changed.
Click Save. The following message displays.
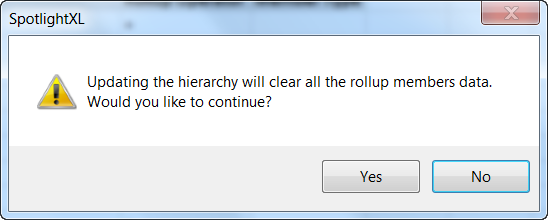
Click Yes to continue. The following message displays.
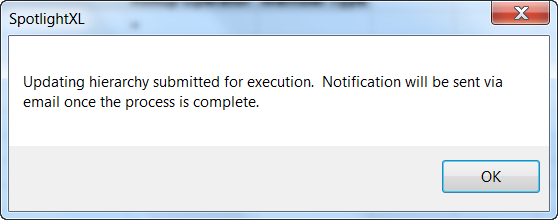
Click OK and check your email to ensure the process completes.
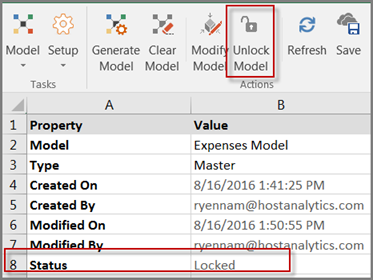
Select the Model task and the Setup subtask.
Ensure the model is selected and click Unlock Model. Notice that the Status is updated from Locked to Generated.
Select the Model task and the Calculation subtask.
Run the Aggregation type as well as any other calculations to make the model available for analysis and reporting. An example is shown below.
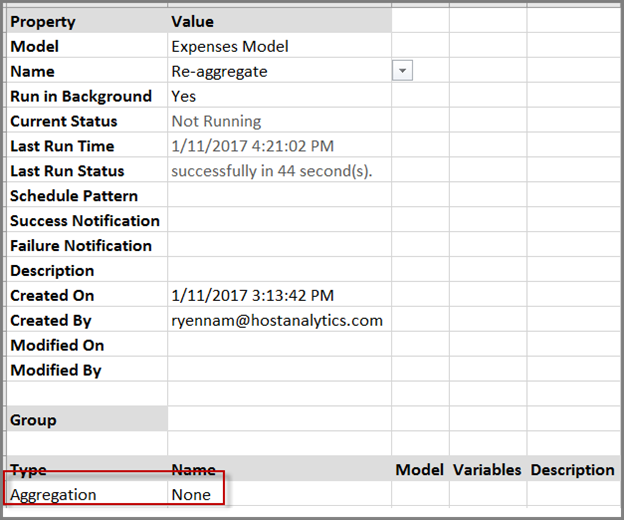
Click Run.
Once the Run Status is Complete, your views and reports are updated. In the view example below, notice that 2010 is now under the Domestic Distribution Centers rollup.
Best Practices for Updating the Hierarchy on a Model With Data
Update one dimension hierarchy at a time. So, when a user updates the hierarchy a process will run in the background to clear the rollup data and retain the leaf level data and finally update the dimension hierarchy. The user will receive the email notification after the process is complete, so the recommendation is to wait until the email notification is received before updating another dimension of the same model.
While the hierarchy is being updated, if a user tries to refresh the dimension hierarchy screen the latest changes made to the hierarchy may not be displayed. The user will see the changes made once the email notification is received indicating that the update hierarchy process is complete.
Users should not try to unlock a model while the hierarchy is being updated. Only unlock a model once the email notification is received indicating that the update hierarchy process is complete.
Run the Model > Validation after the update hierarchy process is complete.
For adding new members, it is recommended to continue to use the ‘Append’ action available in the Dimension Hierarchy page.
Model Restore
With this release we’ve enhanced the Model Restore functionality. In prior releases you could only restore a model with the same name as the model you backed up, which required that you delete the model in SpotlightXL prior to restoring that mode. Now, with the new Restore As field, you have the option of selecting a new name to restore the model.
Access the Manage task and the Application Administration – Model Backup/Restore subtask.
Click the Restore radio button.
Click Browse to select the location of the model you want to restore.
Enter any name in the Restore As field as shown below.
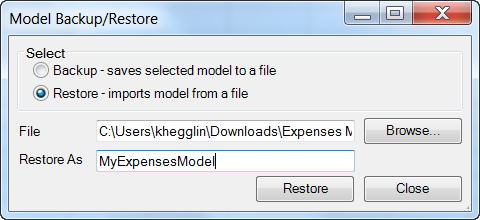
Click Restore.
Note:
If you try to restore a model that already exists, a message will appear. Change the Restore As name to prevent this or delete the model.
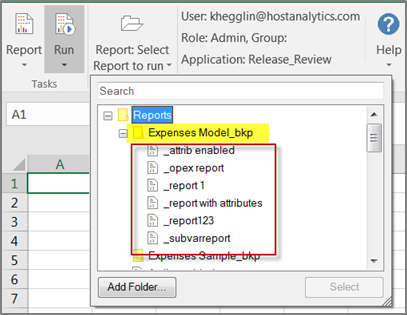
Restoring a model restores all related artifacts (for example, calculations, views, reports, maps, formulas, and so on). Organization folders within views and calculations, for example, are also restored. However, reports are restored in a different manner.
For reports, a folder is created with the name of the model you restored and each report is appended with an underscore. In the example below, the Expenses Model_bkp was restored. This model had 6 associated reports, all of which were restored up the folder named after the name entered in the Restore As field.
Best Practices
Remove unwanted models. Having several backups or somewhat duplicate models impacts performance.
Organize reports after the restore. Move them out of the folder and change the report name to prevent several similar or duplicate reports, which impacts performance.
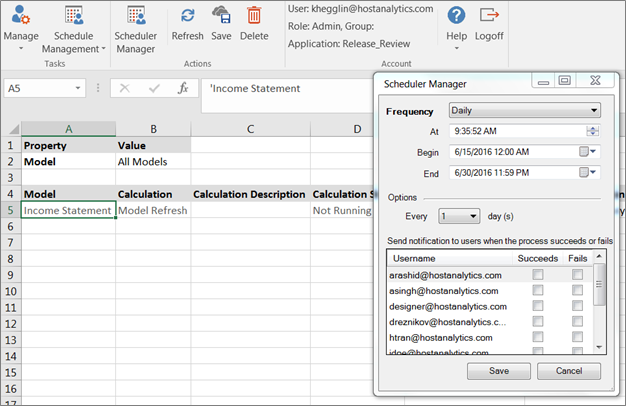
Schedule Management
The new Schedule Management functionality allows you to review existing calculation schedules as well as update existing schedules for all model calculations in one place. Access the Manage task and the Application Administration – Schedule Management subtask.
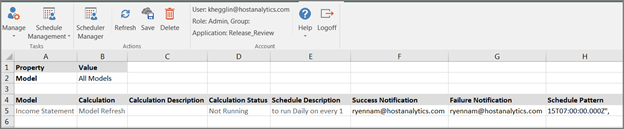
Schedule Manager | Click on a model and click the Scheduler Manager action to display the Scheduler Manager dialog page where you can modify the schedule for the selected model as shown below. |
Model | Select a specific model or select to display calculations for all models. |
Calculation | The name of the calculation associated with the model. |
Calculation Description | A description of the calculation. |
Calculation Status | Indicates if the calculation is running or not. |
Schedule Description | A description of the current calculation’s schedule. |
Success Notification | The email address of the user the email will be sent to once the calculation completes successfully. |
Failure Notification | The email address of the user the email will be sent to if the calculation completes unsuccessfully. |
Schedule Pattern | The pattern set up in Scheduler Manager. |
Attributes Display Enhancement
Attributes displayed on the Attribute page (accessed by selecting the Model task and the Attributes subtask) are now displayed in a level based format as shown below.
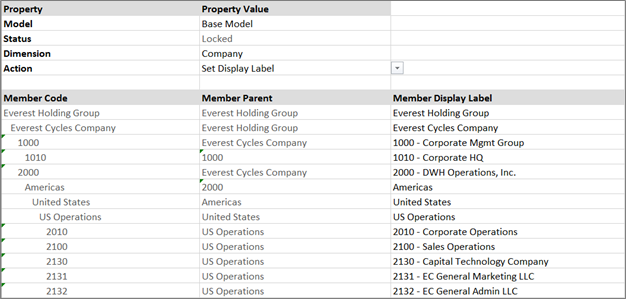
Displaying the Default Display Label
On the Model Dimension page (accessed by selecting the Model task and the Dimension subtask), the existing / default name of each member is now displayed in the Member Display Label column. In past releases, this column was blank. Change the name as desired based on how you want it displayed on reports and in views.
Note:
You must select the Set Display Label action is order to display the Member Display Label column.
Saving Data on Attributes for Views and Reports
Dimension data in views and reports with attributes can now be saved. In prior releases, this was not possible.
In order to save attribute data for a view or report:
Access the Model task and the Attribute subtask.
Select the Model and the Dimension for which the attribute is associated.
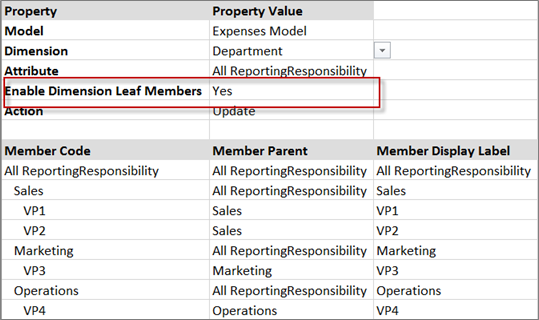
Select the associated attribute and select Yes for Enable Dimension Leaf Members as shown below.
Click Save.
Ensure Enable Save is set to Yes for view on the Design View and/ or Design Report Properties pages.
Drill Through Support
Drill through is now supported for Views and Reports which have attributes and the ‘Enable Dimension Leaf Members’ property is set to ‘Yes’. In the prior releases drill through was not supported.
Known Issues
1882 | Once the model that a variable refers to does not exist, the user is not able to delete or fix the invalid variable in the associated report. |
1853 | Issue if you unlock the model prior to the updating of the hierarchy. |
1845 | If POV member defined is removed or renames, it cannot be fixed in report design mode and error is displayed. |
1492 | Using special characters for the model name results in errors. |
1464 | When suppress rows/columns is enabled, If Dimension Members and Data Intersection are available in same column/row in a report then dimension members will be suppressed along with data intersections. |
1457 | In some cases Suppress blank rows/columns is not working as expected when Groups are expanded in the report. |
1455 | Suppress blank rows/columns is not supported in Spotlight (i.e. Web Interface). |
1454 | In Some cases Suppress blank rows / columns is not working as expected if groups and freeze panes are enabled in the Report. |
1446 | Unable to navigate to Design View after rename or remove HostAnalyze worksheet. |
1406 | Excel 2016 Chart Problems. |
1387 | Designer cannot generate external data source model. |
1322 | Unable to cascade with substitution variables. |
1321 | Substitution variables are not working as expected in Cascade Report. |
1277 | Permissions for view: Group setting not retained for New View. |
1273 | Cascade Report has inconsistencies with Filters. |
1144 | Freeze Panes location should not be outside of the sheet viewable range. |
687 | Modified Report definition by removing months column still retain after Refresh. |
405 | In Report Design, specify a dimension to be cascaded. Copy and paste the cascaded member/block in the same column. Select Save and Run and the following is displayed 'Cannot find variable '@Cascade' in model...'. Select Refresh and the following is displayed 'Object reference not set to an instance of an object'. |
Resolved Issues
1885 | Metadata download – Changed the alert message displayed on the bottom status bar, when metadata download process is executed. |
1806 | Formula: Incorrect calculation for empty cells. |
Was this article helpful?