Consolidate all of your financial statements, which can be automatically generated, and perform eliminations, adjustments, and minority interest calculations.
With Consolidation, you can perform the activities associated with the closing of books for a given period, in addition to analyzing impacts to financial results such as operations in multiple currencies, mergers and acquisitions, and changes in accounting policies.
To search within this document, expand all topics by clicking the Expand Topics button and then use your keyboard and select Ctrl+F. Enter search content in the box that appears.
Intro to Consolidation
How to Access the Consolidation Control Panel
As an end user, all of your Consolidation tasks will be carried out in the Consolidation Control Panel. Your Admin user will provide you with security. There are two types of Consolidation users:
Centralized - If you are at the root member (defined as the top member in the hierarchy) then you are interacting as a Centralized user managing the Consolidation Process in its entirety.
Decentralized - If you have been provided specific dimension member access within the hierarchy and you select a Company from the member selector, then you are interacting in Decentralized mode. This means that the modules available may be restricted and you have limited access to Company intersections for modifying data.
Click the Consolidation icon shown below in blue to access the Consolidation Control Panel.

Dissecting the Consolidation Control Panel
The Consolidation Control Panel is organized by Process. Click a Process (located in the left pane) to view associated details in the center pane.
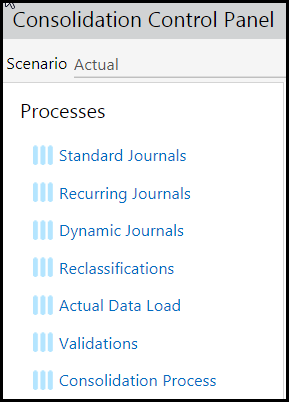
Entry Actions, located in the right pane, are available based on selections made in the center pane. Process approval details are displayed in the right pane. After all processes are posted / processed successfully, you mark processes as Complete. When you mark a process Complete, the grid becomes empty and all the processes are locked from editing. Also, no actions are available for locked processes.
Description of Fields on the Consolidation Control Panel
Scenario - You can run Consolidation for any specific scenario or scenarios. However, journal entries can only be posted against the Actual scenario. You might want to run Consolidation for other scenarios, for example, to eliminate the Fx affect. To do so, you'll add a scenario that takes actuals and converts to a budget rate. Or, you can take budget and convert to actual rates. Now, when you start to analyze actual to budget data for the month, quarter or year, the affect of Fx is removed.
Period - Consolidation tasks relate to dates or time periods. Click the Calendar button to select a month and year.
Lock / Unlock icon - Indicates a locked or unlocked period.  Once periods are closed they are locked and therefore not editable.
Company - Access to dimension members here is based on user type; Centralized or Decentralized. (The label shown here is the name given to Segment 2 – company segment. If you named the segment Company, it will appear as Company)
Left Pane
Processes Pane :
Standard Journals - Standard Journal Entries are entries which are created for processing one-time journal entries. You can add Standard Journals to Budget scenarios.
Recurring Journals - Recurring Journal Entries are those which will not vary across time and can be automated and consistent for each period within your process. For example, if you have an annual expense (such as rent) you can accrue the expense in twelve equal payments every month with a Recurring Journal Entry. A debit and credit to the appropriate segment intersections will be created every month.
Dynamic Journals - Dynamic Journal Entries are used when entry balances fluctuate from period to period. For example, as a financing strategy you take out a loan with a variable interest rate. This means that the principal and interest payment will likely fluctuate from period to period based on the loaded rate for the period.
Non Controlling Interest -Describes the relationship between a parent company and a subsidiary (otherwise referred to as joint ventures or minority interest relationships), the related accounts, and Dynamic Journal Entries used in adjusting the investment in the subsidiary. The calculations and postings take place during the Consolidation Process.
Reclassifications - Reclassification Entries are usually used to correct financial information that has been incorrectly posted against an intersection within the database. For example, if $500 was recorded in the wrong GL account, you can move the amount to the correct GL account with a Reclassification Entry.
Eliminations - Elimination Sets are comprised of due to and due from accounts that make up an intercompany transaction. Eliminations are processed individually or together as part of the Elimination Process. The Elimination Process calculates and posts Elimination Entries at Eliminating Companies within your legal entity hierarchy to ensure the proper aggregation of financial information at consolidated reporting levels. For example, a transaction that involves the sale of an item manufactured by a subsidiary to another subsidiary should be eliminated when reporting consolidated results.
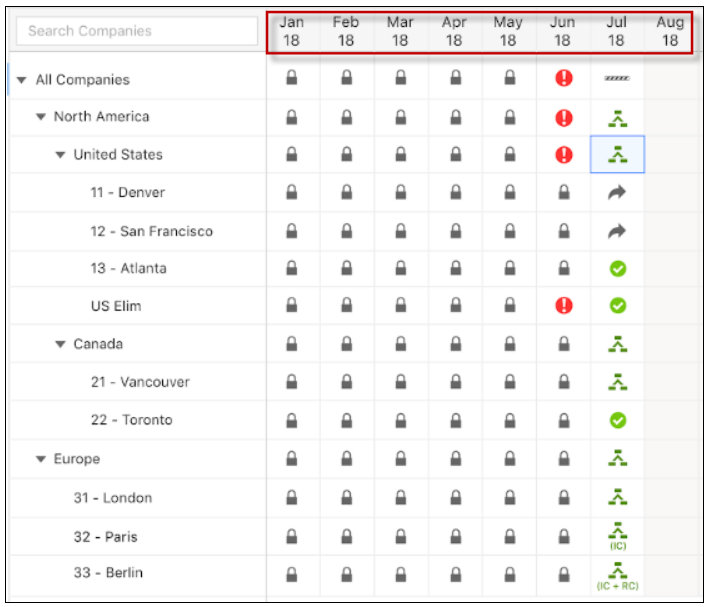
Consolidation Process - Run the Consolidation Process. If a Centralized User runs the Consolidation Process, all company/legal entities will be updated for the selected scenario and time periods. If a Decentralized User runs the Consolidation Process, only the selected company/legal entity(s) will be updated for the selected scenario and time periods . If Consolidation Status is implemented in your application, click here to read all about it. If you are not sure if Consolidation Status is implemented, click the Consolidation Process. If the center pane displays the company hierarchy with a period at the top of each column, then this feature is enabled. If the center pane is blank, it is not enabled.
Actual Data Load - Displays the Actual Data Load grid containing the Actual Data Templates. Using the Actual Data Load process, you input actual budget data in the available templates.
See: How to Input Actuals.
Right Pane
Entry Actions :
Select the checkbox next to entries to perform an Entry Action. These actions are available based on where you are within the Consolidation Process and your security privileges. Entry Actions allow you to control the lifecycle of a journal.
Entry Actions are available based on your selections. For example, if you want to post an Elimination Set, select the checkbox next to the Elimination Set and click the Post Entry Action.
Type of Entry Actions:
Forward - submit an entry for review. Select a journal entry that is in process and click Forward to move the entry to pending review.
Send Back - return a journal entry to an In Process status to make required changes. This option is only available when the journal is in the Pending Review or Approved state.
Approve - approve a journal entry that is pending, which confirms the entry for posting.
Reject - refuse a journal entry. You can edit a rejected journal, select it and click the In Process entry action.
Process - calculate the value of a selected journal entry and post to the database.
Clear Data - delete previously processed Elimination data.
Post - post the entry to the application.
Inactive - disable an entry (such as a Dynamic Journal Entry, an Elimination Set or Non Controlling Interest). Disabled/Inactive entries are not posted.
Active - make an Inactive entry Active. Only active entries are posted.
Reports - Reports are available based on Process. Some examples of reports include; Verify Data, Audit Log, and Exchange Rate.
Center Pane
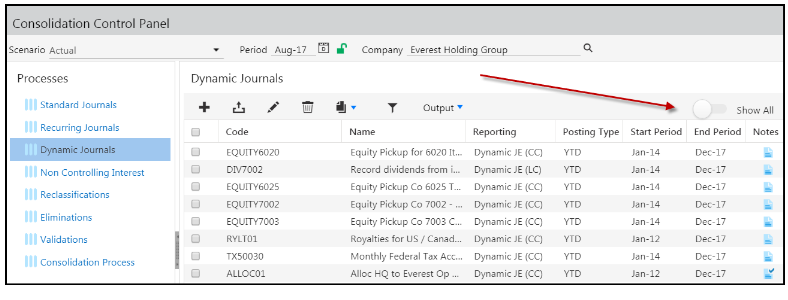
When you click a process, for example Dynamic Journals, the center pane is displayed. All entries for Dynamic Journals are displayed based on scenario, period, and company selections. The Status column (shown below) provides information on whether the entry is active or inactive. Only active entries can be processed.
With Status Column.

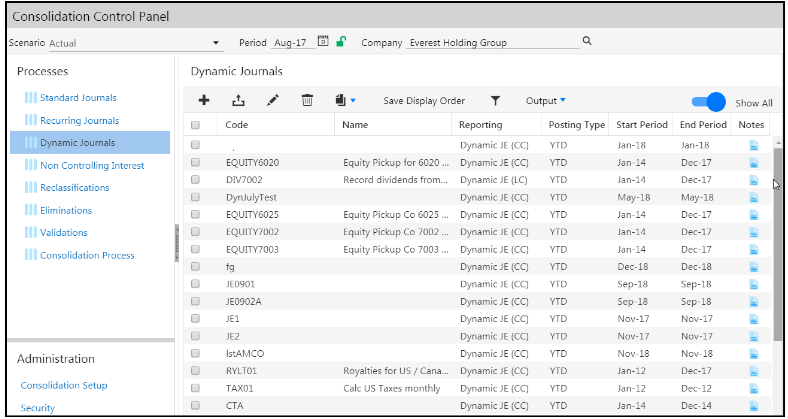
The Show All toggle, when turned off, displays all Active and Inactive journals in the selected period. When turned on, all journals for all periods are shown.
Show All Turned Of
Show All Turned On
If you click the Consolidation Process and the Workflow Status feature is enabled, a company hierarchy with a period at the top of each column is displayed as shown below. If this feature is not enabled, the pane will be blank.
Activities that Complete During Consolidation Processing
When you run Consolidation, the bullet points below happen. However, you have the option to define a Custom Consolidation Process. Click here for information.
Process Dynamic Journals in local and common currency
Process Non Controlling Interest
Calculate the minority interest expense and liability accounts for Non Controlling Interest
Calculate the investment in subsidiary for Non Controlling Interest in local and common currency
Process required partitions in the reporting database
Calculate Retained Earnings for all companies in local currency
Calculate currency translation adjustments
Process interim currencies
Calculate Retained Earnings for interim currencies
Calculate currency translation adjustment for interim currencies
Reporting members with assigned currency values, exchange rates, and calculation types are converted.
Process reporting cube
Custom User-Defined Consolidation Process - What Is It and How Does It Work
With the User Defined Consolidation Process feature, you can configure and personalize your Close process. For example, you can balance books at local and common currencies during your Close process and require interim and reporting currencies get processed after Consolidation is complete. For Budget and Forecasts, you have the flexibility to run the Consolidation Process for specific financial years (period range) for the scenario versus all years.
Without the Custom User-Defined Consolidation Process, the Consolidation Process runs conversions and other calculations for common currency, local currency, interim currency, and reporting currency all at once in a big chunk. For example, let’s say you wanted to post Eliminations, Dynamic Journals (in common currency), and Reclassifications. You have to run the Consolidation Process, then Eliminations, and then the Consolidation Process again so that interim and reporting currency would reflect the eliminated intercompany transactions. With the User Defined Consolidation Process, you can process local currency and common currency, post Eliminations and common currency adjustments (if any) and then consolidate interim and reporting currency.
Follow the steps in the
How to Process Consolidation With Configurable Steps
Access the Consolidation Control Panel.
Select the Scenario, Period and Company.
Click the Consolidation Process and select the Process Action. The Process Setup page is displayed.

The Configurable Steps tab is displayed by default as shown below.
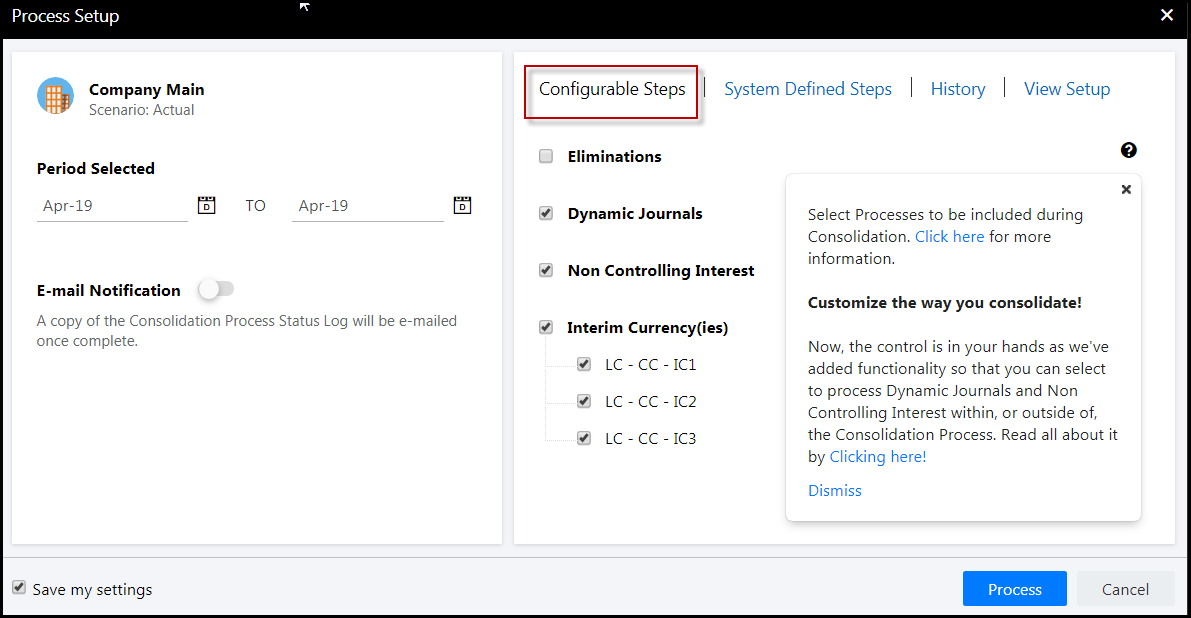
The Period Selected field is populated based on the Period selected on the Consolidation Control Panel. Select a TO period if you want to run the process for multiple periods.
For E-mail Notification, click the slider, which will change to blue (on) and select the e-mail addresses of those you want the Consolidation Process Status Log sent to.
In the Configurable Steps pane, select the Interim Currency(ies) you want consolidated during the Consolidation Process. The number of available Interim currencies is based on the number of Interim Currencies specified on the Define Currency Parameters Configuration Task.
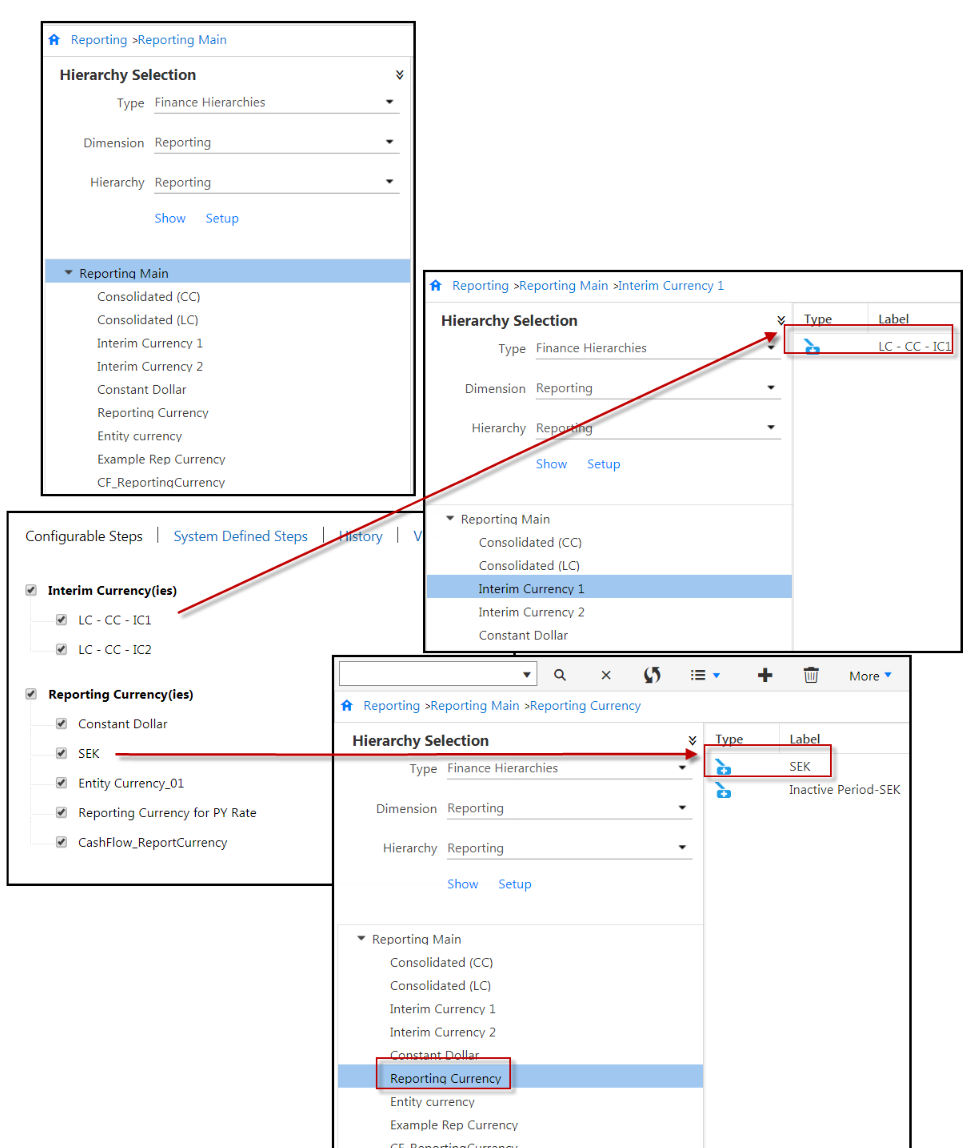
Select the Reporting Currency(ies) you want consolidated during the Consolidation Process. Reporting Currency is defined in Hierarchy Management. In the image below, you can see how the leaf level members in the Reporting hierarchy match up with the Reporting Currency on the Consolidation Setup page.
Select to include Eliminations, Dynamic Journals and Non Controlling Interest to be processed during the Consolidation Process. Alternatively, do not select the checkboxes should you choose to process Dynamic Journals and Non Controlling Interest outside of the Consolidation Process. Customers who had earlier opted to include Dynamic Journals and Non Controlling Interest as part of the Consolidation Process will see that both the options are selected when they navigate to the Process Setup page.
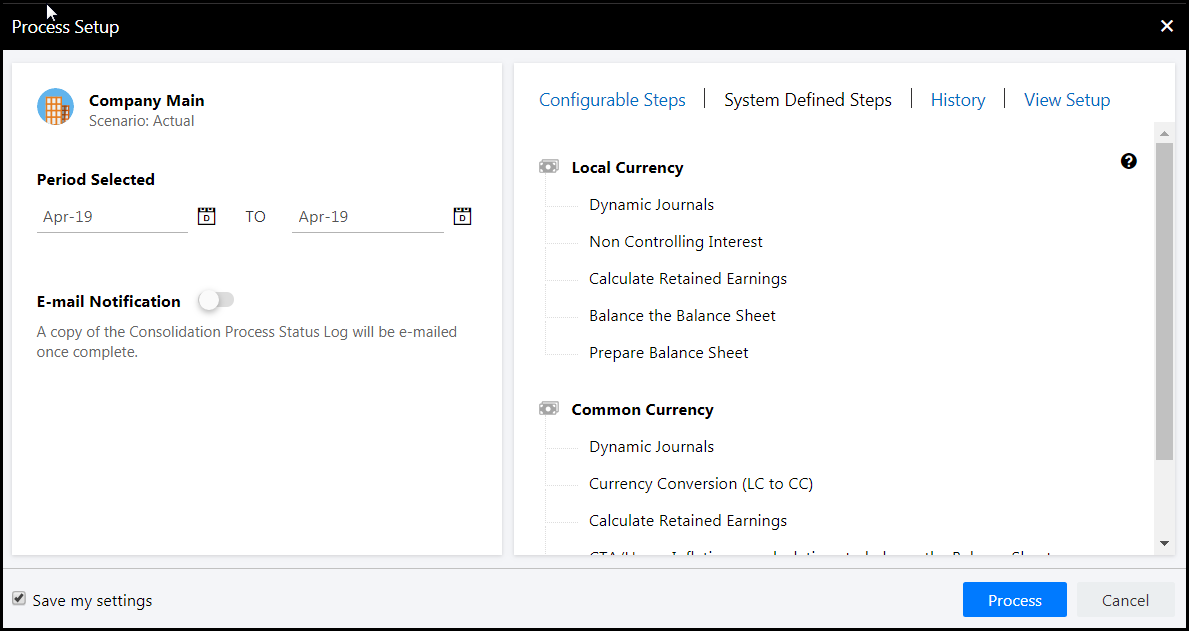
Note:Once you select the checkbox to include Dynamic Journals to be processed during the Consolidation Process, you cannot select specific Dynamic Journal Entries to process for the period. Instead, all active Dynamic Journal Entries for the period will be processed.Click the System Defined Steps tab. The Consolidation Process calculates both Common and Local Currency by default. The activities under Local Currency and Common Currency are system populated based on what needs to be performed and how your application is configured.
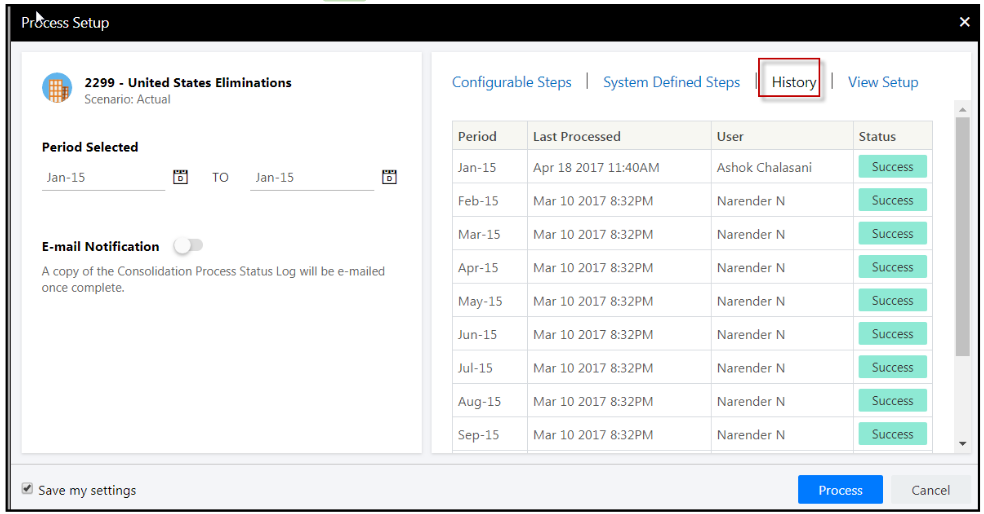
Click the History tab to view information on the period, date and time the last Consolidation Process was run as well as the user that ran the process and the status of the process.
Click the View Setup tab to view the account setup completed on the Consolidation Control Panel > Consolidation Setup.
Click Save my settings so that every time you access the Process Setup page, your selections for Interim and Reporting currency is retained from the previous run. Settings are user specific.
Click Process. You’re done!
Note:The reporting cube should be refreshed 3 times during the Consolidation Process; once before the processing of Dynamic Journals in local currency, prior to the processing of Dynamic Journals in common currency, and at the very end.
How to Post Eliminations During the Consolidation Process
Optionally, include Eliminations (along with Dynamic Journals, Non Controlling Interest, Interim Currencies, and Reporting Currencies) in the Consolidation Process, which can then be scheduled to run in Cloud Scheduler. This eliminates the need for manual execution, however, you can continue to post Eliminations independently as well. Having both options provides additional flexibility and convenience.
Active Elimination Sets are processed and posted during the processing of common currency in the Consolidation Process. More specifically, the sequence of execution within the Consolidation Process is as follows:
Local Currency
Common Currency
Interim Currency
Reporting Currency
During the processing of Common Currency, the following happens:
Local currency is converted to common currency
Dynamic Journals Posting
Non Controlling Interest Calculations
Active Elimination Sets are processed and posted - this happens the first time Elimination Sets are posted and for subsequent Consolidation processing the Elimination Sets are first cleared and then posted.
Current Year Retained Earnings calculations
Beginning Retained Earnings calculations
Hyperinflationary Company Processing
CTA calculations
If the posting of any Eliminations fails during the Consolidation Process, the entire process fails. If a Cloud Scheduler task includes the posting of Eliminations for a company and the Elimination company under the rollup company is deleted at some point in time, the Cloud Scheduler task will fail. To resolve this issue, update the existing Cloud Scheduler task and uncheck the Eliminations checkbox. Save it and run again.
In Practice
Access the Consolidation Control Panel.
Select the Consolidation Process.
Click the Process action. The Process Setup page appears as shown below.
Select the Eliminations checkbox and click Process or set up a Cloud Scheduler process. Note that the Eliminations checkbox is only available/visible in the selected company is a rollup and has an Elimination company as one of its descendants.
Note:The Save my settings option is not applicable for Eliminations. So, the Eliminations checkbox will always be unchecked by default.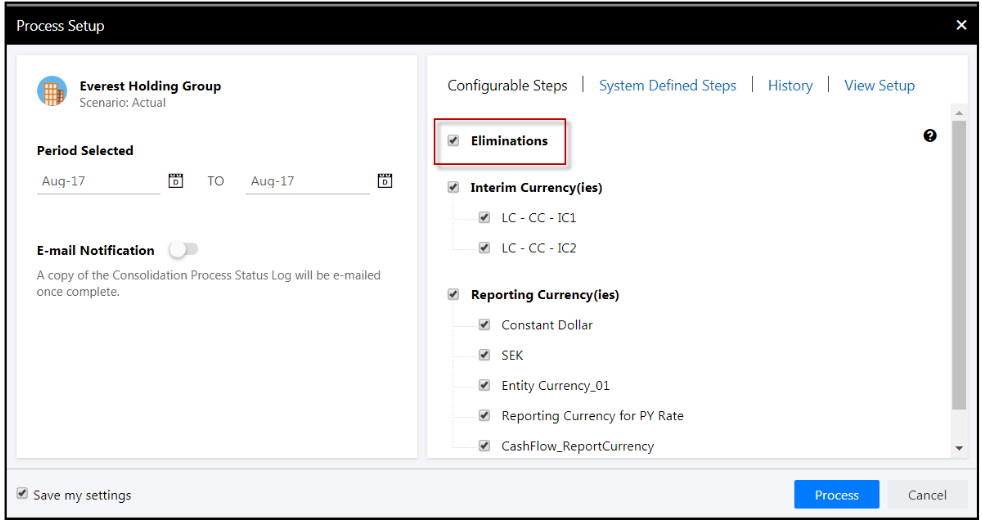
How to Clear Eliminations Posted as Part of the Consolidation Process
When Eliminations are posted as part of the Consolidation Process, the only way to clear Elimination postings is to perform the following steps.
Access the Consolidation Control Panel.
Click the Eliminations Process in the left pane. Eliminations are shown in the center pane.
Select an Elimination and click the Clear Data action as shown below.
 Note:You cannot clear Elimination postings using the Clear data option under Maintenance > DLR.
Clearing Dynamic Journals and Non Controlling Interest Posted as Part of the Consolidation Process
When you select to process Dynamic Journals and Non Controlling Interest as part of the Consolidation Process, the Consolidation Process will not clear data for inactive artifacts (Dynamic Journals and Non Controlling Interest).
How to Process Consolidation Without Configurable Steps
You can set up a process in Cloud Scheduler or run Consolidation from the Consolidation Control Panel. For Centralized Consolidations, all company/legal entities will be updated for the selected scenario and time periods when Consolidation is run. For Decentralized Consolidations, only the selected company/legal entity(s) will be updated for the selected scenario and time periods when Consolidation is run.
Select Consolidation Process from the Processes pane.
Select Process from the Entry Actions pane.
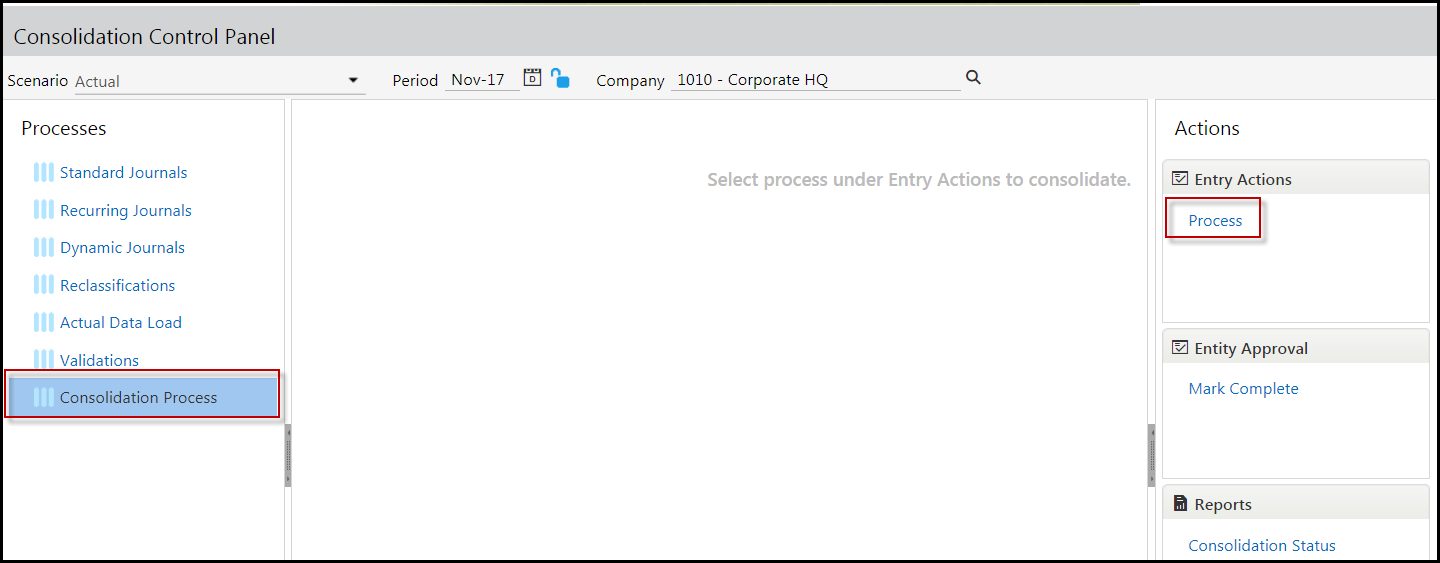
The Process Setup page is opened. Scenario selection includes Actual, Budget, and Forecast scenario types. If Actual scenario is selected then the Year and Period selections are applicable. If Budget/Forecast scenario types are selected then the Year selection is disabled and a single period is displayed for processing. You can select this to process all of the periods within a Budget or Forecast scenario type.
Select a Year to drive periods displayed for processing.
Select from the list of available periods based on the Scenario and Year selections. Locked periods are not available for selection.
Click the Process button to execute the Consolidation Process. Once the Consolidation Process is complete, a Process Status page will appear indicating whether or not the process was successful.
There are prerequisites that must completed before you can process consolidations, which include:
Post Journal Entries
Execute Intercompany Eliminations
Update Foreign Currency Exchange Rates
Define Consolidation Setup selections
Explanation of Journal Types
There are three types of journals; Standard , Recurring and Dynamic.
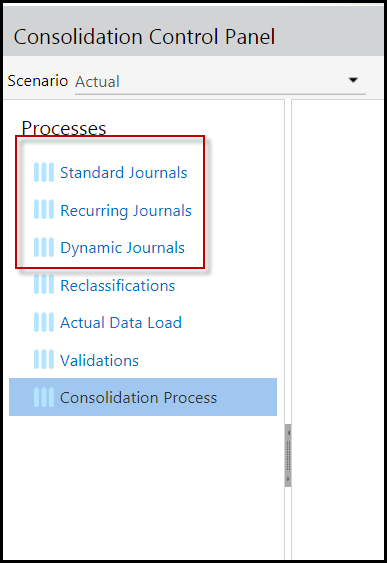
Standard Journal Entries are entries created for processing one-time journal entries. Recurring Journal Entries do not vary across time. Standard Journals can also be of Auto-Reversing type to post subsequent periods.
Recurring Journal Entries do not vary across time and can be automated and consistently applied for each period within your process. For example, if you have an annual expense (such as rent) you can accrue the expense in twelve equal payments every month with a Recurring Journal Entry. A debit and credit to the appropriate segment intersections will be created every month.
Dynamic Journal Entries are used when entry balances fluctuate from period to period. For example, as a financing strategy you may take out a loan with a variable interest rate. This means that the principal and interest payment may fluctuate from period to period based on the loaded rate for the period.
Standard Journals
When Should I Add a Standard Journal and How is it Done
Add a Standard Journal when you have to post a journal entry for only one time.
In the Consolidation Control Panel, under Processes, click Standard Journals. The Standard Journal grid appears.
Click Add. The Add Standard Journal dialog appears.
Enter a code of your choice in the Code field.
Enter a name for the Standard Journal in the Name field.
Select the month and year range in the Period field. During the selected time period, the journal is active.
YTD displays for the journal Posting Type.
Note:MTD (month to date) evaluates entries based on the month’s activity; whereas YTD (year to date) evaluates the entries based on the cumulative balance for the line items.Select Adjustments (CC) or Adjustments (LC) in the Reporting drop-down list. A journal can be in common currency or local currency.
Note:A local currency is often used by a company's subsidiaries and then converted to a common currency for consolidated reporting purposes.Select the Auto-Reversing checkbox to create a Standard Journal Entry with an Auto-Reversing entry in the subsequent period. The originating entry is the base entry in the current period to configure the Auto-Reverse option.
The Auto-Reversing entry is a replica of the originating entry, but applicable for the subsequent period. For example, you can use this feature to close books for a given month (accrue vacation liability), which will be reversed in the subsequent month once more relevant information is known about the actual cost associated with the entry.
When the originating entry is posted, the Auto-Reversing entry is created. For example, if you post the originating entry in Jan-2019, the Auto-Reversing entry will be posted in Feb-2019.
In the grid that displays segment columns based on the application configuration and user's security, set up a journal entry by performing the following steps:
Click Add Row. A new row is added.
Do one of the following to set up the values for each column:
Complete the values in the UI directly, by either typing the values or selecting the value.
Paste copied line items from an Excel spreadsheet to the journal entry grid. You can copy/paste all values, including description, segments, and debit/credit values. Use shortcut keys (Ctrl+C and Ctrl+V).
- The Total displays the Debit or Credit amount for the entire column as well as running variance column.
- Click Save. The journal entry is added.
How to Upload Standard Journals
Upload Standard Journals in xlsx format directly to the Consolidation module. Use the sample template (that you can download) for ease of use when performing the upload.
In Practice: How to Download the Sample Template
Access the Consolidation module.
Click the Standard Journals process.
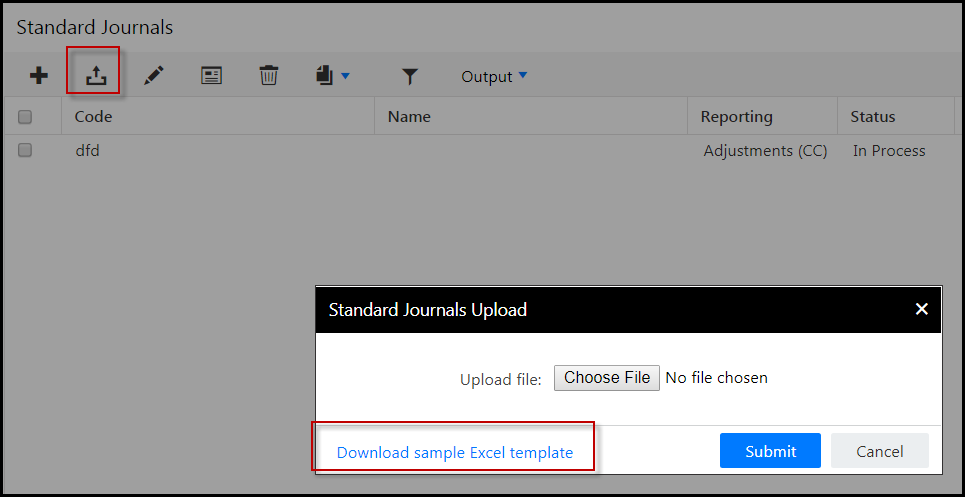
Click the Upload icon shown below. The Standard Journals Upload dialog appears. Click Download sample Excel template.
In Practice: Uploading Standard Journals (with Failed and Completed Examples)
Access the Consolidation module.
Click the Standard Journals process. Standard Journals appear in the center pane as shown below.

If no Standard Journals were created or uploaded then this pane will be blank. You can opt to upload or enter journals or do a medley of both. Click the Upload icon shown below.

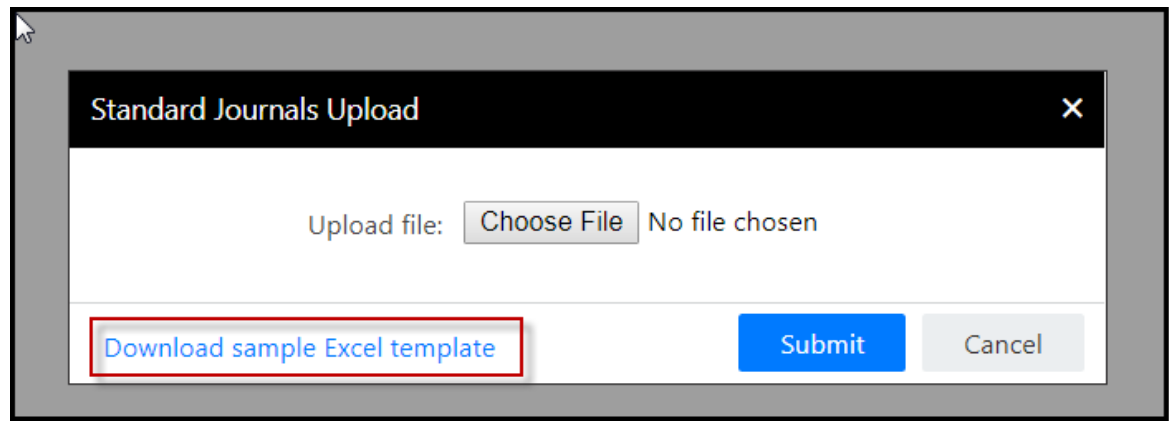
When you click the Upload icon, the Standard Journals Upload dialog appears. It is best practice to use the sample Excel template as it instructs you exactly how to organize your journal data to load it successfully. Click Download sample Excel template.
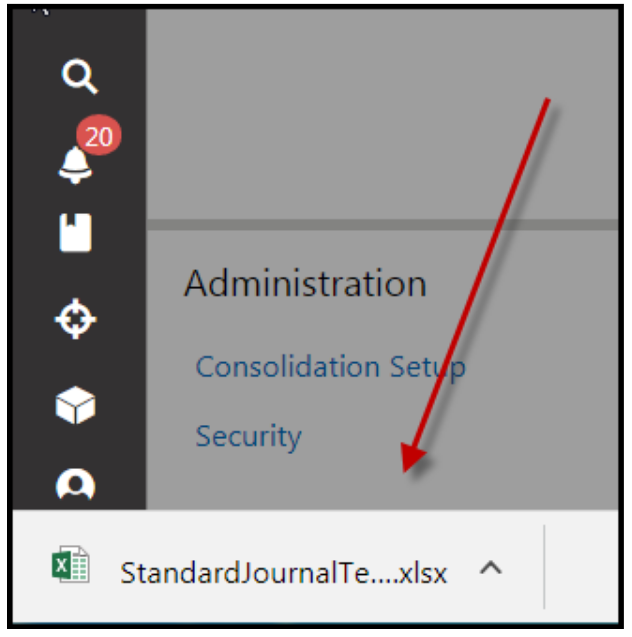
The template is downloaded to your computer. Open the template.
The template displays and indicates the required fields. It also provides information to ensure the correct data is entered where needed. Copy and paste the template into a new file.
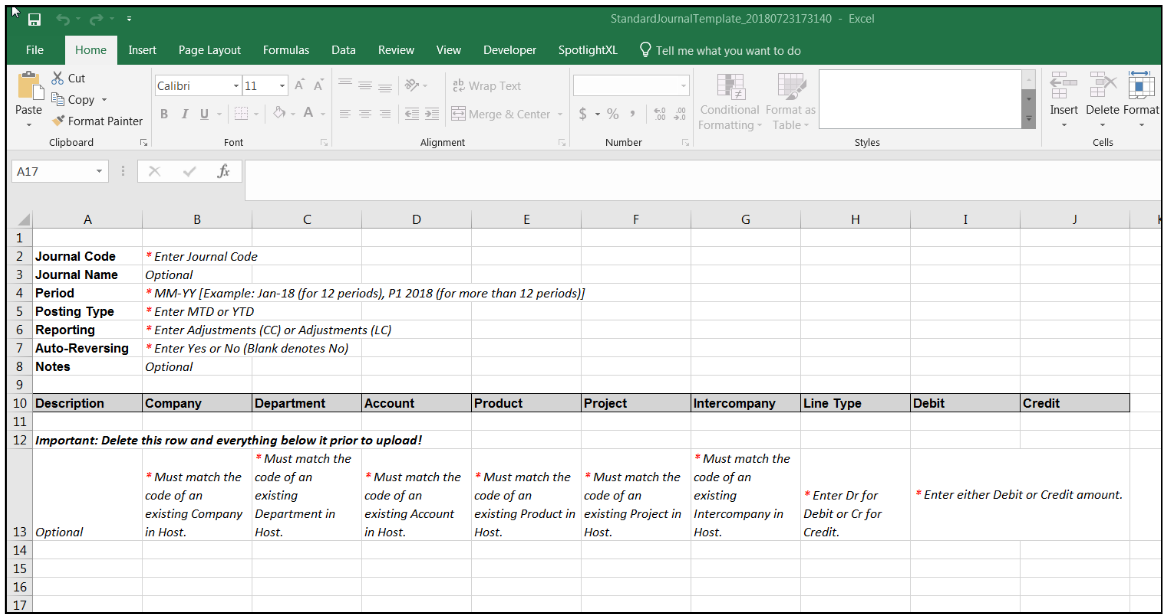
Enter a journal code, the period for which you want to load the journals, and the posting type as shown below.
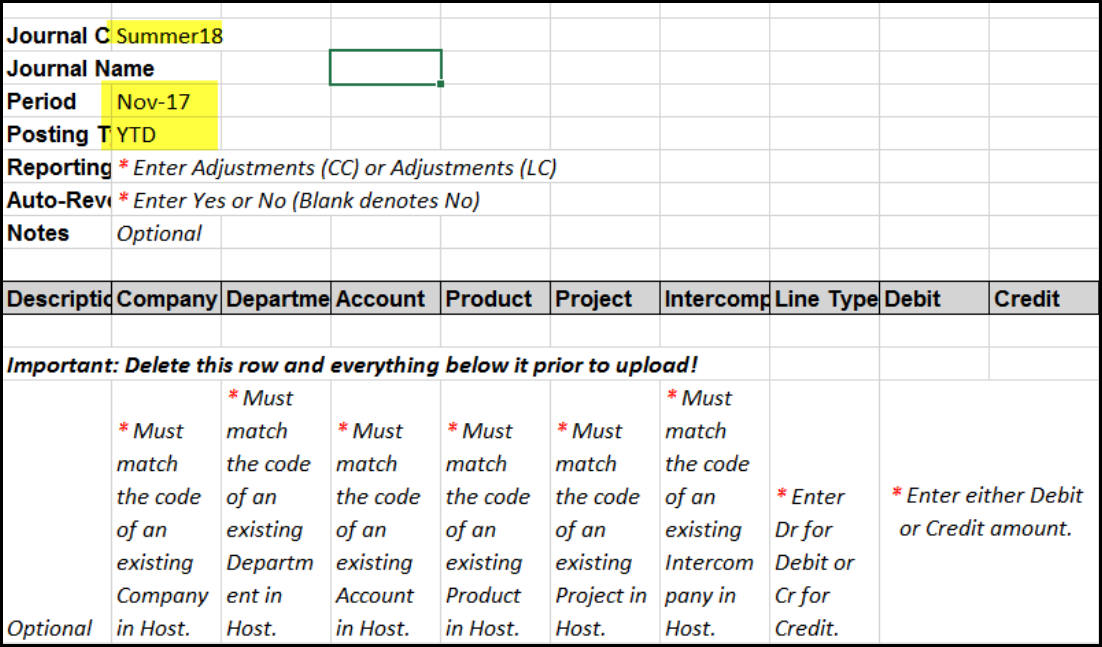
Enter Adjustments (CC) or Adjustments (LC) for reporting, Yes or No for auto-reversing and enter notes as needed.
Now, you’re ready to copy and paste journals to the spreadsheet. Notice how the grid names in the Excel template match the names within the application Journal Add page. Prior to copying and pasting data to the Excel file, make sure you delete all the tips located in the sample file.
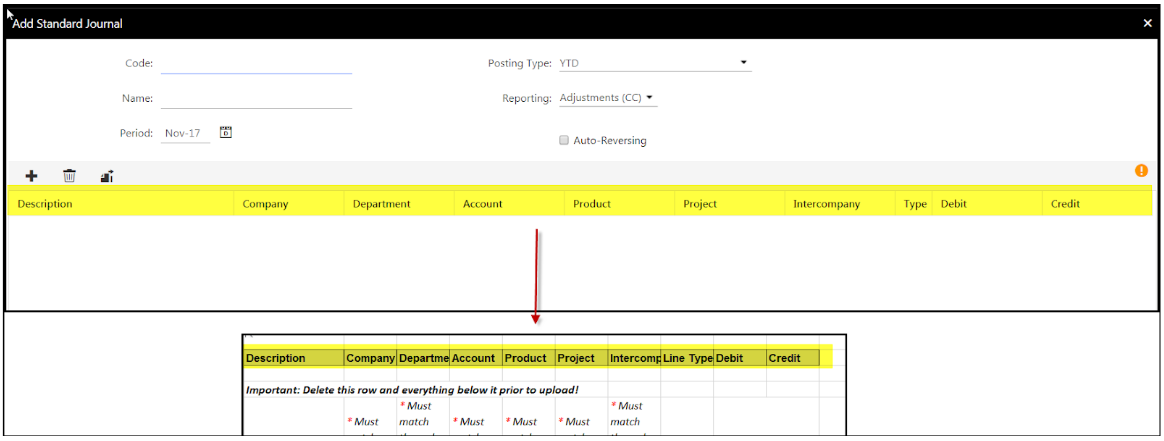

Save the xlsx file to your computer.
Click Choose File.
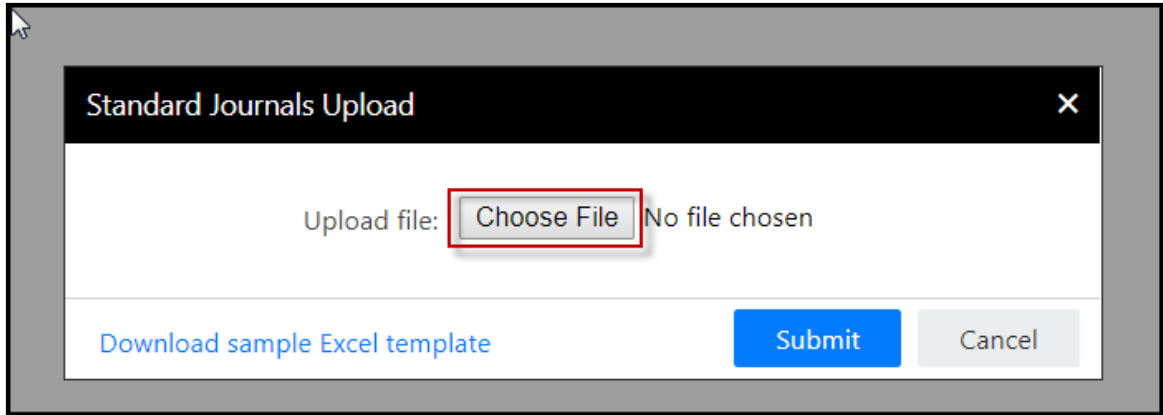
Select the file you just saved to your computer.
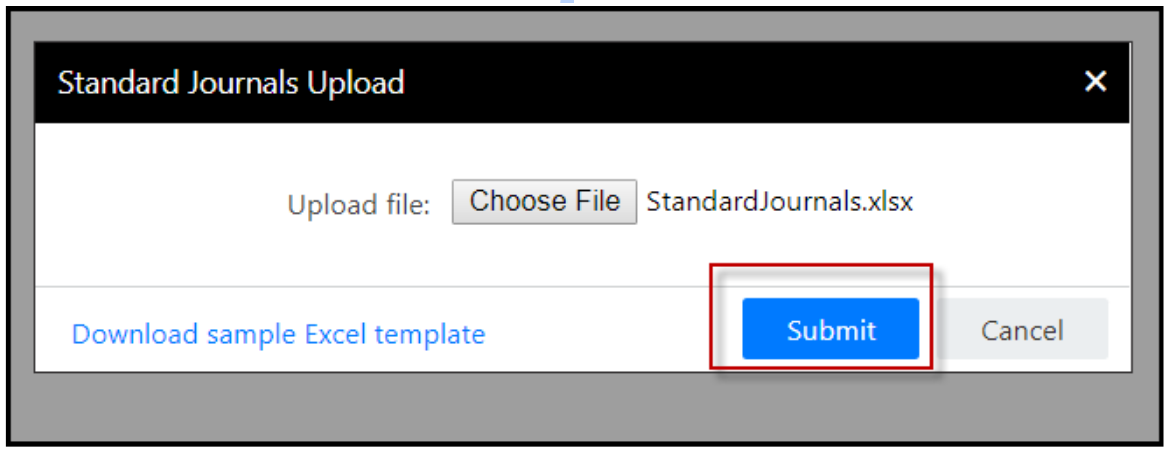
Click Submit to perform the upload. A message will appear once submitted (as well as once the upload is complete) where you can click through to the Detail View (shown below) to view the status of the upload. Additionally, clicking Submit will create a Job Manager process called Standard Journals Upload (also shown below).
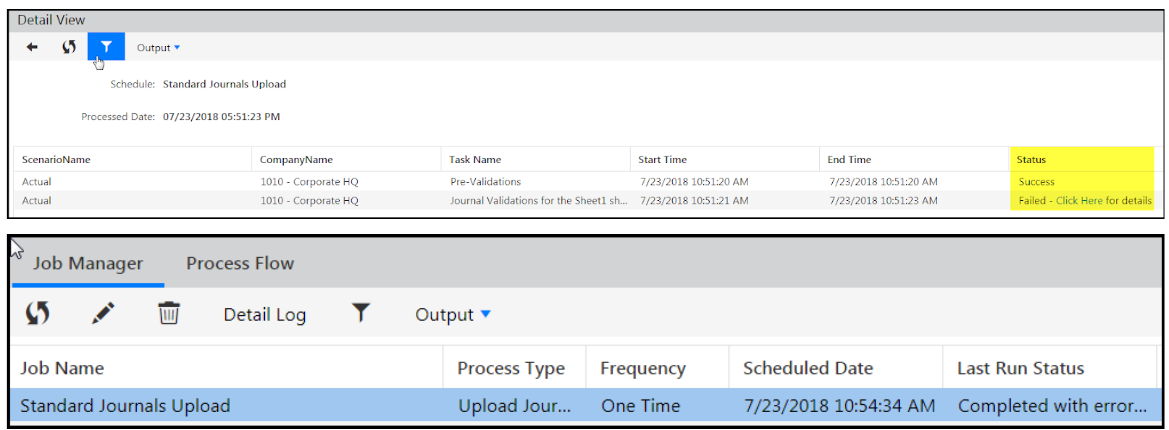
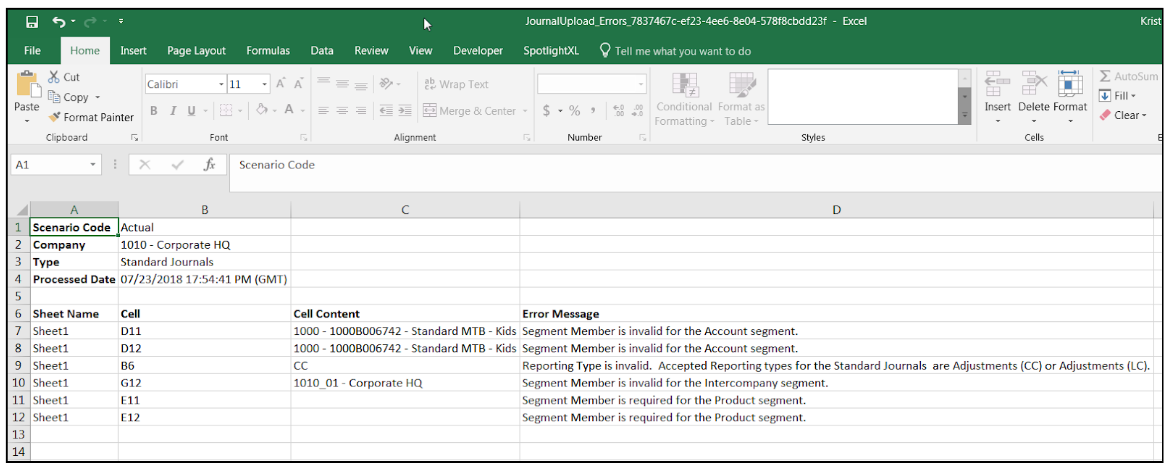
If the upload failed, click the Status field link (Click Here ) to download an Excel file with information on why the failure occurred. An example of a failed upload is shown below. Fix the errors and upload the file again.
Once journals are uploaded successfully, the Detail View will display Success in the Status field and the uploaded Standard Journal will display in the Consolidation Control Panel (shown below).


How to Copy an Existing Standard Journal within the Same Scenari
Use an existing Standard Journal to create a copy with new criteria for posting entries. Doing so saves time.
In the Consolidation Control Panel, under Processes, click Standard Journals. The Standard Journals grid appears.
Select the journal you want to copy.
Click Copy and select Copy Single. The Copy Standard Journal dialog appears.
Click Save.
How to Copy a Standard Journal from One Scenario to Another
Access the Consolidation Control Panel.
Select the scenario you want to copy the journals from.
Select the Standard Journal process.
Click the checkbox next to the entry you want to copy.
Click the Copy icon. Select Copy Multiple . The Copy page appears.
Enter a Code and Name and select period dates.
Select the Target Scenario .
Complete all selections based on process being copied.
Click Save.
If you select multiple entries to copy, the Copy Single option will not be available.
Best Practice when Copying Standard Journals
Limit the number of journals and journal lines you copy to a combined total of 30,000 (journals + lines). For example, 1000 journals with no more than 30 lines. Or, 60 journals; each of which have no more than 500 lines.
How to Edit a Standard Journal
You may want to edit a Standard Journal to add, edit, or delete existing entries, prior to posting of entries. You may or may not be able to edit a journal based on the status. For example, you can't edit a journal that is Approved. You can edit a journal that is In Process.
Edit button available because the journal is In Process:

Edit button not available:

In Practice
In the Consolidation Control Panel, under Processes, click Standard Journals. The Standard Journals grid appears.
Select the Standard Journal you want to edit.
Click Edit. The Edit Standard Journal dialog appears. Edit as necessary.
Click Save to save the changes and to exit the Edit Standard Journal dialog.
When and How to Delete a Standard Journal
You may want to delete unused or inactive Standard Journal lines. When you delete a Standard Journal line, all the associated journal entries are also deleted. You can select many Standard Journal lines at once and delete. To do so, click the checkbox in the column header to select all Standard Journal Entries.

In Practice
In the Consolidation Control Panel, under Processes, click Standard Journals. The Standard Journal grid appears.
Select the Standard Journal line you want to delete. Or select to delete all lines.
Click Delete.
In the confirmation dialog that appears, click OK.
When and How to Forward a Standard Journal

In Practice
In the Consolidation Control Panel, under Processes, click Standard Journals. The Standard Journals grid appears.
Select the journal with an In Process status.

Under Entry Actions, click Forward. The journal enters the Pending Review status. The application sends out notification to the user about the review action for assigned journal entry.

When and How to Approve a Standard Journal
Approve journal entries that are correct and complete. This action is available for journals with a Pending Review status only. An approved journal entry is ready for posting.
In Practice
In the Consolidation Control Panel, under Processes, click Standard Journals. The Standard Journals grid appears.
Select the journal with a Pending Review status.
Under Entry Actions, click Approve. The journal enters the Approved status.

When and How to Reject a Standard Journal
Standard Journals that you want to skip from posting before they are approved can be rejected.

In Practice
In the Consolidation Control Panel, under Processes, click Standard Journals. The Standard Journals grid appears.
Select the journal with a Pending Review status.
Under Entry Actions, click Reject. The journal entry enters the Rejected status.
When and How to Return a Rejected Journal to an In Process State
A rejected Standard Journal may need to complete the full lifecycle to ensure audit-ability. You can edit rejected journals, return them to an In Process state, and have them approved.
In Practice
Follow the steps below to return a rejected Standard Journal to an In Process state.
Access the Consolidation Control Panel.
Select the Standard Journals Process.
In the center pane, all journals are displayed. Select the rejected Standard Journal you want to return to an In Process state.
Click the In Process action.
When and How to Post a Standard Journal
After all the journal entries are posted successfully, no actions are available inside the Entry Actions pane.
In Practice
In the Consolidation Control Panel, under Processes, click Standard Journals. The Standard Journals grid appears.
Select the approved Standard Journal entry, under Entry Actions, click Post. The Post Status dialog appears. The Status column displays "Success" if the journal entry is posted successfully. Otherwise, the Status column displays Failure.
Click OK to exit the Post Status dialog. The Standard Journal status is changed to Posted.
What Happens When I Post an Auto-Reversing Journal
When adding a Standard Journal, if you select the Auto-Reversing option for an originating entry, the Post process creates an Auto-Reversing entry in the Approved state.

If posting of an originating entry fails, the Auto-Reversion entry will not be created in the subsequent period.
When posting a journal with the Auto-Reversing option, the Post Status dialog indicates whether the Auto-Reversing entry is successfully created.
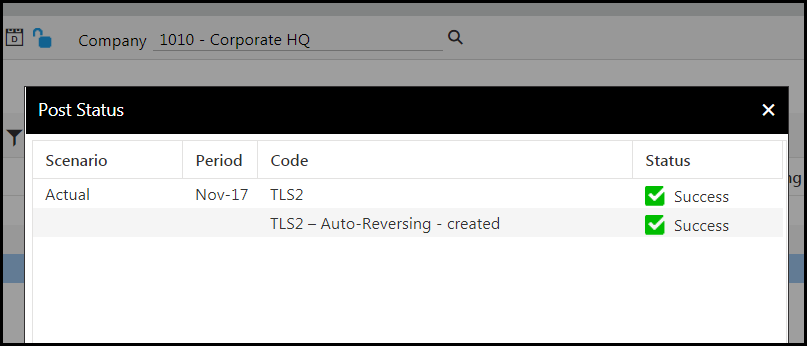
If the originating entry is posted for the last period, you can not create the Auto-Reversing entry until you extend all your application periods. This is done by accessing the Configuration Tasks ( Maintenance > Admin > Configuration Tasks ) page.
If you post the originating entry for the last fiscal period of a year, you will receive an alert indicating that you are about to create an auto-reversing entry in the next fiscal year.
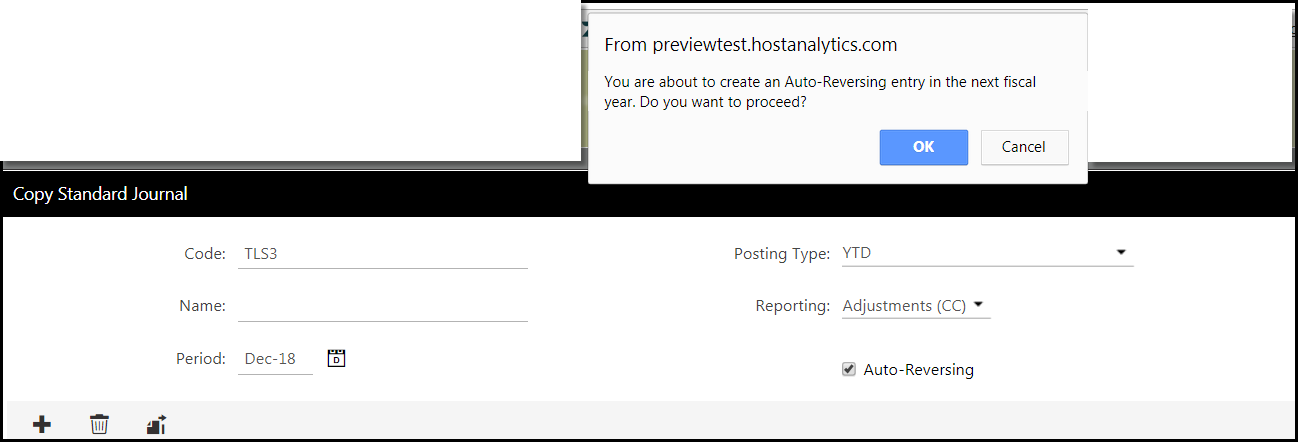
If an Auto-Reversing Journal entry fails to post properly, it remains in an Approved state until you resolve the issue and perform the Post action again.
How to Unpost a Standard Journal
Posted journals with current period or prior period can be unposted. When a journal entry is unposted, a message appears indicating whether the unpost was successful. If a journal entry unpost fails, hover over the Failure Status to determine the reason for the error. A journal entry that has been unposted successfully will enter the Unposted status, and the In Process action is available inside the Entry Action pane. You can rework on the unposted journal entries by clicking the In process action and forwarding after making the necessary changes.
In Practice
In the Consolidation Control Panel, under Processes, click Standard Journals. The Standard Journals grid appears.
Select the posted Standard Journal, under Entry Actions, click Unpost.

The Unpost Status dialog appears. The Status column displays the unpost result for the Standard Journal. The Success status is shown if the journal entry is unposted successfully.
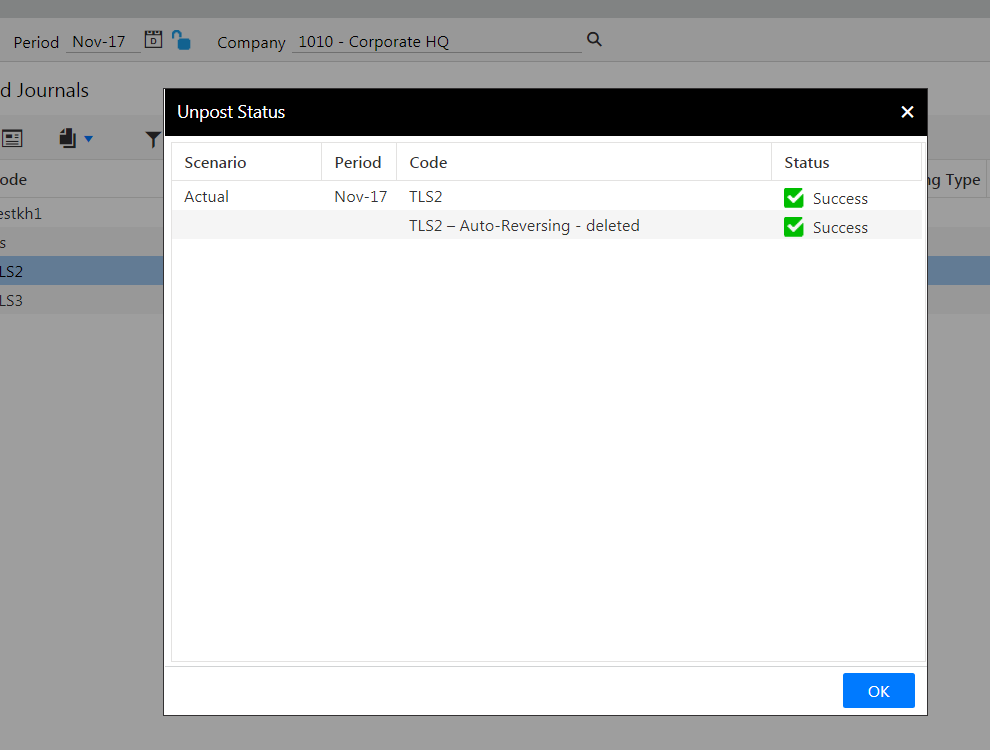
How to Unpost an Auto-Reversing Journal
Posted originating Auto-Reversing Standard Journals can be unposted. When unposting a journal with Auto-Reversing option, the Auto-Reversing entry is unposted and deleted. The procedure to unpost an Auto-Reversing entry is the same as an originating entry.
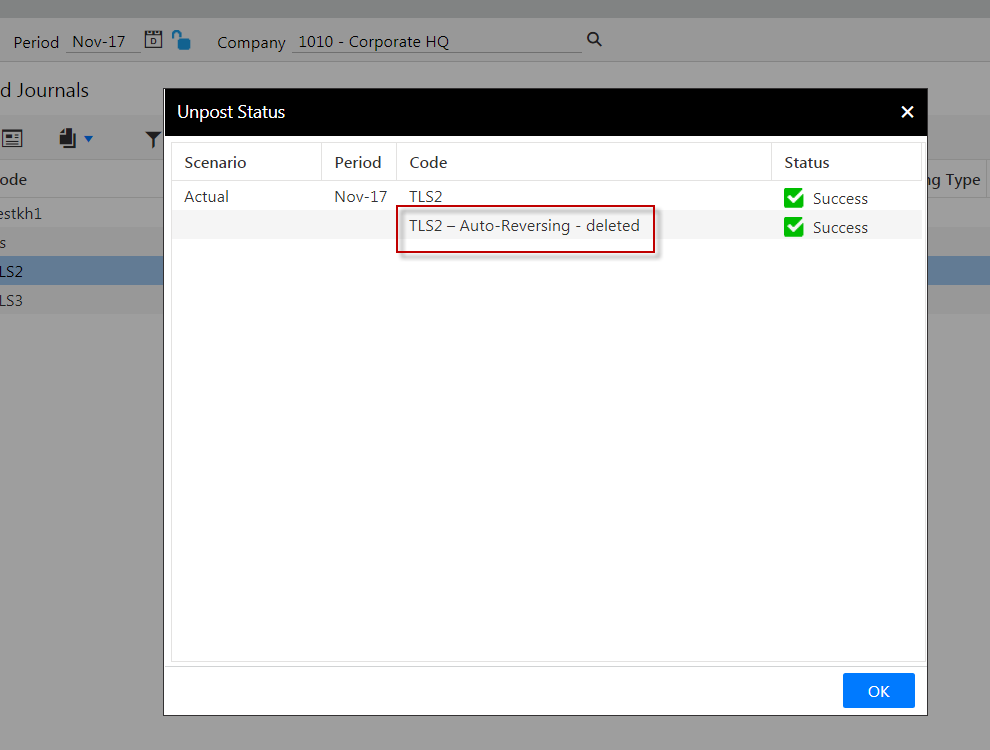
Recurring Journals
When and How to Add a Recurring Journal
Recurring Journal Entries are those which will not vary across time. They can be automated and consistently applied for each period within your process.
You Recurring Journals when you need to repeat the same entry every accounting period.
For example, if you have an annual expense (such as rent) you can accrue the expense in twelve equal payments every month with a Recurring Journal Entry. You can accrue rent for the current period, which will be paid the following period.
Rent Expense: $100,000
Rent Payable: $100,000
In this case, a debit and credit to the appropriate segment intersections will be created every month.
Another example is a trucking organization that depreciates the value of their trucks every period by 10 percent. Or, accruals for utilities, telephone, property taxes, interest, or commissions.
In Practice: How to Add a Recurring Journal:
In the Consolidation Control Panel, click the Recurring Journals Process.
In the center pane, click Add to launch the Add Journal page.
Enter a code of your choice.
Enter a name.
Select the month/year period for the journal entry.
For the Posting Type, YTD (year to date) is displayed.
Note:MTD evaluates entries based on the month’s activity where as YTD evaluates the entries based on the cumulative balance for the line items.Select common currency or local currency for reporting purposes (Adjustments CC or Adjustments LC ).
Note:A local currency is often used by a company's subsidiaries and then converted to a common currency for consolidated reporting purposes.Click Add to add a line item.
Note:Segment columns displayed are based on application configuration and user's security. The Total field displays the Total Debit/Total Credit amount for the entire column as well as running variance column. Validations exist to ensure that your entry is balanced before saving.
If you have several rows of journals and want to move them, drag and drop each row to the correct place on the grid.
Duplicate Row - duplicate a current line, including; the description, segment selections, and debit/credit values. When a line is duplicated the new line is placed, in edit mode, directly below the line selected for duplication.
Copy/paste line items from an Excel spreadsheet into the Journal Entry grid. You can copy/paste all values including; description, segments, and debit/credit. Use shortcut keys (Ctrl+C, Ctrl+V).
Segments - Columns displayed are based on application configuration and user's security.
Total - Displays the Total Debit/Total Credit amount for the entire column as well as running variance column. Validations exist to ensure that your entry is balanced before saving.
Click Save.
How to Upload Recurring Journals
Upload Recurring Journals in xlsx format directly to the Consolidation module. Use the sample template (that you can download) for ease of use when performing the upload.
In Practice: Uploading Recurring Journals
Access the Consolidation module.
Click the Recurring Journals process. Recurring Journals appear in the center pane.
If no Recurring Journals were created or uploaded then this pane will be blank. You can opt to upload or enter journals or do a medley of both. Click the new Upload icon shown below.
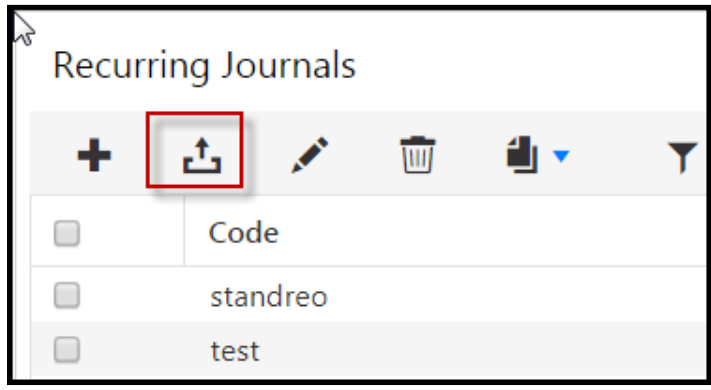
When you click the Upload icon, the Recurring Journals Upload dialog appears. It is a best practice to use the sample Excel template as it shows you exactly how you need to organize your journal data to load it successfully. Click Download sample Excel template.
The template is downloaded to your computer. Open the template.
The template displays and indicates the required fields. It also provides information to ensure the correct data is entered where needed. Copy and paste the template into a new file.
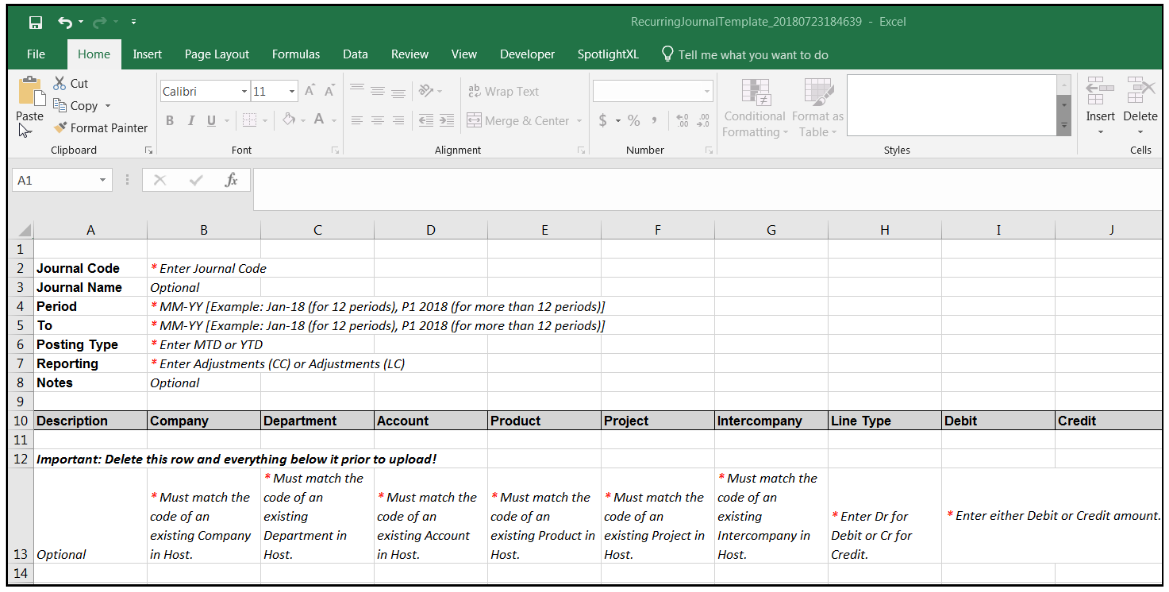
Enter a journal code, the period for which you want to load the journals, and the posting type.
Enter Adjustments (CC) or Adjustments (LC) for reporting and enter notes as needed.
Now, you’re ready to copy and paste journals to the spreadsheet. Prior to copying and pasting data to the Excel file, make sure you delete all the tips.
Save the xlsx file to your computer.
Back in the Consolidation Control Panel, click Choose File.
Select the file you just saved to your computer and click Submit. Once processing is complete, the uploaded Recurring Journal will appear in the center pane.
If the file fails to upload, download the failed file to view the cause(s) of the failure, fix the file, and upload again.
How to Copy a Recurring Journal within the Same Scenario
In the Consolidation Control Panel, under Processes, click Recurring Journals. The Recurring Journals grid appears.
Select the Recurring Journal you want to copy.
Click Copy and select Single Copy. The Copy Recurring Journal dialog appears.
Complete all the fields.
Click Save.
How to Copy a Recurring Journal from One Scenario to Another
Access the Consolidation Control Panel.
Select the scenario you want to copy the journals from.
Select the Recurring Journal process.
Click the checkbox next to the entry you want to copy.
Click the Copy icon. Select Copy Multiple. The Copy page appears.
Enter a Code and Name and select period dates.
Select the Target Scenario.
Complete all selections based on process being copied.
Click Save.
If you select multiple entries to copy, the Copy Single option will not be available.
Best Practices
It is a best practice to limit the number of journals and journal lines you copy to a combined total of 30,000 (journals + lines). For example, 1000 journals with no more than 30 lines. Or, 60 journals; each of which have no more than 500 lines.
How to Edit a Recurring Journal
In the Consolidation Control Panel, under Processes, click Recurring Journals. The Recurring Journals grid appears.
Select the journal.
Click Edit. The Edit Recurring Journal dialog appears.
Edit as needed.
Click Save to save the changes and to exit the Edit Recurring Journal dialog.
How to Delete a Recurring Journal
In the Consolidation Control Panel, under Processes, click Recurring Journals. The Recurring Journals grid appears.
Select the Recurring Journal.
Click Delete.
In the confirmation dialog that appears, click OK. The Recurring Journal(s) is deleted.
You can delete all at once versus one-by-one. In the image below, 6 Recurring journals are selected and available for deletion.
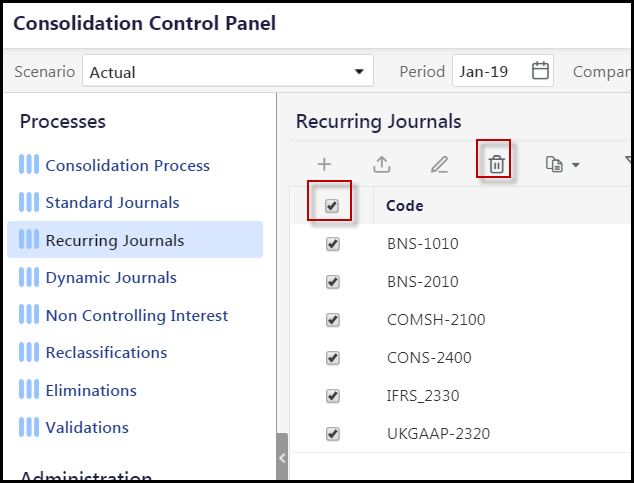
Journals with the following status cannot be deleted:
Pending Review (After forward)
Posted
Approved (Auto-Reversing)
Why and How to Process a Recurring Journal Entry
Process a Recurring Journal when all the entries in a Recurring Journal are accurate and ready to be posted frequently for specific periods.
In the Consolidation Control Panel, under Processes, click Recurring Journals. The Recurring Journals grid appears.
Select the active Recurring Journal, under Entry Actions, click Process.

The Process Status dialog appears. The Status column displays the Consolidation Process results. The Status column displays "Success " if the process is completed successfully. Otherwise, the Status column displays "Failure".
Click OK to exit the Process Status dialog.
Dynamic Journals
Why and How to Add a Dynamic Journal
Add a Dynamic Journal to post balances that fluctuate from one period to another.
In the Consolidation Control Panel, under Processes, click Dynamic Journals. The Dynamic Journals grid appears.
Click the Add icon. The Add Dynamic Journal dialog box appears.
On the Properties tab, specify the required information for the following fields:
In the Code field, enter a code of your choice.
In the Name field, enter a Dynamic Journal name.
In the Period field, select the month and year range. During the selected time period, the Dynamic Journal is active.
In the Posting Type list box, select the MTD or YTD posting type.
Note:MTD (Month-to-date) evaluates entries based on the month’s activity; whereas, YTD (Year-to-date) evaluates the entries based on the cumulative balance of the line items.Note:To use the MTD posting type, contact the Planful support team for the additional guidance on how you can access this functionality.In the Reporting list box, select whether the Journal is a Dynamic JE (CC) or a Dynamic JE (LC). A journal can be in common currency or in local currency.
Note:A local currency is often used by a company's subsidiaries and then converted to a common currency for consolidated reporting purposes.If you are adding an Unbalanced Journal, select the Unbalanced Journal check box. In Unbalanced Journals, debits are not equal to the total of the credits.
To navigate to the Journal Entry tab, click Next or click the Journal Entry tab. The grid displays segment columns based on the application configuration and user's security. To set up a journal entry, perform the following steps:
To add a new row, click Add.
To set up the values for each column, do any one of the following:
Specify the required values directly in the UI.
Paste the copied line items from an MS Excel spreadsheet to the journal entry grid.
You can copy or paste all values, including description, segments, and debit or credit values. Use shortcut keys (Ctrl+C and Ctrl+V) to perform this action.
To build a formula for the journal entry, perform the following steps:
Click Rule in the journal entry row. The rule pane appears.
Build a formula by using Simple Rule or Advanced Rule:
Simple Rule —For the dimensions for which you want to select a member, open the selection pane and select the member.
Advanced Rule —In the left side box, expand the member hierarchy, select the member, and then click the Add icon. Repeat the same procedure to select the function in the right side box. Click the tick (√) icon to verify the syntax of the formula.
To save the rule, click Save
Click Save.
How to Upload Dynamic Journals
Upload Dynamic Journals in xlsx format directly to the Consolidation module. Use the sample template (that you can download) for ease of use when performing the upload.
In Practice: Uploading Dynamic Journals
Access the Consolidation module.
Click the Dynamic Journals process. Dynamic Journals appear in the center pane.
If no Dynamic Journals were created or uploaded then this pane will be blank. You can opt to upload or enter journals or do a medley of both. Click the new Upload icon shown below.
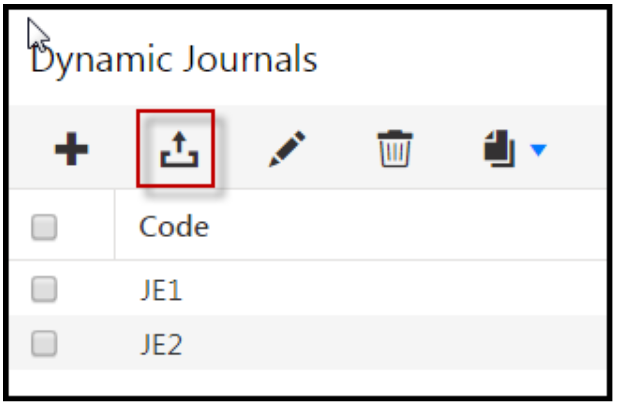
When you click the Upload icon, the Dynamic Journals Upload dialog appears. It is a best practice to use the sample Excel template as it shows you exactly how you need to organize your journal data to load it successfully. Click Download sample Excel template.
The template is downloaded to your computer. Open the template.
The template displays and indicates the required fields. It also provides information to ensure the correct data is entered where needed. Copy and paste the template into a new file.
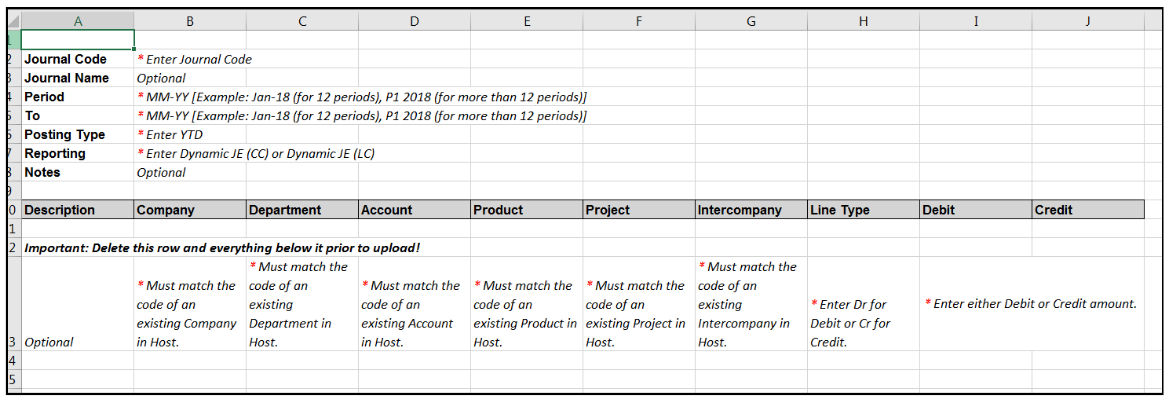
Enter a journal code, the period for which you want to load the journals, and the posting type.
Enter Dynamic JE (CC) or Dynamic JE (LC) for reporting and enter notes as needed.
Now, you’re ready to copy and paste journals to the spreadsheet. Prior to copying and pasting data to the Excel file, make sure you delete all the tips.
Save the xlsx file to your computer.
Back in the Consolidation Control Panel, click Choose File.
Select the file you just saved to your computer and click Submit. Once processing is complete, the uploaded Dynamic Journal will appear in the center pane.
If the file fails to upload, download the failed file to view the cause(s) of the failure, fix the file, and upload again.
When and How to Copy a Dynamic Journal
Use copy when you want to use an existing Dynamic Journal to create a copy with new criteria for posting entries. For example, copy a Dynamic Journal with local currency to create a new Dynamic Journal to report on common currency.
Copy a Dynamic Journal :
In the Consolidation Control Panel, under Processes, click Dynamic Journals. The Dynamic Journals grid appears.
Select a journal.
Click Copy and select Copy Single. The Copy Dynamic Journal dialog appears.
Complete all the fields.
Click Save.
How to Copy a Dynamic Journal from One Scenario to Another
Performing a copy includes all associated entries/lines and formulas/rules.
Access the Consolidation Control Panel.
Select the scenario you want to copy the Dynamic Journals from.
Select the Dynamic Journals process and click the checkbox next to the Dynamic Journal you want to copy.
Click the Copy button and select Copy Multiple. The Copy Dynamic Journal page appears as shown below.
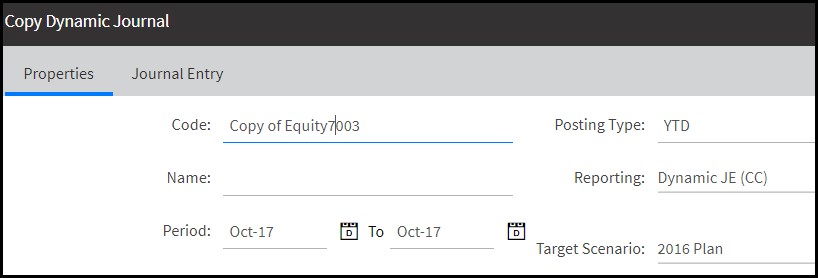
Enter a Code and Name and select period dates.
Select the Target Scenario (scenario you want to copy the Dynamic Journal to). In this case it is 2016 Plan.
Click Next or select the Journal Entry tab. Entries for the Dynamic Journal are displayed and will be copied to the target scenario.

Click Save.
Select the 2016 Plan scenario and select the Dynamic Journals process. Notice the copied Dynamic Journal.

Open the Dynamic Journal in Edit mode to view entries. Click the Journal Entry tab to view the copied journal lines.
How to Edit a Dynamic Journal
You may want to edit a Dynamic Journal prior to the posting of entry balances.
To edit a Dynamic Journal :
In the Consolidation Control Panel, under Processes, click Dynamic Journals. The Dynamic Journals grid appears.
Select the Dynamic Journal.
Click Edit. The Edit Dynamic Journal dialog appears.
Edit as needed.
Click Save.
How to Delete a Dynamic Journal
You may want to delete unused or inactive Dynamic Journals. When you delete a Dynamic Journal, all the associated journal entries are also deleted.
In the Consolidation Control Panel, under Processes, click Dynamic Journals. The Dynamic Journal grid appears.
Select the Dynamic Journal.
Click Delete.
In the confirmation dialog that appears, click OK. The Dynamic Journal is deleted.
How to Delete Several Dynamic Journal Lines at Once
In the Consolidation Control Panel, under Processes, click Dynamic Journals. The Dynamic Journal grid appears.
Select a Dynamic Journal and click Edit.
Select the checkbox in the header to select all lines or select more than one line and click Delete.
In the confirmation dialog that appears, click OK.
How to Post a Dynamic Journal
Active Dynamic Journal Entries can be posted.
To post a Dynamic Journal :
In the Consolidation Control Panel, under Processes, click Dynamic Journals. The Dynamic Journals grid appears.
Select the active Dynamic Journal Entry, under Entry Actions, click Post.

The Post Dynamic Journal dialog appears. The Scenario field is read-only and indicates the selected scenario that will be used when posting Dynamic Journal Entries.
Select the fiscal Year by using the calendar icon.
Select the Period by selecting a month range.
Select the E-mail Notification checkbox if you want to send notification about results when the process is complete, and then enter email addresses of recipients you want to notify.
Click Post. The Post Dynamic Journal dialog is exited. A message appears indicating that the Dynamic Journal Entry is submitting for posting based on the selected periods, and includes a link to navigate to the Detail View for status.
When posting Dynamic Journals, undefined segments revert to the target. For example, if you define only three measures in the formula, the remaining segment combinations will be retrieved from the target segment members.
How to Post a Dynamic Journal Using Cloud Scheduler
You can process and post active Dynamic Journals as an independent task in Cloud Scheduler. Inactive Dynamic Journals are not available for selection via the Cloud Scheduler. You must make inactive Dynamic Journals active via the Consolidation Control Panel to make them available for selection in Cloud Scheduler.
In Practice
Access Cloud Scheduler by navigating to Maintenance > Admin > Cloud Scheduler.
Add a process and add a new task to the process. The New Task page appears.
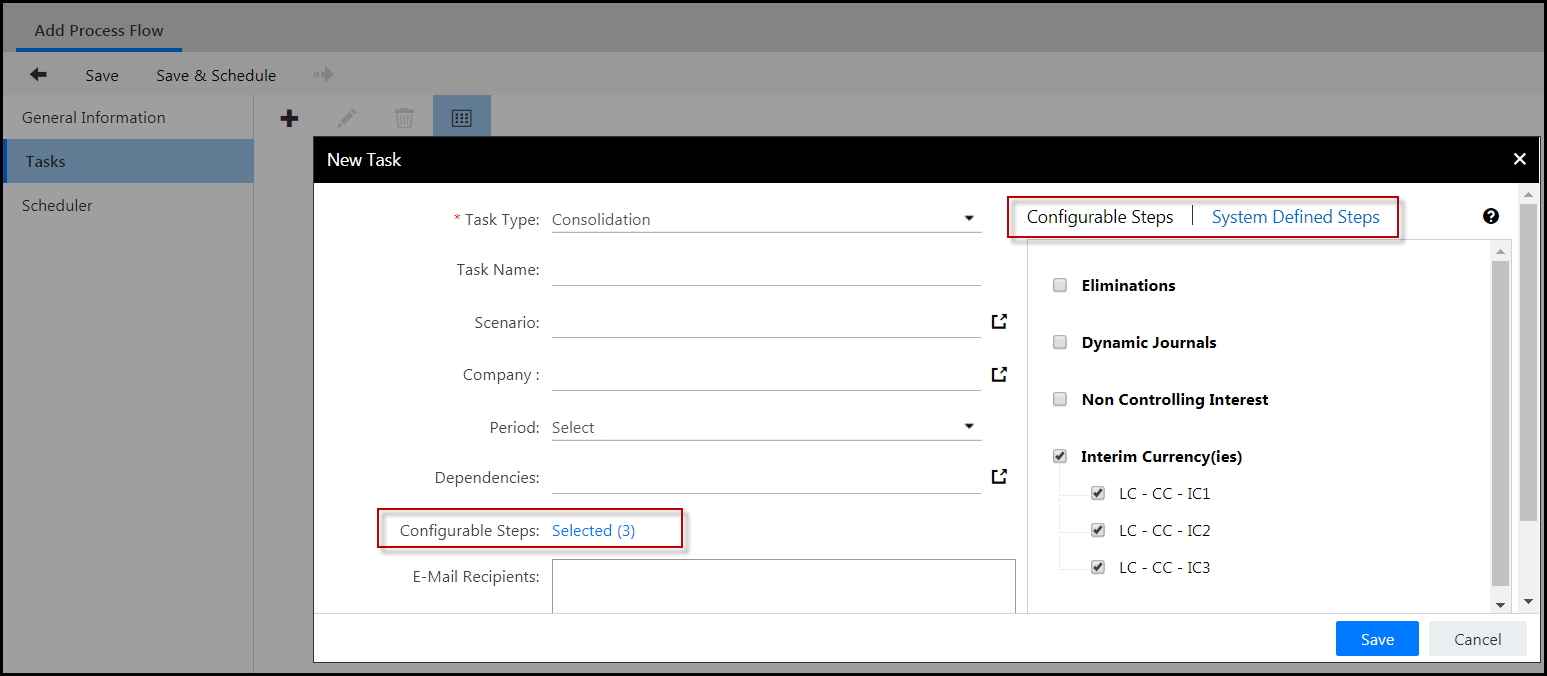
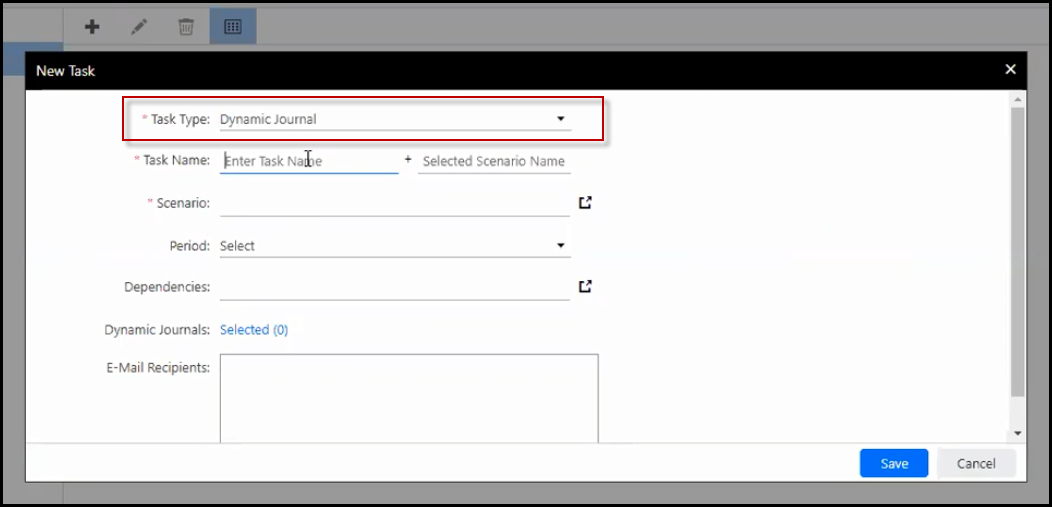
Select Dynamic Journal as the Task Type as shown in the image below. When the Dynamic Journal task type is selected, Task Name + Scenario Name, Scenario, Period, and Dependencies fields are displayed.
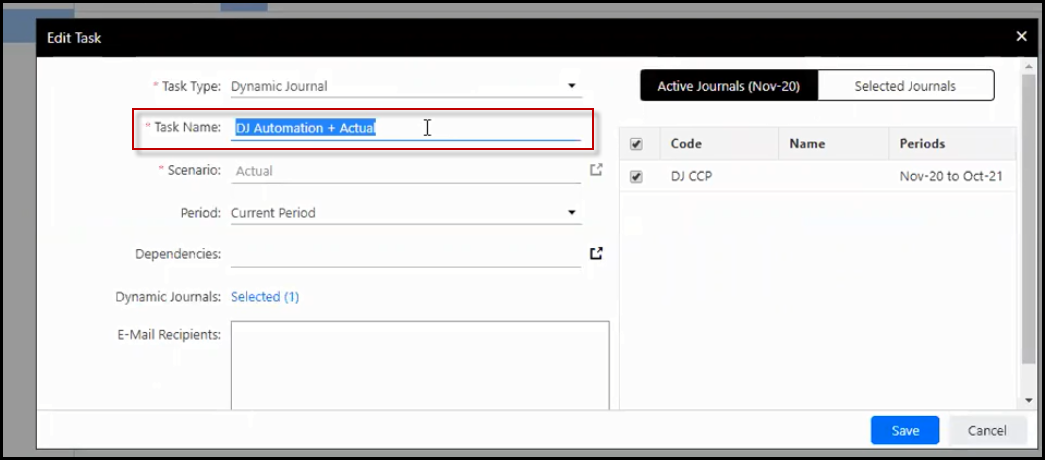
Enter a task name and select the scenario for which you want to process Dynamic Journals. Once the scenario is selected, it will be added to the Task Name as shown below.
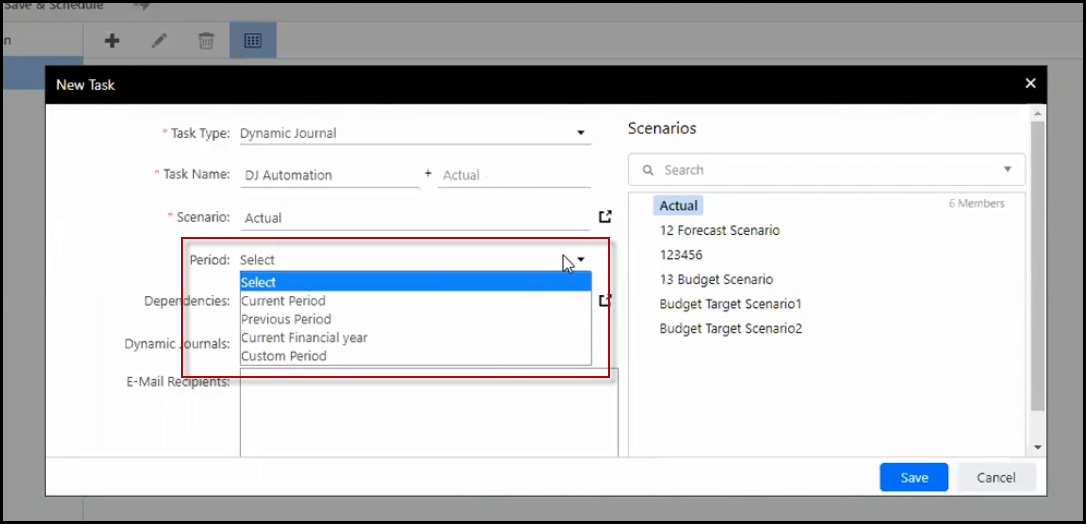
Select the period for which you want to process Dynamic Journals. Options include Custom Period (where you can select a specific date range), Previous Period, Current Financial Year, and Current Period.
For Dependencies, select a dependent task that must occur and complete prior to the posting of Dynamic Journals. For example, the processing of the reporting cube.
Now, select the Dynamic Journals you want to process by clicking the Selected link. The Active Journals/Selected Journals pane appears. Active Journals for the current period are displayed based on actions performed in the Consolidation Control Panel. If there is a journal not displayed, navigate to the Consolidation Control Panel and change the period of the journal to the same period selected in Cloud Scheduler. Navigate back to Cloud Scheduler and the journal will appear in the Active Journals pane. Selected Journals displays the journals selected.
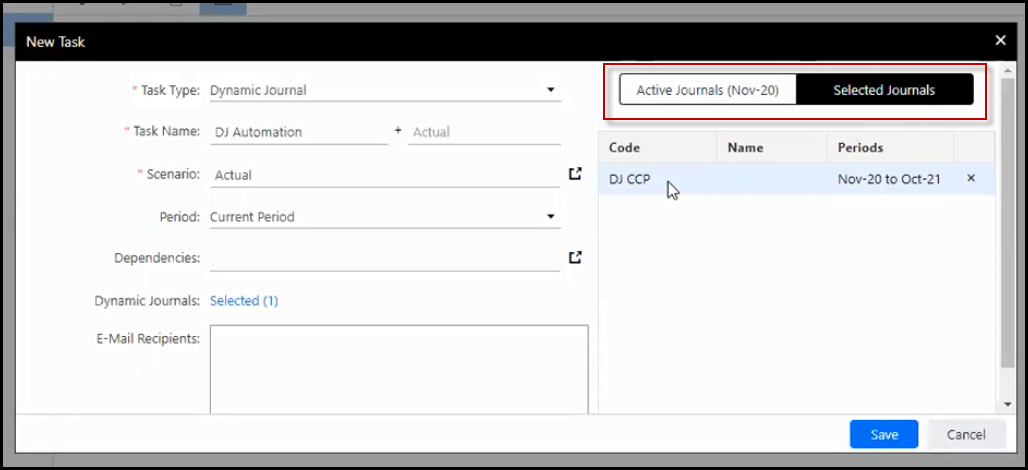
Select all journals you want processed/posted. Click Save.
Here is an example of how the task name (Task Name + Scenario) appears in the process flow once processed.

Dynamic Journals can be processed for both the Actual scenario and other scenarios. If you select Custom Period for the Period field, additional From and To fields are displayed. This allows you to select specific dates for which to process Dynamic Journals.
How to Clear Dynamic Journal Data
Data in the previously posted Dynamic Journals can be cleared.
In the Consolidation Control Panel, under Processes, click Dynamic Journals. The Dynamic Journals grid appears.
Select the processed Dynamic Journal, under Entry Actions, click Clear Data.

The Clear Dynamic Journal dialog appears.
The Scenario field is read-only and indicates the selected scenario that will be used when posting Dynamic Journal Entries.
Select the fiscal Year by using the calendar icon.
Select the Period by selecting a month range.
Select the E-mail Notification checkbox if you want to send notification about results when the process is complete, and then 8. enter email addresses of recipients you wish to notify.
Click Clear Data. The Clear Dynamic Journal dialog is exited. A message appears indicating that the Dynamic Journal Entry is submitted for clearing of data based on the selected periods and includes a link to navigate to the Detail View for status.
Processing Dynamic Journals and Non Controlling Interest Outside of the Consolidation Process
An opt-in configuration item allows you to process Dynamic Journals and Non Controlling Interest outside of the Consolidation Process. This configuration removes the steps associated with posting and clearing data for Dynamic Journals and Non Controlling Interest from the Consolidation Process and enables the functionality to allow users to post and clear Dynamic Journals and Non Controlling Interest within the processes themselves. If you are interested in this item being configured for your application please contact Planful Support for assistance.
You can also post and clear Dynamic Journals and Reclassifications in the cloud so that you can continue working while processing takes place. Once complete, you will be notified via email as well as an in-application notification.
Consolidation Process Changes
The steps within the Consolidation Process associated with calculating Dynamic Journals and Non Controlling Interest in Local and Common Currency will be removed from the Consolidation Process. These steps will post Active Dynamic Journals and Non Controlling Interest as established by the Status, which is set by journal or rule for the time period selected. Inactive journals or rules will clear data for the time period selected.
Dynamic Journals Module Changes
Dynamic Journal List Screen
A checkbox to select journals to Post or Clear Data from is available for updated Entry Actions.
The Status column is removed.
Entry Actions will be updated with the following options:
Active/Inactive – these options will not be visible as users will determine which journals they would like to execute Entry Actions for and leverage the Start and End Period to determine which journals are active or inactive.
Post:
To post a Dynamic Journal, select the Post checkbox next to the Dynamic Journal and click the Post Entry Action.
The Post Setup page is opened. Select the periods for which you wish to post and click the Post button.
Scenario - Displays the Actual scenario for which the Dynamic Journals will post.
Year - Select the fiscal year for which you want the Dynamic Journals to post.
Period - The months available for processing are displayed. You can only post to unlocked months.
Post - Execute the process.
- Once Dynamic Journal data is posted, a status page provides you with information as to whether the posting was successful or not.
Clear Data:
Delete previously processed Dynamic Journal data.
To clear Dynamic Journal data, select the journal in the middle pane (by selecting the Post/Clear checkbox) and click on the Clear Data Entry Action. This action opens a dialog page, which allows you to clear Dynamic Journal data for the selected period(s).
Scenario - Displays the Actual scenario for which the Dynamic Journals will clear.
Year - Select the fiscal year for which you want the Dynamic Journals to clear.
Period - The months available for clearing are displayed. You can only clear data for unlocked months.
Clear Data - Execute the process.
- Once Dynamic Journal data is cleared, a status page provides you with information as to whether the clear was successful or not.
Non Controlling Interest Module Changes
Non Controlling Interest List Screen
A checkbox to select rules to Post or Clear Data is opened for the updated Entry Actions.
The Status column is removed.
Entry Actions will be updated with the following options:
Active/Inactive – use to determine which rules you would like to execute Entry Actions for and leverage the Start and End Period to determine which rules are active or inactive.
Post:
To post Non Controlling Interest, select the Post checkbox next to the Non Controlling Interest entry and click the Post Entry action.
The Post Setup page is opened. Select the periods for which you wish to post and click the Post button.
Scenario - Displays the Actual scenario for which the Non Controlling Interest will post.
Year - Select the fiscal year for which you want the Non Controlling Interest to post.
Period - The months available for processing are displayed. You can only post to unlocked months.
Post - Execute the process.
- Once Non Controlling Interest data is posted, a status page provides you with information as to whether the posting was successful or not.
Clear Data:
Delete previously processed Non Controlling Interest data.
To clear Non Controlling Interest data, select the entry in the middle pane (by selecting the Post/Clear checkbox) and click on the Clear Data Entry Action. This action opens a dialog page, which allows you to clear Non Controlling Interest data for the selected period(s).
Scenario - Displays the Actual scenario for which the Non Controlling Interest will clear.
Year - Select the fiscal year for which you want the Non Controlling Interest to clear.
Period - The months available for clearing are displayed. You can only clear data for unlocked months.
Clear Data - Execute the process.
- Once Non Controlling Interest data is cleared, a status page provides you with information as to whether the clear was successful or not.
These Entry Actions will captured in the Audit Log under the Non Controlling Interest Audit Area for more detailed analysis, if required.
Non Controlling Interest
What Is Non Controlling Interest
Non Controlling Interest describes the relationship between a parent company and a subsidiary (otherwise referred to as joint ventures or minority interest relationships), the related accounts, and Dynamic Journal Entries used in adjusting the investment in the subsidiary. The calculations and postings take place during the Consolidation Process. Non Controlling Interest comprises Relationship, Income, and Investment tabs.
How to Add Non Controlling Interest
In the Consolidation Control Panel, under Processes, click Non Controlling Interest. The Non Controlling Interest grid appears.
Click Add. The Add Non Controlling Interest dialog appears with the Properties tab selected.
On the Properties tab, complete the following fields:
Enter a code of your choice in the Code field.
Enter a Non Controlling Interest entry name in the Name field.
Select the month and year range in the Period field. During the selected time period, the Non Controlling Interest entry is active.
Select Adjustments or Eliminations in the Reporting drop-down list to identify the reporting dimension member.
Click the Relationship tab, or click Next to navigate to the Relationship tab, and then complete the following fields:
Select a leaf level member of the company hierarchy in the Parent Entity field.
Select a leaf level member of the company hierarchy in the Subsidiary Entity field. The selected member will be used for calculations and posting.
Select a leaf or parent level member in the Consolidated Entity field.
Select the segments under Percentage Ownership Account to store the Non Controlling Interest percentage for the subsidiary entity.
The selected values determine the company that will be used for calculation purposes and the location of the Non Controlling Interest percentage account.
Click the Income tab, or click Next to navigate to the Income tab, and then select members under Minority Interest Expense Account , Minority Interest Liability Account , and Net Income Account . By doing so, the net income amount for the part of the subsidiary that is not owned by the parent company is removed from the books in accordance with the Equity method. Additional joint venture accounting methods are not supported programmatically at this time. However, within Investment tab, you can create the required entries to support additional methods, such as Consolidation, Cost, or a combination of both.
Click the Investment tab, or click Next navigate to the Investment tab. The grid displays segment columns based on the application configuration and user's security. To set up a Non Controlling Interest entry, perform the following steps:
Click Add Row. A new row is added.
Do one of the following to set up the values for each column:
Complete the values in the UI directly.
Paste copied line items from an Excel spreadsheet to the entry grid. You may copy/paste all values, including description, segments, and debit/credit values. Use shortcut keys (Ctrl+C and Ctrl+V).
To build a formula for a Non Controlling Interest entry, perform the following steps:
Click Rule in the Non Controlling Interest entry row. The rule pane appears.
Build a formula using the Simple Rule or Advanced Rule.
Simple Rule —For the dimensions for which you wish to select a member, open the selection pane and select the member.
Advanced Rule —In the left-hand side box, expand the member hierarchy, select the member, and then click + . Repeat the same procedure for selecting the function in the right-hand side box. Click the tick (√) icon to verify the syntax of the formula.
Click Save to save the rule.
Click Save.
How to Copy a Non Controlling Interest Entry
To copy a Non Controlling Interest entry :
In the Consolidation Control Panel, under Processes, click Non Controlling Interest. The Non Controlling Interest grid appears.
Click Copy and select Copy Single. The Copy Non Controlling Interest dialog appears with the Properties tab selected.
Complete all the fields.
Click Save.
How to Copy a Non Controlling Interest Entry from One Scenario to Another
Performing a copy includes all associated entries/lines and formulas/rules.
Access the Consolidation Control Panel.
Select the scenario you want to copy the Non Controlling Interest entries from.
Select the Non Controlling Interest process and click the checkbox next to the entry you want to copy.
Click the Copy button and select Copy Multiple. The Copy Non Controlling Interest page appears.
Enter a Code and Name and select period dates.
Select the Target Scenario.
lick Next or select the Relationship tab. Continue through the Income and Investment tabs.
Click Save.
How to Edit a Non Controlling Interest Entry
You will want to edit a Non Controlling Interest entry to add, edit, or delete existing entries, prior to posting of entries.
In the Consolidation Control Panel, under Processes, click Non Controlling Interest. The Non Controlling Interest grid appears.
Select a Non Controlling Interest entry and click Edit. The Edit Non Controlling Interest dialog appears with the Properties tab selected.
Edit as needed.
Click Save.
How to Delete a Non Controlling Interest Entry
You may want to delete unused or inactive Non Controlling Interest entry. When you delete a Non Controlling Interest entry, all the associated entries are also deleted.
In the Consolidation Control Panel, under Processes, click Non Controlling Interest. The Non Controlling Interest grid appears.
Select the Non Controlling Interest entry.
Click Delete.
In the confirmation dialog that appears, click OK. The Non Controlling Interest entry is deleted.
How to Delete Several Non Controlling Interest Lines at Once
In the Consolidation Control Panel, select the Non Controlling Interest process. All Non Controlling Interest rows are displayed in the center pane.
Open a Non Controlling Interest row.
Click the Investment tab.
Click the checkbox in the column header to select all Non Controlling Interest lines.
Click the Delete icon.
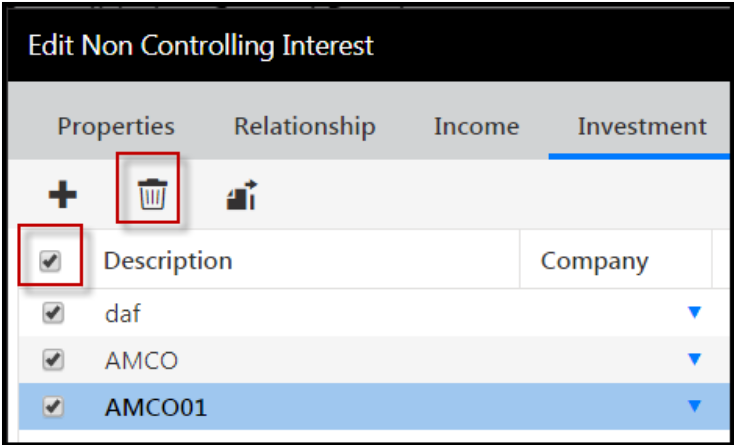
How to Post a Non Controlling Interest Entry
You can post Non Controlling Interest that are active.
In the Consolidation Control Panel, under Processes, click Non Controlling Interest. The Non Controlling Interest grid appears.
Select the active Non Controlling Interest entry, under Entry Actions, click Post. The Post Setup dialog appears.
The Scenario field is read-only and indicates the scenario associated for posting the Non Controlling Interest entries.
Select the fiscal Year by using the calendar icon.
Select the Period by selecting a month range.
Click Post. The Post Setup dialog is exited. A message appears indicating that the Non Controlling Interest entry is submitted for posting based on the selected periods, and includes a link to navigate to the Detail View for status.
How to Clear a Non Controlling Interest Entry
You can clear data in the previously processed Non Controlling Interest.
In the Consolidation Control Panel, under Processes, click Non Controlling Interest. The Non Controlling Interest grid appears.
Select the Non Controlling Interest entry, under Entry Actions, click Clear Data. The Clear Data Setup dialog appears.
The Scenario field is read-only and indicates the scenario associated for posting the Non Controlling Interest entries.
Select the fiscal Year by using the calendar icon.
Select the Period by selecting a month range.
Click Clear Data. The Clear Data Setup dialog is exited. A message appears indicating that the Non Controlling Interest entry is submitted for clearing of data based on the selected periods, and includes a link to navigate to the Detail View for status.
How to Discontinue a Non Controlling Interest Entry
There are situations during the year when Non Controlling Interest (Minority Interest) relationships are modified. This can be caused by the parent company acquiring all of the outstanding ownership of the subsidiary in which case the subsidiary becomes a wholly owned entity. The opposite situation can also occur where the parent company sells their interest in the subsidiary in which case they cease to own any interest in the subsidiary. For companies who have previously created Non Controlling Interest to manage their minority interest relationships this requires modifications of the inputs for calculating a correct minority interest expense and liability entry. In either case it is not recommended to make the Non Controlling Interest entry “inactive” within the Non Controlling Interest module. Instead it is recommended to ensure the following are setup in the system:
Ensure that the end period for the Non Controlling Interest entry is the end of the fiscal year (for example December 2018).
Modify the loaded Non Controlling Interest account to reflect either a 100% or 0% ownership in the subsidiary in which case the appropriate calculations will be performed.
Once you roll into next fiscal year you can make the Non Controlling Interest entry “Inactive” for that new year and there will be no need to process that moving forward.
Loading Non Controlling Interest Data
To load Non Controlling Interest data, you must create a posting account (referred to as Non Controlling Interest account in the example below) and the Non Controlling percentage should be loaded for the Subsidiary company as shown in the example below.
In Practice
If Company A (Currency: USD) holds 80% in Company B (Currency: BPS) then the Data Load setup columns will be : Company, Non Controlling Interest account, Non Controlling percentage
Company B, Non Controlling Interest account, 0.8
After completing the data load, the Minority interest rule has to be setup to define the relationship between Company A and Company B - Company A as 'Parent entity' and Company B as 'Subsidiary entity'.
The Non Controlling Interest calculation posts the data in the Local Currency of the Subsidiary. Reporting selections are available as ‘Adjustments’ and ‘Eliminations’. While posting the Minority Interest based on the Subsidiary Currency, data is posted to the corresponding Local or Common Currency reporting members.
Reclassifications
Overview
Reclassification Entries are usually used to correct financial information that has been incorrectly posted against an intersection within the database. For example, if $500 dollars was recorded in the wrong GL account, you can move the amount to the correct GL account with a Reclassification Entry.
How to Add a Reclassification
The steps below walk you through the procedure to add a Reclassification Entry.
In the Consolidation Control Panel, under Processes, click Reclassifications. The Reclassifications grid appears.
Click Add. The Add Reclassification dialog appears.
Enter a code of your choice in the Code field.
Enter a name in the Name field.
Select the month and year range in the Period field. During the selected time period, the Reclassification is active.
In the grid that displays segment columns based on the application configuration and user's security, set up a Reclassification Entry by performing the following steps:
Click Add Row. A new row is added.
Do one of the following to set up the values for each column:
Complete the values in the UI directly, by either typing the values or selecting the value.
Paste copied line items from an Excel spreadsheet to the journal entry grid. You may copy/paste all values, including description, segments, and debit/credit values. Use shortcut keys (Ctrl+C and Ctrl+V).
To change the default selections for source and target segment columns, follow the information below:
For a source type line, the default selected value for segment columns is All. To select specific members for a column, click All, clear the checkbox for the column shown on the right, and then select the checkbox for the members from the list that appears. If you select more than one member, Multi is shown in the segment column.
For a target type line, the default selected value for segment columns is Same. To select specific members for a segment column, click Same, clear the Same as Source checkbox shown on the right, and then select the members from the list that appears. Only one member can be selected.
Click Save.
How to Copy a Reclassification within the Same Scenario
In the Consolidation Control Panel, under Processes, click Reclassifications. The Reclassifications grid appears.
Select a Reclassification.
Click Copy and select Copy Single. The Copy Reclassification dialog appears.
Complete all the fields.
Click Save.
How to Copy a Reclassification from One Scenario to Another
Access the Consolidation Control Panel.
Select the scenario you want to copy the Reclassifications from.
Select the Reclassification process and click the checkbox next to the entry you want to copy.
Click the Copy button and select Copy Multiple. The Copy page appears.
Enter a Code and Name and select period dates.
Select the Target Scenario.
Complete all selections based on process being copied.
Click Save.
If you select multiple Reclassifications to copy, the Copy Single option will not be available.
How to Edit a Reclassification
In the Consolidation Control Panel, under Processes, click Reclassifications. The Reclassifications grid appears.
Select a Reclassification.
Click Edit. The Edit Reclassification dialog appears.
Edit as needed.
Click Save.
Run the Consolidation Process.
How to Delete a Reclassification
In cases where you need to delete a Reclassification (such as a mistake made when entering and / or posting data), follow the steps below.
In the Consolidation Control Panel, under Processes, click Reclassifications. The Reclassifications grid appears.
Select the checkbox for the Reclassification you want to delete.
Click Delete.
In the confirmation dialog that appears, click OK. The Reclassification is deleted.
Run the Consolidation Process.
How to Post a Reclassification
In the Consolidation Control Panel, under Processes, click Reclassifications. The Reclassifications grid appears.
Select the active Reclassification rule.
Under Entry Actions, click Post. The Reclassification Post dialog appears.
The Scenario field is read-only and indicates the scenario that will be used when posting Reclassifications.
Select the fiscal Year by using the calendar icon.
Select the Period by selecting a month range.
Select the E-mail Notification checkbox if you want to send notification about results when the process is complete, and then enter email addresses of recipients you wish to notify.
Click Post. The Reclassification Post dialog is exited. A message appears indicating that the Reclassification is submitted for posting based on the selected periods, and includes a link to navigate to the Detail View for status.
How to Discontinue a Reclassification
It might be necessary to discontinue a Reclassification mid year. If so, you must perform an additional step to ensure that the data is accurate for the period after the process is stopped.
For example, you have a Reclassification from Jan through October (assuming Jan – Dec fiscal year) and you cease the Reclassification in November. Due to the calculation of the YTD/MTD values generated by the Reclassification Entry, this will cause the November values to be off by the reversal of the October entry for the Reclassification Entry. This is because the system assumes that YTD=0 when a zero value is calculated (i.e. Reclassification stops and no value recorded for November). Therefore, it will calculate MTD based off of YTD. When the assumption is YTD=0, MTD will have to reverse the previous month’s entry to get the YTD value to 0 (i.e. Debit of 125,458 in October would then be credited for (125,458) in November to achieve a YTD=0 in November as the Reclassification stopped).
When this situation occurs (stopping reversal mid-year), it may be necessary to perform a “reversing” entry in the month subsequent to when the process is ended. To use the Reclassification example above where the Reclass is active for Jan – Oct and then becomes Inactive in November, perform the following steps.
Set the End Period to October in the Reclassification Entry. This will stop the execution of the Reclassification in November as November will not be considered as an Active period.
Then due to the reversal of the October Reclassification in November (assuming a Flow type account in Reclassification), book a Standard Journal Entry or Dynamic Journal Entry referencing the November reversal amounts with the opposite signs (if November entry is a debit then credit, and vice versa). Once posted in November then there are no additional entries required for December as the reversal is a one-time entry only. This will ensure that the data that has been posted is in the correct accounts for reporting purposes.
How to Clear a Post Reclassification Entry
Select Edit and make each row inactive.
Click Save. The Status is updated.
Process the Reclassification Entry again.
Now process the cube again before you run reports.
Eliminations
Overview
Eliminations are comprised of due to and due from accounts that make up an intercompany transaction. Elimination Sets are processed individually or together as part of the Elimination Process. The Elimination Process calculates and posts active Elimination Entries at Eliminating Companies within your legal entity hierarchy to ensure the proper aggregation of financial information at consolidated reporting levels. For example, a transaction that involves the sale of an item manufactured by a subsidiary to another subsidiary should be eliminated when reporting consolidated results.
When Eliminations are processed, all active Elimination Entries are posted to the Elimination company. Elimination companies are defined during Segment Hierarchy creation. During this process you have the option of defining companies as Elimination Companies. These companies will determine points within the hierarchy where Elimination Entries should be recorded. Consider the example of a regional hierarchy where you have an Americas division, EMEA division and APAC division that all rollup to a Corporate company member. If there are intercompany transactions between two American companies, they will be eliminated at the Americas Elimination company. If there are intercompany transactions that occur between an EMEA and America company, then those intercompany transactions will not be eliminated until the Corporate Elimination.
When there are multiple Elimination companies with a hierarchy, the system decides which Elimination company to use based on Intercompany Segment and the Company.
You can opt to post Eliminations during the Consolidation Process. See the topic called How to Post Eliminations During the Consolidation Process.
How to Add an Elimination
In the Consolidation Control Panel, under Processes, click Eliminations. The Eliminations grid appears.
Click Add. The Add Elimination dialog appears with the Properties tab selected.
On the Properties tab, complete the following fields:
Enter a code of your choice in the Code field.
Enter a name in the Name field.
Select the Out of Balance Account to store the differences resulting from intercompany transactions. It is a way to keep a balance sheet in balance. The Out of Balance Account cannot be the same as the Elimination account.
Select the Retain Source Segments checkbox to define the default values that will be applied to out of balance account entries only. That means that Elimination data will be posted to the Elimination Company with other segment members of the inter company transaction. The Elimination Entries that are created by selecting this option will be unique across all other segment member combinations. This is relevant only to segments other than company and the intercompany dimension. If you don't select this checkbox, the Elimination data will populate to the Elimination Company with other segment members selected in the Elimination setup.
Click the Elimination Accounts tab, or click Next to navigate to the Elimination Accounts tab, and then set up an Elimination account by following the steps given below:
In the Account box, locate the account, then select the checkbox for account you want to add to the Elimination list. Selecting accounts displays them in the Elimination Accounts grid.
For each added account, select the value from the Due To /From drop-down list. The available values for selection are Due To, Due From, and Not Included . By default, the selected value in the Due To/From drop-down list is Not Included. Select Due To or Due From to generate a variance report.
Enter a number for Maximum Variance Thresholds. Variance thresholds represent the variation bands; coloring schemes for displaying current variances.
Click Save. The Elimination Entry is added.
How to Copy an Elimination
In the Consolidation Control Panel, under Processes, click Eliminations. The Eliminations grid appears.
Select the Elimination you want to copy.
Click Copy. The Copy Elimination dialog appears with the Properties tab selected.
Complete all the fields.
Click Save.
How to Edit an Elimination
In the Consolidation Control Panel, under Processes, click Eliminations. The Eliminations grid appears.
Select an Elimination.
Click Edit. The Edit Elimination dialog appears with the Properties tab selected.
Edit as needed.
Click Save.
How to Delete an Elimination
You may want to delete unused or inactive Eliminations. When you delete an Elimination, all the associated Elimination accounts are also removed from the Elimination.
In the Consolidation Control Panel, under Processes, click Eliminations. The Eliminations grid appears.
Select the Elimination.
Click Delete.
In the confirmation dialog that appears, click OK. The Elimination is deleted.
How to Make an Elimination Inactive
Access the Consolidation Control Panel.
Select the Eliminations Process.
In the center pane, all Eliminations are displayed. Select the Elimination you want to make inactive.
Click the Inactive Action.
When you make an Elimination inactive, the only action available will be “Active”. This is because you can’t perform other actions (such as post or clear data) on an inactive Elimination.
How to Make an Elimination Set Active
Access the Consolidation Control Panel.
Select the Eliminations Process.
In the center pane, all Eliminations are displayed. Select the inactive Elimination set you want to make active.
Click the Active Action.
How to Post an Elimination
You can post Eliminations that are active.
In the Consolidation Control Panel, under Processes, click Eliminations. The Eliminations grid appears.
Select the Elimination, under Entry Actions, click Post. The Elimination Process dialog appears.
The Scenario is read-only field and indicates that the associated scenario is used when posting an Elimination.Select the fiscal Year by using the calendar icon
Select the Period by selecting a month range. You can only post to successive months.
Select the E-mail Notification checkbox if you want to send notification about results when the process is complete, and then enter email addresses of recipients you wish to notify.
Click Post . The Elimination Process dialog is exited. A message appears indicating that the Elimination is submitted for posting based on the selected periods, and includes a link to navigate to the Detail View for status.
You can opt to post Eliminations during the Consolidation Process. See the topic called How to Post Eliminations During the Consolidation Process.
How to Post Multiple Elimination Sets At Once:
Access the Consolidation Control Panel.
Select the Eliminations Process.
In the center pane, all Eliminations are displayed. Select the checkbox to the left of Code as shown below. Notice that only the ACTIVE Eliminations are selected to post

Click Post.
Posting an Elimination Across Multiple Hierarchies
Organizations may need different Eliminations setup in the main consolidation hierarchy and alternative reporting hierarchies.
To address this need, the Planful application allows the setup for the Eliminations differently for each 'legal entity' segment hierarchy (main and alternate). When you run the Elimination Process, based upon where the Elimination companies are placed in the respective hierarchies, the application will eliminate properly and populate the data against the Elimination companies in each hierarchy.
In Practice
Following is an example of a fictitious company named ABC Inc The Main and Alternate Hierarchy views are shown below for ABC Inc.
Under the Main Hierarchy, there is 'Elim 1&2' (Elimination company) to hold intercompany Eliminations across companies 1&2. Similarly, Elim_corp is there for eliminating the intercompany transactions across the companies 1&2 with either of companies 3&4 or between the companies 3&4.
Under the Alternate Hierarchy view called Division Alternate Hierarchy, you have different Elimination Entries under each division view for companies. In order to support this division level Elimination in the alternate hierarchy, we have 3 different Elimination Entities. These members are to be created in the main hierarchy as leaf level members and are mapped over to the alternate division hierarchy as Elimination Entities.
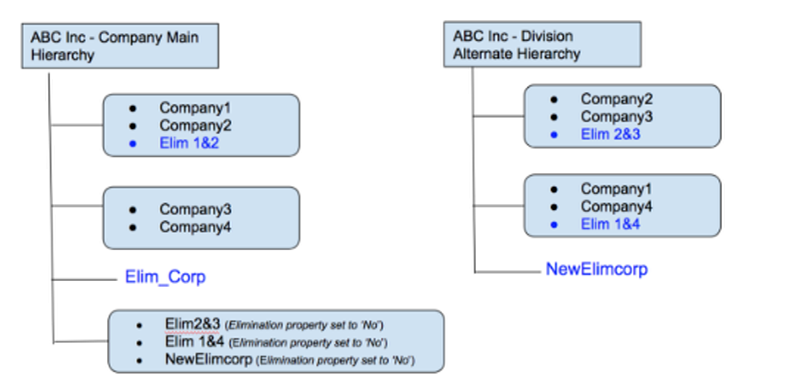
Recommended Order To Process Eliminations and Consolidation
Run Consolidations first - to consolidate all GL Companies
Run Eliminations - to eliminate all inter-company transactions
Run the Consolidation Process again - to consolidate the Elimination companies
Clear Elimination Data
You can clear data in the previously posted Eliminations.
In the Consolidation Control Panel, under Processes, click Eliminations. The Eliminations grid appears.
Select the Elimination, under Entry Actions, click Clear Data. The Clear Elimination Data dialog appears.
The Scenario is read-only field and indicates that the associated scenario is used when posting an Elimination.
Select the fiscal Year by using the calendar icon
Select the Period by selecting a month range.
Select the E-mail Notification checkbox if you want to send notification about results when the process is complete, and then enter email addresses of recipients you wish to notify.
Click Clear Data . The Clear Elimination Data dialog is exited. A message appears indicating that the Elimination is submitted for clearing of data based on the selected periods, and includes a link to navigate to the Detail View for status.
Validations
What are Validations and How Are They Used
Validations ensure proper data values and general accounting standards exist within the application. For example, a Validation might check to see if an account is zero before making the decision to run the Consolidation Process. Or, that a group of accounts should be equal to another account before allowing data to be saved to the application. Validations also ensure proper adherence before executing the Consolidation Process.
Validation functionality allows you to create Validations that should be successfully passed before subsequent actions can be performed. You can create your own Validation methodology to help you manage your Consolidation Process. Validations can be applied to certain aspects of the Consolidation Process to ensure proper usage of the system and adherence to corporate or accounting standards.
Validations can be made executable by end users at different levels within the hierarchy (including interim rollup levels) to ensure accurate results. In addition, Validations should be executed prior to a Consolidation Process to ensure that accurate results are being consolidated.
How to Add a Validation
In the Consolidation Control Panel, under Processes, click Validations. The Validations grid appears.
Click Add. The Add Validation dialog appears.
Complete the following fields:
Enter a code of your choice in the Code field. The code that you enter should correlate with your company's accounting identification practices.
Enter a name in the Name field.
Select one of the following Validation Types:
Report Validations —Created for reporting verification and Validation purposes. Report Validations are system-defined and cannot be deleted or edited.
Formula Validations —Specific to your operations. For example, create a Formula Validation to determine whether account A plus account B equals to account C.
Click the Formula tab. The Formula tab is available if the Validation Type is Formula. In Formula, you create a Validation formula by selecting members and functions. By default, Members are shown. Click Functions to display available functions. Set up a formula by performing the following steps:
From within Members and Functions, drag and drop members and functions into the Left Hand Side and Right Hand Side boxes as necessary.
Select the operator from the Operator drop-down list.
Optional. Click √ to check the syntax of the formula. For more information, see Manage Formulas.
Click the Mapping tab, and map members by performing the following steps:
In the hierarchy, locate the member by entering the search criteria in the Search box or expanding the hierarchy.
Select the checkbox next to the members or drag and drop the members from the hierarchy into the Mapped box.
Click Save.
Managing Formulas When Working with Validations
You manage formulas when adding, copying, and editing a Validation. The following elements are available to manage a formula.
Left Hand Side and Right Hand Side —The left-hand and right-hand portion of the formula that can include members, functions, or both. You can also click inside the box to edit members and functions directly. A copy-paste is also allowed inside the box.
If the data entered in the Left Hand Side and Right Hand Side returns no data, the application validates as if the data is equal to zero (no data). After the Validation, the result may be a pass or fail based on each case. For example, if LHS(0)=RHS(0), the status is pass.
Operator —Contains various operators to build a meaningful formula. Select an operator for the formula. Use a combination of mathematical operators to build full expressions, including multiple components, if desired.
Example formulas are:
Sum(Acct1,Acct2,Acct3)=Acct4
(Acct1+Acct2)-(Acct3)=Acct4
Acct1*70%=Acct2
Acct1>0
Acct/Acct2 = Acct3/Acct4
When a formula based Validation is defined using an equal to (=), less than or equal to (<=), or greater than or equal to (>=) operator, the absolute difference between the LHS and RHS is displayed for your convenience. For example, if account 1 is not equal to account 2, the difference between the accounts is displayed.
Check Syntax —Click √ to verify whether the formula is syntactically correct.
Clear Formula —Click Clear Formula to clear the formula. The Clear Formula option is available for both the Left Hand Side and Right Hand Side boxes.
How to Add and Clear a Formula
In the Consolidation Control Panel, under Processes, click Validations. The Validations grid appears.
Click Add (or Edit or Copy). The dialog to add, edit, or copy a Validation appears.
Click the Formula tab.
Build a formula by performing the following steps:
From within Members and Functions, drag and drop members and functions into the Left Hand Side and Right Hand Side boxes as necessary.
Select an operator from the Operator drop-down list.
Optional. Click √ to check the syntax of the formula. A status message will appear below the Left Hand Side and Right Hand Side boxes indicating whether or not the syntax is correct.
Clear a formula in the Left Hand Side box or Right Hand Side box by performing the following step:
Click Clear Formula associated with the Left Hand Side box or Right Hand Side box.
Click Save.
How to Manage Validation Mappings
Only the mapped members are considered when you run the Validation Process. You manage mappings when adding, copying, and editing a Validation.
To map and unmap members :
In the Consolidation Control Panel, under Processes, click Validations. The Validations grid appears.
Click Add. The Add Validation dialog appears.
Click the Mappings tab.
Map members by performing the following steps:
In the hierarchy, locate members by entering the search criteria in the Search box or expand the hierarchy.
Select the checkbox next to the members or drag and drop the members from the hierarchy into the Mapped box.
Unmap members by performing the following steps:
In the hierarchy, locate the member by entering the search criteria in the Search box or expanding the hierarchy.
Select the checkbox next to the members or drag and drop the members from the hierarchy into the Mapped box.
OR
In the Mapped Companies pane, locate the member you wish to unmap by entering the search criteria or by using the scroll bar, then drag and drop the member from Mapped Companies box into the hierarchy on the left.
How to Copy a Validation within the Same Scenario
In the Consolidation Control Panel, under Processes, click Validations. The Validations grid appears.
Select a Validation.
Click Copy and select Copy Single. The Copy Validation dialog appears.
Complete Code, Name, and all other fields available on the Formula tab and Mappings tab.
Click Save.
How to Copy a Validation from One Scenario to Another
Access the Consolidation Control Panel.
Select the scenario you want to copy the Validations from.
Select a process and click the checkbox next to the entry you want to copy.
Click the Copy icon. Select Copy Multiple. The Copy page appears.
Enter a Code and Name and select period dates.
Select the Target Scenario.
Complete all selections based on process being copied.
Click Save.
If you select Validations to copy, the Copy Single option will not be available.
How to Edit a Validation
You will want to edit a Validation to add, edit, or delete mapping members, prior to processing a Validation.
In the Consolidation Control Panel, under Processes, click Validations. The Validations grid appears.
Click the Edit icon. The Edit Validation dialog appears.
Edit Code, Name, and any other fields on the Formula tab and Mappings.
Click Save.
How to Delete a Validation
You can delete unused or inactive Validations.
In the Consolidation Control Panel, under Processes, click Validations. The Validations grid appears.
Select the Validation.
Click Delete.
In the confirmation dialog that appears, click OK. The Validation is deleted.
How to Process a Validation
You can process only active Validations. The Validation is performed on the mapped members to confirm whether the calculations pertaining to those members have produced accurate results.
In the Consolidation Control Panel, under Processes, click Validations. The Validations grid appears.
Select the active Validation, under Entry Actions, click Process. The Process Setup dialog appears.
The Scenario field is read-only and indicates the scenario used when processing the Validation.
Select the fiscal Year by using the calendar icon.
Select the Period by selecting a month range.
Select the Reporting currency type. Available currency types are Common Currency (CC) and Local Currency (LC).
Select the E-mail Notification checkbox if you want to send notification about results when the process is complete, and enter email addresses of recipients you wish to notify.
Click Process. The Process Setup dialog is exited. A message appears indicating that the Validation is submitted for processing based on the selected periods, and includes a link to navigate to the Detail View for status.
Pre-Defined Report Validations
Planful provides you with pre-defined Validations to support your general financial and accounting practices and ensure proper reporting.
Formula Validation
To configure the Formula Validation for Trial Balance and Balance Sheet Report information, perform the following steps:
Access the Consolidation Control Panel and click the Validations process.
In the center pane of the Consolidation Control Panel, click the Add button to add a new Formula Validation.
On the Add Validation page, drag and drop the Balance account to the Left Hand Side, which is mapped in the Consolidation Setup.
Select the equal (=) Operator.
Enter zero (0) in the Right Hand Side.
If the Validation is successful, meaning that the balance of the balance account in local or common currency is equal to ‘0’ then the Balance Sheet is balanced. If the Validation fails, meaning that the balance of the balance account is not equal to ‘0’, the Balance Sheet is not balanced.
Copying Journal Entry Data
Overview
You can copy and paste Standard Journal data, Recurring Journal data, Dynamic Journal data, and Non Controlling Interest Investment data directly into Planful from Microsoft Excel. Pasting functionality does not overwrite existing content. Content can be copied from Microsoft Excel only; pasting from any other editor is not supported.
How To Copy Journal Entry Data
In this example data is copied to the Add Standard Journal page.
To access the Add Standard Journal page, navigate to Consolidation and select a scenario.
Click the Standard Journal process. In the Standard Journals pane, click the Add button. Use Ctrl+C and Ctrl+V (or Cmd+C and Cmd+V) to copy and paste data to the Add Standard Journal grid. You can copy and paste all values including descriptions, segments, and debits or credits. When you copy and paste values, they appear at the end of existing line items. For example, if there are 10 existing lines in a journal and you paste another 20 lines, the new lines are pasted after the 10 existing lines.
Journals with Zero Values
It is important that you leave the offsetting debit or credit field blank instead of entering a zero as shown below in the sample Excel file.

Performing Entry Actions on Multiple Entries
How It Works
You can select multiple journal entries and perform a common entry action, such as forward or reject, when the selected entries have the same status. However, if you select entries that have a different status (one is “in process” when the other is “pending review”, for example) then only the common action available for both entries is enabled.
This functionality is available for Standard, Recurring, and Dynamic Journals as well as Reclassifications and Validations.
In the example below, the Standard Journal entry is pending review while the Standard Journals entry is in process. The only common entry action is Reject.

Deselect an entry to see all actions available for the single entry. In the example below, only one entry is selected and an additional action (Forward) is available.

When you select multiple entries, some buttons will be greyed out as shown below.
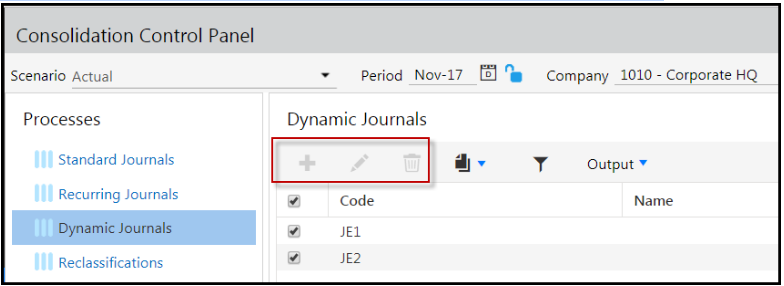
Rules
What Are Rules
Rules allow you to look-up data from the Reporting Cube and modify the formula for the line associated with the journal entry. The Cube is a multi-dimensional structure defined by a set of dimensions and functions and is used to analyze data. The Reporting Cube is created based on the application structure.
For Non Controlling Interest and Dynamic Journals, you can define a formula to access data from a previous financial year, access data for two periods prior to the period for which a Dynamic Journal is being processed, or access data from a scenario other than the scenario for which the formula is being processed.
Simple Rule Explained
The Simple and Advanced Rule pages are accessed from the journal line item by clicking the Rule button shown below.

The Simple Rule page is displayed as shown below.
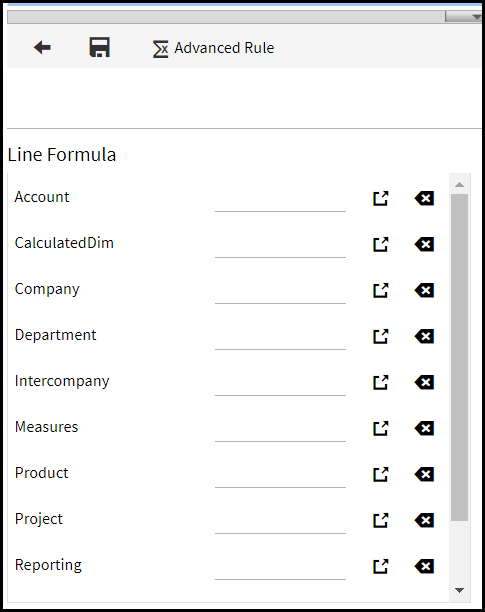
Build rules for journal entry lines by selecting dimension members as shown below.
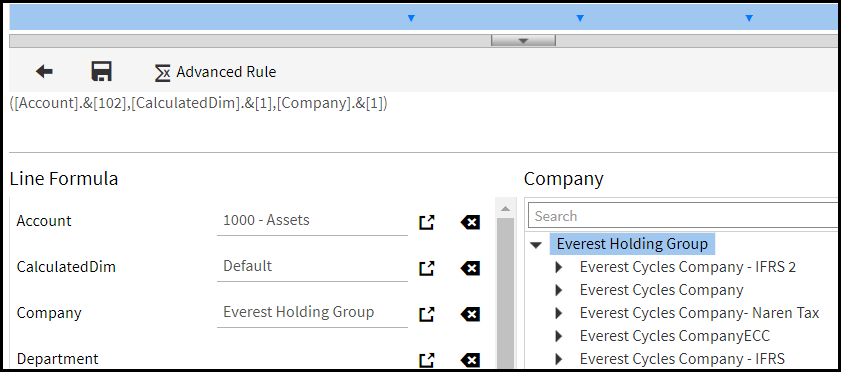
Advanced Rule Explained
Change the formula for the line associated with the journal entry as well as add functions to create a dynamic formula.
In the image below the Time dimension is selected and added to the Rule. The time dimension members have an ID of 5005 and 5010. The Avg formula is applied to the time dimension members.
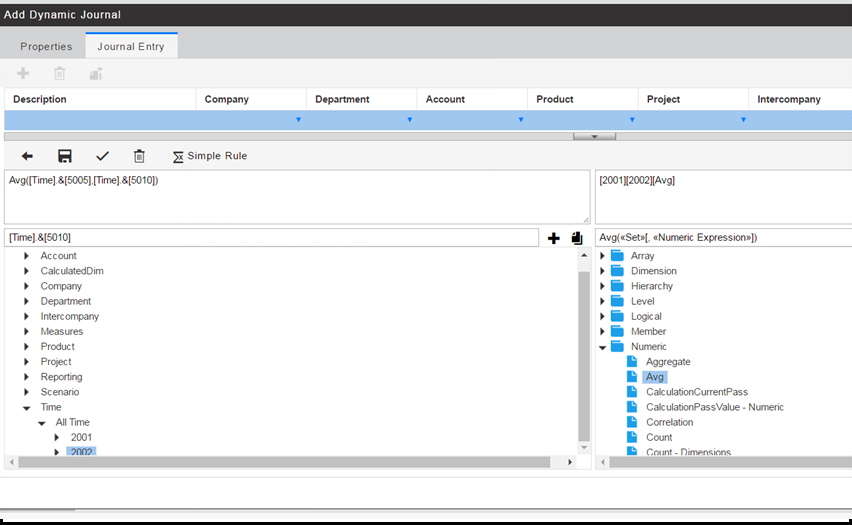
Reporting
Overview of Reports Available for Consolidation
| Report | Available for | Description |
| CTA Detailed Report | CTA accounts | For the accounts selected in the CTA set, this report provides the difference between the local currency balances converted using the currency type specified against the account versus the currency type specified in the CTA set definition. |
| Journal Entry Report | Standard, Recurring, Dynamic, Non Controlling Interest | View journal entry details for a selected time period and print the output or download and save as an Excel file for offline analysis. |
| Verify Data | Standard, Recurring, Dynamic, Validations | Confirm the accuracy of the postings and verify where data has been sourced from. |
| Exchange Rates | Standard, Recurring, Dynamic, Non Controlling Interest, Validations, Reclassifications, Consolidation Process | View currency exchange rates for the application. |
| Audit Log | Standard, Recurring, Dynamic, Non Controlling Interest, Eliminations, Reclassifications, Consolidation Process, Validations | Provides information that can be very useful to administrative users. Administrative users may monitor all actions taken by regular users. If there are any discrepancies, administrative users can view the regular users that were logged on when the discrepancy occurred as well as the actions each user took associated with the module or piece of functionality in question. |
| Elimination Report | Eliminations | Elimination reports allow you to view the results of Elimination Entries that were posted during the Elimination Process. Run deployed Elimination reports for a selected time period, Elimination Set, and list of accounts. |
| Variance Report | Eliminations | Run deployed Elimination Variance reports for a selected time period, Elimination Set, and list of accounts. An Elimination Variance report is a standard report that must be deployed from the Standard Reports page. |
| Natural Account Balance | Standard, Recurring, Dynamic, Eliminations, Non Controlling Interest, Reclassifications, Consolidation Process | |
| Validation Status Report | Validations, Consolidation Process | Review the status of each processed Validation. The Remarks column provides you with additional information on the status of the Validation. Validations which result in a zero with an asterisk (0*), indicates that there was no data in the LHS or RHS and the system assumed it was a zero. This is not to be confused with a simple zero (0), which indicates that the formula resulted in a zero value. Export the report to Excel by clicking the button highlighted in orange.
|
| Activity Log | Non Controlling Interest, Validations | Review the activity associated with a given Validation. For example, for a selected period/Validation combination you could review how many times the Validation was ran and the status of each run. |
| Consolidation Status | Consolidation Process | The Consolidation Status report is an opt in feature used to view the status of the Consolidation Process for a given intersection (entity, scenario, period) within a close cycle. The Consolidation Status report offers several benefits, such as providing the necessary information to complete the close process in a timely manner. Further, consolidators can view the status by entity and time period for which they are responsible. |
CTA Set and CTA Detailed Report
Accounting principles mandate that when translating financial statements to a reporting currency, the closing rate for all Balance Sheet accounts is used, as well as the weighted average rate for Profit and Loss Accounts, and historical rates for Historical Accounts and Retained Earnings. After translating using these principles, if the books do not balance, then a plug account can be posted to a balancing account called Cumulative Translation Adjustment (CTA) to balance the books.
The balance posted to the CTA account is also known as unrealized gains or losses due to currency fluctuations. The balance posted to the CTA account is an accumulation of the FX gains\losses generated by multiple accounts in the natural hierarchy.
In Planful , a plug account must be specified for posting the unrealized gains or losses during Consolidation Setup. Consolidation Setup (discussed in the Consolidation Admin Guide) is also where you specify the rollup accounts for Total Assets, Total Liabilities and Total Equity. For converted currencies such as; common currency, interim currency and reporting currencies, the system calculates Total Assets - (Total Liabilities + Total Equity). If the results of the calculation does not equal zero (unbalanced books), the difference is posted to the CTA plug account to balance the books. Using this method, Planful doesn’t provide the account detail for the balance posted to the CTA account. You can overcome this using the functionality called CTA Sets (discussed in the Consolidation Admin Guide under the CTA topic)
In Practice
Navigate to Maintenance > Currency > CTA Sets.
Click New (Add button).
Enter a title and description.
Specify a Base Rate. Typically this base rate has to be the closing rate of the period such as End of the Month rate (EOM).
Click Add Accounts and select the accounts that contribute to the CTA balance. Typically these are historical accounts such as Common Stock, Retained Earnings, and PPE accounts.
Under Target CTA Setup, specify the segment combination of the CTA account. This might be the same CTA account specified in Consolidation Setup.
Save the CTA Set. Create as many sets as required.
Navigate to Maintenance > Hierarchy. Select the Reporting dimension and click Show.
Create a new Reporting Currency (See documentation on how to create Reporting Currency in the Currency Admin Guide).
Select a leaf level member of the Reporting Currency in Hierarchy Management. The Properties pane appears. Under Segment Properties, select Account Based for Calculation Type. Select other properties as required.
Select Overwrite default CTA.
Under CTA Sets, select the sets created earlier (steps 1 - 6) based on which accounts for FX gains\losses. Save.
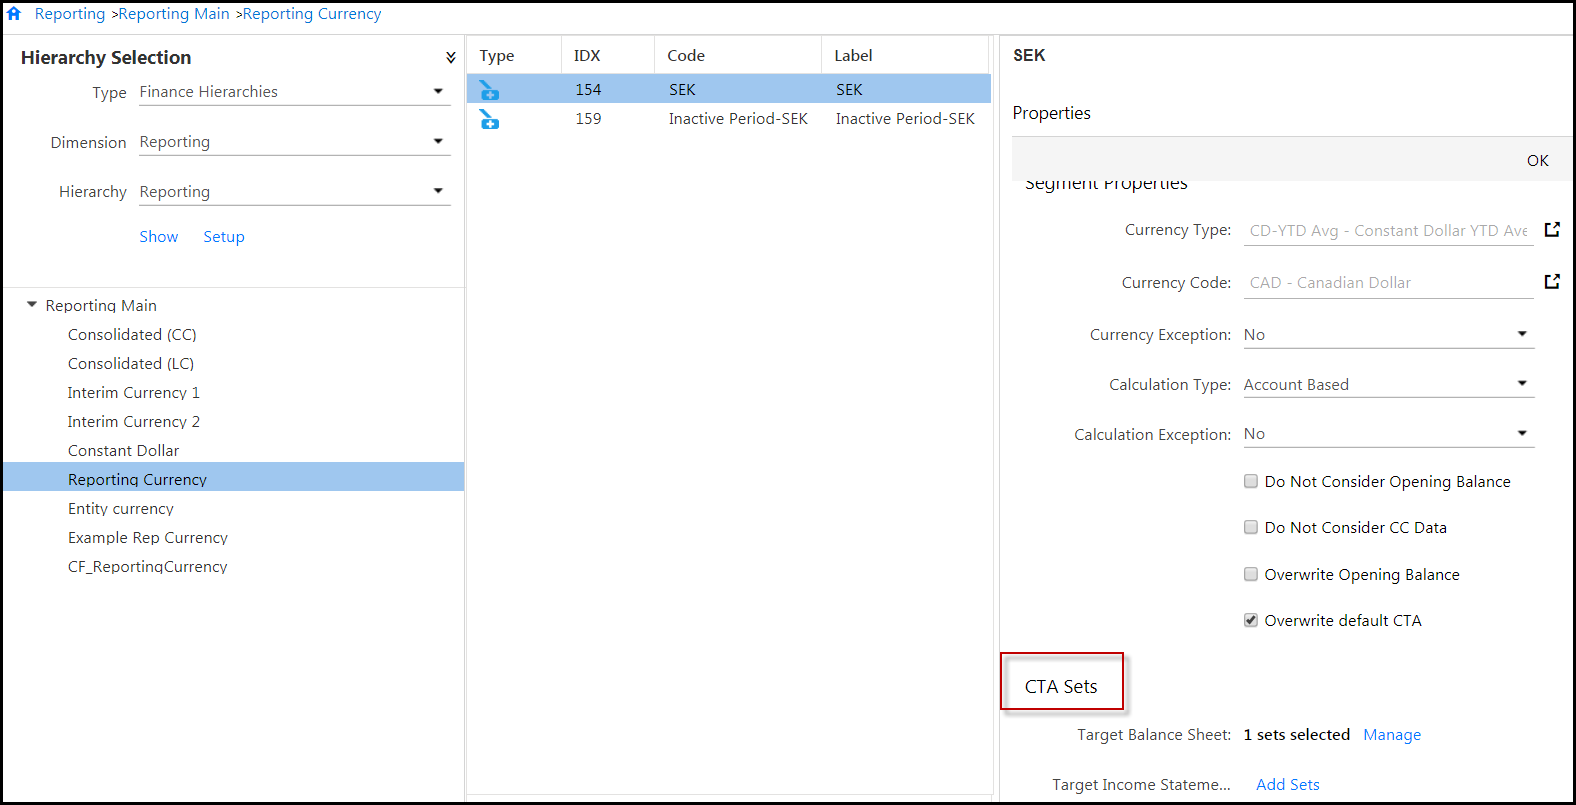
Run the Consolidation Process for the Reporting Currency.
Navigate to Reporting > Standard Reports and open\run the CTA Detailed Report (which must be deployed by an Admin user).
Select a Scenario, Period Range, Account rollup, Company, Reporting currency and the CTA set and run the report.
For the accounts selected in the CTA set, the report provides the difference between the local currency balances converted using the currency type specified against the account versus the currency type specified in the CTA set definition.
Journal Entry Report - What Is It and How Do I Run It
The Journal Entry report provides a quick glance of journal entries for a specific status. Use this report to query journal entries from the point they are created, to approved. This report is available for Standard Journals, Recurring Journals, and Dynamic Journals only.
To run and view the Journal Entry report :
In the Consolidation Control Panel, under Processes, select a process. The grid for the process you have selected appears.
Under Reports, click Journal Entry Report. The Journal Entry Report dialog appears.
Select the Scenario.
Select the Period by selecting a date range using the calendar icon.
Select the Journal Types. Available values are Standard Journals, Dynamic Journals, and All Journal Types.
Select the Status for journal entries. Available values are All (Status), In Process, Pending Review, Approved, Posted, Unposted, and Rejected.
Select Journals.
Select the Display for journal entries in report results by code, name, or both. Selecting Label displays code and name for journal entries.
Click Apply & Open. The report details appear at the bottom, within the Journal Entry Report dialog.
Activity Log Report - What Is It and How Do I Run I
The Activity Log report contains data that can be used to review the activity associated with a given Validation. For example, for a selected period-Validation combination, you could review the number of times the Validation was run and the status of each run. This report is available for Validations Process only.
To run and view the Activity Log report :
In the Consolidation Control Panel, under Processes, click Validations. The Validations grid appears.
Under Reports, click Activity Log. The Activity Log dialog appears.
Select the Validation.
Select the Period by clicking the calendar icon.
Click GO. The report details appear at the bottom, within the Activity Log dialog.
Variance Report - What Is It and How Do I Run It
The Variance report is a standard report that must be deployed by your administrator. You can run a Variance Report by selecting a scenario, time period, Elimination, and Elimination accounts in various combinations. This report is available for the Eliminations Process only.
To run and view the Variance report :
In the Consolidation Control Panel, under Processes, click Eliminations. The Eliminations grid appears.
Under Reports, click Variance Report. The Variance Report dialog appears.
Select the scenario.
Select the fiscal year.
Select the month.
Select the Elimination Set.
Select the Elimination accounts.
Note:Show/Hide option is a toggle to display or hide fields.Click Run. The report results display within the Variance Report dialog.
Elimination Report - What Is It and How Do I Run It
Run the Elimination report to view the results of Elimination Entries that were posted during the Elimination Process. You can view the Elimination Report by selecting time period, Elimination, and Elimination accounts in various combinations. This report is available for Eliminations Process only.
To run and view the Elimination report :
In the Consolidation Control Panel, under Processes, click Eliminations. The Eliminations grid appears.
Under Reports, click Elimination Report. The Elimination Report dialog appears.
The Scenario field for Eliminations is read-only.
Select the month by selecting a month and fiscal year using the calendar icon.
Select the Elimination Process.
Select the Elimination account.
Click Go. The report details appear within the Elimination Report dialog.
Exchange Rates Report - What Is It and How Do I Run It
The Exchange Rates report provides information on currency exchange rates used in the application. This report is available for all processes.
To run and view the Exchanges Rates report :
In the Consolidation Control Panel, click a process, then Reports, and then click Exchange Rates. The Exchange Rates page appears.
Select a scenario.
Select the year.
Select the currency.
The report displays data.
Natural Account Balance Report - What Is It and How Do I Run It
The Natural Account Balance report contains transaction level data. This report checks the natural balance as defined by you (debit/credit account property in segment hierarchies) and determines if the current period’s balance is different from the natural balance. If there is a difference, an email notification is sent to users to take an appropriate action. This report is available for all processes.
Examples of Natural Account Balances for accounts include:
Income – Credit balance
Expense – Debit balance
Assets – Debit balance
Liabilities – Credit balance
Equity – Credit balance
To run and view the Natural Account Balance report :
In the Consolidation Control Panel, under Processes, select the process. The grid for the process you selected appears.
Under Reports, click Natural Account Balance Report, The Natural Account Balance Report dialog appears.
Select the scenario.
Select the fiscal year.
Select the company.
Select the fiscal month.
Select the currency. Available values are Local and Common.
Note:The Show/Hide option is a toggle to display or hide fields.Click Run. The report details appear within the Natural Account Balance Report dialog.
Verify Data Report - What Is It and How Do I Run It
The Verify Data report is a standard report that must be deployed by your administrator. It provides confirmation on the accuracy of the data postings and information on the data source.
To preview the Verify Data report :
In the Consolidation Control Panel, select a process, under Reports, click Verify Data. The Verify Data page appears.
Select the display type. Available Display types are Code, Name, and Label. Selecting Label displays the code and name associated with the dimension parameters.
Under Selection Criteria, select members for the dimensions displayed, and then click Preview. The report displays data.
Validation Status Report - What Is It and How Do I Run It
The Validation Status Report provides the status on processed Validations. This report provides a list of successful and failed Validations. Access this report from Validations Process.
To run and view the Validation Status report :
In the Consolidation Control Panel, under Processes, click Validations. The Validations grid appears.
Under Reports, click Validation Status Report. The Validation Status Report dialog appears.
The Scenario field is read-only and indicates the scenario associated with the Validations.
Select the company.
Select the Validation.
Select the period by clicking the calendar icon.
Click GO. The report details display within the Validation Status Report dialog.
Consolidation Status Report - What Is It
The Consolidation Status report is an opt in feature to view the status of the Consolidation Process for a given intersection (entity, scenario, period) within a close cycle. The Consolidation Status report offers several benefits, such as providing the necessary information to complete the close process in a timely manner. Further, consolidators can view the status by entity and time period they are responsible for. This report is available for the Consolidation Process only.
Once the necessary General Ledger data is loaded, journal entry processing and consolidation activities are completed, a behind-the-scenes log stores each action with a date and time-stamp. For example, if you run the Consolidation Process, the application logs the activity and time, along with the consolidated action. All this information is available in the Consolidation Status report.
If you modify data in a previous or current period, the consolidation status for all subsequent periods will be affected and year-to-date amounts. For example, if you modify data for July 2019, the Consolidation Status report will change for August 2019 and September 2019 as well.
How to Run and View the Consolidation Status Report
In the Consolidation Control Panel, under Processes, click Consolidation Process.
Under Reports, click Consolidation Status. The Consolidation Status dialog appears.
The Scenario is a read-only field that indicates the scenario associated with the Consolidation Process.
Select the period by clicking the calendar icon.
Select the company.
Click GO. The report details with the Overview tab selected is displayed within the Consolidation Status dialog.
How to Interpret the Consolidation Status Report Results
Consolidations Status report results are spread across four different tabs —Overview, Consolidation Detailed, Standard Journals, and Validations. This section helps you understand the information on each tab. Note that all children of a parent entity display the same status as the parent.
Overview
The Overview tab provides information on the consolidation status, data load, Standard Journals, locked, and Validations. The consolidation statuses are "Consolidation successful", " Not Started", "Consolidation required", "Consolidation was never performed", "Consolidation Process was performed", "Data has changed since the last Consolidation Process", and so on. You can drill down into unprocessed consolidations for more information.
Consolidated Detailed
The Consolidated Detailed tab provides information on the location of the modified data, the modifications itself (add, edit, etc.), the user who modified the data, and so on. For more information on modifications, click an individual processes to open the pop-up message containing the most recent five modifications.
Click the more... link to download an Excel report containing the modifications across all processes for the entity. When clicking the more... link at roll-up level, the Excel report provides information on modifications to all processes for all entities under the roll-up.
Standard Journals
The Standard Journals tab provides information on the unprocessed Standard Journals. The indicators used for the Overview and Consolidation Detailed tabs are the same. You can also drill down into unprocessed Standard Journals and export them to an Excel sheet.
Validations
The Validations tab provides information on unprocessed and failed Validations. The indicators used for the Overview and Consolidation Detailed tabs provide the same purpose on the Validations tab as well. You can also drill down into unprocessed Validations and export them to an Excel sheet.
Report Behavior
The following is a sample Consolidation Status report that describes the behavior of each status for various processes.
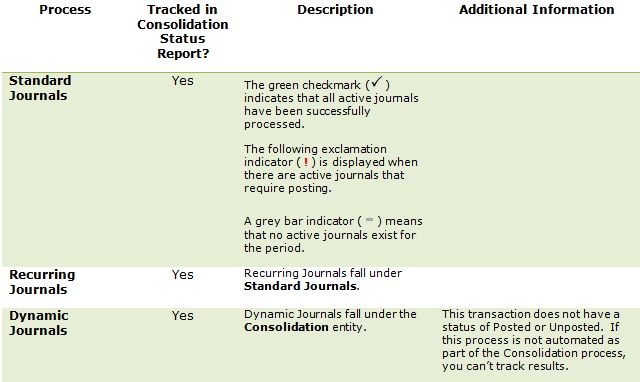
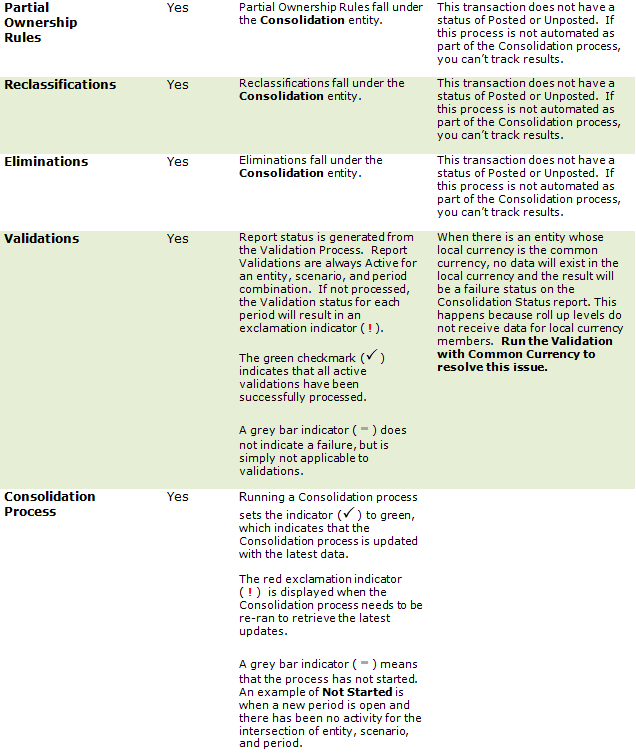
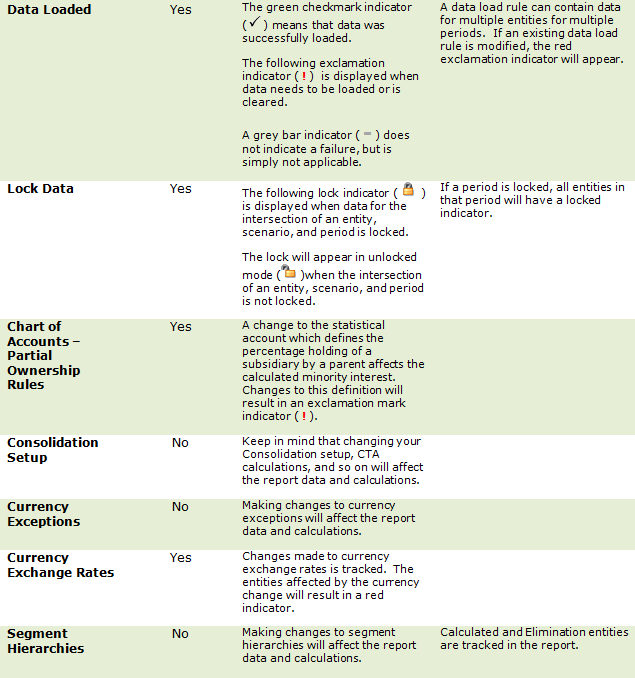
How to Close with Consolidation
Overview
Whether you do month-end, quarter-end, mid-year, or end-of-year closing, we suggest you follow this high level procedure.
What are the Steps to Perform a Month End Close
Step 1: Update User Security
Ensure users have the correct access to perform their portion of the close cycle. For example, if a user needs to work on journal entries or run the Consolidation Process, access the Consolidation control panel and select Security from the lower left pane. Here, you'll select a user and the security settings to be granted to that user and click save. The Decentralized tab can be used to assign access to a specific company or rollup.
Step 2: Update Substitution Variables
Update the substation variables for @CURMTH@ and @CURQTR@. At the beginning of each new fiscal year, update the @CURYR@ substitution variable. The @CURMTH@ variable is a reference to the Time segment and is used to map data into reports.
Navigate to Maintenance > Report Administration > Cube Settings.
Select the Substitution Variable tab.
Select a substitution variable, for example @CURMTH@, and click Edit.
Enter the close cycle month, click Select, and then Save.
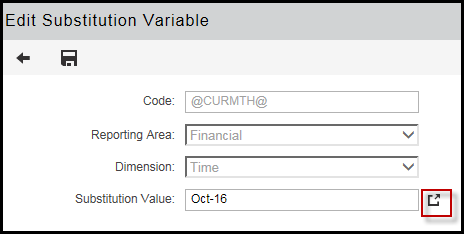
Step 3: Update Segments
Identify new accounts need to be added into the common chart of accounts in Planful . Also, identify if any other new segment IDs are needed for newly acquired companies, or updates to the department or location dimension.
Access the segment hierarchy information through Maintenance, Hierarchy Management and Segment Hierarchies. Add new segment IDs in the correct location within the hierarchy and save the changes.
In the account dimension, the best way to ensure that the account properties are correct for a new account is to locate the position in the hierarchy where the new account belongs and then do the following:
Highlight another account under the rollup – select the Copy icon
Highlight the parent of the rollup - select Paste as a Child
Assign the code and name to the new account.
All of the account properties will be copied to the new account.
Step 4: Update Journal Entries
If there are changes to standard, recurring, or Dynamic Journal Entries, go to the Consolidation module, and select the journal type on the Processes pane. Click the green plus sign to add a new journal, or click on an existing journal line to edit it.
Step 5: Update Reports
Review reports for any changes needed. If new accounts or account subtotals were added to the account segment, determine if any additional rows should be added to the reports. If any changes were made in the corporate structure (any new companies acquired or sold), adjust the column sets to add/remove the related company IDs.
Step 6: Add a Currency / Upload Exchange Rates
If any newly acquired companies require use of a different local currency, than already in use, go through the steps to add the new currency. This must be done before adding the new company into the company segment, or referencing this currency in the company properties.
To update exchange rates, see the Exchange Rate section in the Currency Admin guide.
Step 7: Update Actual Data Load Months
Navigate to Maintenance > Reports > Lock Data.
Select the Actual Data Load Months tab, then select month that you will load data to and save.
Data will not appear in reporting for any month that is not checked. If you check future months on this tab where no data has been loaded, you will see negative numbers which reverse out the YTD balance if the future months are displayed on the column. To prevent negative numbers on a report which shows future periods, simply uncheck any future months, and the columns in the report will be blank.
Step 8: Data Loading
Step 8a: Prepare Data Files for Loading
Collect data files from each company showing trial balance account information by year and period along with the other Planful dimension. Save the files in csv, txt, xls, or xlsx format.
Step 8b: Select the Data Load Rule
Navigate to Maintenance > DLR > Data Load Rules. For each file to be loaded, select the appropriate data load rule.
Review all settings in the rule by clicking Next in each screen. Once you have determined that all of the settings are correct, attach the new data load file in the last screen. The last step is to click Finish.
Repeat the data loading steps until data has been loaded for each company for the close month. If anything needs to be edited in the source system, obtain a revised data file and repeat the data load routine.
Step 8c: Verify Loaded Data
After loading data, Validation reports should be used to view the data, showing the data in the account structure. To view the Validation reports:
If you have a data load verification report set up in the File Cabinet, open it.
Run the report with the current month.
Verify that the data loaded to each company tied to the source data file from your company’s system.
Step 9: Consolidation Steps
After the data is loaded and verified, go to the Consolidation module and perform the steps required for Consolidations:
Process Recurring Journal Entries
Post Standard Journal Entries
Post Eliminations
Process Consolidations
Process Recurring Journal Entries
MTD vs YTD Journal Entries
All year to date journal entries reverse the next month in the consolidation module. You will see this in verify data. All balance sheet accounts reflect a YTD balance in verify data. If these accounts were shown in a report with MTD activity, you would see a negative amount on each line item the next month. Amounts in month to date journal entries are retained for the current fiscal year.
Retained Earnings
If journal entries made in consolidation create net income or loss for the year, Beginning Retained Earnings will need to be updated in period 1 the following year.
Step 10: Reporting
Validation Report
After completing the Consolidation Process, review the data results in the Consolidation Validation reports:
Verify that the current year earnings account equals the net income rollup
Verify that the Planful only balance account is zero
Verify that the balance sheet nets to zero.
Verify that the CTA account has the correct balance
Journal Entry Report
In the Consolidation module, run the Journal Entry report. This report will list each journal depending on the selection. It can be exported to Excel and retained with other month end work papers and analysis.
Consolidating Balance Sheet and Consolidating Income Statement
Run the Consolidating Balance Sheet and Consolidating Income Statement
Verify that all Eliminations have resulted in the correct consolidated balance
Verify that any adjustments made in consolidation have posted properly
Verify that the net income/loss agrees to source ledgers.
What Do I Do After Close Takes Place
Once the month is closed and all reporting has been validated, under the Maintenance tab, select Lock Data. On the Lock Data tab, check the closed month so that no further data or adjustments can be made to the period. (Assuming data is loaded for only one month at a time). This also prevents data from being inadvertently being cleared.
How to Input Actuals
In the Consolidation Control Panel, select the scenario, period, and company.
Under Processes, click Actual Data Process. The Actual Data Process grid appears.
Select the template, under Entry Actions, then click Input as shown below.

- The template opens in the Input mode as shown below.
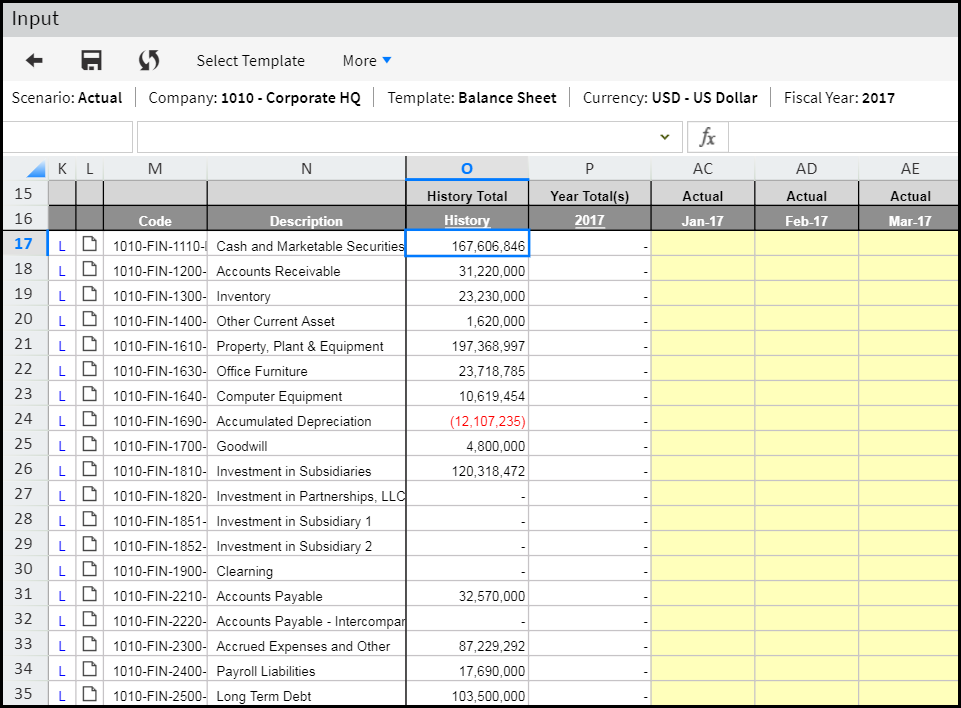
Enter actual budget data for the available periods.
Click Save.