Exploring the Top Ribbon
- 4 Minutes to read
- Print
- DarkLight
- PDF
Exploring the Top Ribbon
- 4 Minutes to read
- Print
- DarkLight
- PDF
Article summary
Did you find this summary helpful?
Thank you for your feedback
Top Ribbon Icons/Functionality In View Mode:
Top Ribbon Icons/Functionality In Edit Mode:
Search
Search for hierarchy members.
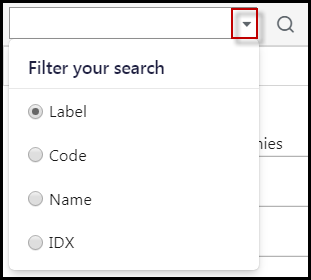
To perform a basic search:
- In the Search box, click the down arrow. Filter search options appear.
- Select from: Label (code + name), Code, Name, and IDX.
- Enter search criteria in the Search box and then click the magnifying glass icon. The search results appear.
Use an advanced search to produce or narrow and results. You can write a query using Type, IDX, Label, Code, and Label columns with the operators ( <, >, =, !=), and use the keyword And.
For example, if you want to search for rollup nodes "Label1" and "Label2," the query you would input is Label=Label1 AND Label=Label2
Locate Results Display
When you search a hierarchy for a member, you can use the Locate button to display the location of a selected member within the hierarchy. The parent member displays in the hierarchy in the left pane, the member displays in the center pane, and the member’s properties display in the right pane.
In Practice
Access Hierarchy Management by navigating to Maintenance > Hierarchy > Hierarchy Management.
Perform a search. In this case, ot is entered in the Search field. Results are displayed.
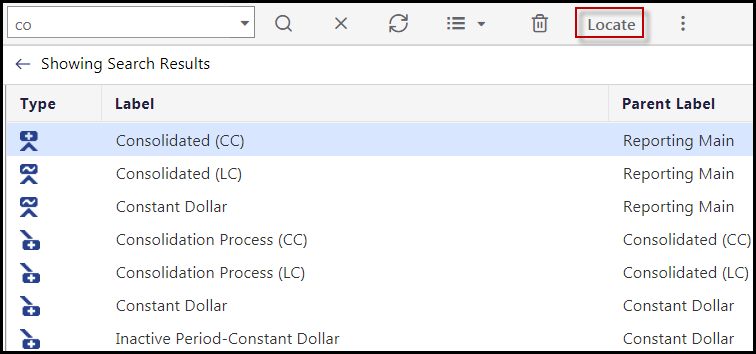
Select a member.
Click the Locate button. Results display with the parent member highlighted in blue in the left pane, the member highlighted in blue in the center pane, and properties are displayed in the right pane.

Hierarchy Path
The hierarchy path is displayed based on where you navigate within a hierarchy.
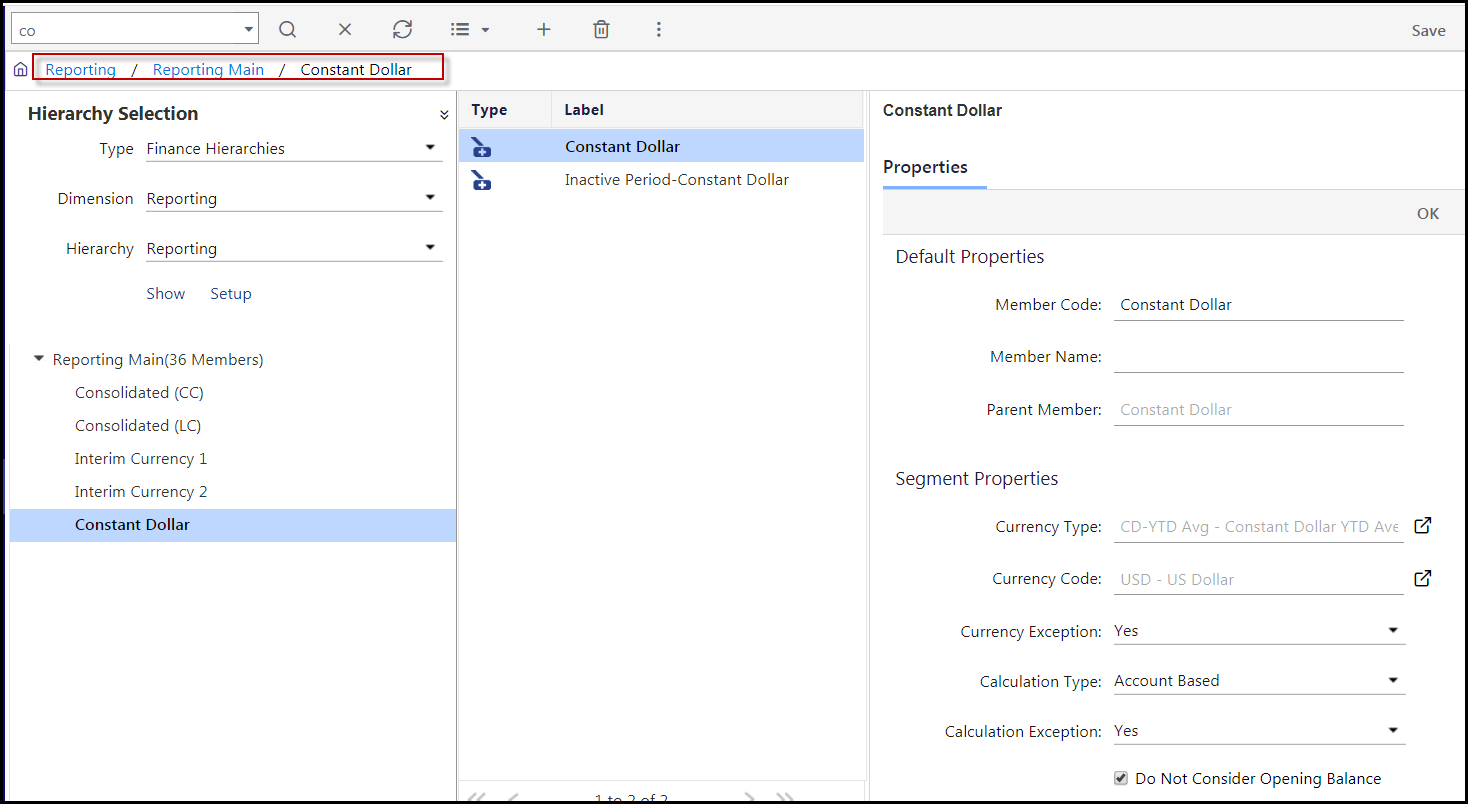
Click a member in the path and the parent member will be displayed in the left pain and the member itself will be displayed in the center pane.
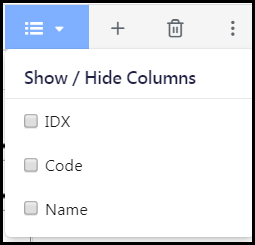
Show/Hide Columns
You can display members in the center pane by IDX, Code, Name and / or Label as shown below.
Sort
Sort members in ascending and descending order.

Add
Click the plus icon to add a member to the hierarchy.
Add a Rollup Member:
- Ensure Hierarchy Management is opened in Edit mode.
- Under Hierarchy Selection, select Type, Dimension, and Hierarchy and click Show.
- In the hierarchy tree, select the desired member location.
- Click Add.
- Select Rollup Node from the Node Type drop-down list. For Rollup Node, you can only create a Rollup Member Node Sub Type.
- Click Add.
- Complete required fields (i.e. Default Properties).
- Click OK.
- Click Save.
Add a Leaf Level Member:
- Ensure Hierarchy Management is opened in Edit mode.
- Under Hierarchy Selection, select Type, Dimension, and Hierarchy and click Show.
- In the hierarchy tree, select the desired member location.
- Click Add.
- Select Leaf Node from the Node Type drop-down list. If you are adding a leaf level member in Financial Hierarchies, select Leaf Member or Calculated Member from the Node Sub Type drop-down list. If you are adding a level member in Entity Hierarchies, the default budget entity hierarchy selected in the Node Sub Type drop-down list.
- Complete all the required fields (for example; Default Properties and Segment Properties).
- Click OK.
- Click Save.
In addition to adding a rollup member and /or leaf member, you can edit and delete each of these members. Information on how to do so is provided below.
Edit a Rollup Member:
- Open Hierarchy Management in Edit mode.
- Under Hierarchy Selection, select Type, Dimension, and Hierarchy and click Show.
- In the hierarchy tree, select the immediate parent member of the desired rollup member.
- In the middle pane, select the rollup member. If the properties panel is not visible, click the three vertical dots, and then click Show/Hide Properties.
- Edit the properties as needed.
- Click OK.
- Click Save.
Delete a Rollup Member:
- Open Hierarchy Management in Edit mode.
- Under Hierarchy Selection, select Type, Dimension, and Hierarchy and click Show.
- In the hierarchy tree, select the immediate parent member of the desired rollup member.
- In the middle panel, select the rollup member.
- Click Delete.
- In the message that appears for confirmation, click OK.
Edit a Leaf Level Member:
- Open Hierarchy Management in Edit mode.
- Under Hierarchy Selection, select Type, Dimension, and Hierarchy and click Show.
- In the hierarchy tree, select the immediate parent member of the desired leaf level member.
- In the middle pane, select the leaf level member. If the properties panel is not visible, click the three vertical dots, and then click Show/Hide Properties.
- Edit the properties as needed.
- Click OK.
- Click Save.
Delete a Leaf Level Member:
- Open Hierarchy Management in Edit mode.
- Under Hierarchy Selection, select Type, Dimension, and Hierarchy and click Show.
- In the hierarchy tree, select the immediate parent rollup member of the desired leaf level member.
- In the middle pane, select the leaf level member.
- Click Delete.
- In the message that appears for confirmation, click OK.
Understanding the Difference between a Rollup Node and a Leaf Node
Rollup Node functions are different from Leaf Node functions. Leaf Node is the last level in a hierarchy and data can be loaded to leaf nodes. The data loaded to the leaf is rolled up to the leaf node's rollup member.
Cut / Paste
Use cut and paste to move members around within a hierarchy. Select the member, click Cut. Locate the place where you want the member and click Paste. You must be in Edit mode.
Copy
Use Copy to make a duplicate of a selected member. You must be in Edit mode.
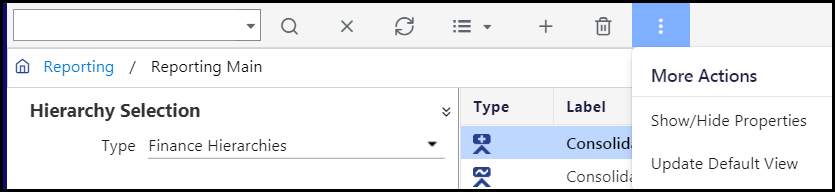
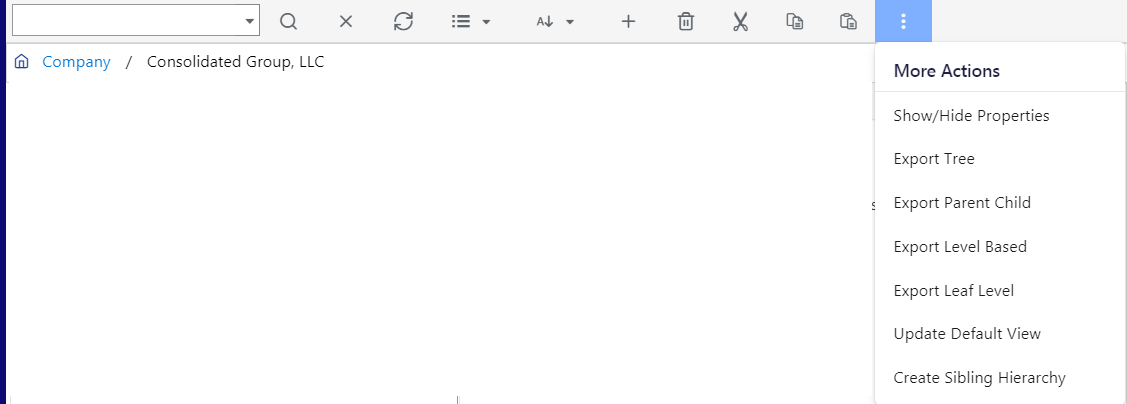
Three Vertical Dots
Select from the following:
Show/Hide Properties (the right pane).
Export the hierarchy to Excel in one of the following formats: Tree, Level-Based, Parent-Child, Leaf Level.
Create a Sibling Hierarchy. For MSOB (Multiple Set of Books), you will create a sibling hierarchy (to the main hierarchy versus a segment only). You might use MSOB when you need to provide financial statements for GAAP as well as IFRS. Information on Sibling Hierarchies and how to create them is provided below.
Was this article helpful?