Structured Planning: Introduced Snapshot feature
With this release, we have introduced a Snapshot feature that allows finance teams to take a backup of a template for the selected budget entity. Using this feature, finance teams can easily take a backup and restore the version of the template if needed.
Let's understand this with an example:
John from the finance team takes a Snapshot of the "Operating Expense" template and shares this template with a budget manager Michel and wants him to update "T&E Accounts". Michel updates "T&E Accounts" but accidentally deletes some existing data. John gets a notification about the status of the template and verifies it. John observes some data discrepancies.
Now, with this feature, John can use the Snapshot of the template he created before sharing it with Michel and easily restore the backup version as the main version of the template.

- The Snapshot feature is enabled by default in the application. If you wish to disable this feature, you can deselect the Enable Template Snapshot checkbox in your user profile's Approval Role Setup screen.
- This feature is currently only available for GTSC templates. You should have the input permission to the template to create and restore any snapshot. If you have view permission, you can only see the existing snapshots of a template.

In practice: Creating a Snapshot
- Navigate to the Planning Control Panel. Select a Scenario > Budget Entity and a template.
- Click the Snapshot icon . You will see a dialog box on the screen.
- In the Create New tab, provide a name for the backup version of the template and click Save.
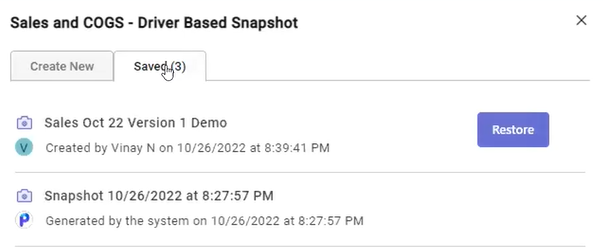
- Click the Saved tab to view the backup version. The latest backup version is saved at the top.
- Click the Export to Excel icon if you want to download the backup version of the template.

In practice: Restore a Snapshot
- Navigate to the Planning Control Panel. Select a Scenario > Budget Entity and a template with at least one snapshot.
- Click the Snapshot icon . You will see a dialog box on the screen.
- Click the Saved tab to view the list of backup versions.
- Click the Restore button associated with the snapshot you want to restore. A confirmation message will appear asking for your permission.
- Click Yes to restore this version of the template.


Notes:
- You can take a snapshot of the entire template, but the application can restore only L-type lines (including the sublines) when you restore a template.
- You can only restore the latest backup for the Template. Although, you can download the older template versions with the Export to Excel icon.
- In the Template Input screen, you can see the modified date and time for the template in the history window.
- You cannot restore the backup version if the template is open in the input mode. You have to close all instances of a template before restoring its backup version.
- If you have made structural changes to the template in the Template Setup mode, such as adding a new line type or updating a calculation formula, the latest backup version of the template will become invalid.
- The audit logs record all the activities performed related to the Snapshot feature.


Structured Planning: Export Detailed Compensation Report
With this release, you can export the compensation metadata for a selected scenario using the Detailed Compensation Report.
The Detailed Compensation Report exports the data of all employee compensation items for that scenario. If you want to export only the data displayed on the Compensation Items tab, use the Compensation Item Summary option.
In Practice: Exporting Compensation Items
1. Navigate to Maintenance > Workforce > Workforce Planning Setup
2. Click on the Compensation Items tab.
3. Click the Export to Excel option in the menu bar, and select the required export option from the drop-down to export the compensation items.

Dynamic Planning: Enhanced Hierarchy Management
With this release, we have introduced an Enable Versioned Hierarchy Management flag to automate the dimension hierarchy process for the Analytical Model and Master Model. Enable this flag to automate the actions such as:
- Locking
- Clearing up the rollup data
- Saving the hierarchy updates
- Unlocking the model
- Running the selected calculation that took manual effort
When you save and publish the hierarchy, the application automatically performs these actions for you. This enhancement can be enabled with the Enable Versioned Hierarchy Management flag.
Use case 1: If you want to update the existing hierarchy, which is published to the end users:
- Optional, in the Model Setup page, select Restore Rollup Data Calculation from the drop-down list. This will restore the rollup data after the changes in the hierarchy.
.png?sv=2022-11-02&spr=https&st=2025-12-01T02%3A05%3A58Z&se=2025-12-01T02%3A23%3A58Z&sr=c&sp=r&sig=nuYjxDoF9Y2kRWL2G5218Y5u%2BWGwJFNjjmFcM1MP9pA%3D)
- On the Model Dimension page, set Update as the Action property value to make any changes in dimension members from the published hierarchy.

- On the Dimension page, click Save. This will save and publish the updates to the user.

- The selected calculation in Restore Rollup Data will run automatically.
Use case 2: If you want to add new versions, update the dimensions in it and then publish them:
In Practice: Add a member to the Dimensions Page
- Select a Model in SpotlightXL.

- Navigate to Dimension. Select the model you want to update.
.png?sv=2022-11-02&spr=https&st=2025-12-01T02%3A05%3A58Z&se=2025-12-01T02%3A23%3A58Z&sr=c&sp=r&sig=nuYjxDoF9Y2kRWL2G5218Y5u%2BWGwJFNjjmFcM1MP9pA%3D)
- Select the dimension to map the hierarchy.
- Select the New Hierarchy Version from the hierarchy drop-down list, and update the name.
- In the Action drop-down list, select Update.
.png?sv=2022-11-02&spr=https&st=2025-12-01T02%3A05%3A58Z&se=2025-12-01T02%3A23%3A58Z&sr=c&sp=r&sig=nuYjxDoF9Y2kRWL2G5218Y5u%2BWGwJFNjjmFcM1MP9pA%3D)
- Navigate to Model > Setup to map the dimensions with the updated hierarchy version.
- Select the calculation that the hierarchy has to run after publishing. These calculations are visible under a particular model that does not have the following:
- Append metadata
- Clear model
- Downloaded metadata
- Users will be notified upon completion.
- If you don't wish to update the existing published hierarchy, you can create up to 10 versions of each dimension hierarchy within the published hierarchy.
- To create other versions, you must generate a base hierarchy model/main hierarchy model.
- These dimension versions can either have the same or different dimension structures for all the dimensions in the model. You can update the new version of the published hierarchy and publish it to the end users.
In Practice: To create a version of the published hierarchy
- Navigate to Model > Dimension.
- Select the Model.
- You can select Update, Set Display Label, or Set Dimension Based Properties to update the existing hierarchy.
In Practice: To publish existing published hierarchy
- Navigate to Model > Setup.
- Click the Publish Hierarchies option in the Actions column.

- The selected version will be published.

- Select appropriate versions for each dimension and calculation and click Publish Hierarchies to publish the selected versions to the end users.
- The selected hierarchy version will be published.
- After publishing the new hierarchy, only the data common to old and new hierarchy members are retained.
- Disabling and enabling the flag clears all versions
- Versioned hierarchy is also supported for export/import models
- Adding dimension members from web/append API adds them to the existing published hierarchy.
- If you already have 10 published hierarchy versions, delete any one of the hierarchies to create a new one.
Use case 3: If you want to delete a few existing versions:
In Practice: To delete the existing published hierarchy
- Navigate to Model > Setup.
- Click the Delete Hierarchies option in the Actions column.

- The selected version will be deleted.
- The first published hierarchy is the main hierarchy, and you cannot delete a version hierarchy in use.
- Published hierarchy/main hierarchy can be updated in the generated/locked/non-generated state.
- Regenerating model/clearing model sets the main hierarchy for all dimensions.
In addition to the above features, the following are some additional rows added in the dimension:
- Published Hierarchy - displays the version of the selected dimension published to the end users.
- Hierarchy- displays the versions of the dimension hierarchy.
- You can also add new versions from here.
- After creating and updating the dimension hierarchy, save the hierarchy and navigate to Model > Setup for mapping and publishing the dimension version.
Budget Manager Experience: Support for Workforce Planning Templates
With this release, the finance team can share Workforce Planning (WFP) templates with budget managers through email or copy link feature.
Budget managers can access the WFP templates only through a shared link and view the templates in Read-Only mode. By default, the template displays the template details in Grid View.

To know more about the details of these templates in Budget Manager Experience, click here.
Integrations: API Documentation Portal
Our upgraded and interactive API documentation is here! Read, explore code snippets, and consume APIs directly on your Postman.
Consolidation: Email Notification for Currency Conversion
With this release, you no longer have to wait on the screen for the Currency Conversion process to complete. Instead, you will receive an email notifying the status of the process.
Previously, you had to stay on the screen and wait for the Currency Conversion process to complete.
.png?sv=2022-11-02&spr=https&st=2025-12-01T02%3A05%3A58Z&se=2025-12-01T02%3A23%3A58Z&sr=c&sp=r&sig=nuYjxDoF9Y2kRWL2G5218Y5u%2BWGwJFNjjmFcM1MP9pA%3D)
For more information, about Currency Exchange Rates, click here.
Consolidation: Updated the Currency Export Report Format
With this release, we have updated the exported Currency Exchange report format. The currency exchange report will now have the currencies mapped against each currency type to avoid empty rows and any data discrepancy in the exported report.
Previously the currencies were not mapped against each currency type which could lead to data discrepancy in the exported report.

Predict Projections: Introduced GL Exclusion for Predict Scenarios
With this release, you can exclude unwanted GL Combinations from Predict use cases by creating a GL exclusion list. This enhancement allows you to consume this exclusion list to ignore the defined GLs from the Projections Scenario Data Seeding. This helps to effectively use AI Projections only for the GL Combinations that best leverage Predict Projections.
In Practice: Creating the GL exclusion list
- Navigate to Maintenance > Overview > Configuration Tasks > Predict: Projections.
- Click the Add GL Combinations link to define the GL Combinations you want to exclude from Data Seeding.

- Select the dimension members from the respective fields, and click Save.

In Practice: Consuming the GL exclusion list
- Navigate to Maintenance > Overview > Scenario Setup.
- Click the Add icon.

- Select the Preloaded Budget option from the Scenario Type field.
- Once you select the Predict Scenario checkbox, the Exclude GL Combinations checkbox will be available to use.

- Enter the required details and click the Save icon.
Predict Signals: Signals Supported in Allocation Templates
With this release, Predict Signals are supported in Allocation templates. You can use the Check Selected Lines and Check All Lines features to review signals.

Predict Signals: Introduced Resolve Signals in the Signal Context Screen
With this release, you can now resolve signals for single or multiple cells in the Signal Context screen of Signals Overview, Dynamic Reports, and Templates.
