22.9 Release Notes
- 10 Minutes to read
- Print
- DarkLight
- PDF
22.9 Release Notes
- 10 Minutes to read
- Print
- DarkLight
- PDF
Article summary
Did you find this summary helpful?
Thank you for your feedback
Structured Planning: Introduced an option to export employee data
With this release, you can export employee data from the application using an option. Navigate to the Workforce Planning Export > Employee Reports screen and select the Employee Compensation By Period option added in the Report Type drop-down to download the data based on compensations.
Once you select the Employee Compensation By Period option, you can see Financial Year and Currency fields on the screen. You can filter the compensation items of each employee based on the selected financial year and currency value when you run the report. The exported report will contain the compensation details of each employee mapped against a scenario for the selected budget entity. The compensation export screen will only display 500 records with limited compensation item data. Export the report to view the complete data. 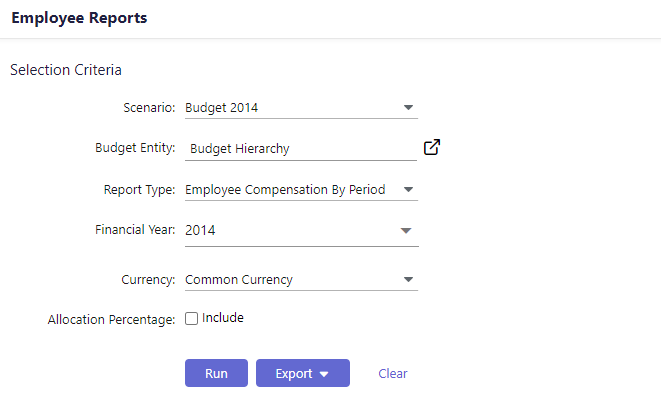

Note
If you select the Allocation Percentage check box, you can see the employee compensation mapped against different financial years and currency types in the report.
For more information about Export Reports, click here.
Dynamic Planning: Pause or Unpause the Scheduler from Report Collections
With this release, you can now switch On/Off the schedulers from the Scheduled column introduced on the Report Collections landing page. Previously, users had to navigate to the scheduler from report collections and then switch On/Off each scheduler. Now, you can select multiple reports and switch the scheduler On/Off for the selected reports.
Note
- If you switch on a scheduled report after the due date, the scheduled report will not be sent at all.
- Reports will be sent out for the number of occurrences mentioned irrespective of calculated days.
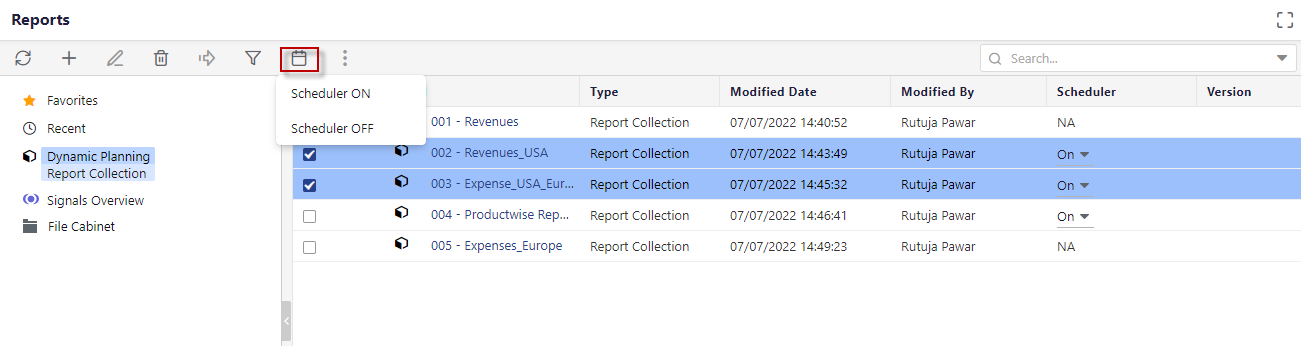
In Practice: Switch On/Off Scheduler for Reports
- Navigate to Reports and select Dynamic Planning Report Collections.
- Select a single report and select On/Off from the scheduler drop-down list.
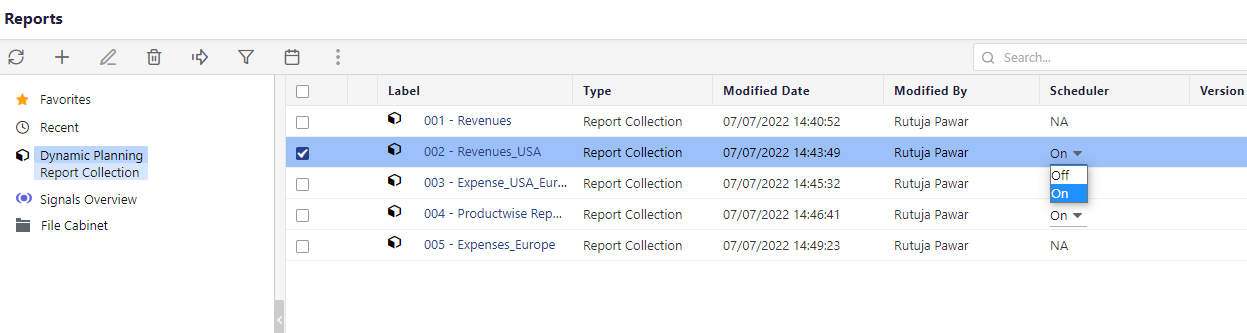
- Select multiple reports and choose On or Scheduler Off from the icon in the menu bar.
Platform: Reset Data Load with Transfer API
From this release, if needed, you can reset any ongoing data load, and start a fresh one. Add the following header to the Transfer Data API call along with the fresh payload.
ResetDataLoad
Passing the value of DataLoadExecutionId is optional at the moment and it’s recommended to keep the ResetDataLoad parameter value empty. You can reset the ongoing data load only if you have started it.
You can even send the IsLoadCompleted header as True if this is the only batch of data you want to load while resetting the previous execution.
Platform: Retry a Failed Data Load with Transfer API
From this release, you can now retry a failed data load. If any data load fails for any reason, and you wish to retry the failed data load after fixing the issue, rerun the API, and the API will retry the data transfer. This is more useful when you are loading the data in chunks. You can send the execution ID (this is optional) of the failed DLR and payload as NULL to retry the transfer. This avoids starting the process from the beginning if any DLR fails. However, there are some conditions the DLR has to meet if you want to retry the data load:
- The DLR should not have any other execution since a failed data load.
- You can retry executing the DLR within 8 hours of a failed data load.
Note
You can retry a failed DLR execution only five times. The number of retries attempted to execute a DLR is available in the API response as the Attempts parameter.
Sample Request Body
{
"DataLoadRuleConfig": {
"dataLoadRuleId": 609012,
"dataLoadRuleName": "REST_FL_Test_2_XLSX",
"rowDelimiter": "|",
"columnDelimiter": ",",
"callbackOptions": {
"httpMethod": "POST",
"url": "https://fpa-infra.planfuldev.com//financemodel/data/CallbackToLog"
}
},
"payload": null
}
Platform: Enhancements to GetDataLoadStatus API
With this release, there is an update in the query string of the API endpoint. When you initiate a DLR execution through REST API, the API will return an Execution ID in the response. You can now use that Execution ID instead of Task Id to know the status of a DLR execution. Following is the updated GetDataLoadStatus API endpoint:
GET /<application URL>/financemodel/data/GetDataLoadStatus?ExecutionId=<Exec Guid>
Sample Response Body :
{
    "ExecutionId": "bdc0a259-7348-44a3-89b8-f380bdae2dc7",
    "ChunksRecieved": 1,
    "RecordsRecieved": 11,
    "LastBatchRecievedDateTimeUtc": "2022-07-15T12:37:05.84",
    "LoadCompletedDateTimeUtc": "2022-07-15T12:37:05.867",
    "TransferStartedDateTimeUtc": "2022-07-15T12:37:05.9",
    "TransferCompletedDateTimeUtc": "2022-07-15T12:37:14.917",
    "Attempts": 1,
    "ExecutionStatus": "Processed"
}
This API now fetches information about both Sync and Async API execution types, which is made available in the API response. The API can return any of the following execution statuses:
- Uploading
- Uploaded
- Processing
- Processed
- Failed
- Abandoned
Apart from the mentioned updates, the following are other enhancements made to the API response:
- The API response will include the following additional parameters:
- ChunksRecieved: Displays the number of chunks of data successfully loaded using the API for a particular DLR.
- RunAsynchronously: Displays whether the DLR was run in sync or async mode. The possible values for this parameter are True or False.
- Attempts: Displays the number of attempts made to transfer the entire data successfully for a particular DLR.
- Time stamps
Platform: Enhancements to Transfer Data API
Following are the enhancements made in the Transfer Data API:
- From now the API response will include the following additional parameters:
- ChunksRecieved: Displays the number of chunks of data successfully loaded using the API for a particular DLR.
- RunAsynchronously: Displays whether the DLR was run in sync or async mode. The possible values for this parameter are True or False.
- Attempts: Displays the number of attempts made to transfer the entire data successfully for a particular DLR.
- Time Stamps
- While loading the data in chunks, providing the Execution ID of the previous API call is not mandatory.
Following are the sample API responses for successful Sync and Async DLR uploads:
Async
HTTP/1.1 202 ACCEPTED

{
    "DataLoadRuleId": 600058,
    "ExcecutionId": "35e76b96-83ab-40e1-897e-e8ea5aa4c171",
    "ChunksRecieved": 1,
    "RecordsRecieved": 2,
    "RunAsynchronously": true,
    "Attempts": 1,
    "TransferResponse": {
        "TaskId": "85db011b-d582-4dc9-9ffc-322fbb2540a1",
        "Success": true,
        "Message": "Task submitted successfully."
    }
}
Sync
HTTP/1.1 200 OK

{
    "DataLoadRuleId": 600058,
    "ExcecutionId": "def9f7b2-4644-4b89-a4da-f0508eed0b4e",
    "ChunksRecieved": 1,
    "RecordsRecieved": 2,
    "RunAsynchronously": false,
    "Attempts": 1,
    "TransferResponse": {
        "Success": true,
        "Message": "Data Transferred Successfully."
    }
}
Note
Similar responses are expected if you try to execute a DLR with Form-Data in a single API call.
Platform: Get Running Data Load Status API
From this release, you can now use the GetRuningDataLoadStatus API to know if there is any execution going on for any DLR. This API requires the DLR name as the query string parameter and it retrieves detailed information about the execution. If there is no active DLR execution, then the API will return a “404 Not Found” message.
Rest API Endpoint - GET /<application URL>/financemodel/data/GetRuningDataLoadStatus?dlrName=<>
Sample Response if there is no ongoing DLR execution:
HTTP/1.1 404 Not Found
Requested data not found. No data load in progress for this DLR 'S - Rest WS GL'
Sample Response if there is any ongoing DLR execution:
{
    "ExecutionId": "ce8ba642-8f6f-4041-a706-fa602eced7c7",
    "ChunksRecieved": 1,
    "RecordsRecieved": 11,
    "LastBatchRecievedDateTimeUtc": "2022-07-21T21:54:15.157",
    "LoadCompletedDateTimeUtc": "2022-07-21T21:54:15.21",
    "TransferStartedDateTimeUtc": "2022-07-21T21:54:15.26",
    "Attempts": 1,
    "ExecutionStatus": "Processing"
}
Platform: Other API enhancements
From this release, we added support for Segment Hierarchy (all 8 segments) data loads. You can invoke the following DLR types:
- File load
- Web services
- Copy paste
Budget Manager Experience: Introduced Action Items
With this release, sharing templates with budget managers will create a new task for them, helping budget managers to keep track of their pending activities and finish them on time.
If any budget manager has access to multiple budget entities mapped to that template, every budget entity will have a new task. If any template is shared twice, the new task replaces the existing task to avoid duplicates.
Budget managers can review their tasks from the Action Items option and click I’m Done to complete them. They can click any task in their list and easily navigate from one task to another.
Completing a task will permanently remove it from the Action Items list, and the respective user who shared the template with the budget manager will get a task completion notification.
In Practice: Accessing Action Items
To view the Action Items option, Budget managers can perform the following steps:
Click the template link shared through email or any other means. The link navigates them to the application login page.
- Log in to the application to access the shared template.
- Click Action Items at the top right corner of the template and access the list of pending tasks. The following details are displayed about each task:
- Name of the user who shared the template
- The date on which the template was shared through email or using the Copy Link option
- Template name
- Entity name
(3).png)
For more information about Budget Manager Experience, click here.
Budget Manager Experience: Introduced Track feature
From this release, you can use the Track feature to view the status of the budget managers working on each shared template. This feature lists all the templates you have shared with the budget managers, and you can view the status of budget managers working on each of those templates.
You can click on any status to view the details of the budget managers in that status.
Note
You can track entities' status only at the leaf level and rollups above the leaf level.
In Practice: Track Shared Templates
- Log in to the application and click the Structured Planning icon from the side menu.
- Select a Scenario.
- Select the required Budget Entity from a leaf-level or a rollup level above leaf-level entities.
- Click Track, and the Track screen appears. It displays the list of templates associated with the selected budget entity. All the shared templates are associated with some status.
- You can click on the respective status (Done or In Progress) to know the details of the budget managers in that status.
(2).png)
Budget Manager Experience: Introduced Predict Projections
With this release, the Budget Manager Experience supports Predict Projections capabilities. Predict Projections helps plan your budget/forecast scenarios in a data-driven approach as part of Structured Planning. Predict Projections generates future projections using Planful’s proprietary AI/ML algorithms through the Predict Projections AI engine.
To know more about how Predict Projections work in Budget Manager Experience, click here.
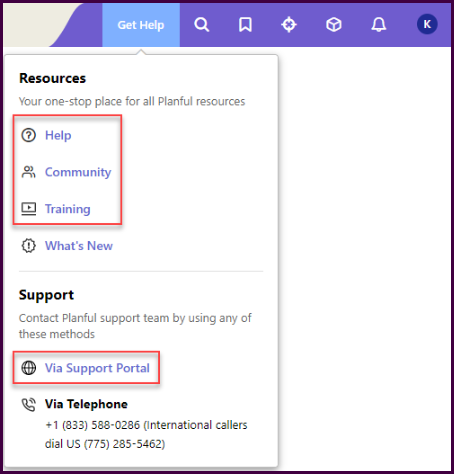
Platform: Deprecating Help, Support & Community, and Training links from the User Menu
With this release, you will no longer be able to access Help, Support & Community, and Training links from the User menu. Instead, you can access them only from the Get Help menu in the top toolbar.
Platform: Enhanced the Left Navigation Pane
You can now pin/unpin the left navigation pane. With this change, you will see the navigation menu in the pinned state and can no longer use the old navigation menu.
Business Value
This change is driven by the desire to have all customers on a single layout so that we can improve the layout efficiently for all customers. The enhanced navigation menu is more user intuitive with labels and allows customers to collapse/unpin it for maximum horizontal space.
The following is an illustration of a pinned left navigation menu.

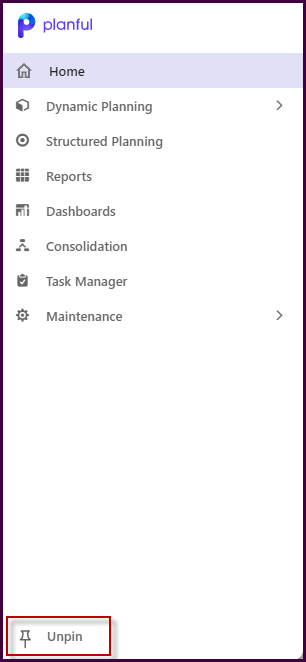
The following is an illustration of an expanded pinned left navigation menu, highlighting the Unpin icon which you can click on to collapse/unpin the menu.
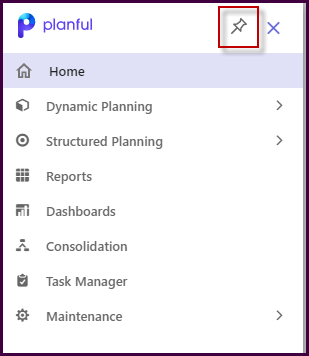
The following is an illustration of an unpinned left navigation menu, highlighting the Pin icon which you can click on to expand/pin the menu.
Platform: Enhanced the Notification Settings
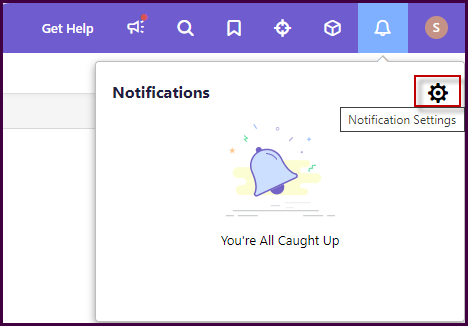
With this release, the notification settings have been moved from the General settings page to a separate in-app pop-up that appears when you click the Notification Settings icon from the Notifications menu.
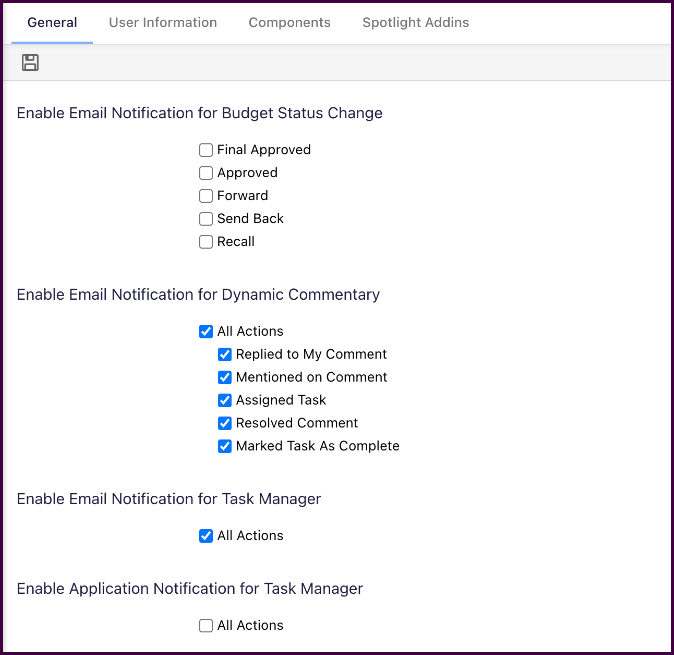
Previously, all settings related to notifications were available under the User menu > Manage your Account > General settings page. The following is an illustration of the previous notifications settings page.
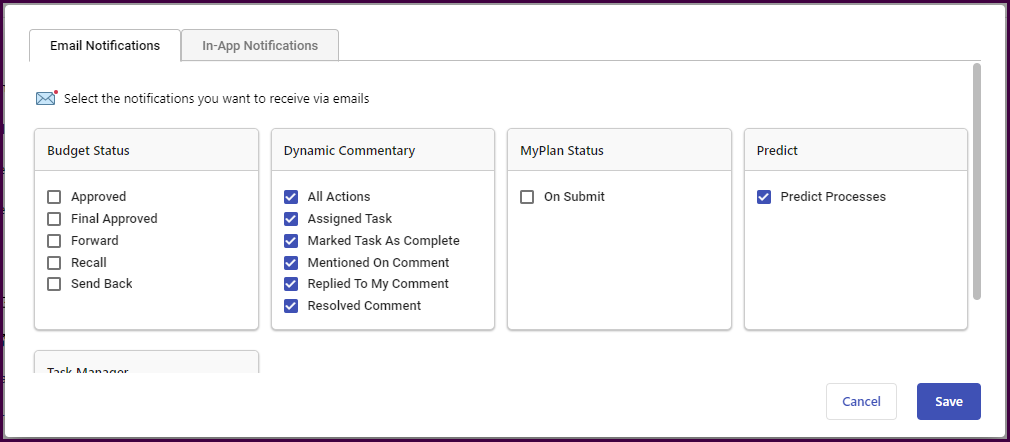
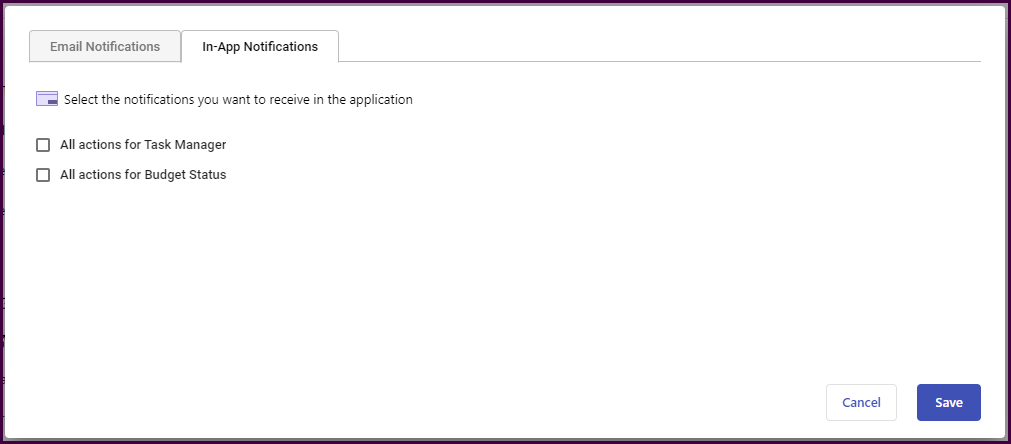
You can choose between the Email Notifications and In-App Notifications tabs to select the type of notifications you wish to receive for any relevant change.
The following is an illustration of the latest Email Notifications pop-up.
The following is an illustration of the latest In-App Notifications pop-up.
Predict: Added Signals on Templates with Dimension Attributes
With this release, Predict Signals will be available on templates based on budget entities with dimension attributes. You can use the Check All Lines and Check Selected Lines features on such templates to generate signals.
For more information on Predict Signals, click here.
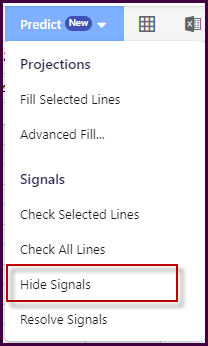
Predict: Introduced Hide Signals in Templates
You can now hide signals on Templates. Previously, you did not have the option to hide signals and had to refresh the template to avoid seeing any signals at the risk of losing unsaved changes.
Use the Hide Signals option now to view your templates in a regular way.
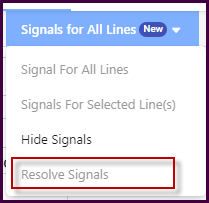
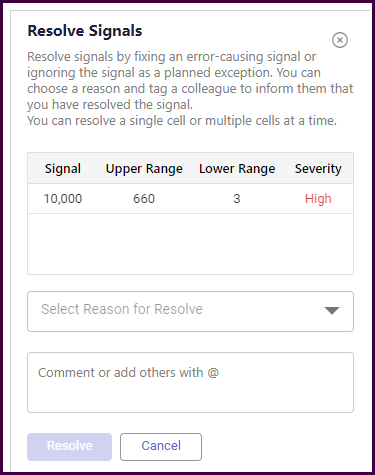
Predict: Introduced Resolve Signals in Dynamic Reports
With this release, you can mark a signal as resolved by selecting a reason from a list of pre-existing options. This will permanently unflag those GL combinations for those specific values.
You can choose to resolve a single signal or multiple signals at once. If you resolve multiple signals simultaneously, the same reason will apply to them.
The resolved signal will no longer appear as a signal in the report. Instead, it will be marked with a comment displaying the original cell value followed by the reason for resolving the signal, along with any comment typed in at the time of resolving the signal.
Note
Once you resolve a signal or multiple signals in DR, the signal(s) will be marked as resolved in all other areas of the application for the same GL combination(s) and value(s).
The following is an illustration of the Resolve Signals pane.
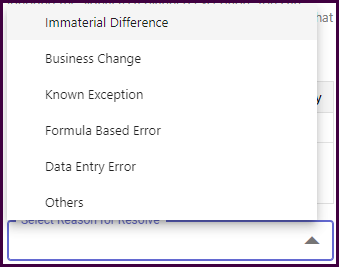
The following is an illustration of the list of reasons available to mark a signal or multiple signals as resolved.
The following is an illustration of the comment displaying the original cell value followed by the reason for resolving the signal, along with the comment typed in at the time of resolving the signal.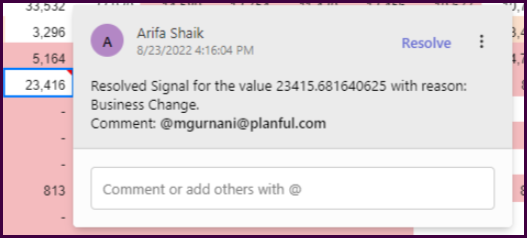
Was this article helpful?