Financial Hierarchies
- 5 Minutes to read
- Print
- DarkLight
- PDF
Financial Hierarchies
- 5 Minutes to read
- Print
- DarkLight
- PDF
Article summary
Did you find this summary helpful?
Thank you for your feedback
Set up a hierarchy for each financial segment/dimension that you added on the Financial Segments Configuration Task page. You will load members to Planful for each dimension. For example, if you created a Company segment, you can load all company data to build a financial hierarchy.
Setup for Finance Type Hierarchies
Clicking Setup displays the Financial Hierarchies Setup page. You can add hierarchies based on the dimension you select by clicking the Add icon.
You can add an Attribute, Alternate or Dated hierarchy to a selected dimension.
Note:
You must have Dated Hierarchies enabled on the Define Financial Segments Configuration Task page in order for the option to be available.
You cannot edit a hierarchy once its' members are in use. For example, you can't edit an Attribute hierarchy if the members are used in reporting.
The icons/options in the ribbon of the Financial Hierarchies Setup page are explained below.
Add - Click to add a new Attribute, Alternate or Dated Hierarchy
Edit - Edit an existing hierarchy if not in use (i.e. used in reporting).
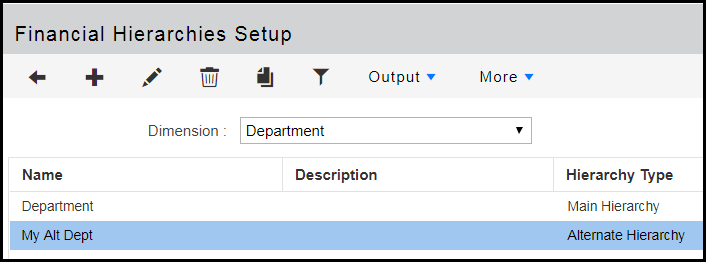
Copy - Make a duplicate copy of a selected hierarchy. For example, let's say you want to duplicate the Department Main hierarchy and save it as an Alternate hierarchy where you can make modifications based on your reporting needs. To do so:
Select the Department Main hierarchy as shown below.
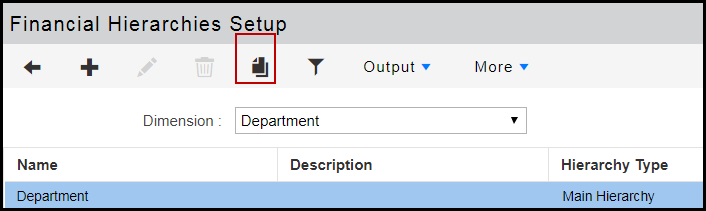
Click Copy.
Hierarchy Type is defaulted to Alternate Hierarchy.
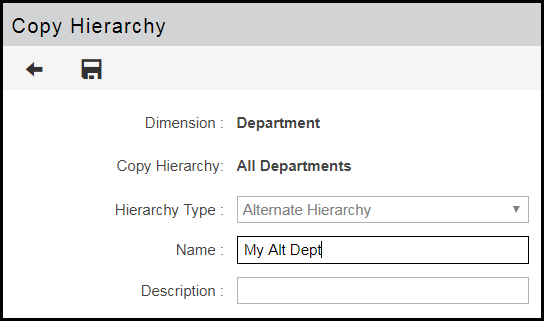
Enter a Name and Description for your copied Alternate Hierarchy and click Save.
More - There are two options available; Report Categories and Attribute Setup. For Attribute Setup, see the Defining Attributes section. For Report Categories, see Understanding Report Categories.
Understanding Reporting Members
Using the Segment Hierarchy page, you can create user-defined Reporting members used in the Consolidation module. The value of the Reporting members can be converted in multiple ways to achieve different calculations and meet reporting requirements. Independently create a Reporting member, assign a currency for values to be converted, choose currency exchange rates to be used for the conversion, and choose the calculation type to be used for the conversion. You can add a rollup child to a reporting member and then define calculation parameters by adding a Leaf Child to the New Rollup Child. An example of a Reporting hierarchy is provided below.
Important Notes:
You can create up to five reporting members. If you would like to create more than five, contact Support. The maximum number of reporting members is twelve.
Once a reporting member is created, it cannot be deleted.
You can modify the settings of the reporting member and use it for another set of calculations. A reporting member can be modified any number of times.
If the Consolidation process is run after modifying the reporting member settings, data is automatically recalculated based on new settings.
Note:
A rollup child will not be saved without the creation of a Leaf child.
The Leaf member becomes a Reporting member, available for selection on the Currency Exception and Calculation Exception pages.
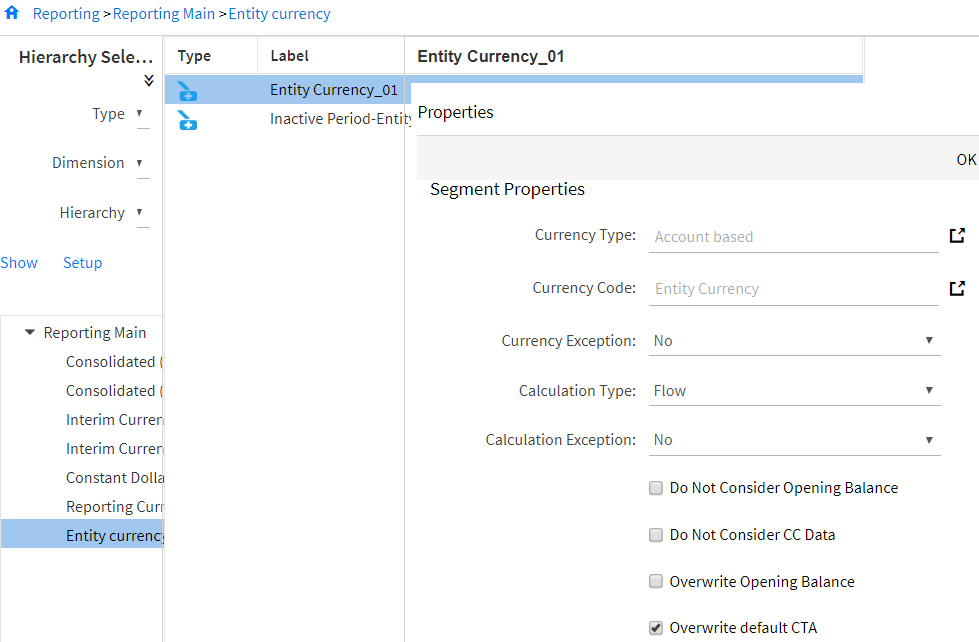
The Properties pane contains Segment Properties configuration functionality, where you can define calculation parameters around the reporting member.
Use each of the fields under Segment Properties to map the reporting member to new currency parameters, used specifically to generate a Cash Flow report with a common currency, local currency, or other currency, when multiple entities are assigned to different local currencies.
| Currency Type | Select a Currency Type to associate with the new reporting member:
Note: Currency types are defined on the Add Currency Type page. |
| Currency Code | Common Currency is selected by default. All values will be converted to the common currency for reporting purposes. Entity Currency allows you post a Local Currency to the reporting member with the proper Local Currency calculation. This can be used when you need to generate cash flow reports in Local Currency. |
| Currency Exception | Select Yes if the currency exception rates defined apply for all currency conversions. Select No if the currency exception rates defined do not apply for all currency conversions. Note: Use the Currency Exception Setup page to set currency exceptions for defined reporting members. see Also: Currency Exception Page |
| Calculation Type | Select Flow to convert all accounts associated with the reporting member to a Cash Flow account. For Cash Flow reporting, select this option so that all accounts will be converted based on the Cash Flow calculation. Select Account Based to convert all accounts associated with the reporting member to Balance Accounts. |
| Calculation Exception | Select Yes to set exceptions to the calculation type based on currency conversions for each account and entity combination. Select No if you don’t want to set exceptions to calculation type based on currency conversions for each account and entity combination. |
| Do Not Consider Opening Balance | Select if you want YTD values calculated in first period to exclude the opening balance of the previous period. |
| Do Not Consider CC Data | Select if you do not want Common Currency value to be converted and reported in Local Currency. |
Note:
Overwrite default CTA is available for CTA Sets.
Adding a Calculated Member to an Account Dimension
Navigate to Maintenance > Hierarchy > Hierarchy Management.
Select the Account Dimension and Hierarchy.
Click Show.
Select the rollup node to place the new formula member under that node in the hierarchy. The middle pane now displays members.
Click Add.
Select Leaf Node for Node Type and Calculated Member for Node Sub Type.
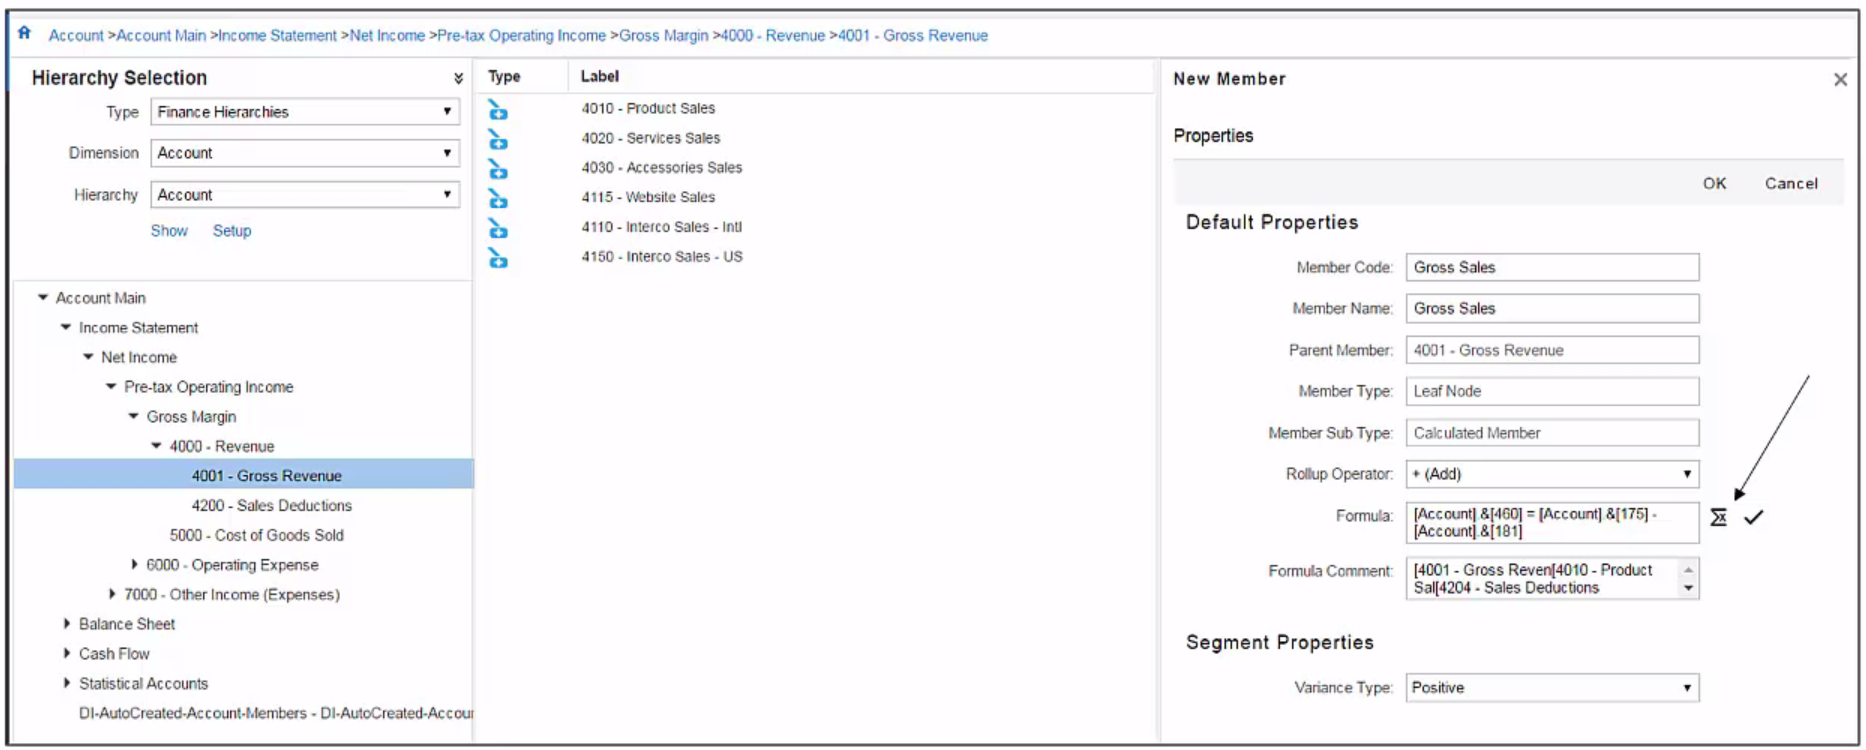
Enter the new member Code and Name in the Right pane.
Click the Formula icon. Enter the formula using the Formula Wizard.
Click the Set button in the member toolbar.
Click Save.
Select the newly created calculated member from the hierarchy.
Calculated Member- Creating a Member and Including it in a Dynamic Report
In this example, a calculated member is created in the Account Finance Hierarchy and named Gross Sales.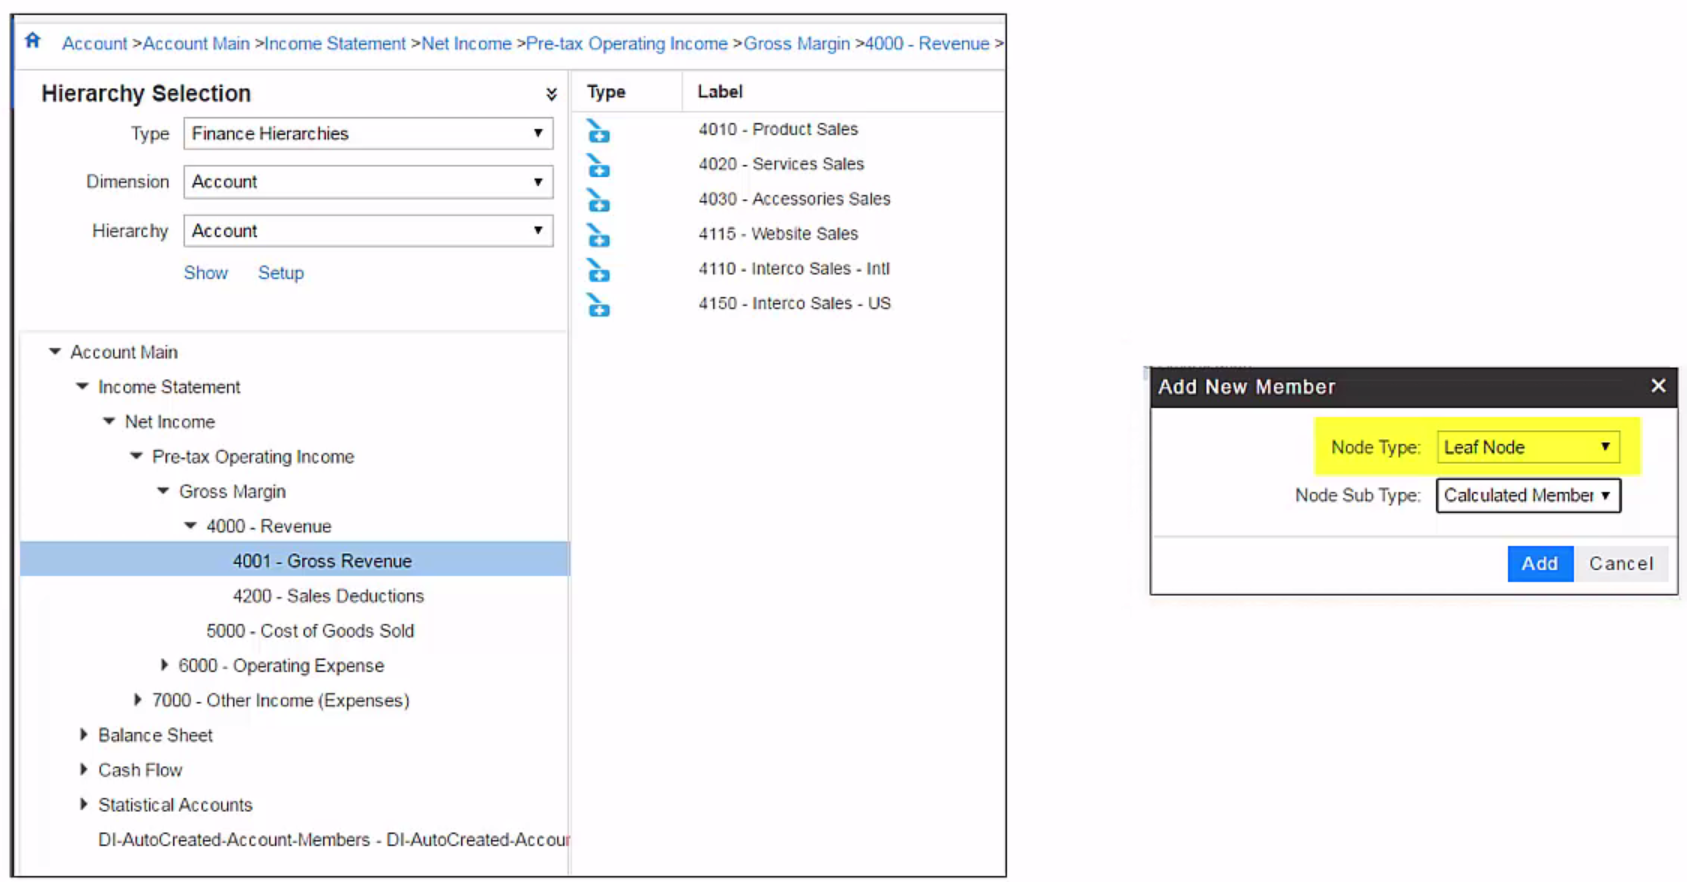
Property fields are completed and a formula is added via Rule Builder. In this case, the new Gross Sales account will be equal to gross revenue for all products minus returns.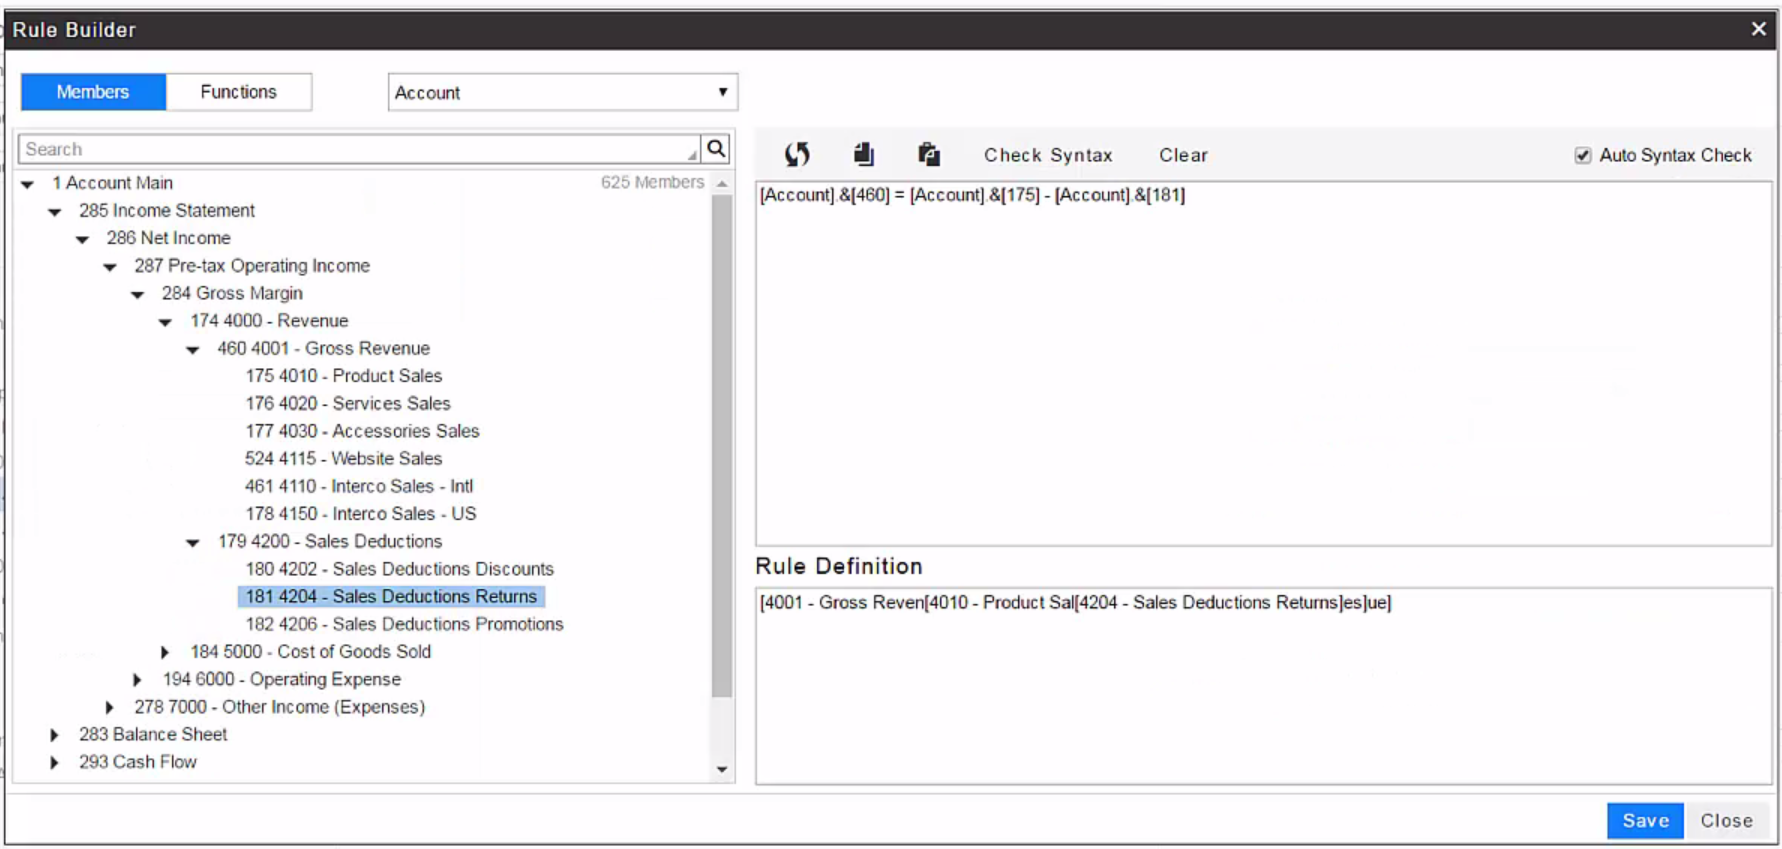
In Dynamic Reports, the new Gross Sales account is mapped at the page level.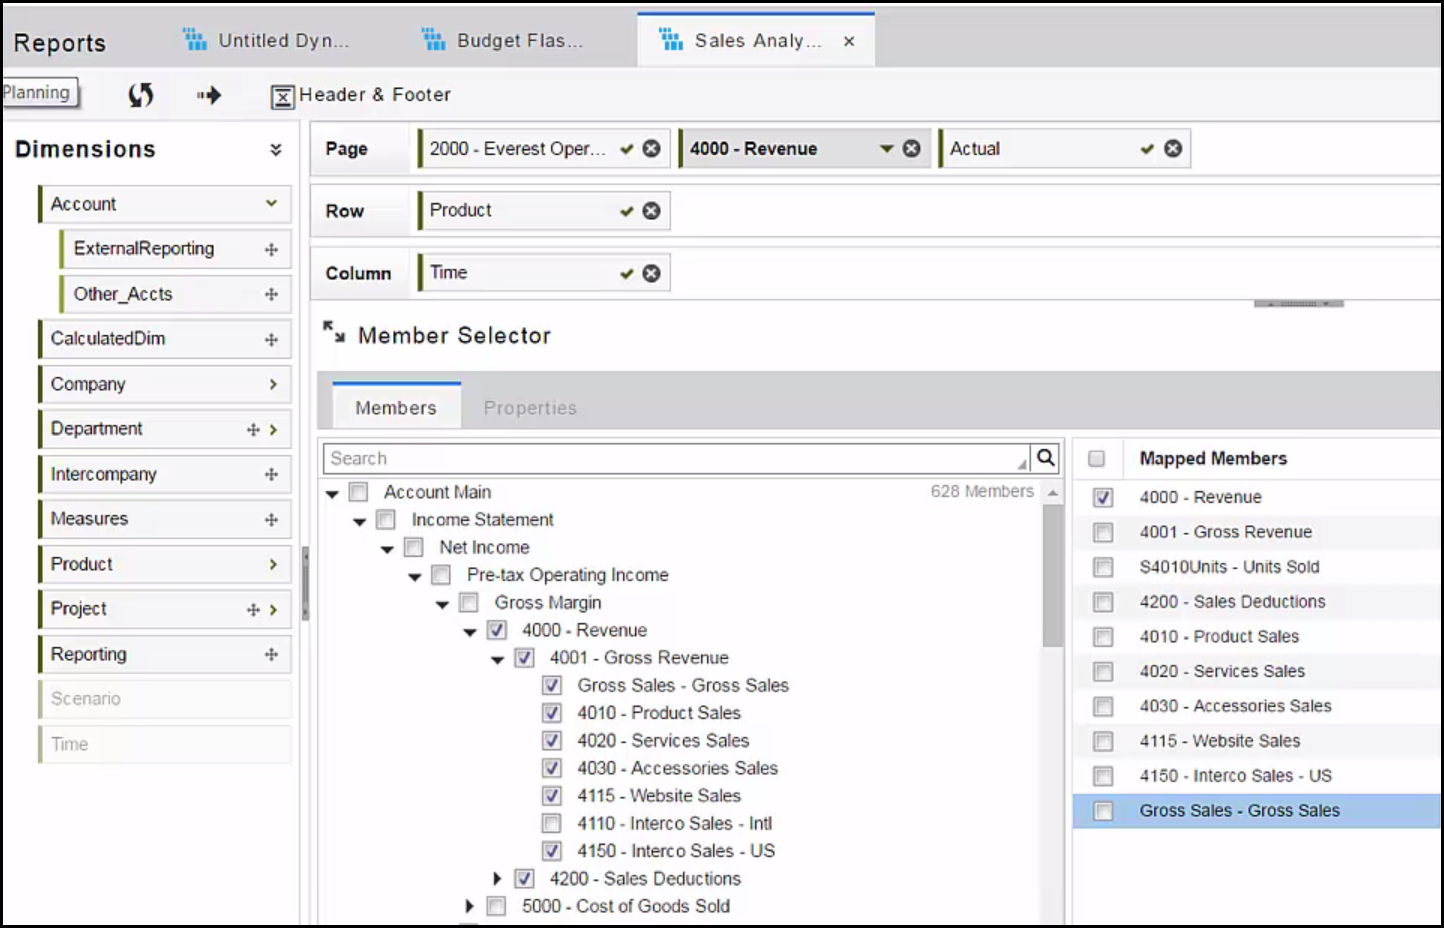
Run the Dynamic Report and all data is displayed for Gross Sales.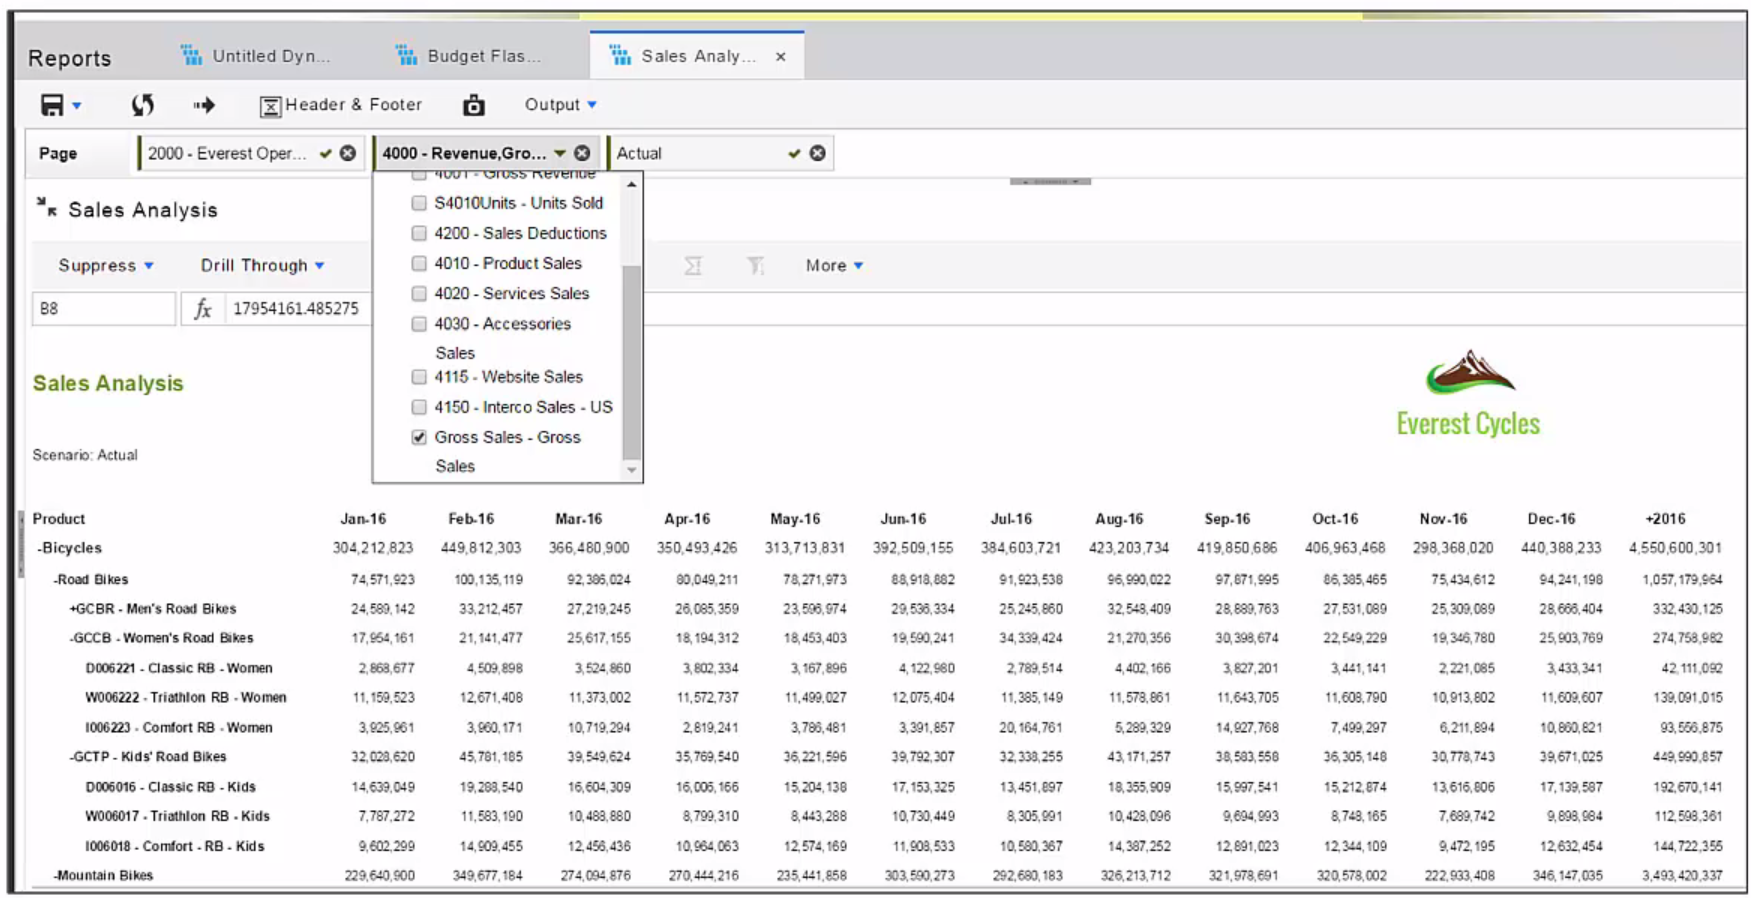
Editing Hierarchy Members
There are some cases when you cannot edit a hierarchy member (for example, such as the code).
You cannot edit a member when:
- The member is being used in Templates (both budget and Data Integration) with mappings using the segment code set
- The member is being used in Data Integration as default
- The member is being used in Translations
- The member is being used in Reclassifications (if consolidation module is being used)
Was this article helpful?